Page 228 of 289
, you will see readings 4 to 6
psi (30 to 40 kPa, 0.3 to 0.4 kgf /cm )
higher than the cold readings. This
i")
�Î �Î
�Î�Î
If you check air pressures when the
tires are hot (driven f or several
miles), you will see readings 4 to 6
psi (30 to 40 kPa, 0.3 to 0.4 kgf /cm )
higher than the cold readings. This
is normal. Do not let air out to match
the recommended cold air pressure.
The tire will be underinf lated.The following chart shows the
recommended cold tire pressures f or
most normal driving conditions.
Thecompactsparetirepressureis:
For additional inf ormation about
your tires, see page .
For convenience, the recommended
tire sizes and cold air pressures are
on a label on the driver’s doorjamb.
Youshouldgetyourowntire
pressure gauge whenever you check
your tire pressures. This will make it
easier f or you to tell if a pressure
loss is due to a tire problem and not
due to a variation between gauges.
While tubeless tires have some
ability to self -seal if they are
punctured, you should look closely
for punctures if a tire starts losing
pressure. LX model
All models except LX
276
Tire Size Cold Tire Pressurefor Normal Driving Tire Size Cold Tire Pressure
for Normal Driving
12 Front:
Rear:
EX and V6 models
DX model Front:
Rear:
1 2
Tires
Recommended Tire Pressures
Maint enance
237
60 psi (420 kPa , 4.2 kgf/cm)
P195/65R15 89H
P205/60R16 91V 32 psi (220 kPa , 2.2 kgf/cm
)
30 psi (210 kPa , 2.1 kgf/cm
) P205/65R15 92H
30 psi (210 kPa ,
2.1 kgf/cm
)
29 psi (200 kPa , 2.0 kgf/cm
)
�����—�����—�����y�
������
������y���
�(�����������y���������y
Page 229 of 289

Every time you check inf lation, you
should also examine the tires f or
damage, f oreign objects, and wear.
Youshouldlookfor:Have your dealer check the tires if
you f eel a consistent vibration while
driving. A tire should always be
rebalanced if it is removed f rom the
wheel. When you have new tires
installed, make sure they are
balanced. This increases riding
comf ort and tire lif e. For best results,
have the installer perform a dynamic
balance.
In addition to proper inf lation,
correct wheel alignment helps to
decrease tire wear. If you f ind a tire
is worn unevenly, have your dealer
check the wheel alignment.
Bumps or bulges in the tread or
side of the tire. Replace the tire if
youfindeitherof theseconditions.
Your tires have wear indicators
molded into the tread. When the
tread wears down, you will see a
band 1/2 inch (12.7 mm) wide across
the tread. This shows there is less
than 1/16 inch (1.6 mm) of tread lef t
on the tire.
A tire this worn gives very little
traction on wet roads. You should
replace the tire if you can see three
or more tread wear indicators.
Excessive tread wear.
Cuts, splits, or cracks in the side
of the tire. Replace the tire if you
can see f abric or cord.
U.S. LX, EX and EX-V6 models
Tires
Tire Inspection
Tire Maintenance
238
INDICATOR LOCATION MARKS
TREAD WEAR INDICATORS
Improper wheel weights can damage
your vehicle’s aluminum wheels. Use
only genuine Honda wheels weights f or
balancing.
�����—�����—���
�y�
����
��������y���
�(�����������y�������
�y
Page 231 of 289

�´
If you mount snow tires on your
vehicle, make sure they are radial
tires of the same size and load range
as original tires. Mount snow tires on
all f our wheels. The traction
provided by snow tires on dry roads
maybelowerthanyouroriginaltires.
Check with the tire dealer f or
maximum speed recommendations.
For the best perf ormance in snowy
or icy conditions, you should install
snow tires or tire chains. They may
be required by local laws under
certain conditions.
Tires marked ‘‘M S’’ or ‘‘All
Season’’ on the sidewall have an all-
weather tread design suitable for
most winter driving conditions.
Wheel:
Tire:
See page f or DOT tire quality
grading inf ormation, and page
f or tire size inf ormation.
If you ever replace a wheel, make
sure that the wheel’s specif ications
match those of the original wheels.
Replacement wheels are available at
your dealer.
DX model
LX model
All EX and V6 models
LX-V6 model
277
DX and LX models
All EX models
279
Tires
Snow T ires
Winter Driving
Wheels and T ires
240
15x61/2JJ
16x61/2JJ
16x61/2JJ
P195/65R15 89H
P205/65R15 92H
P205/60R16 91V
Installing improper tires on your
vehicle can affect handling and
stability. This can cause a crash
in which you can be seriously
hurt or killed.
Always use the size and type of
tires recommended in this
owner’s manual.
�����—�����—�����y�
�����������
�y���
�(�����������y���������y
Page 233 of 289

�µ
Check the condition of the battery
monthlybylookingatthetest
indicator window. The label on the
battery explains the test indicator’s
colors. Check the terminals f or corrosion (a
white or yellowish powder). To
remove it, cover the terminals with a
solution of baking soda and water. It
will bubble up and turn brown. When
this stops, wash it of f with plain
water. Dry off the battery with a
cloth or paper towel. Coat the
terminals with grease to help prevent
f uture corrosion.If additional battery maintenance is
needed, see your dealer or a
qualif ied technician.
Battery posts,
terminals, and related accessories
contain lead and lead compounds.
If you need to connect the battery to
a charger, disconnect both cables to
prevent damaging your vehicle’s
electrical system. Always disconnect
the negative ( ) cable first, and
reconnect it last.
Checking the Battery
WARNING:
Wash your hands af ter handling.
242
TEST INDICATOR WINDOW
4-cylinder models TEST INDICATOR WINDOW
6-cylinder models
�����—�����—�����y�
�������������y���
�(�����������y���������y
Page 244 of 289
�µ
�´
�´
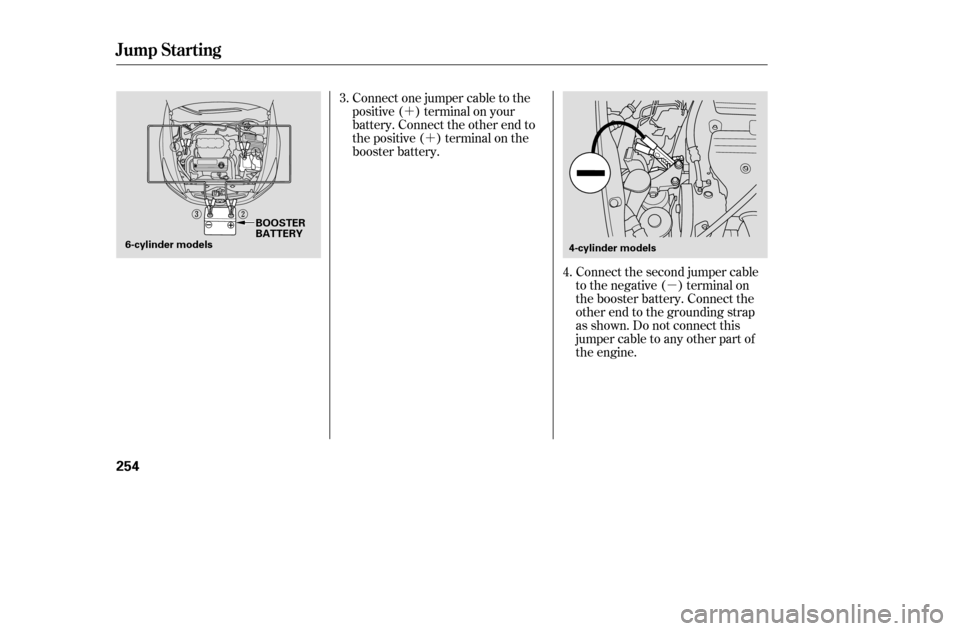
Connect the second jumper cable
to the negative ( ) terminal on
the booster battery. Connect the
other end to the grounding strap
as shown. Do not connect this
jumper cable to any other part of
the engine.
Connect one jumper cable to the
positive ( ) terminal on your
battery. Connect the other end to
the positive ( ) terminal on the
booster battery.
4.
3.
Jump Starting
254
4-cylinder models
BOOSTER
BATTERY
6-cylinder models
�����—�����—�����y�
�������������y���
�(�����������y���������y