2005 GMC YUKON XL DENALI phone
[x] Cancel search: phonePage 21 of 62

Route Preview
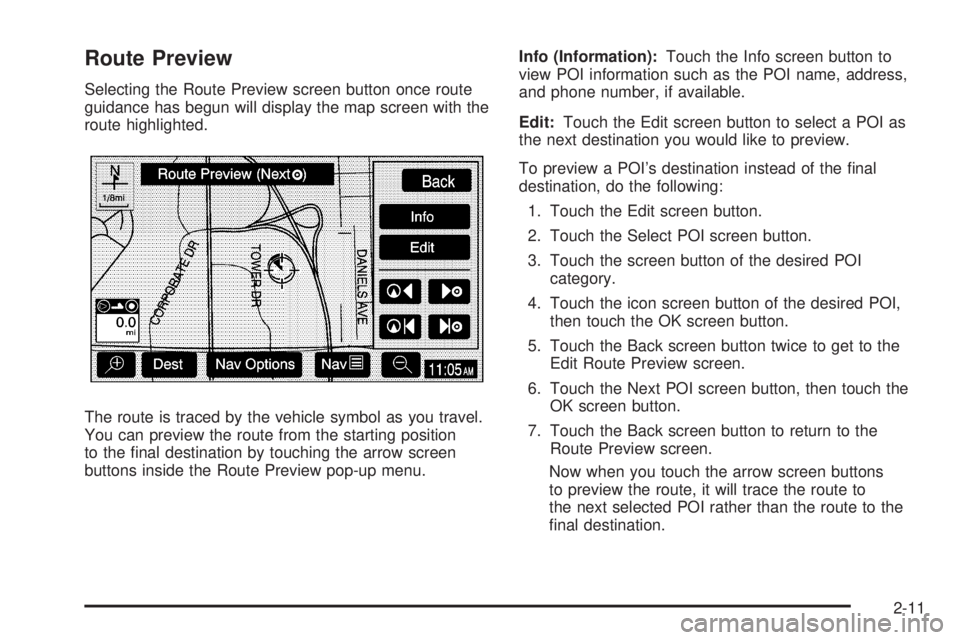
Selecting the Route Preview screen button once route
guidance has begun will display the map screen with the
route highlighted.
The route is traced by the vehicle symbol as you travel.
You can preview the route from the starting position
to the �nal destination by touching the arrow screen
buttons inside the Route Preview pop-up menu.Info (Information):Touch the Info screen button to
view POI information such as the POI name, address,
and phone number, if available.
Edit:Touch the Edit screen button to select a POI as
the next destination you would like to preview.
To preview a POI’s destination instead of the �nal
destination, do the following:
1. Touch the Edit screen button.
2. Touch the Select POI screen button.
3. Touch the screen button of the desired POI
category.
4. Touch the icon screen button of the desired POI,
then touch the OK screen button.
5. Touch the Back screen button twice to get to the
Edit Route Preview screen.
6. Touch the Next POI screen button, then touch the
OK screen button.
7. Touch the Back screen button to return to the
Route Preview screen.
Now when you touch the arrow screen buttons
to preview the route, it will trace the route to
the next selected POI rather than the route to the
�nal destination.
2-11
Page 28 of 62

Alpha-Numeric Keypad
Letters of the alphabet, symbols, punctuation, and
numbers, when available to you, will be displayed on
the navigation screen as an alpha or numeric keypad.
The appropriate keypad will automatically be displayed
whenever the system needs information from you.
The alpha keypad will be displayed when the system
needs you to input a street or city name. The numeric
keypad will be displayed when the system needs you to
input a phone number or house address.
Touch a character on the screen to select it. You may
also touch the 0 - 9 screen button at any time from
the alpha keypad to reach the numeric keypad.
U(Space):Touch this screen button to enter a
space between characters or the words of a name.
V(Backspace):Touch this screen button if you have
selected an incorrect character.
To make your name selections easier, the system will
only allow you to select a character which can follow the
last one entered. For example, if you enter Z, you would
not be allowed to follow it with T. The system will
highlight the available characters and darken the
unavailable characters.If you are unsuccessful when inputting a name, it may
need to be selected differently. It is also possible that the
map DVD database may not contain that information
or the correct search area has not been selected.
SeeDatabase Coverage Explanations on page 2-36
for more information.
Address
The Address destination entry method allows you to
input an address by providing the system with a house
number, street name, and city.
2-18
Page 33 of 62

Map
The Map destination entry method displays the last
location on the map, and the road preference.
Scroll across and touch the map at the location you
would like to set as your destination. Once you
have located the desired destination, touch the Enter
Destination screen button and then the OK screen
button. The route will then be calculated. You may begin
driving to start route guidance or you may touch the
Route screen button and then the Start screen button.
You may also zoom out to view the entire regional map.
See “Touch-Sensitive Screen Buttons” underUsing
the Navigation System on page 2-2for more information.
However, if you zoom out as much as possible and
scroll around the map, some parts of the map will
appear to be missing because they are not readable in
larger scales.
Previous Start Point
The Previous start point destination entry method allows
you to select the last start point as a destination.
Phone Number
The Phone Number destination entry method allows you
to search for a point of interest (POI) destination by
entering the POI phone number.
Enter the POI phone number on the numeric keypad
and touch the OK screen button. The destination
location will then be displayed. Most phone numbers for
POIs included in the DVD database can be entered
to locate a destination. Cellular phone numbers
and internal company phone numbers cannot be
entered to locate a destination.
2-23
Page 36 of 62

Info (Information):When a POI icon is selected on the
screen, you can touch this screen button to display
the name, address, and telephone number, if available,
for the selected POI. See “Navigation Options” later
in this section for more information on POIs and
their icons.
Route Preference:This option will display the Route
Preference screen. To adjust your route preferences,
touch Change. See “Edit Route” underNavigation Menu
on page 2-7for more information.
Once the desired adjustments from the destination
preview menu are complete, the route overview menu
can be displayed. See “Route Overview Menu” following
in this section for more information.
Once you have entered your destination by touching the
Enter Destination screen button, you can do one of
the following:
Press the NAV hard key to begin route guidance.
Start driving to begin route guidance.
Touch the Route screen button on the map screen
displaying the new destination to make further
changes. See “Route Overview” following in this
section for more information.
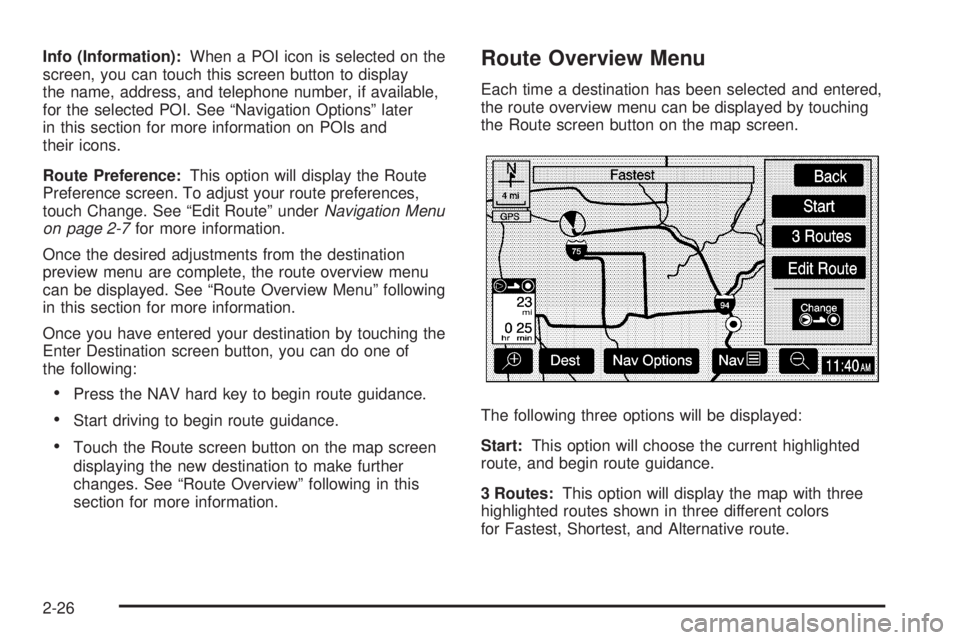
Route Overview Menu
Each time a destination has been selected and entered,
the route overview menu can be displayed by touching
the Route screen button on the map screen.
The following three options will be displayed:
Start:This option will choose the current highlighted
route, and begin route guidance.
3 Routes:This option will display the map with three
highlighted routes shown in three different colors
for Fastest, Shortest, and Alternative route.
2-26
Page 48 of 62

Navigation Audio System
Notice:Before adding any sound equipment to
your vehicle, like a tape player, CB radio, mobile
telephone, or two-way radio, make sure that it can
be added by checking with your dealer. Also,
check federal rules covering mobile radio and
telephone units. If sound equipment can be added,
it is very important to do it properly. Added
sound equipment may interfere with the operation
of your vehicle’s engine, radio, or other systems,
and even damage them. Your vehicle’s systems may
interfere with the operation of sound equipment
that has been added improperly.
Your vehicle has a feature called Retained Accessory
Power (RAP). With RAP, the audio system can be
played even after the ignition is turned off. See
“Retained Accessory Power (RAP)” in Section 2 of
your vehicle’s owner manual for more information.
The audio system is operated using navigation system
menus. The audio menus are explained in this section.
Playing the Radio
O
(Power/Volume):Press this knob to turn the audio
and navigation systems on and off. Turn the knob to
increase or decrease the volume.
Finding a Station
BAND:Press this hard key to access the BAND screen
and to switch between AM, FM1, FM2, XM1, and
XM2, if equipped.
Tuning Knob:Use the tuning knob on the lower
left corner of the navigation system to choose a
radio station.
wSEEKx:Press the SEEK up or the down arrow to
go to the next or previous station and stay there.
To scan stations, press and hold the SEEK up or down
arrow for two seconds until you hear a beep. The radio
will go to a station, play for a few seconds, then go
on to the next station. Press either SEEK arrow again
to stop scanning.
To scan preset stations, press and hold the SEEK up or
down arrow for more than four seconds. You will hear
two beeps and PSCAN will be displayed, along with
the highlighted preset. The radio will go to one of
the preset stations, play for a few seconds, then go on
to the next preset station. Press either SEEK arrow
again to stop scanning presets.
The radio will only seek and scan stations with a strong
signal that are in the selected band.
3-2