Page 105 of 256
•one wheel nut wrench. Depress
button and slide together.
2. If equipped, unlock and remove
the spare tire carrier lock from the
rear access hole located just above
the rear bumper and below the
tailgate.
3. Insert the straight end of the jack
handle into the rear access hole
located just above the rear bumper
and below the tailgate.
Forward motion will stop and
resistance to turning will be felt
when properly engaged.
4. Turn the handle counterclockwise
until tire is lowered to the ground
and the cable is slightly slack.
REVIEW COPY
2005 Ranger(ran), Owners Guide (post-2002-fmt)(own2002),
Market:USA_English(fus)
Tires, Wheels and Loading
105
Page 106 of 256
5. With the spare tire on the ground,
remove the retainer from the spare
tire.
Tire change procedure
To help prevent the vehicle from moving when you change a tire,
be sure the parking brake is set, then block (in both directions)
the wheel that is diagonally opposite (other side and end of the
vehicle) to the tire being changed.
If the vehicle slips off the jack, you or someone else could be
seriously injured.
1. Park on a level surface, activate
hazard flashers and place gearshift
lever in P (Park) (automatic
transmission) or 1 (First) (manual
transmission).
2. Set the parking brake and turn
engine OFF.
3. Block the diagonally opposite
wheel.
REVIEW COPY
2005 Ranger(ran), Owners Guide (post-2002-fmt)(own2002),
Market:USA_English(fus)
Tires, Wheels and Loading
106
Page 107 of 256
4. Insert tapered end of the lug
wrench behind hub caps and twist
them off.
5. Loosen each wheel lug nut
one-half turn counterclockwise but
do not remove them until the wheel
is raised off the ground.
6. Position the jack according to the
following guides and turn the jack
handle clockwise until the tire is a
maximum of 1 inch (25 mm) off the ground.
•Front
•Rear
To lessen the risk of
personal injury, do not put
any part of your body under the
vehicle while changing a tire. Do
not start the engine when your
vehicle is on the jack. The jack is
only meant for changing the tire.
REVIEW COPY
2005 Ranger(ran), Owners Guide (post-2002-fmt)(own2002),
Market:USA_English(fus)
Tires, Wheels and Loading
107
Page 108 of 256

•Never use the differential as a jacking point.
7. Remove the wheel lug nuts with the lug wrench.
8. Replace the flat tire with the spare tire, making sure the valve stem is
facing outward. Reinstall the lug nuts until the wheel is snug against the
hub. Do not fully tighten the lug nuts until the wheel has been lowered.
9. Lower the wheel by turning the jack handle counterclockwise.
10. Remove the jack and fully
tighten the lug nuts, in the order
shown. Refer toWheel lug nut
torque specificationslater in this
chapter for the proper lug nut
torque specification.
11. Stow the flat tire. Refer to
Stowing the flat/spare tire.
12. Stow the jack and lug wrench.
Make sure the jack is fastened so it
does not rattle when you drive.
13. Unblock the wheels.
Stowing the flat/spare tire
Note:Failure to follow spare tire stowage instructions may result in
failure of cable or loss of spare tire.
1. Lay the tire on the ground with the valve stem facing up.
2. Slide the wheel partially under the vehicle and install the wire and
retainer through the center of the wheel.
3. Turn the jack handle clockwise until the tire is raised to its original
position underneath the vehicle. The effort to turn the jack handle
increases significantly as the tire contacts the frame. The spare tire
carrier will ratchet when the tire is in the fully stowed position. The
spare tire carrier has a built-in ratchet feature that will not allow you to
overtighten. If the spare tire carrier ratchets with very little effort, take
the vehicle to your dealer for assistance at your earliest convenience.
4. Check that the tire lies flat against the frame assembly. Push against
the tire to make sure it is tightly seated under the vehicle. Loosen and
retighten, if necessary. Failure to properly stow the spare tire may result
in failure of the winch cable and loss of the spare tire.
5. Repeat this tightness check procedure when servicing the spare tire
pressure (every six months, perScheduled Maintenance Guide),or at
any time that the spare tire is disturbed through service of other
components.
1
4 3
2 5
REVIEW COPY
2005 Ranger(ran), Owners Guide (post-2002-fmt)(own2002),
Market:USA_English(fus)
Tires, Wheels and Loading
108
Page 109 of 256

6. Install the spare tire lock (if equipped) into the access hole above the
rear bumper with the spare tire lock key (if equipped) and jack handle.
WHEEL LUG NUT TORQUE SPECIFICATIONS
Retighten the lug nuts to the specified torque at 50–100 miles (80–160
km) after any wheel disturbance (rotation, flat tire, wheel removal, etc.).
Lug nut socket
size/Bolt sizeWheel lug nut torque*
lb.ft. N•m
Lug nut socket size:
3⁄4” (19 mm) hex
Bolt size:1⁄2x20100 135
* Torque specifications are for nut and bolt threads free of dirt and
rust. Use only Ford recommended replacement fasteners.
When a wheel is installed, always remove any corrosion, dirt and
foreign materials present on the mounting surfaces of the wheel
and the surface of the front disc brake hub and rotor that contacts the
wheel. Installing wheels without correct metal-to-metal contact at the
wheel mounting surfaces can cause the wheel nuts to loosen and the
wheel to come off while the vehicle is in motion, resulting in loss of
control.
Note:If there is corrosion on the area where the wheel contacts the
hub, apply a thin film of grease or anti-seize compound on that area.
INFORMATION CONTAINED ON THE TIRE SIDEWALL
Federal law requires tire manufacturers to place standardized
information on the sidewall of all tires. This information identifies and
describes the fundamental characteristics of the tire and also provides a
U.S. DOT Tire Identification Number for safety standard certification and
in case of a recall.
REVIEW COPY
2005 Ranger(ran), Owners Guide (post-2002-fmt)(own2002),
Market:USA_English(fus)
Tires, Wheels and Loading
109
Page 110 of 256

Information on “P” type tires
P215/65R15 95H is an example of a
tire size, load index and speed
rating. The definitions of these
items are listed below. (Note that
the tire size, load index and speed
rating for your vehicle may be
different from this example.)
1.P:Indicates a tire, designated by
the Tire and Rim Association
(T&RA), that may be used for
service on cars, SUVs, minivans and
light trucks.
Note:If your tire size does not
begin with a letter this may mean it
is designated by either ETRTO
(European Tire and Rim Technical Organization) or JATMA (Japan Tire
Manufacturing Association).
2.215:Indicates the nominal width of the tire in millimeters from
sidewall edge to sidewall edge. In general, the larger the number, the
wider the tire.
3.65:Indicates the aspect ratio which gives the tire’s ratio of height to
width.
4.R:Indicates a“radial”type tire.
5.15:Indicates the wheel or rim diameter in inches. If you change your
wheel size, you will have to purchase new tires to match the new wheel
diameter.
6.95:Indicates the tire’s load index. It is an index that relates to how
much weight a tire can carry. You may find this information in your
Owner’s Guide. If not, contact a local tire dealer.
Note:You may not find this information on all tires because it is not
required by federal law.
7.H:Indicates the tire’s speed rating. The speed rating denotes the
speed at which a tire is designed to be driven for extended periods of
time under a standard condition of load and inflation pressure. The tires
on your vehicle may operate at different conditions for load and inflation
pressure. These speed ratings may need to be adjusted for the difference
in conditions. The ratings range from 81 mph (130 km/h) to 186 mph
(299 km/h). These ratings are listed in the following chart.
REVIEW COPY
2005 Ranger(ran), Owners Guide (post-2002-fmt)(own2002),
Market:USA_English(fus)
Tires, Wheels and Loading
110
Page 111 of 256

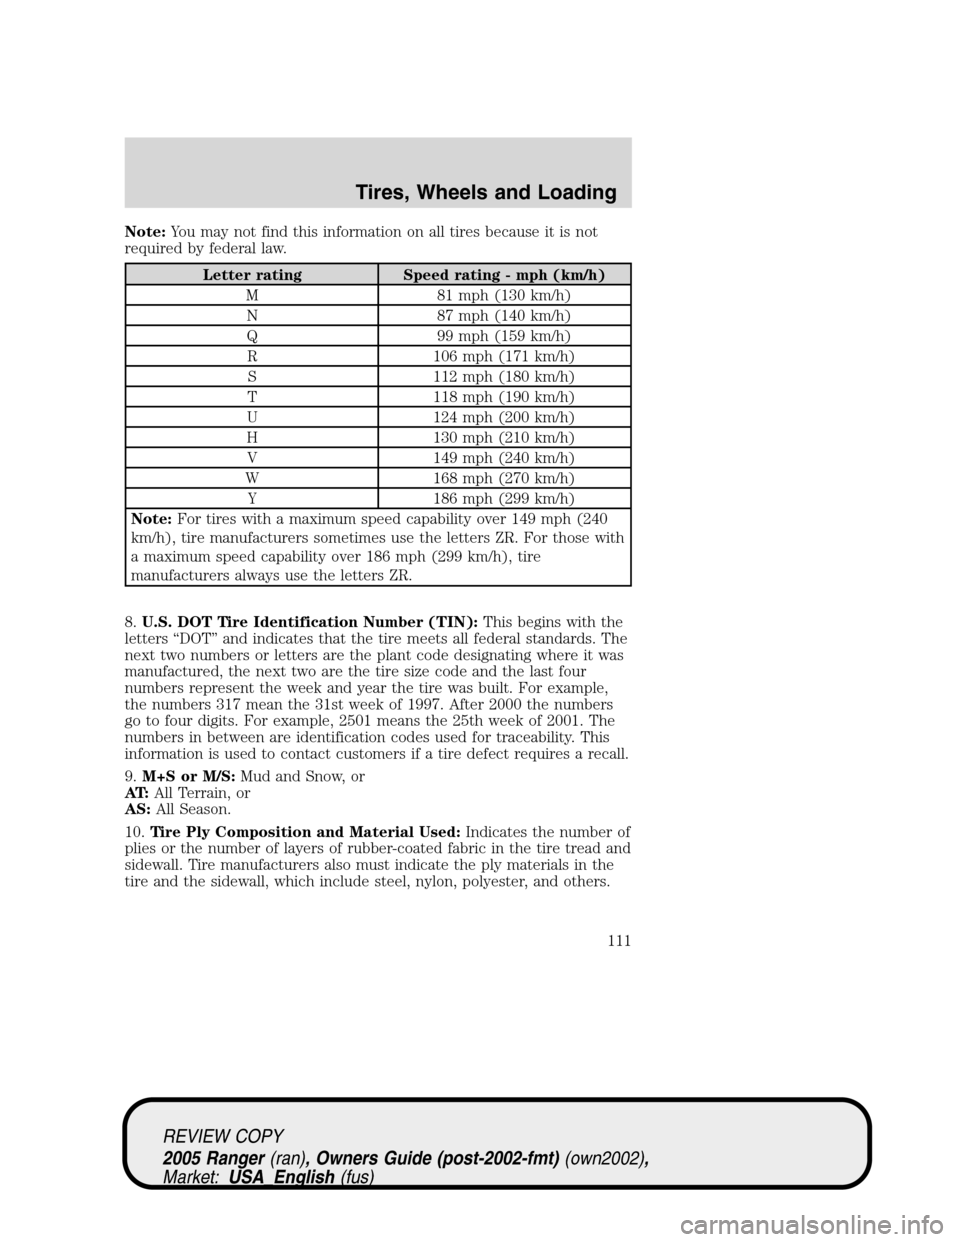
Note:You may not find this information on all tires because it is not
required by federal law.
Letter rating Speed rating - mph (km/h)
M 81 mph (130 km/h)
N 87 mph (140 km/h)
Q 99 mph (159 km/h)
R 106 mph (171 km/h)
S 112 mph (180 km/h)
T 118 mph (190 km/h)
U 124 mph (200 km/h)
H 130 mph (210 km/h)
V 149 mph (240 km/h)
W 168 mph (270 km/h)
Y 186 mph (299 km/h)
Note:For tires with a maximum speed capability over 149 mph (240
km/h), tire manufacturers sometimes use the letters ZR. For those with
a maximum speed capability over 186 mph (299 km/h), tire
manufacturers always use the letters ZR.
8.U.S. DOT Tire Identification Number (TIN):This begins with the
letters“DOT”and indicates that the tire meets all federal standards. The
next two numbers or letters are the plant code designating where it was
manufactured, the next two are the tire size code and the last four
numbers represent the week and year the tire was built. For example,
the numbers 317 mean the 31st week of 1997. After 2000 the numbers
go to four digits. For example, 2501 means the 25th week of 2001. The
numbers in between are identification codes used for traceability. This
information is used to contact customers if a tire defect requires a recall.
9.M+S or M/S:Mud and Snow, or
AT:All Terrain, or
AS:All Season.
10.Tire Ply Composition and Material Used:Indicates the number of
plies or the number of layers of rubber-coated fabric in the tire tread and
sidewall. Tire manufacturers also must indicate the ply materials in the
tire and the sidewall, which include steel, nylon, polyester, and others.
REVIEW COPY
2005 Ranger(ran), Owners Guide (post-2002-fmt)(own2002),
Market:USA_English(fus)
Tires, Wheels and Loading
111
Page 112 of 256

11.Maximum Load:Indicates the maximum load in kilograms and
pounds that can be carried by the tire. Refer to the tire label or the
safety certification label, which is located on the B-Pillar or the edge of
the driver’s door, for the correct tire pressure for your vehicle.
12.Treadwear, Traction and Temperature Grades
•Treadwear:The treadwear grade is a comparative rating based on the
wear rate of the tire when tested under controlled conditions on a
specified government test course. For example, a tire graded 150
would wear one and one-half (1
1⁄2) times as well on the government
course as a tire graded 100.
•Traction:The traction grades, from highest to lowest are AA, A, B,
and C. The grades represent the tire’s ability to stop on wet pavement
as measured under controlled conditions on specified government test
surfaces of asphalt and concrete. A tire marked C may have poor
traction performance.
•Temperature:The temperature grades are A (the highest), B and C,
representing the tire’s resistance to the generation of heat and its
ability to dissipate heat when tested under controlled conditions on a
specified indoor laboratory test wheel.
13.Maximum Permissible Inflation Pressure:Indicates the tire
manufacturers’maximum permissible pressure and/or the pressure at
which the maximum load can be carried by the tire. This pressure is
normally higher than the manufacturer’s recommended cold inflation
pressure which can be found on either the tire label or certification label
which is located on the B-Pillar or the edge of the driver’s door. The cold
inflation pressure should never be set lower than the recommended
pressure on the vehicle label.
The tire suppliers may have additional markings, notes or warnings such
as standard load, radial tubeless, etc.
REVIEW COPY
2005 Ranger(ran), Owners Guide (post-2002-fmt)(own2002),
Market:USA_English(fus)
Tires, Wheels and Loading
112