Page 129 of 312
2. If you plan to carry very large
objects or items that might damage
the center lap/shoulder belt, detach
the belt from the seat. Use a key or
seat belt tongue to release the
buckle.
3. Store the tongue of the sliding
latchplate in the belt pocket.
REVIEW COPY
2005 Freestar(win), Owners Guide (post-2002-fmt)(own2002),
Market:USA_English(fus)
Seating and Safety Restraints
129
Page 130 of 312
4. Store the belt in the housing
found on the ceiling by inserting the
smaller tongue in the slot provided.
Note:The seat can be stowed with
the safety belt connected if desired.
Store the tongue of the sliding
latchplate in the belt pocket to
avoid potential damage to the seat.
5. Push the head restraint release buttons and move the head restraints
fully down. Remove all objects from the seat and stowage tub.
6. From the rear of the vehicle, fold seat back bypulling and releasing
the number 1 strap.
REVIEW COPY
2005 Freestar(win), Owners Guide (post-2002-fmt)(own2002),
Market:USA_English(fus)
Seating and Safety Restraints
130
Page 131 of 312
Important:If you don’t let go of
the number 1 strap before the seat
back folds completely, the seat may
not stow flat in the tub. Refer to the
label attached to the rear of the
vehicle seat.
7. Release the cushion latches by pulling the number 2 strap.
REVIEW COPY
2005 Freestar(win), Owners Guide (post-2002-fmt)(own2002),
Market:USA_English(fus)
Seating and Safety Restraints
131
Page 132 of 312
8. Pull the number 3 strap on the seat back to tumble seat all the way in
to the tub in the floor.
Do not use the seat anchors as cargo tie downs.
Unstowing the third row seat
Ensure seat latching area is free of objects.
1. Lift the seat out of the tub in the
floor by pulling up on the exposed
strap or handle. Once seat is at a
vertical position, push the seat over,
letting it fall onto the latches.
REVIEW COPY
2005 Freestar(win), Owners Guide (post-2002-fmt)(own2002),
Market:USA_English(fus)
Seating and Safety Restraints
132
Page 133 of 312

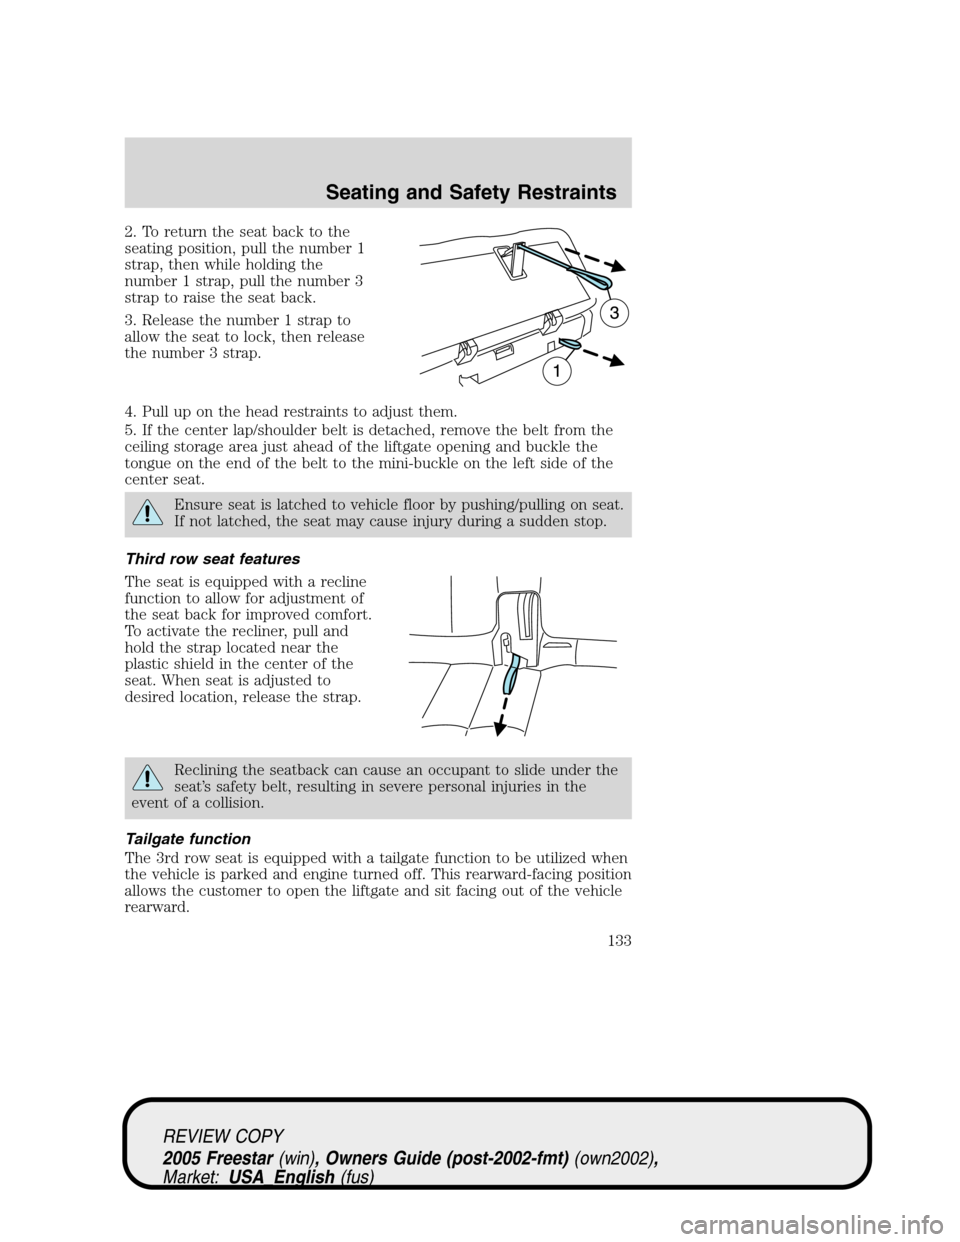
2. To return the seat back to the
seating position, pull the number 1
strap, then while holding the
number 1 strap, pull the number 3
strap to raise the seat back.
3. Release the number 1 strap to
allow the seat to lock, then release
the number 3 strap.
4. Pull up on the head restraints to adjust them.
5. If the center lap/shoulder belt is detached, remove the belt from the
ceiling storage area just ahead of the liftgate opening and buckle the
tongue on the end of the belt to the mini-buckle on the left side of the
center seat.
Ensure seat is latched to vehicle floor by pushing/pulling on seat.
If not latched, the seat may cause injury during a sudden stop.
Third row seat features
The seat is equipped with a recline
function to allow for adjustment of
the seat back for improved comfort.
To activate the recliner, pull and
hold the strap located near the
plastic shield in the center of the
seat. When seat is adjusted to
desired location, release the strap.
Reclining the seatback can cause an occupant to slide under the
seat’s safety belt, resulting in severe personal injuries in the
event of a collision.
Tailgate function
The 3rd row seat is equipped with a tailgate function to be utilized when
the vehicle is parked and engine turned off. This rearward-facing position
allows the customer to open the liftgate and sit facing out of the vehicle
rearward.
REVIEW COPY
2005 Freestar(win), Owners Guide (post-2002-fmt)(own2002),
Market:USA_English(fus)
Seating and Safety Restraints
133
Page 134 of 312

This is not a position suitable for driving. Do not drive the
vehicle with the seat in this position. The safety belts are not
functional when the seat is in the tailgate position.
Ensure head restraints are moved to their full down position, all seat
belts are released from the seat, seat and stowage tub are free of objects.
1. Push the head restraint release buttons and move all head restraints
fully down.
2. To access the tailgate function,
the seat must be in the seating
position. If the seat is not in the
seating position, follow all the steps
of the‘Unstowing Seat Section’.
Once the seat is in the seating
position, release the cushion latches
by pulling the number 2 strap.
Then, pull the seat rearward by the
number 3 strap and set the seat on
the liftgate scuff plate. The number
1 strap is not used to access this
position.
Do not sit on the head restraints.
2
REVIEW COPY
2005 Freestar(win), Owners Guide (post-2002-fmt)(own2002),
Market:USA_English(fus)
Seating and Safety Restraints
134
Page 135 of 312

3. To return the seat, ensure seat
latching area is free of objects.
Then, raise the seat off the liftgate
scuff plate and push at the top of
the seat back to rotate the seat back
onto the latches. Pull up on the
head restraints to raise them.
Ensure seat is latched to vehicle floor by pushing/pulling on seat.
If not latched, the seat may cause injury during a sudden stop.
SAFETY RESTRAINTS
Personal Safety System
The Personal Safety System provides an improved overall level of frontal
crash protection to front seat occupants and is designed to help further
reduce the risk of air bag-related injuries. The system is able to analyze
different occupant conditions and crash severity before activating the
appropriate safety devices to help better protect a range of occupants in
a variety of frontal crash situations.
Your vehicle’s Personal Safety System consists of:
•Driver and passenger dual-stage air bag supplemental restraints.
•Front safety belts with pretensioners, energy management retractors
(first row only), and safety belt usage sensors.
•Driver’s seat position sensor.
•Passenger occupant classification sensor
•Front crash severity sensor.
•Restraints Control Module (RCM) with impact and safing sensors.
•Restraint system warning light and back-up tone.
•The electrical wiring for the air bags, crash sensor(s), safety belt
pretensioners, front safety belt usage sensors, driver seat position
sensor, passenger occupant classification sensor, and indicator lights.
How does the Personal Safety System work?
The Personal Safety System can adapt the deployment strategy of your
vehicle’s safety devices according to crash severity and occupant
REVIEW COPY
2005 Freestar(win), Owners Guide (post-2002-fmt)(own2002),
Market:USA_English(fus)
Seating and Safety Restraints
135
Page 136 of 312

conditions. A collection of crash and occupant sensors provides
information to the Restraints Control Module (RCM). During a crash, the
RCM activates the safety belt pretensioners and/or either one or both
stages of the dual-stage air bag supplemental restraints based on crash
severity and occupant conditions.
The fact that the pretensioners or air bags did not activate for both front
seat occupants in a collision does not mean that something is wrong with
the system. Rather, it means the Personal Safety System determined the
accident conditions (crash severity, belt usage, etc.) were not
appropriate to activate these safety devices. Front air bags are designed
to activate only in frontal and near-frontal collisions (not rollovers, side
impacts or rear impacts) unless the collision causes sufficient
longitudinal deceleration. The pretensioners are designed to activate in
frontal and side collisions, and rollovers.
Driver and passenger dual-stage air bag supplemental restraints
The dual-stage air bags offer the capability to tailor the level of air bag
inflation energy. A lower, less forceful energy level is provided for more
common, moderate-severity impacts. A higher energy level is used for
the most severe impacts. Refer toAir bag supplemental restraints
section in this chapter.
Front crash severity sensor
The front crash severity sensor enhances the ability to detect the
severity of an impact. Positioned up front, it provides valuable
information early in the crash event on the severity of the impact. This
allows your Personal Safety System to distinguish between different
levels of crash severity and modify the deployment strategy of the
dual-stage air bags and safety belt pretensioners.
Driver’s seat position sensor
The driver’s seat position sensor allows your Personal Safety System to
tailor the deployment level of the driver dual-stage air bag based on seat
position. The system is designed to help protect smaller drivers sitting
close to the driver air bag by providing a lower air bag output level.
Front passenger sensing system
For air bags to do their job they must inflate with great force, and this
force can pose a potentially deadly risk to occupants that are very close
to the air bag when it begins to inflate. For some occupants, this occurs
because they are initially sitting very close to the air bag. For other
occupants, this occurs when the occupant is not properly restrained by
REVIEW COPY
2005 Freestar(win), Owners Guide (post-2002-fmt)(own2002),
Market:USA_English(fus)
Seating and Safety Restraints
136