Page 23 of 258
22GETTING TO KNOW YOUR VEHICLE
HOW TO KEEP THE SEAT
BELTS IN PROPER WORKING
ORDER AT ALL TIMES
1)When wearing the seat belts, al-
ways ensure they are not twisted and
are free to wind in and out.
2)Following a serious accident, re-
place the belt being worn at that time,
even if it does not seem damaged. Al-
ways replace the seat belts if preten-
sioners have been activated.
3)When cleaning the belts, wash
them by hand with water and neutral
soap, rinse them and let them dry in
the shade. Do not use strong deter-
gents, bleach, colouring or any other
chemical substance that could weaken
the fibres.
4)Do not allow the reel mechanisms
to get wet: they are only guaranteed
to work properly if they remain dry.
5)Replace the seat belt when show-
ing significant wear or cut signs.TRANSPORTING
CHILDREN
IN SAFETY
For optimal protection in the event
of a crash, all passengers must be seat-
ed and wearing adequate restraint sys-
tems.
This is even more important for chil-
dren.
According to 2003/20/EC Directive,
this prescription is compulsory for all
European Community countries.
Compared with adults, their head is
proportionally larger and heavier than
the rest of the body, while the mus-
cles and bone structure are not com-
pletely developed. Therefore, correct
restraint systems are necessary, oth-
er then adult seat belts.The results of research on the best
child restraint systems are contained
in the European Standard ECE-R44.
This Standard enforces the use of re-
straint systems classified in five groups:
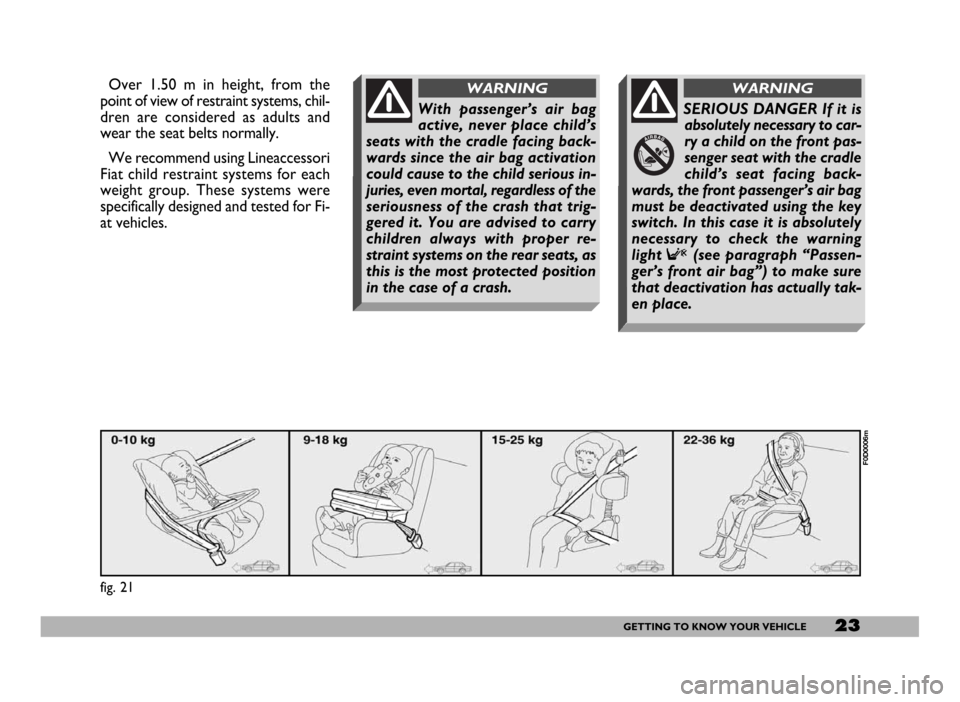
Group 0 - weight 0-10 kg
Group 0+ - weight 0-13 kg
Group 1 weight 9-18 kg
Group 2 weight 15-25 kg
Group 3 weight 22-36 kg
As it may be noted, the groups over-
lap partly and in fact, in commerce it
is possible to find devices that cover
more than one weight group fig. 21.
All restraint devices must bear the
certification data, together with the
control brand, on a solidly fixed label
which must absolutely never be re-
moved.
Page 24 of 258
23GETTING TO KNOW YOUR VEHICLE
Over 1.50 m in height, from the
point of view of restraint systems, chil-
dren are considered as adults and
wear the seat belts normally.
We recommend using Lineaccessori
Fiat child restraint systems for each
weight group. These systems were
specifically designed and tested for Fi-
at vehicles.
fig. 21
F0D0006m
With passenger’s air bag
active, never place child’s
seats with the cradle facing back-
wards since the air bag activation
could cause to the child serious in-
juries, even mortal, regardless of the
seriousness of the crash that trig-
gered it. You are advised to carry
children always with proper re-
straint systems on the rear seats, as
this is the most protected position
in the case of a crash.
WARNING
SERIOUS DANGER If it is
absolutely necessary to car-
ry a child on the front pas-
senger seat with the cradle
child’s seat facing back-
wards, the front passenger’s air bag
must be deactivated using the key
switch. In this case it is absolutely
necessary to check the warning
light
F(see paragraph “Passen-
ger’s front air bag”) to make sure
that deactivation has actually tak-
en place.
WARNING
Page 25 of 258

24GETTING TO KNOW YOUR VEHICLE
GROUP 0 and 0+
Babies up to 13 kg must be carried
facing backwards on a cradle seat,
which, supporting the head, does not
induce stress on the neck in the event
of sharp deceleration.
The cradle is restrained by the vehi-
cle seat belts, as shown infig. 22and
in turn it must restrain the child with
its own belts.GROUP 1
Children from 9 to 18 kg are to be
seated facing forward in child seats
with front cushionfig. 23. The vehi-
cle seat belt secures both seat and
child.
fig. 22
F0D0007m
fig. 23
F0D0008m
The figure is only an exam-
ple. Attain to the instruc-
tions for fastening which must be
enclosed with the specific child re-
straint system you are using.
WARNING
The figure is only an exam-
ple. Attain to the instruc-
tions for fastening which must be
enclosed with the specific child re-
straint system you are using.
WARNING
Seats exist which are suit-
able for covering weight
groups 0 and 1 with a rear connec-
tion to the vehicle belts and their
own belts to restrain the child. Due
to their size, they can be dangerous
if installed incorrectly fastened to
the vehicle belts with a cushion.
Carefully follow the instructions for
installation provided with the seat.
WARNING
Page 26 of 258
25GETTING TO KNOW YOUR VEHICLE
GROUP 2
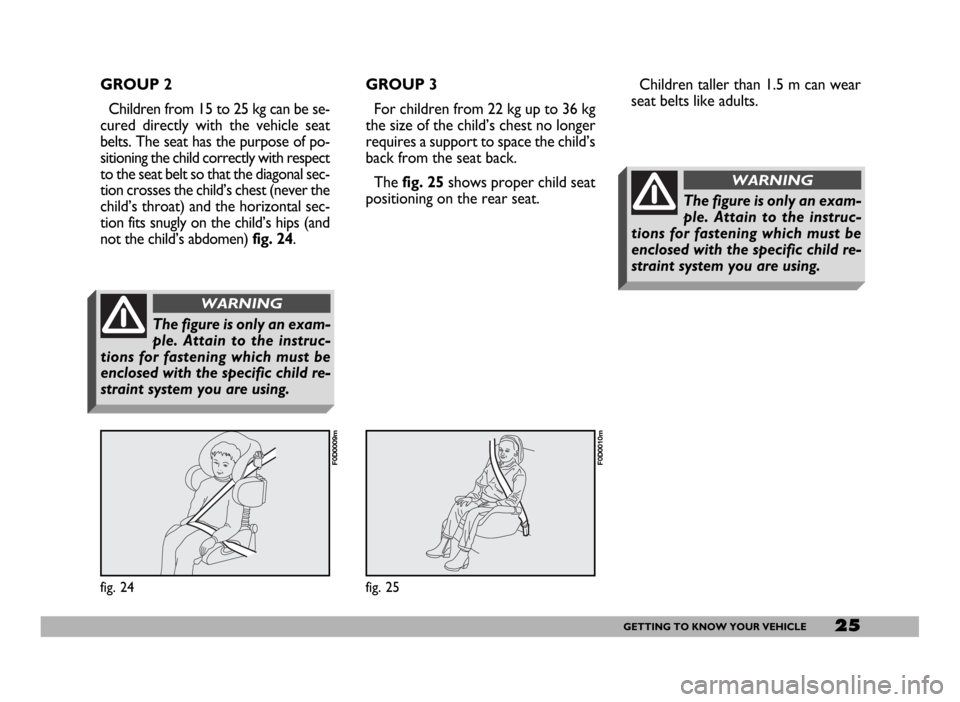
Children from 15 to 25 kg can be se-
cured directly with the vehicle seat
belts. The seat has the purpose of po-
sitioning the child correctly with respect
to the seat belt so that the diagonal sec-
tion crosses the child’s chest (never the
child’s throat) and the horizontal sec-
tion fits snugly on the child’s hips (and
not the child’s abdomen) fig. 24.GROUP 3
For children from 22 kg up to 36 kg
the size of the child’s chest no longer
requires a support to space the child’s
back from the seat back.
The fig. 25shows proper child seat
positioning on the rear seat.
fig. 24
F0D0009m
fig. 25
F0D0010m
The figure is only an exam-
ple. Attain to the instruc-
tions for fastening which must be
enclosed with the specific child re-
straint system you are using.
WARNING
Children taller than 1.5 m can wear
seat belts like adults.
The figure is only an exam-
ple. Attain to the instruc-
tions for fastening which must be
enclosed with the specific child re-
straint system you are using.
WARNING
Page 29 of 258

28GETTING TO KNOW YOUR VEHICLE
IGNITION SWITCH
The key can be turned to four dif-
ferent positions fig. 26.
STOP:engine off, key can be re-
moved, steering column locked.
MAR:drive position. All electrical
devices can be used.
AVV:to start the engine.
PARK:engine off, parking lights on,
key can be removed, steering column
locked. To turn the key to PARK,
press button A.STEERING COLUMN LOCK
To engage the lock: remove the ig-
nition key at STOPor PARK, and
turn the steering wheel until it locks.
To release the lock: rock the steer-
ing wheel slightly as you turn the igni-
tion key to MAR.
fig. 26
F0D0052m
If the ignition switch has
been tampered with (e.g.
someone has tried to steal your ve-
hicle), get a Fiat Dealership to make
sure it is still functioning properly
before you start driving again.
WARNING
When you get out of the
vehicle, always remove the
ignition key. This will prevent any-
one from accidentally working the
controls. Remember to apply the
handbrake and, if the vehicle is
faced up on a steep slope engage
the first gear. If it is facing down,
engage the reverse gear. Never
leave children in the vehicle by
themselves.
WARNING
Never remove the ignition
key while the vehicle is
moving. The steering wheel will au-
tomatically lock as soon as you try
to turn it. This also applies when
the vehicle is being towed.
WARNING
It is absolutely forbidden to
carry out whatever after-
market operation involving steering
system or steering column modifi-
cations (e.g.: installation of anti-
theft Device) that could badly af-
fect performance and safety, cause
the lapse of warranty and also re-
sult in non-compliance of the car
with homologation requirements.
WARNING
Page 30 of 258
29GETTING TO KNOW YOUR VEHICLE
INSTRUMENT PANEL
A- Engine coolant temperature
gauge
B- Speedometer
C- Rev counter
D- Fuel level gauge
E- Odometer setting and scheduled
servicing
F- Odometer
G- Clock setting.
fig. 27 Left-hand drive versionF0D0147m
fig. 28 Right-hand drive versionF0D0148m
Page 31 of 258

30GETTING TO KNOW YOUR VEHICLE
INSTRUMENTS
ENGINE COOLANT
TEMPERATURE
GAUGE fig. 29
Under normal conditions, the needle
should hover around the middle of the
scale.
If it approaches the red section, it
means that the engine is being over-
taxed and you should reduce your de-
mand on it.
Also travelling too slowly when the
outside temperature is very hot can
cause the needle to approach the red
sector. In this case, it is better to stop
and turn the engine off. After a few
moments you can start the engine
again and accelerate slightly.SPEEDOMETER
fig. 30- left-hand drive versions
fig. 31- right-hand drive versions.
REV COUNTER fig. 32
IMPORTANT The electronic sys-
tem progressively blocks fuel flow to
prevent engine from overrevving. This
will lead to a progressive loss of en-
gine power. If the situation persists
even after the measures
you have taken, turn off
the engine and have the vehicle
seen at a Fiat Dealership.
fig. 29
F0D0150m
fig. 30
F0D0149m
fig. 31
F0D0153m
fig. 32
F0D0151m
Page 32 of 258
31GETTING TO KNOW YOUR VEHICLE
fig. 35 - total kilometres
F0A0011m
fig. 36 - trip kilometres
F0A0012m
FUEL LEVEL GAUGE
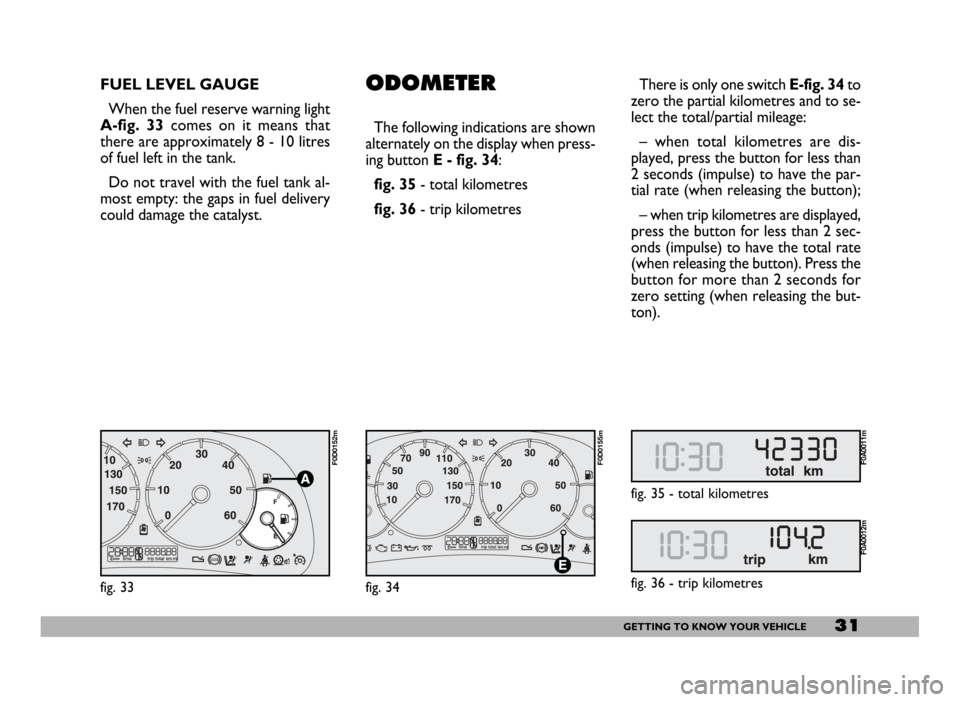
When the fuel reserve warning light
A-fig. 33comes on it means that
there are approximately 8 - 10 litres
of fuel left in the tank.
Do not travel with the fuel tank al-
most empty: the gaps in fuel delivery
could damage the catalyst.ODOMETER
The following indications are shown
alternately on the display when press-
ing button E - fig. 34:
fig. 35- total kilometres
fig. 36- trip kilometres
fig. 33
F0D0152m
fig. 34
F0D0155m
There is only one switch E-fig. 34to
zero the partial kilometres and to se-
lect the total/partial mileage:
– when total kilometres are dis-
played, press the button for less than
2 seconds (impulse) to have the par-
tial rate (when releasing the button);
– when trip kilometres are displayed,
press the button for less than 2 sec-
onds (impulse) to have the total rate
(when releasing the button). Press the
button for more than 2 seconds for
zero setting (when releasing the but-
ton).
