2005 DODGE STRATUS COUPE fuel cap
[x] Cancel search: fuel capPage 40 of 396
WARNING!
²Remove the fuel tank filler tube cap (gas cap)
slowly to prevent fuel spray from the filler neck
which may cause injury.
²The volatility of some gasolines may cause a build
up of pressure in the fuel tank that may increase
while you drive. This pressure can result in a
spray of gasoline and/or vapors when you remove
the cap from a hot vehicle. Removing the cap
slowly allows the pressure to vent and prevents
fuel spray.
²Never have any smoking materials lit in or near
the vehicle when the gas cap is removed or the
tank filled.
²Never add fuel when the engine is running. This
is in violation of most state and federal fire
regulations and will cause the malfunction indi-
cator light to turn on.
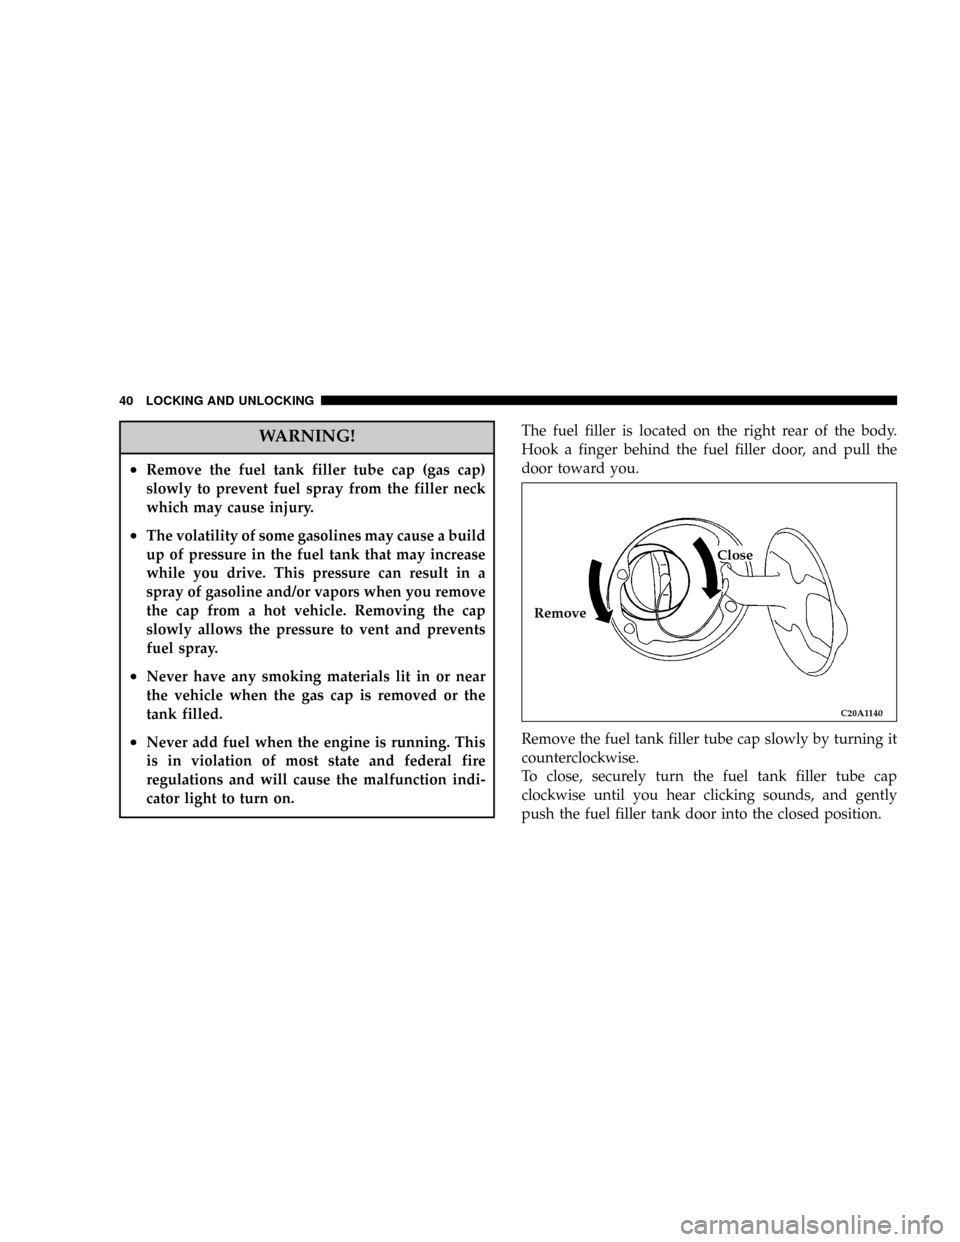
The fuel filler is located on the right rear of the body.
Hook a finger behind the fuel filler door, and pull the
door toward you.
Remove the fuel tank filler tube cap slowly by turning it
counterclockwise.
To close, securely turn the fuel tank filler tube cap
clockwise until you hear clicking sounds, and gently
push the fuel filler tank door into the closed position.
C20A1140
RemoveClose
40 LOCKING AND UNLOCKING
Page 41 of 396
Low fuel warning chime
If a chime sounds when the low fuel warning light is on,
that means the fuel is low.
NOTE: If the low fuel warning light goes off, then comes
back on again, the chime will not sound.
Fuel tank capacity 62 L (16.4 gal)
CAUTION!
²As the fuel system may be under pressure, remove the
fuel tank filler tube cap slowly. Removing the cap
slowly relieves any pressure or vacuum that might have
built up in the fuel tank. If the cap is venting vapor or
if you hear a hissing sound, wait until it stops before
completely removing the cap. Otherwise, fuel may
spray out and injure you or others.
²If you need to replace the fuel tank filler tube cap,
use only a cap specified for your model vehicle.
²To avoid fuel spillage and overfilling, do not ªtop-offº
the fuel tank again and again after filling.
NOTE: If the fuel tank filler tube cap is not tight while
driving, the ªMalfunction indicator light (SERVICE EN-
GINE SOON)º may illuminate when the onboard diag-
nostic (OBD) system performs its self check.
Always tighten the fuel tank filler tube cap until you hear
clicking sounds. The indicator light will go off after
driving several times. If the indicator light does not go
off, contact your authorized dealer as soon as possible.
LOCKING AND UNLOCKING 41
2
Page 118 of 396

CAUTION!
²Prolonged driving with the malfunction indicator
light on may result in further damage to the
emission control system. Continued driving could
also affect fuel economy and driveability.
²If the light does not illuminate when the ignition
key is turned to the ªONº position (bulb check),
have the system checked at an authorized dealer.
NOTE: Do not disconnect the battery cable when the
Malfunction indicator light (SERVICE ENGINE SOON) is
ON.
The engine electronic control module stores critical OBD
data, which may be lost if the battery is disconnected.
This can make rapid diagnosis more difficult.
If the fuel tank filler cap is not secured properly, the
light may come on. Be sure the fuel tank filler tube cap
is tightened every time you add fuel. (Turn the fuel
tank filler cap clockwise until you hear clicking
sounds.)Overheating warning light
If the warning light illuminates while the
engine is running, it is possible that the
engine is overheated.
Immediately park your vehicle in a safe
place and make the necessary corrections.
(Refer to ``Engine overheating'' on page 279.)
While driving, care should always be taken to maintain
the normal operating temperature.
Supplemental Restraint System (SRS)-air bag
warning light
This light illuminates when the Supplemen-
tal Restraint System-air bag is not working
properly. It will also illuminate for about 7
seconds after the ignition key is turned to the ªONº
position or after the engine is started. The light should
then go out.
Check the light every time the vehicle is started.
If it does not illuminate, or stays on for more than
approximately 7 seconds after the ignition key is turned
ªONº or after the engine is started, or if it comes on while
118 INSTRUMENTS AND CONTROLS
Page 146 of 396
BREAK-IN RECOMMENDATIONS
Advanced automobile manufacturing techniques permit
you to operate your new vehicle without experiencing a
long break-in period of low-speed driving.
However, you can add to the future performance and
economy of your vehicle by observing the following
precautions during the first 300 miles (500 km).
It is recommended that you drive your vehicle at mod-
erate speeds during the break-in period.
1. Avoid racing the engine.
2. Avoid harsh driving such as fast starts, sudden accel-
eration, prolonged high-speed driving and abrupt appli-
cation of the brakes. These operations not only have a
detrimental effect on the engine but also cause increased
fuel and oil consumption, which could result in malfunc-
tion of engine components. Be particularly careful to
avoid wide-open throttle acceleration in low gear.
3. Do not overload the vehicle. Observe the seating
capacity. (See ªWeightsº page 375)
4. Do not use this vehicle for trailer towing during the
break-in period.
FUEL SELECTION
Your vehicle is designed to use unleaded gasoline only. It
is equipped with a fuel filler tube especially designed to
accept only the smaller diameter unleaded gasoline dis-
pensing nozzle.
WARNING!
Gasoline is highly flammable and explosive. You can
be burned or seriously injured when handling it.
When refueling this vehicle, always turn the engine
off and keep flames, sparks, and smoking materials
away. Always handle fuel in well-ventilated outdoor
areas.
146 STARTING AND DRIVING
Page 150 of 396
NOTE:Tighten the gas cap until you hear a ªclickingº
sound. This is an indication that the gas cap is properly
tightened.
The Malfunction Indicator Light (ªSERVICE ENGINE
SOONº) will come on if the gas cap is not properly
secured. Make sure that the gas cap is tightened each
time the vehicle is refueled.
WARNING!
A fire may result if gasoline is pumped into a
portable container that is inside of a vehicle. You
could be burned. Always place gas containers on the
ground while filling.
Fuel Filler Cap (Gas Cap)
The gas cap is behind the fuel filler door, on the passen-
ger's side of the vehicle. If the gas cap is lost or damaged,
be sure the replacement cap is for use with this vehicle.
CAUTION!
Damage to the fuel system or emission control
system could result from using an improper fuel
tank filler tube cap (gas cap). A poorly fitting cap
could let impurities into the fuel system.
CAUTION!
A poorly fitting gas cap may cause the Malfunction
Indicator Light (ªSERVICE ENGINE SOONº) to
turn on.
WARNING!
²Never have any smoking materials lit in or near
the vehicle when the gas cap is removed or the
tank filled.
²Never add fuel to the vehicle when the engine is
running.
150 STARTING AND DRIVING
Page 204 of 396

over curbs or parking stop blocks. Always use caution
when traveling up or down sharp inclines as your
bumper may contact the road surface.
2. Maintain specified tire inflation pressures. Replace
tires before they are excessively worn.
3. If you plan to drive in another country, comply with
the vehicle registration laws and confirm the availability
of the correct fuel.
OPERATION DURING COLD WEATHER
1. Check the battery, including terminals and cables.
During extremely cold weather, the battery capacity will
decrease. Also, the battery power level may drop because
more power is needed for cold starting and operation.
Before driving the vehicle, check to see if the engine runs
at the proper speed and if the headlights are at their usual
intensity. Charge or replace the battery if necessary.
During cold weather, it is possible that a discharged
battery could freeze.
WARNING!
The battery gives off explosive hydrogen gas. Any
spark or flame can cause the battery to explode,
which could seriously injury or kill you.
Always wear protective clothes and a face shield
when doing battery maintenance, or let a skilled
technician do it.
2. Manual transaxles may be more difficult to shift
during cold weather operation. This is normal and shift
effort will become easier as the transaxle reaches a
normal operating temperature.
Maintain low-speed operation at first to allow the trans-
axle oil to be distributed to all lubrication points.
3. Check the engine antifreeze.
If there is a shortage of coolant due to leakage or engine
overheating, add high-quality ethylene glycol antifreeze
and water. The recommended ratio is about 50% water
and 50% anti-freeze. This ratio provides adequate corro-
sion, boiling, and freeze protection.
204 STARTING AND DRIVING
Page 291 of 396
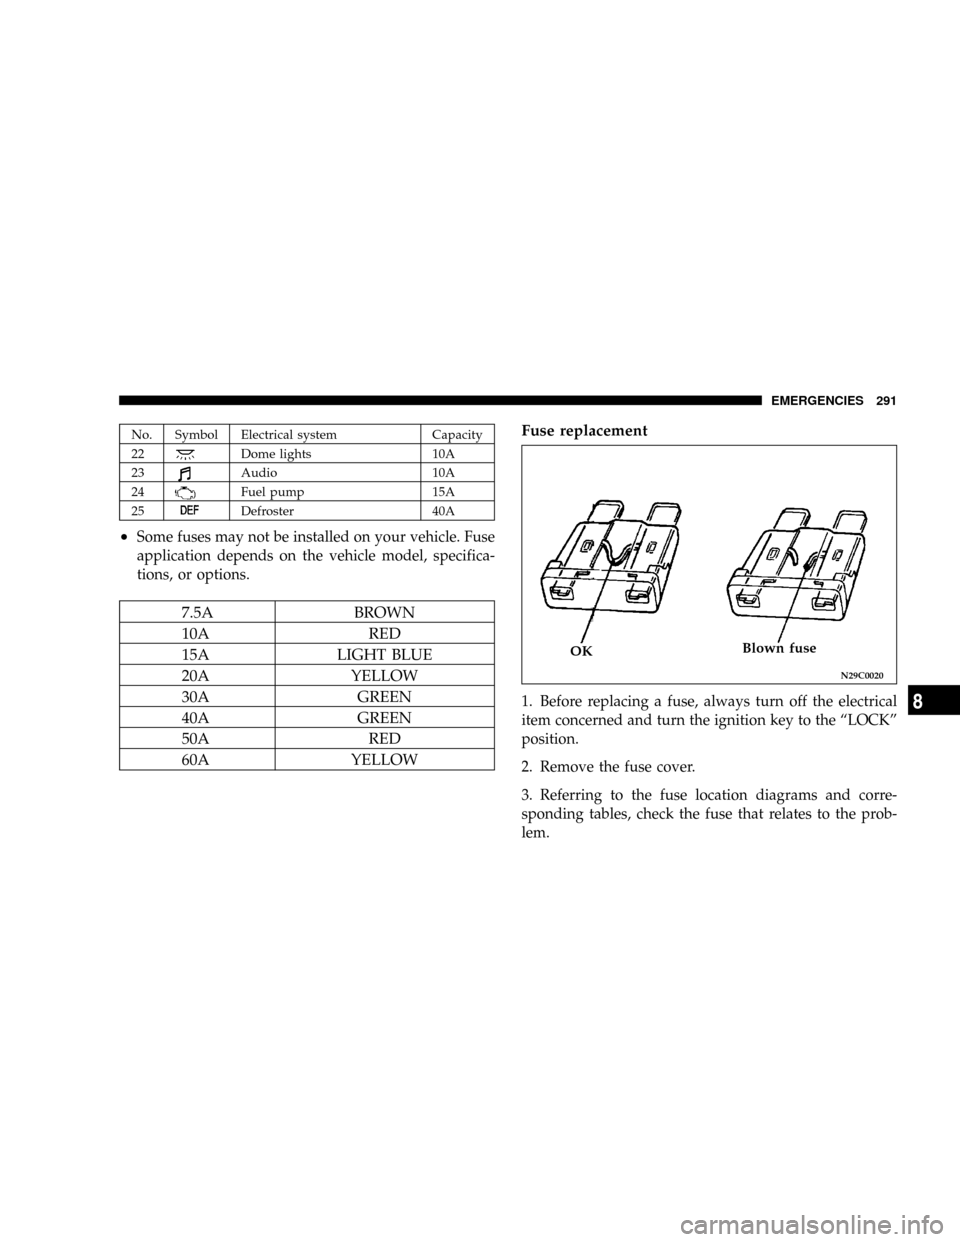
No. Symbol Electrical system Capacity
22
Dome lights 10A
23
Audio 10A
24
Fuel pump 15A
25
Defroster 40A
²Some fuses may not be installed on your vehicle. Fuse
application depends on the vehicle model, specifica-
tions, or options.
7.5A BROWN
10A RED
15A LIGHT BLUE
20A YELLOW
30A GREEN
40A GREEN
50A RED
60A YELLOWFuse replacement
1. Before replacing a fuse, always turn off the electrical
item concerned and turn the ignition key to the ªLOCKº
position.
2. Remove the fuse cover.
3. Referring to the fuse location diagrams and corre-
sponding tables, check the fuse that relates to the prob-
lem.
N29C0020
OKBlown fuse
EMERGENCIES 291
8
Page 309 of 396

MAINTENANCE
CONTENTS
mView of engine compartment..............311
mService precautions.....................312
mEmission-control system maintenance.......313
mEmissions Testing......................314
mOnboard Diagnostic System (OBD II)........314
mReplacement Parts......................315
NFuel system (tank, filler tube, connections,
and fuel tank filler cap).................315
NFuel hoses...........................315
NAir cleaner filter......................316
NEvaporative emission control system
(except evaporative emission canister).......316
NSpark plugs..........................317
NIgnition cables........................317NDistributor cap and rotor................317
mGeneral maintenance....................318
NEngine oil and oil filter..................318
mEngine coolant.........................322
NTo check the coolant level................322
NTo add coolant........................322
mBrake fluid...........................323
mClutch fluid (manual transaxle)............324
NTo check the clutch fluid.................324
NTo replace the fluid....................324
mBattery..............................325
NDuring cold weather...................327
9