Page 378 of 455

Clutch Linkage
If the clutch pedal linkage begins to squeak or grunt, the
clutch pedal pivot bushings should be lubricated. Refer
to Recommended Fluids, Lubricants and Genuine Parts
for the correct lubricant type.
Rear Axle And 4x4 Front Driving Axle Fluid Level
Refer to Recommended Fluids, Lubricants and Genuine
Parts for the correct Fluid type. For normal service,
periodic fluid level checks are not required. When the
vehicle is serviced for other reasons the exterior surfaces
of the axle assembly should be inspected. If gear oil
leakage is suspected inspect the fluid level.
This inspection should be made with the vehicle in a level
position. The fluid level should be even with the bottom
of the fill hole for the Manufacturer’s C205F HD Front
Axles. The fluid level should be 5/8”(16 mm) below on
9 1/4”Manufacturer’s Rear Axles.For all 2500 Model axles, the fluid level should be 1/4”±
1/4”(6.4 mm ± 6.4 mm) below the fill hole on the 9.25”
Front and 3/4”± 1/4”(19 mm ± 6.4 mm) on 10.5”Rear
axles. The 11.5”Rear Axle level should be 1/4”± 1/4”
(6.4 mm ± 6.4 mm) below the fill hole.
Drain and Refill
Vehicles operated in normal service do not have regularly
scheduled oil changes. If fluid has become contaminated
with water or to provide the correct viscosity grade, drain
and refill.
Lubricant Selection
Refer to Recommended Fluids, Lubricants and Genuine
Parts for correct fluid type.
NOTE:The presence of water in the gear lubricant will
result in corrosion and possible failure of differential
components. Operation of the vehicle in water, as may be
encountered in some off-highway types of service, will
require draining and refilling the axle to avoid damage.
378 MAINTAINING YOUR VEHICLE
Page 379 of 455
.
Transfer Case
Fluid Level Check
This fluid level can be checked by removing the filler
plu")
Limited-Slip Differentials
Power Wagon AxlesDO NOT REQUIREany limited slip
oil additive (friction modifiers).
Transfer Case
Fluid Level Check
This fluid level can be checked by removing the filler
plug. The fluid level should be to the bottom edge of the
filler plug hole with the vehicle in a level position.
Lubricant Selection
Refer to Recommended Fluids, Lubricants and Genuine
Parts for correct fluid type.
Front Drive Shaft
The front drive shaft contains a grease fitting which
should be serviced at every oil change (see maintenance
schedule A/B).
Manual Transmission
Fluid Level Check
This fluid level can be checked by removing the filler
plug. If the level of the lubricant is more than 1/4”(6.4
mm) below the bottom of the filler hole while the vehicle
is on level ground, enough lubricant should be added to
bring the level to the bottom of the filler hole.
Lubricant Selection G56 (6–Speed Manual
Transmission—If Equipped)
This transmission does not require periodic changing. If
it becomes necessary to add or change the fluid in this
transmission, refer to Recommended Fluids, Lubricants
and Genuine Parts for correct fluid type.
MAINTAINING YOUR VEHICLE 379
7
Page 380 of 455

Automatic Transmission
Fluid Level Check
The fluid level should be checked when the engine is
fully warmed up and the fluid in the transmission is at
normal operating temperature. Operation of the trans-
mission with an improper fluid level will greatly reduce
the life of the transmission and of the fluid. Check the
fluid level whenever the vehicle is serviced.
Fluid Level Check–545RFE
Check the fluid level while the transmission is at normal
operating temperature 82°C (180°F). This occurs after at
least 15 miles (25 km) of driving. At normal operating
temperature the fluid cannot be held comfortably be-
tween the fingertips.
To check the automatic transmission fluid level properly,
the following procedure must be used:1. Operate the engine at idle speed and normal operating
temperature.
2. The vehicle must be on level ground.
3. Fully apply the parking brake and press the brake
pedal.
4. Place the gear selector momentarily in each gear
position ending with the lever in P (Park).
5. Remove the dipstick, wipe it clean and reinsert it until
seated.
6. Remove the dipstick again and note the fluid level on
both sides. The fluid level should be between the“HOT”
(upper) reference holes on the dipstick at normal operat-
ing temperature. Verify that solid coating of oil is seen on
both sides of the dipstick. If the fluid is low, add as
required into the dipstick tube.Do not overfill.After
adding any quantity of oil through the oil fill tube, wait
380 MAINTAINING YOUR VEHICLE
Page 381 of 455
 minutes for the oil to fully drain
into the transmission before rechecking the fluid level.
NOTE:If it is necessary to check the transmissionbelow
the operating temperature, the f")
a minimum of two (2) minutes for the oil to fully drain
into the transmission before rechecking the fluid level.
NOTE:If it is necessary to check the transmissionbelow
the operating temperature, the fluid level should be
between the two“COLD”(lower) holes on the dipstick
with the fluid at approximately 70°F (21°C) (room tem-
perature). If the fluid level is correctly established at
room temperature, it should be between the“HOT”
(upper) reference holes when the transmission reaches
180°F (82°C). Remember it is best to check the level at the
normal operating temperature.CAUTION!
Be aware that if the fluid temperature is below 50°F
(10°C) it may not register on the dipstick. Do not add
fluid until the temperature is elevated enough to
produce an accurate reading.
7. Check for leaks. Release parking brake.
To prevent dirt and water from entering the transmission
after checking or replenishing fluid, make certain that the
dipstick cap is properly reseated. It is normal for the
dipstick cap to spring back slightly from its fully seated
position, as long as its seal remains engaged in the
dipstick tube.
MAINTAINING YOUR VEHICLE 381
7
Page 390 of 455

CAUTION!
Do not use abrasive or strong cleaning materials
such as steel wool or scouring powder, which will
scratch metal and painted surfaces.
Special Care
•
If you drive on salted or dusty roads or if you drive
near the ocean, hose off the undercarriage at least once
a month.
•It is important that the drain holes in the lower edges
of the doors, rocker panels and tailgate be kept clear
and open.
•If you detect any stone chips or scratches in the paint,
touch them up immediately. The cost of such repairs is
considered the responsibility of the owner.
•If your vehicle is damaged due to an accident or
similar cause which destroys the paint and protective
coating have your vehicle repaired as soon as possible.
The cost of such repairs is considered the responsibil-
ity of the owner.
•All wheels and wheel trim, especially aluminum and
chrome plated wheels should be cleaned regularly
with mild soap and water to prevent corrosion. To
remove heavy soil, select a nonabrasive, non-acidic
cleaner. Do not use scouring pads, steel wool, a bristle
brush or metal polishes. Only Mopar cleaners are
recommended. Do not use oven cleaner. Avoid auto-
matic car washes that use acidic solutions or harsh
brushes that may damage the wheels’protective fin-
ish.
•If you carry special cargo such as chemicals, fertilizers,
de-icer salt, etc., be sure that such materials are well
packaged and sealed.
390 MAINTAINING YOUR VEHICLE
Page 391 of 455

•If a lot of driving is done on gravel roads, consider
mud or stone shields behind each wheel.
•Use Mopar�touch up paint on scratches as soon as
possible. Your dealer has touch up paint to match the
color of your vehicle.
Interior Care
Use Mopar�Fabric Cleaner to clean fabric upholstery
and carpeting.
Use Mopar�Vinyl Cleaner to clean vinyl upholstery and
trim.
Mopar�Total Clean is specifically recommended for
leather upholstery.Your leather upholstery can be best preserved by regular
cleaning with a damp soft cloth. Small particles of dirt
can act as an abrasive and damage the leather upholstery
and should be removed promptly with a damp cloth.
Stubborn soils can be removed easily with a soft cloth
and Mopar�Total Clean. Care should be taken to avoid
soaking your leather upholstery with any liquid. Please
do not use polishes, oils, cleaning fluids, solvents, deter-
gents, or ammonia based cleaners to clean your leather
upholstery. Application of a leather conditioner is not
required to maintain the original condition.
WARNING!
Do not use volatile solvents for cleaning purposes.
Many are potentially flammable, and if used in
closed areas they may cause respiratory harm.
MAINTAINING YOUR VEHICLE 391
7
Page 406 of 455
FLUIDS AND CAPACITIES
U.S. Metric
Fuel
5.7L, 89 Octane
2500 Shortbed Models 34 gal. 128L
2500 Longbed Models 35 gal. 132L
Engine Oil (with filter)
5.7L Engine V-8, SAE 5W-20, API Certified 7.0 qts. 6.6L
Cooling System
5.7L (Mopar�Antifreeze/Coolant 5 Year/100,000 Mile
Formula)18.7 qts. 17.7L
406 MAINTAINING YOUR VEHICLE
Page 407 of 455
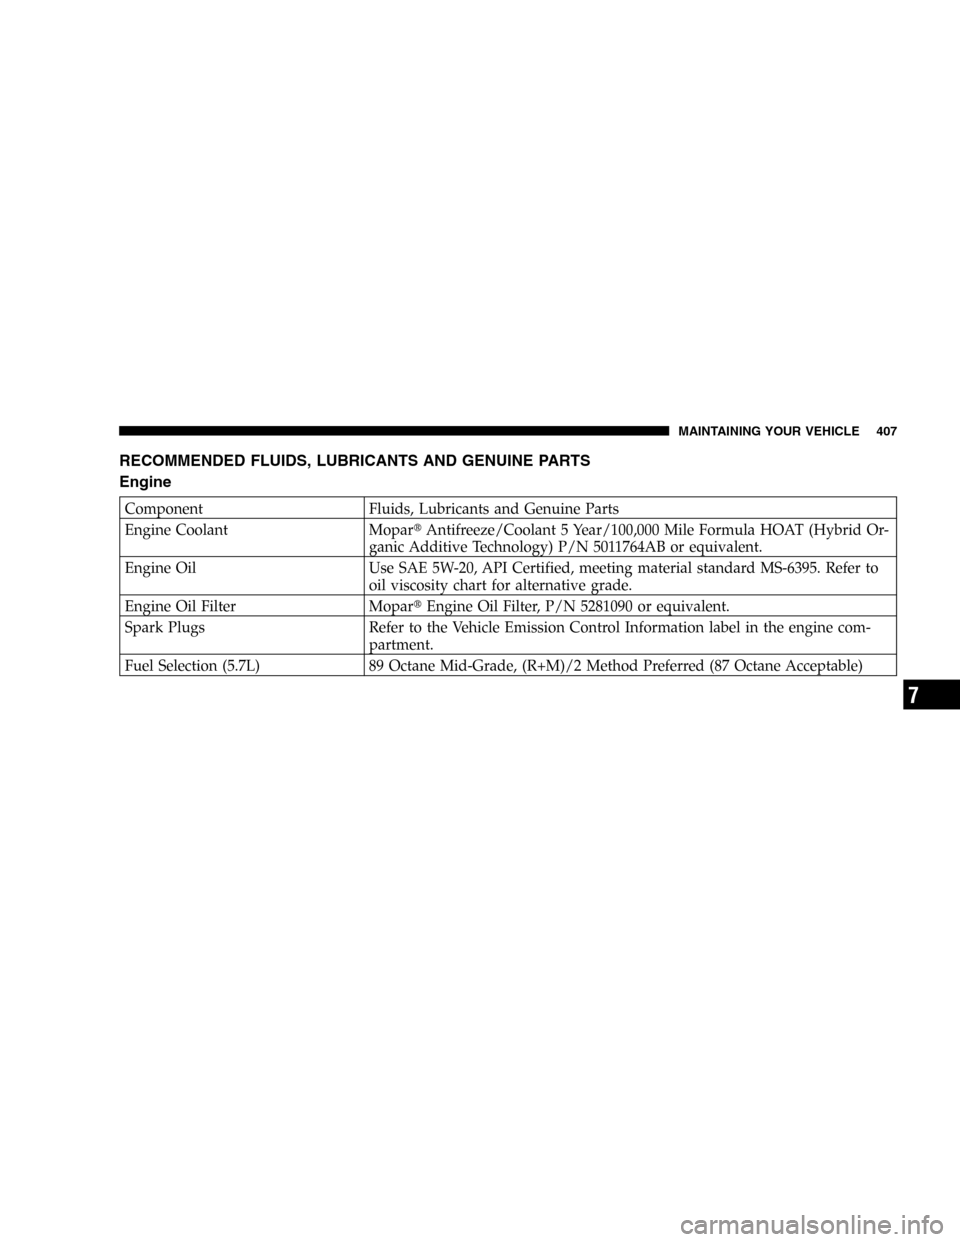
RECOMMENDED FLUIDS, LUBRICANTS AND GENUINE PARTS
Engine
Component Fluids, Lubricants and Genuine Parts
Engine Coolant Mopar�Antifreeze/Coolant 5 Year/100,000 Mile Formula HOAT (Hybrid Or-
ganic Additive Technology) P/N 5011764AB or equivalent.
Engine Oil Use SAE 5W-20, API Certified, meeting material standard MS-6395. Refer to
oil viscosity chart for alternative grade.
Engine Oil Filter Mopar�Engine Oil Filter, P/N 5281090 or equivalent.
Spark Plugs Refer to the Vehicle Emission Control Information label in the engine com-
partment.
Fuel Selection (5.7L) 89 Octane Mid-Grade, (R+M)/2 Method Preferred (87 Octane Acceptable)
MAINTAINING YOUR VEHICLE 407
7

5.7L Engine V-8, SAE 5W-20, API Certified 7.0 qts. 6.")