2005 CHRYSLER VOYAGER child seat
[x] Cancel search: child seatPage 513 of 2339

anchor. The OCM then monitors the return voltage
from each of the sensors. The bladder pressure sen-
sor input allows the OCM to determine whether the
passenger front seat is occupied and the relative size
of the occupant by providing a weight-sensing refer-
ence to the load on the seat cushion. The belt tension
sensor provides an additional logic input to the OCM
microprocessor that allows it to distinguish between
the lower seat belt cinch loads of a belted occupant
and the higher loads associated with a belted child
seat.
Pre-programmed decision algorithms and OCS cal-
ibration allow the OCM microprocessor to determine
when the seat cushion load as signaled by the blad-
der pressure sensor and the seat belt cinch load as
signaled by the belt tension sensor indicate that pas-
senger airbag protection is appropriate. When the
programmed conditions are met, the OCM sends the
proper electronic occupant classification messages
over the PCI data bus to the Occupant Restraint
Controller (ORC), and the ORC enables or disables
the deployment circuits for the passenger front sup-
plemental restraints. The ORC also provides a con-
trol output for the Passenger Airbag Disabled (PAD)
indicator in the instrument panel center stack, based
upon the electronic occupant classification messages
it receives from the OCM.
The OCM microprocessor continuously monitors all
of the OCS electrical circuits and components to
determine the system readiness. If the OCM detects
a monitored system fault, it sets an active and stored
Diagnostic Trouble Code (DTC) and sends the appro-
priate electronic messages to the ORC over the PCI
data bus. Then the ORC sets a DTC and sends mes-
sages to control the airbag indicator operation
accordingly. An active fault only remains for the
duration of the fault, or in some cases for the dura-
tion of the current ignition switch cycle, while a
stored fault causes a DTC to be stored in memory by
the OCM and the ORC. For some DTC's, if a fault
does not recur for a number of ignition cycles, the
OCM will automatically erase the stored DTC. For
other internal faults, the stored DTC is latched for-
ever.
The OCM receives battery current from an IPM
high side driver (Run/Start). The OCM receives
ground through a ground circuit of the body wire
harness, which it shares with the ORC. These con-
nections allow the OCM to be operational whenever
the ignition switch is in the Start or ON positions.
To diagnose and test the OCS, use a scan tool and
the appropriate diagnostic information.
REMOVAL
Once any of the original factory-installed compo-
nents except the Occupant Classification Module(OCM) have been replaced with the service replace-
ment package components, the OCM can only be ser-
viced by replacing the entire passenger front seat
cushion unit with another complete service replace-
ment package (Refer to 23 - BODY/SEATS/SEAT
CUSHION - FRONT - REMOVAL).
WARNING: Never replace both the Occupant
Restraint Controller (ORC) and the Occupant Clas-
sification Module (OCM) at the same time. If both
require replacement, replace one, then perform the
Airbag System test (Refer to 8 - ELECTRICAL/RE-
STRAINTS - DIAGNOSIS AND TESTING - AIRBAG
SYSTEM) before replacing the other. Both the ORC
and the OCM store Occupant Classification System
(OCS) calibration data, which they transfer to one
another when one of them is replaced. If both are
replaced at the same time, an irreversible fault will
be set in both modules and the OCS may malfunc-
tion and result in personal injury or death.
(1) Disconnect and isolate the battery negative
cable.
(2)
WARNING: Wait two minutes for the airbag system
reserve capacitor to discharge before beginning
any airbag system or component service. Failure to
do so may result in accidental airbag deployment,
personal injury or death.
(3) Reach under the front edge of the passenger
side front seat cushion to access and remove the lock
pin from the connector lock tower on the Occupant
Classification Module (OCM) (Fig. 36).
(4) Disconnect the passenger front seat wire har-
ness connector for the OCM.
(5) Remove the two screws that secure the OCM to
the OCM bracket.
(6) Remove the OCM from under the passenger
front seat.
INSTALLATION
WARNING: To avoid personal injury or death on
vehicles equipped with the Occupant Classification
System (OCS), only the Occupant Classification
Module (OCM) and the seat cushion trim may be
serviced separately. All other components of the
passenger front seat cushion must be serviced only
as a complete factory-calibrated, assembled and
tamper-evident service replacement package.
Once any of the original factory-installed compo-
nents except the OCM have been replaced with the
service replacement package components, the OCM
can only be serviced by replacing the entire passen-
8O - 26 RESTRAINTSRS
OCCUPANT CLASSIFICATION MODULE (Continued)
Page 520 of 2339

(28) Install two right side nuts at instrument
panel center stack support to floor.
(29) Install two left side nuts at instrument panel
center stack support to floor.
(30) Connect the two wiring connectors to lower
instrument panel cubby bin at bottom of center stack
and install six screws.
(31) Align left side upper A-pillar trim over retain-
ing slots and firmly snap into place.
(32) Install four nuts at brake pedal support
bracket to instrument panel.
(33) Align left A-pillar lower extension trim over
retaining slots and firmly snap into place.
(34) Install knee blocker and retaining screws.
(35) Install Data Link Connector (DLC) into bot-
tom of knee blocker.
(36) Align parking brake lever and snap into place
on knee blocker reinforcement.
(37) Install lower steering column cover and four
retaining screws
(38) Align left cowl panel over retaining slots and
firmly snap into place.
(39) Align left front door sill plate over retaining
slots and firmly snap into place.
(40) Install center console bin between front seats.
WARNING: Do not connect the battery negative
cable (Refer to 8 - ELECTRICAL/RESTRAINTS -
DIAGNOSIS AND TESTING - AIRBAG SYSTEM). Per-
sonal injury or death may result if the system test
is not performed first.
(41) Close hood.
(42) Verify system and vehicle operation.
PASSENGER AIRBAG
DISABLED INDICATOR
DESCRIPTION
Vehicles equipped with the Occupant Classification
System (OCS) include a Passenger Airbag Disabled
(PAD) indicator (Fig. 40) which is located in the
instrument panel center stack, above the radio. The
PAD indicator is present only in vehicles equipped
with the OCS.The PAD indicator consists of a molded plastic
housing with an integral connector at the back. An
amber Light Emitting Diode (LED) behind the lens
causes the ªPASS AIR BAG OFFº text and icon to
appear silhouetted against an amber field through
the translucent lens when the indicator is illumi-
nated from behind by the LED. The PAD indicator is
available for separate service replacement.
OPERATION
In vehicles equipped with the Occupant Classifica-
tion System (OCS), the Passenger Airbag Disabled
(PAD) indicator gives an indication when the passen-
ger airbag and seat belt tensioner deployment cir-
cuits are disabled by the Occupant Restraint
Controller (ORC). The PAD indicator is controlled by
a transistor within the ORC through a hard wired
output based upon ORC programming and electronic
occupant classification messages received by the ORC
over the Programmable Communications Interface
(PCI) data bus from the Occupant Classification
Module (OCM). The PAD indicator Light Emitting
Diode (LED) is completely controlled by the ORC.
The LED receives a battery current input on the
fused ignition switch output (RUN/START) circuit.
Therefore, the LED will always be OFF when the
ignition switch is in any position except ON or
START. The LED only illuminates when it is pro-
vided a path to ground by the ORC transistor. The
ORC will turn on the PAD indicator for the following
reasons:
²Bulb Test- Each time the ignition switch is
turned to the ON position the PAD indicator is illu-
minated for about six seconds.
²Child Seat Detected Occupant Classifica-
tion Message- Each time the ORC receives a mes-
sage from the OCM indicating a child seat has been
detected in the passenger front seat, the passenger
airbag and seat belt tensioner deployment circuits
are deactivated and the PAD indicator will be illumi-
nated. The indicator remains illuminated until the
ORC receives an occupant classification message
indicating that:
²The passenger front seat is empty.
²The seat is occupied by a load equal to or
greater than a fifth percentile female.
²OR,Until the ignition switch is turned to the
OFF position, whichever of these three occurs first.
²Load Less Than Fifth Percentile Female
Occupant Classification Message- Each time the
ORC receives a message from the OCM indicating
that a load less than a fifth percentile female has
been detected in the passenger front seat, the pas-
senger airbag and seat belt tensioner deployment cir-
cuits are deactivated and the PAD indicator will be
illuminated. The indicator remains illuminated until:
Fig. 40 PASSENGER AIRBAG DISABLED (PAD)
INDICATOR
RSRESTRAINTS8O-33
PASSENGER AIRBAG (Continued)
Page 1789 of 2339
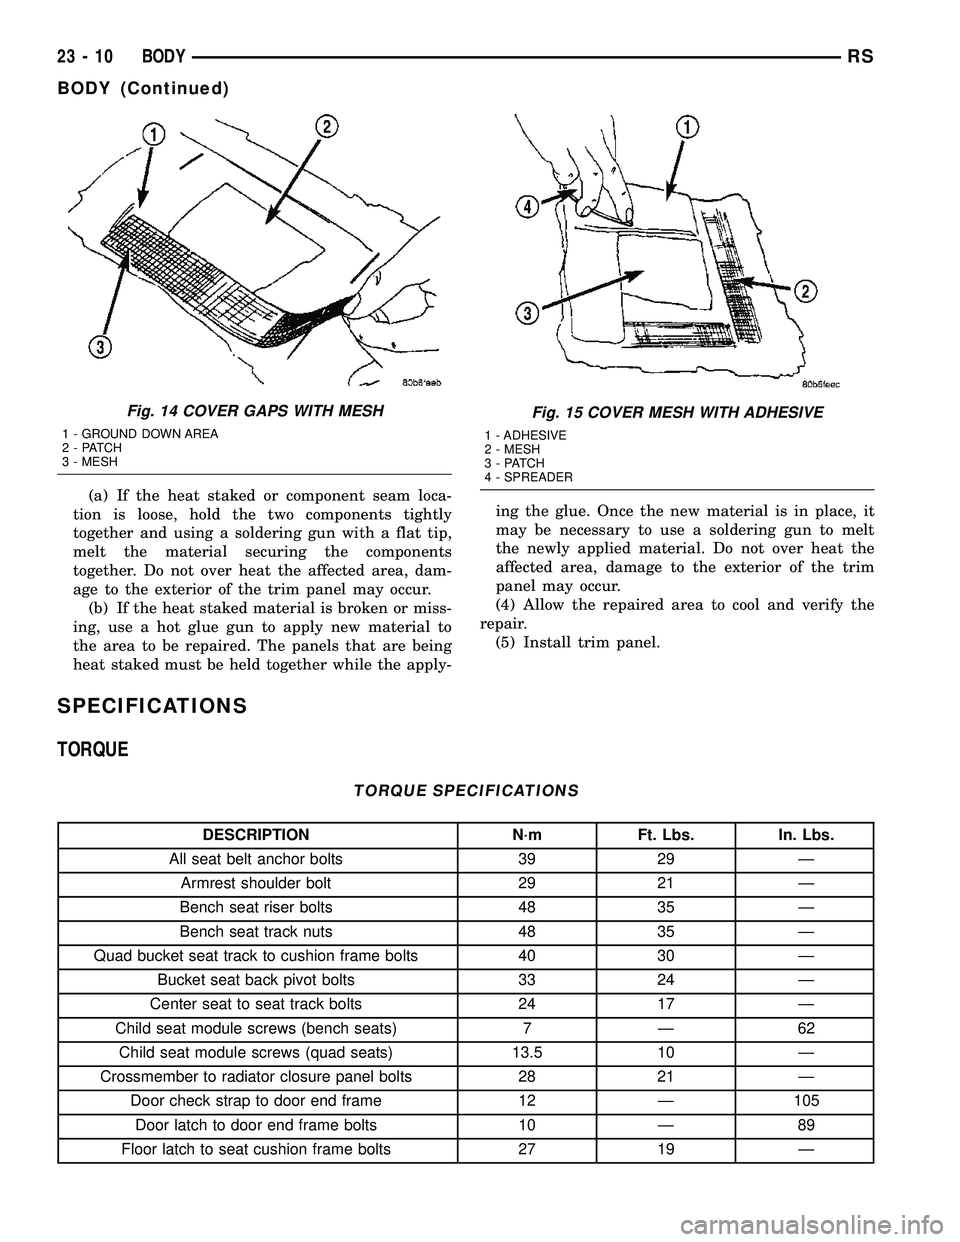
(a) If the heat staked or component seam loca-
tion is loose, hold the two components tightly
together and using a soldering gun with a flat tip,
melt the material securing the components
together. Do not over heat the affected area, dam-
age to the exterior of the trim panel may occur.
(b) If the heat staked material is broken or miss-
ing, use a hot glue gun to apply new material to
the area to be repaired. The panels that are being
heat staked must be held together while the apply-ing the glue. Once the new material is in place, it
may be necessary to use a soldering gun to melt
the newly applied material. Do not over heat the
affected area, damage to the exterior of the trim
panel may occur.
(4) Allow the repaired area to cool and verify the
repair.
(5) Install trim panel.
SPECIFICATIONS
TORQUE
TORQUE SPECIFICATIONS
DESCRIPTION N´m Ft. Lbs. In. Lbs.
All seat belt anchor bolts 39 29 Ð
Armrest shoulder bolt 29 21 Ð
Bench seat riser bolts 48 35 Ð
Bench seat track nuts 48 35 Ð
Quad bucket seat track to cushion frame bolts 40 30 Ð
Bucket seat back pivot bolts 33 24 Ð
Center seat to seat track bolts 24 17 Ð
Child seat module screws (bench seats) 7 Ð 62
Child seat module screws (quad seats) 13.5 10 Ð
Crossmember to radiator closure panel bolts 28 21 Ð
Door check strap to door end frame 12 Ð 105
Door latch to door end frame bolts 10 Ð 89
Floor latch to seat cushion frame bolts 27 19 Ð
Fig. 14 COVER GAPS WITH MESH
1 - GROUND DOWN AREA
2 - PATCH
3 - MESH
Fig. 15 COVER MESH WITH ADHESIVE
1 - ADHESIVE
2 - MESH
3 - PATCH
4 - SPREADER
23 - 10 BODYRS
BODY (Continued)
Page 1881 of 2339
SEATS
TABLE OF CONTENTS
page page
CHILD SEAT MODULE, BENCH SEAT
REMOVAL............................104
INSTALLATION
INSTALLATION......................105
SYNCHRONIZING CABLE ADJUSTMENT . . 105
QUAD CHILD SEAT
REMOVAL............................106
INSTALLATION........................106
HEADREST
REMOVAL............................106
INSTALLATION........................106
HEADREST SLEEVE
REMOVAL............................107
INSTALLATION........................107
RECLINER HANDLE
REMOVAL............................108
INSTALLATION........................108
ARMREST
REMOVAL............................108
INSTALLATION........................108
FRONT SEAT
REMOVAL............................108
INSTALLATION........................110
FRONT SEAT BACK
REMOVAL............................111
INSTALLATION........................111
FRONT SEAT BACK ASSIST STRAP
REMOVAL............................112
INSTALLATION........................112
FRONT SEAT BACK PANEL
REMOVAL............................112
INSTALLATION........................113
FRONT SEAT BACK COVER
REMOVAL............................113
INSTALLATION........................116
FRONT SEAT CUSHION
REMOVAL............................117
INSTALLATION........................118
FRONT SEAT CUSHION - OCS
REMOVAL............................119
INSTALLATION........................120
FRONT SEAT CUSHION SIDE COVER
REMOVAL............................120
INSTALLATION........................121
FRONT SEAT CUSHION SIDE COVER - OCS
REMOVAL............................121
INSTALLATION........................122
FRONT SEAT RISER - MANUAL - OCS
REMOVAL............................123INSTALLATION........................123
FRONT SEAT TRACK POWER ADJUSTER
REMOVAL............................124
INSTALLATION........................124
FRONT SEAT TRACK ADJUSTER/POWER -
OCS
REMOVAL............................124
INSTALLATION........................125
FRONT SEAT TRACK MANUAL ADJUSTER
REMOVAL............................125
INSTALLATION........................126
FRONT SEAT TRACK ADJUSTER/MANUAL -
OCS
REMOVAL............................126
INSTALLATION........................128
FRONT SEAT TRACK - REAR COVER
REMOVAL............................128
INSTALLATION........................128
FRONT SEAT TRACK REAR COVER - OCS
REMOVAL............................129
INSTALLATION........................129
ARMREST - SECOND ROW - FOLD-IN-FLOOR
REMOVAL............................130
INSTALLATION........................130
ARMREST ROTATING ASSEMBLY - SECOND
ROW - FOLD-IN-FLOOR
REMOVAL............................130
INSTALLATION........................130
HEADREST SLEEVE - SECOND ROW -
FOLD-IN-FLOOR
REMOVAL............................131
INSTALLATION........................131
SEAT - SECOND ROW - FOLD-IN-FLOOR
REMOVAL............................132
INSTALLATION........................132
SEAT BACK COVER/FOAM - SECOND ROW -
FOLD-IN-FLOOR
REMOVAL............................133
INSTALLATION........................133
SEAT BACK FRAME - SECOND ROW -
FOLD-IN-FLOOR
REMOVAL............................134
INSTALLATION........................134
SEAT BACK PANEL - SECOND ROW -FOLD-IN-
FLOOR
REMOVAL............................134
INSTALLATION........................134
23 - 102 SEATSRS
Page 1883 of 2339
SEAT BACK COVER/FOAM - THIRD ROW -
FOLD-IN-FLOOR
REMOVAL............................155
INSTALLATION........................156
SEAT BACK FRAME - THIRD ROW - FOLD-IN-
FLOOR
REMOVAL............................156
INSTALLATION........................157
SEAT BELT CENTER LAP BELT - FOLD-IN-
FLOOR
REMOVAL............................157
INSTALLATION........................157
SEAT BACK PANEL - THIRD ROW -FOLD-IN-
FLOOR
REMOVAL............................158
INSTALLATION........................158SEAT BACKSTOW STRAP - THIRD ROW -
FOLD-IN-FLOOR
REMOVAL............................158
INSTALLATION........................158
SEAT CUSHION COVER/FOAM - THIRD ROW -
FOLD-IN-FLOOR
REMOVAL............................159
INSTALLATION........................159
SIDE SHIELD CUP HOLDER - FOLD-IN-FLOOR
REMOVAL............................160
INSTALLATION........................160
SEAT RECLINER/FOLD FORWARD
MECHANISM -THIRD ROW -FOLD-IN-FLOOR
REMOVAL............................160
INSTALLATION........................160
CHILD SEAT MODULE, BENCH
SEAT
REMOVAL
(1) Close child restraint seat.
(2) Remove seat back cover. (Refer to 23 - BODY/
SEATS/SEAT BACK COVER - REMOVAL).
(3) Remove screws attaching child restraint seat
module hinges to seat back frame lower rail (Fig. 1).
(4) Return seat back to upright position.
(5) Disengage push in fasteners attaching upper
bolster to child restraint seat module (Fig. 2).
(6) Remove screws attaching top of module to seat
back frame upper rail (Fig. 3).
(7) Remove child restraint seat module from seat
back (Fig. 4).
Fig. 1 CHILD RESTRAINT SEAT LOWER HINGE
1 - CHILD RESTRAINT SEAT MODULE
2 - LOWER HINGE
Fig. 2 CHILD RESTRAINT SEAT UPPER BOLSTER
1 - UPPER BOLSTER
2 - CHILD RESTRAINT SEAT MODULE
3 - PUSH-IN FASTENER
Fig. 3 CHILD RESTRAINT SEAT UPPER SCREWS
1 - UPPER BOLSTER
2 - CHILD RESTRAINT SEAT MODULE
23 - 104 SEATSRS
Page 1884 of 2339
INSTALLATION
INSTALLATION
(1) Place child restraint seat module in position on
seat back (Fig. 4).
(2) Position seat back hinge interlock lever over
the top of the outboard child restraint seat hinge
(Fig. 5).
(3) Install screws attaching child restraint seat
module hinges to seat back frame lower rail (Fig. 1).
(4) Install screws attaching top of module to seat
back frame upper rail (Fig. 3). Tighten nuts to 7 N´m
(62 in. lbs.) torque.
(5) Install push in fasteners attaching upper bol-
ster to child restraint seat module (Fig. 2).(6) Return seat back to folded position.
(7) Install seat back cover. (Refer to 23 - BODY/
SEATS/SEAT BACK COVER - INSTALLATION).
(8) Check belt for smooth operation and verify
interlock operation. Recliner should not operate with
child seat deployed.
SYNCHRONIZING CABLE ADJUSTMENT
NOTE: Bench seats equipped with child restraint
seats have an interlock feature that will not allow
the seat back to fold forward with the child seat
open.
If the seat back hinges do not release at the same
time the synchronizing cable must be adjusted.
(1) Remove seat from vehicle. Refer to Owner's
Manual for proper procedures.
(2) Disengage cable from the recline mechanism by
pulling the cable end toward the front of the seat
(Fig. 6).
(3) Pull U-shaped locking tab on self-adjusting
mehcanism to disengage auto-adjust feature.
(4) Reattach self-adjusting mechanism, pulling
against spring load to tighten cable.
(5) Press locking tab onto the adjusting mecha-
nism to lock into place.
Fig. 4 CHILD RESTRAINT SEAT MODULE
1 - 1ST REAR SEAT BACK
2 - CHILD RESTRAINT SEAT MODULE
3 - SEAT BACK HINGE INTERLOCK LEVER
Fig. 5 INTERLOCK LEVER
1 - CHILD RESTRAINT SEAT HINGE
2 - SEAT BACK HINGE INTERLOCK LEVER
3 - 1ST REAR SEAT BACK
4 - SEAT BACK FRAME RAIL
RSSEATS23 - 105
CHILD SEAT MODULE, BENCH SEAT (Continued)
Page 1885 of 2339
QUAD CHILD SEAT
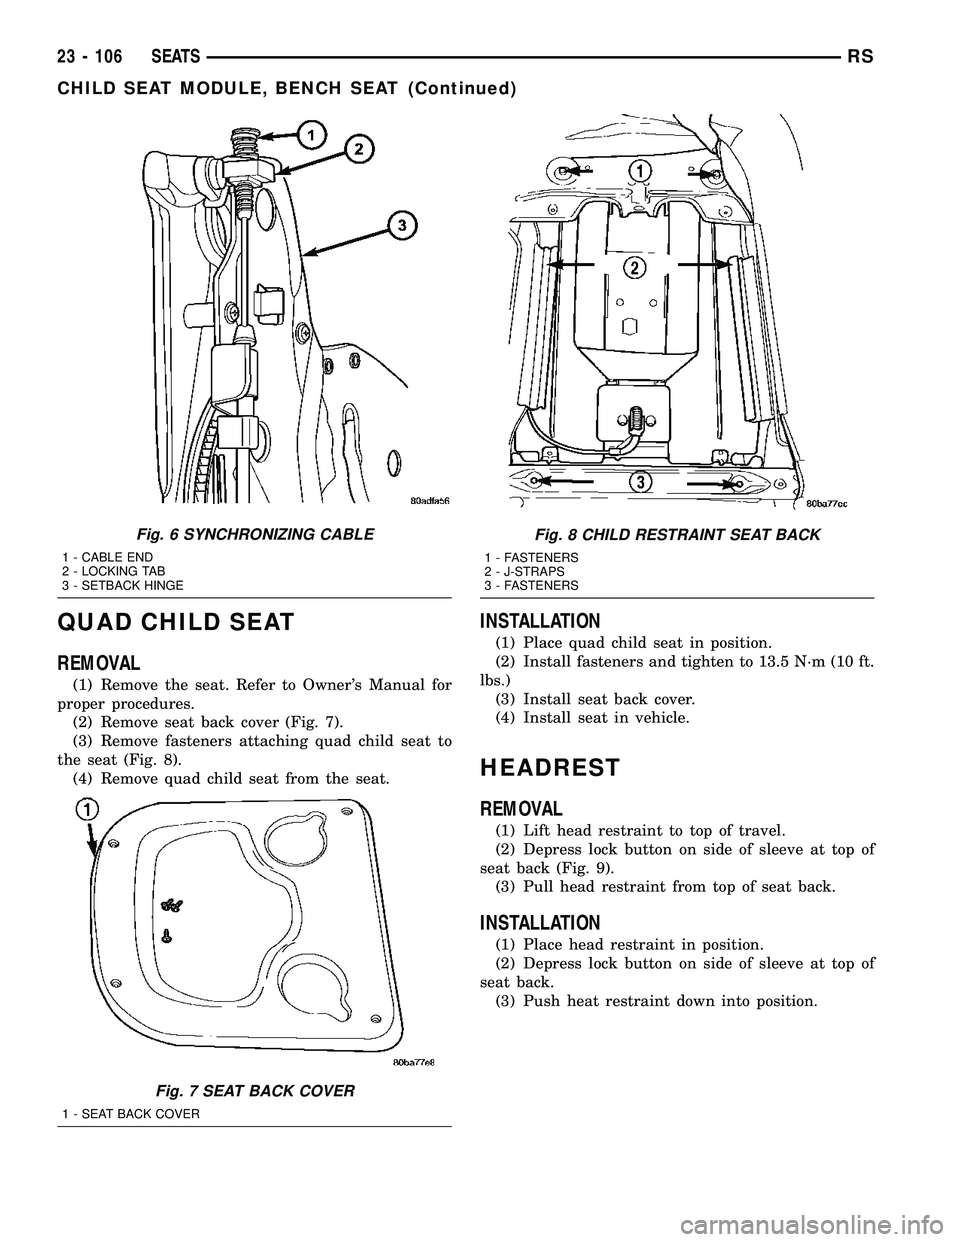
REMOVAL
(1) Remove the seat. Refer to Owner's Manual for
proper procedures.
(2) Remove seat back cover (Fig. 7).
(3) Remove fasteners attaching quad child seat to
the seat (Fig. 8).
(4) Remove quad child seat from the seat.
INSTALLATION
(1) Place quad child seat in position.
(2) Install fasteners and tighten to 13.5 N´m (10 ft.
lbs.)
(3) Install seat back cover.
(4) Install seat in vehicle.
HEADREST
REMOVAL
(1) Lift head restraint to top of travel.
(2) Depress lock button on side of sleeve at top of
seat back (Fig. 9).
(3) Pull head restraint from top of seat back.
INSTALLATION
(1) Place head restraint in position.
(2) Depress lock button on side of sleeve at top of
seat back.
(3) Push heat restraint down into position.
Fig. 6 SYNCHRONIZING CABLE
1 - CABLE END
2 - LOCKING TAB
3 - SETBACK HINGE
Fig. 7 SEAT BACK COVER
1 - SEAT BACK COVER
Fig. 8 CHILD RESTRAINT SEAT BACK
1 - FASTENERS
2 - J-STRAPS
3 - FASTENERS
23 - 106 SEATSRS
CHILD SEAT MODULE, BENCH SEAT (Continued)
Page 1919 of 2339
INSTALLATION
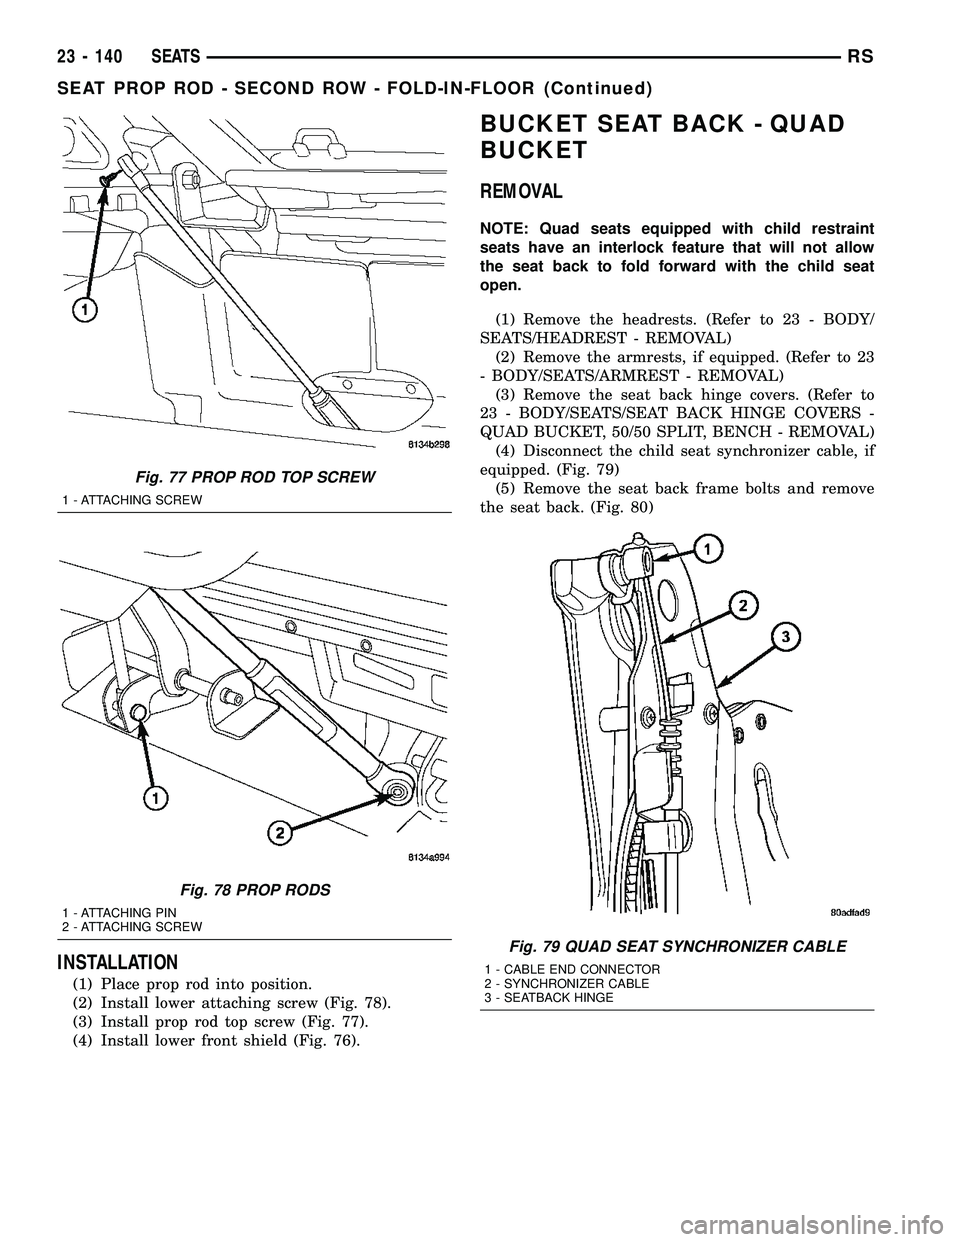
(1) Place prop rod into position.
(2) Install lower attaching screw (Fig. 78).
(3) Install prop rod top screw (Fig. 77).
(4) Install lower front shield (Fig. 76).
BUCKET SEAT BACK - QUAD
BUCKET
REMOVAL
NOTE: Quad seats equipped with child restraint
seats have an interlock feature that will not allow
the seat back to fold forward with the child seat
open.
(1) Remove the headrests. (Refer to 23 - BODY/
SEATS/HEADREST - REMOVAL)
(2) Remove the armrests, if equipped. (Refer to 23
- BODY/SEATS/ARMREST - REMOVAL)
(3) Remove the seat back hinge covers. (Refer to
23 - BODY/SEATS/SEAT BACK HINGE COVERS -
QUAD BUCKET, 50/50 SPLIT, BENCH - REMOVAL)
(4) Disconnect the child seat synchronizer cable, if
equipped. (Fig. 79)
(5) Remove the seat back frame bolts and remove
the seat back. (Fig. 80)
Fig. 77 PROP ROD TOP SCREW
1 - ATTACHING SCREW
Fig. 78 PROP RODS
1 - ATTACHING PIN
2 - ATTACHING SCREW
Fig. 79 QUAD SEAT SYNCHRONIZER CABLE
1 - CABLE END CONNECTOR
2 - SYNCHRONIZER CABLE
3 - SEATBACK HINGE
23 - 140 SEATSRS
SEAT PROP ROD - SECOND ROW - FOLD-IN-FLOOR (Continued)