2005 CHRYSLER CARAVAN body
[x] Cancel search: bodyPage 1930 of 2339
SEAT RISER LATCH LOCKING
LINK
REMOVAL
(1) Remove seat as necessary to access latch lock-
ing link.
NOTE: If the seat is locked in the seated position
and cannot be tilted forward, it can be released by
reaching into the escutcheons with a hook tool or a
finger from the rear. Pulling the latch toward the
rear of the vehicle will unlock the seat latch allow-
ing the seat to tilt forward.
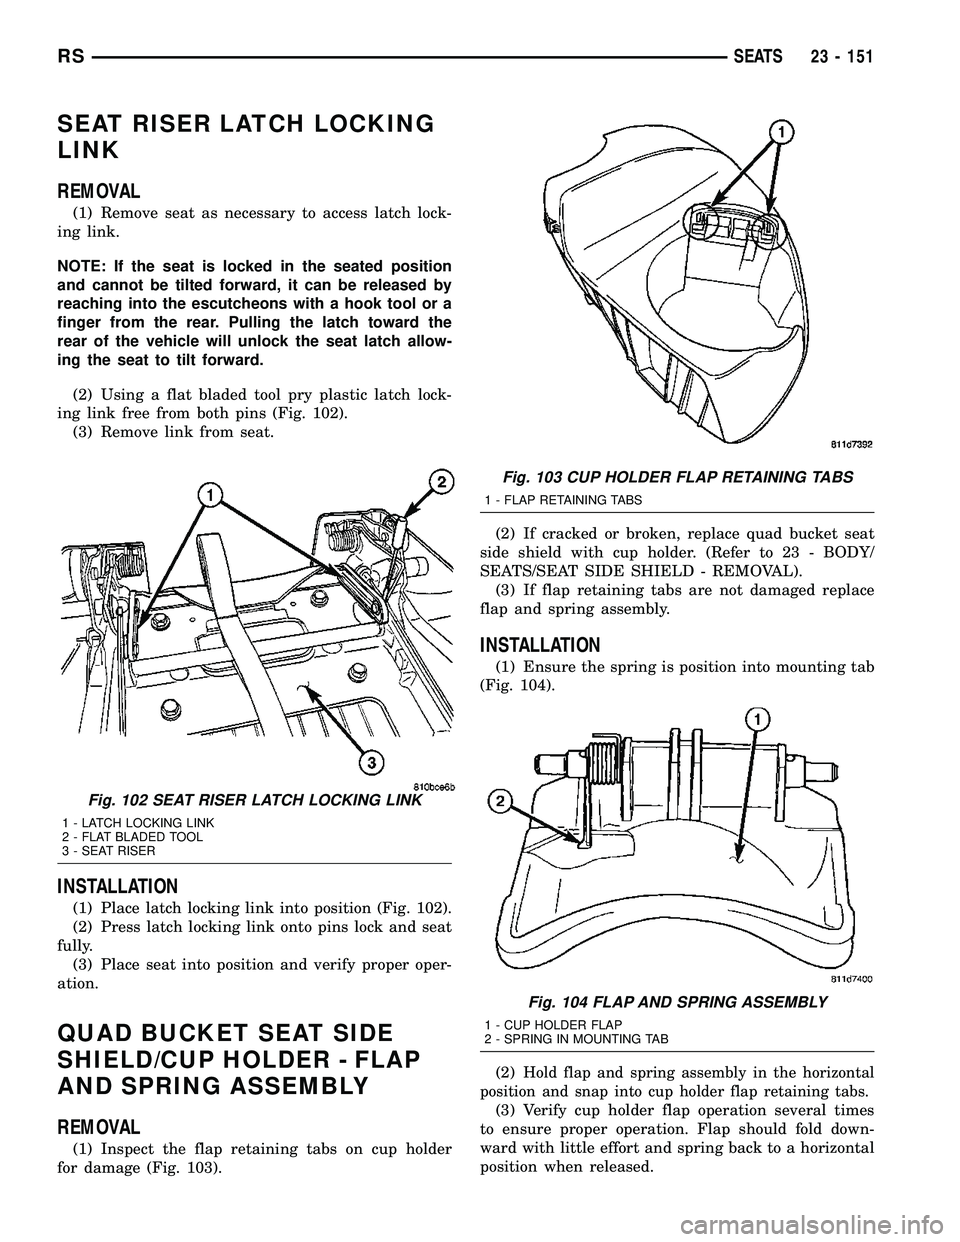
(2) Using a flat bladed tool pry plastic latch lock-
ing link free from both pins (Fig. 102).
(3) Remove link from seat.
INSTALLATION
(1) Place latch locking link into position (Fig. 102).
(2) Press latch locking link onto pins lock and seat
fully.
(3) Place seat into position and verify proper oper-
ation.
QUAD BUCKET SEAT SIDE
SHIELD/CUP HOLDER - FLAP
AND SPRING ASSEMBLY
REMOVAL
(1) Inspect the flap retaining tabs on cup holder
for damage (Fig. 103).(2) If cracked or broken, replace quad bucket seat
side shield with cup holder. (Refer to 23 - BODY/
SEATS/SEAT SIDE SHIELD - REMOVAL).
(3) If flap retaining tabs are not damaged replace
flap and spring assembly.
INSTALLATION
(1) Ensure the spring is position into mounting tab
(Fig. 104).
(2)
Hold flap and spring assembly in the horizontal
position and snap into cup holder flap retaining tabs.
(3) Verify cup holder flap operation several times
to ensure proper operation. Flap should fold down-
ward with little effort and spring back to a horizontal
position when released.
Fig. 102 SEAT RISER LATCH LOCKING LINK
1 - LATCH LOCKING LINK
2 - FLAT BLADED TOOL
3 - SEAT RISER
Fig. 103 CUP HOLDER FLAP RETAINING TABS
1 - FLAP RETAINING TABS
Fig. 104 FLAP AND SPRING ASSEMBLY
1 - CUP HOLDER FLAP
2 - SPRING IN MOUNTING TAB
RSSEATS23 - 151
Page 1935 of 2339
INSTALLATION
(1) Place seat back foam into cover.
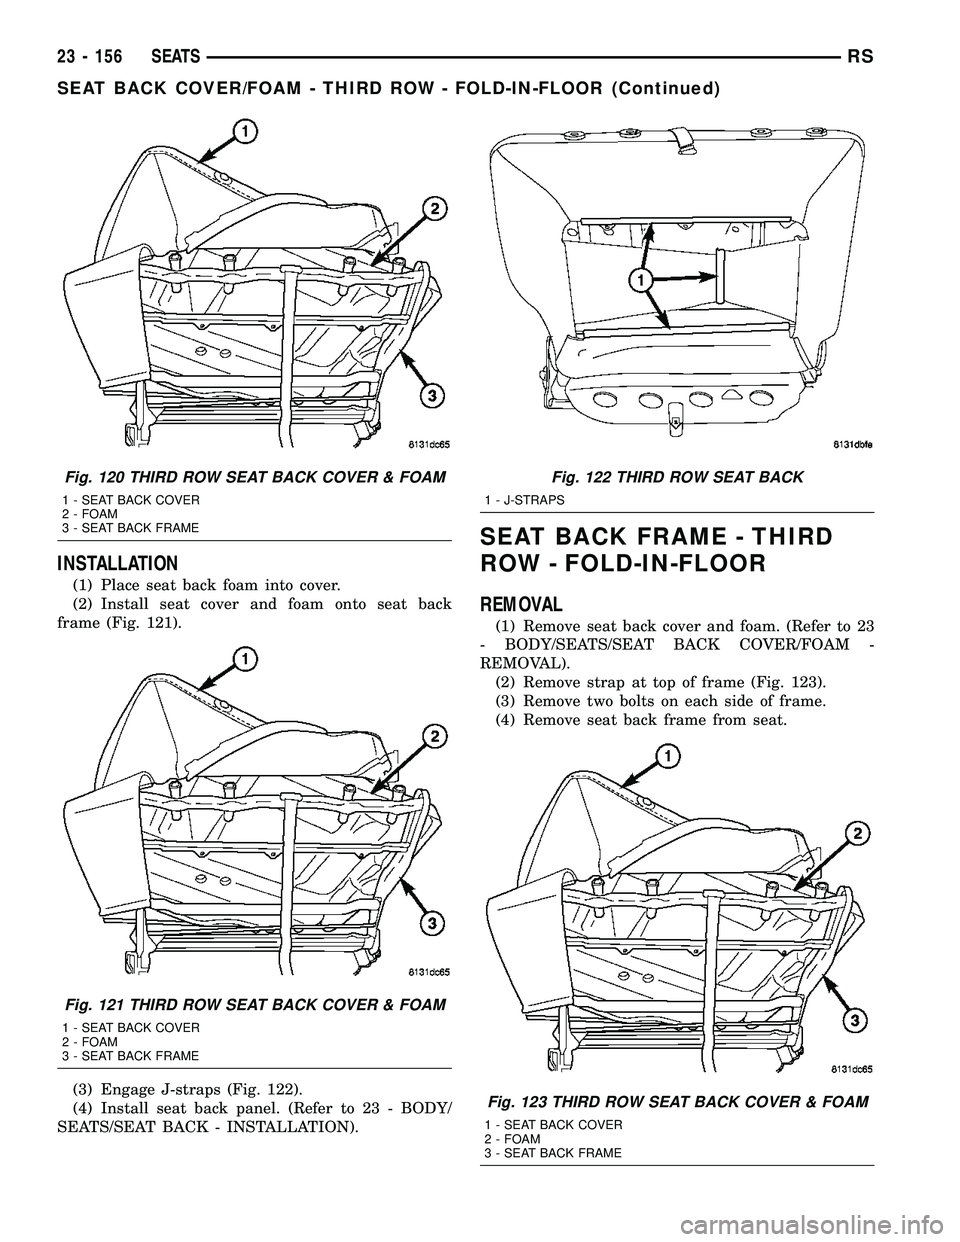
(2) Install seat cover and foam onto seat back
frame (Fig. 121).
(3) Engage J-straps (Fig. 122).
(4) Install seat back panel. (Refer to 23 - BODY/
SEATS/SEAT BACK - INSTALLATION).
SEAT BACK FRAME - THIRD
ROW - FOLD-IN-FLOOR
REMOVAL
(1) Remove seat back cover and foam. (Refer to 23
- BODY/SEATS/SEAT BACK COVER/FOAM -
REMOVAL).
(2) Remove strap at top of frame (Fig. 123).
(3) Remove two bolts on each side of frame.
(4) Remove seat back frame from seat.
Fig. 120 THIRD ROW SEAT BACK COVER & FOAM
1 - SEAT BACK COVER
2 - FOAM
3 - SEAT BACK FRAME
Fig. 121 THIRD ROW SEAT BACK COVER & FOAM
1 - SEAT BACK COVER
2 - FOAM
3 - SEAT BACK FRAME
Fig. 122 THIRD ROW SEAT BACK
1 - J-STRAPS
Fig. 123 THIRD ROW SEAT BACK COVER & FOAM
1 - SEAT BACK COVER
2 - FOAM
3 - SEAT BACK FRAME
23 - 156 SEATSRS
SEAT BACK COVER/FOAM - THIRD ROW - FOLD-IN-FLOOR (Continued)
Page 1936 of 2339
INSTALLATION
(1) Place seat back frame into position.
(2) Install two bolts on each side of seat back
frame.
(3) Install strap at top of frame (Fig. 123).
(4) Install seat back cover and foam. (Refer to 23 -
BODY/SEATS/SEAT BACK COVER - INSTALLA-
TION).
SEAT BELT CENTER LAP BELT
- FOLD-IN-FLOOR
REMOVAL
(1) Set third row seat in the upright position.
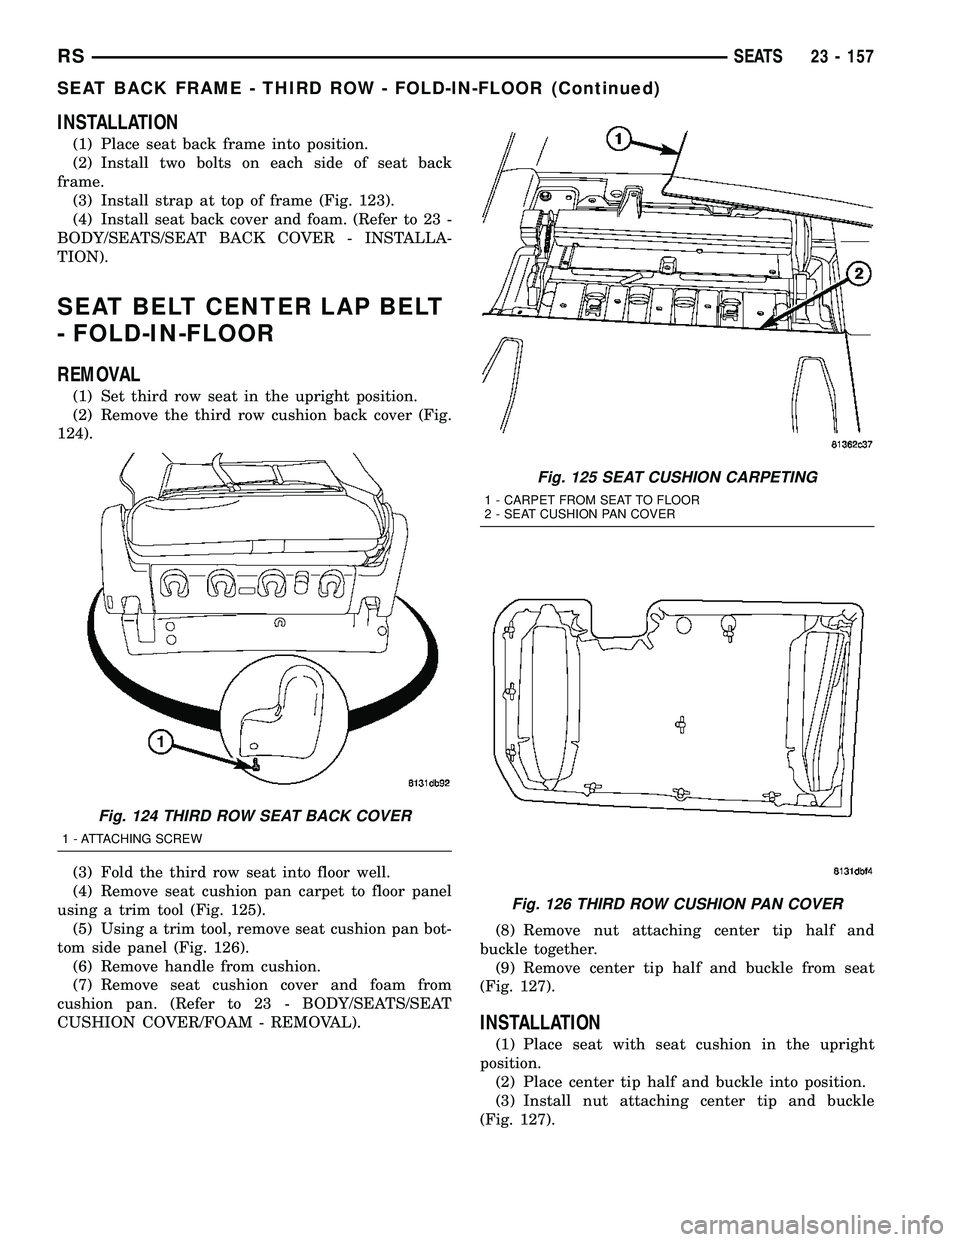
(2) Remove the third row cushion back cover (Fig.
124).
(3) Fold the third row seat into floor well.
(4) Remove seat cushion pan carpet to floor panel
using a trim tool (Fig. 125).
(5) Using a trim tool, remove seat cushion pan bot-
tom side panel (Fig. 126).
(6) Remove handle from cushion.
(7) Remove seat cushion cover and foam from
cushion pan. (Refer to 23 - BODY/SEATS/SEAT
CUSHION COVER/FOAM - REMOVAL).(8) Remove nut attaching center tip half and
buckle together.
(9) Remove center tip half and buckle from seat
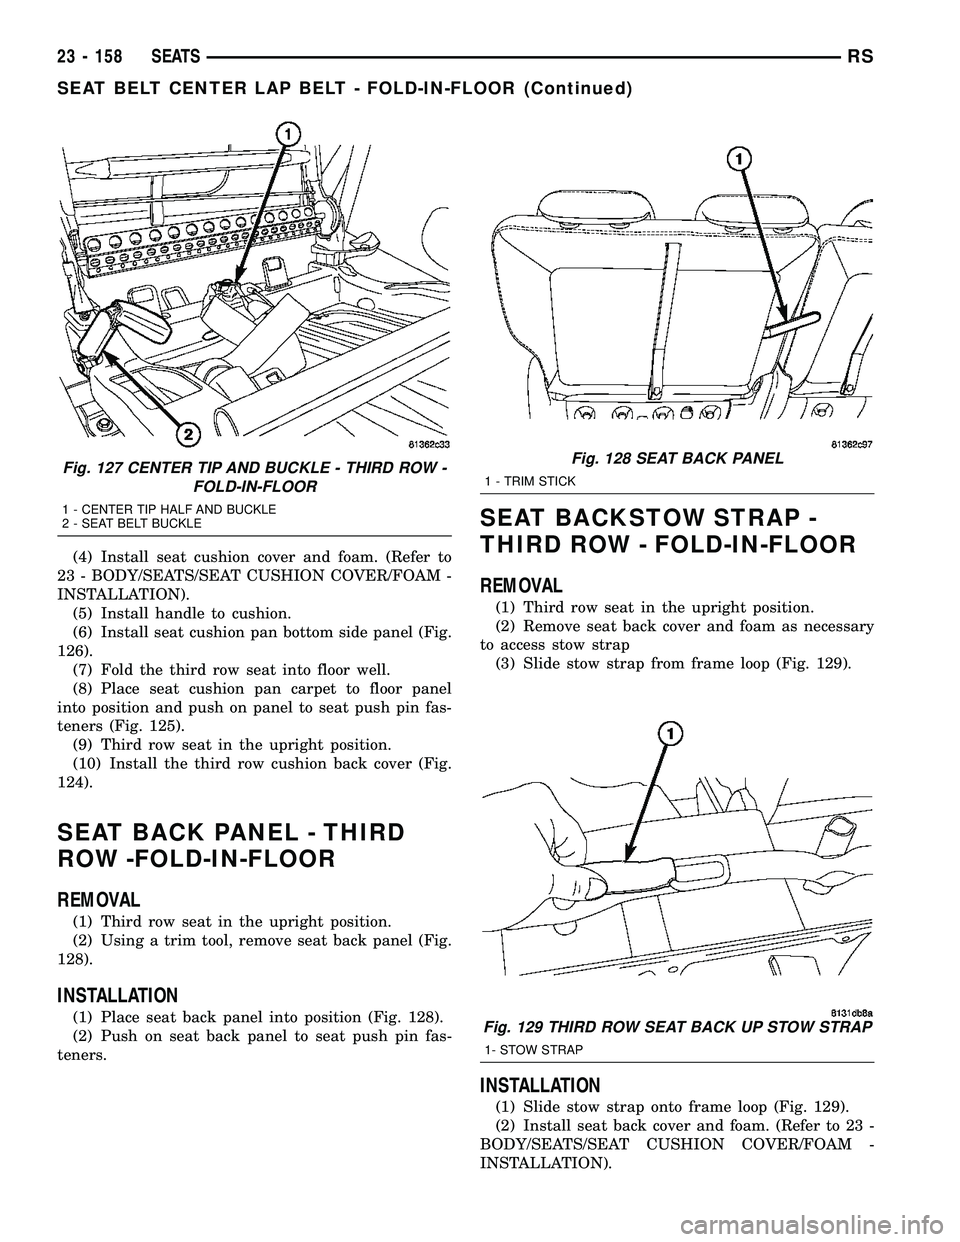
(Fig. 127).
INSTALLATION
(1) Place seat with seat cushion in the upright
position.
(2) Place center tip half and buckle into position.
(3) Install nut attaching center tip and buckle
(Fig. 127).
Fig. 124 THIRD ROW SEAT BACK COVER
1 - ATTACHING SCREW
Fig. 125 SEAT CUSHION CARPETING
1 - CARPET FROM SEAT TO FLOOR
2 - SEAT CUSHION PAN COVER
Fig. 126 THIRD ROW CUSHION PAN COVER
RSSEATS23 - 157
SEAT BACK FRAME - THIRD ROW - FOLD-IN-FLOOR (Continued)
Page 1937 of 2339
(4) Install seat cushion cover and foam. (Refer to
23 - BODY/SEATS/SEAT CUSHION COVER/FOAM -
INSTALLATION).
(5) Install handle to cushion.
(6) Install seat cushion pan bottom side panel (Fig.
126).
(7) Fold the third row seat into floor well.
(8) Place seat cushion pan carpet to floor panel
into position and push on panel to seat push pin fas-
teners (Fig. 125).
(9) Third row seat in the upright position.
(10) Install the third row cushion back cover (Fig.
124).
SEAT BACK PANEL - THIRD
ROW -FOLD-IN-FLOOR
REMOVAL
(1) Third row seat in the upright position.
(2) Using a trim tool, remove seat back panel (Fig.
128).
INSTALLATION
(1) Place seat back panel into position (Fig. 128).
(2) Push on seat back panel to seat push pin fas-
teners.
SEAT BACKSTOW STRAP -
THIRD ROW - FOLD-IN-FLOOR
REMOVAL
(1) Third row seat in the upright position.
(2) Remove seat back cover and foam as necessary
to access stow strap
(3) Slide stow strap from frame loop (Fig. 129).
INSTALLATION
(1) Slide stow strap onto frame loop (Fig. 129).
(2) Install seat back cover and foam. (Refer to 23 -
BODY/SEATS/SEAT CUSHION COVER/FOAM -
INSTALLATION).
Fig. 127 CENTER TIP AND BUCKLE - THIRD ROW -
FOLD-IN-FLOOR
1 - CENTER TIP HALF AND BUCKLE
2 - SEAT BELT BUCKLE
Fig. 128 SEAT BACK PANEL
1 - TRIM STICK
Fig. 129 THIRD ROW SEAT BACK UP STOW STRAP
1- STOW STRAP
23 - 158 SEATSRS
SEAT BELT CENTER LAP BELT - FOLD-IN-FLOOR (Continued)
Page 1939 of 2339
(5) Fold seat into floor well.
(6) Install seat cushion pan bottom side panel (Fig.
132).
(7) Install seat cushion pan carpet to floor panel
(Fig. 131).
(8) Install the third row cushion side shield (Fig.
130).
(9) Place third row seat in the upright position.
SIDE SHIELD CUP HOLDER -
FOLD-IN-FLOOR
REMOVAL
(1) Open cup holder door.
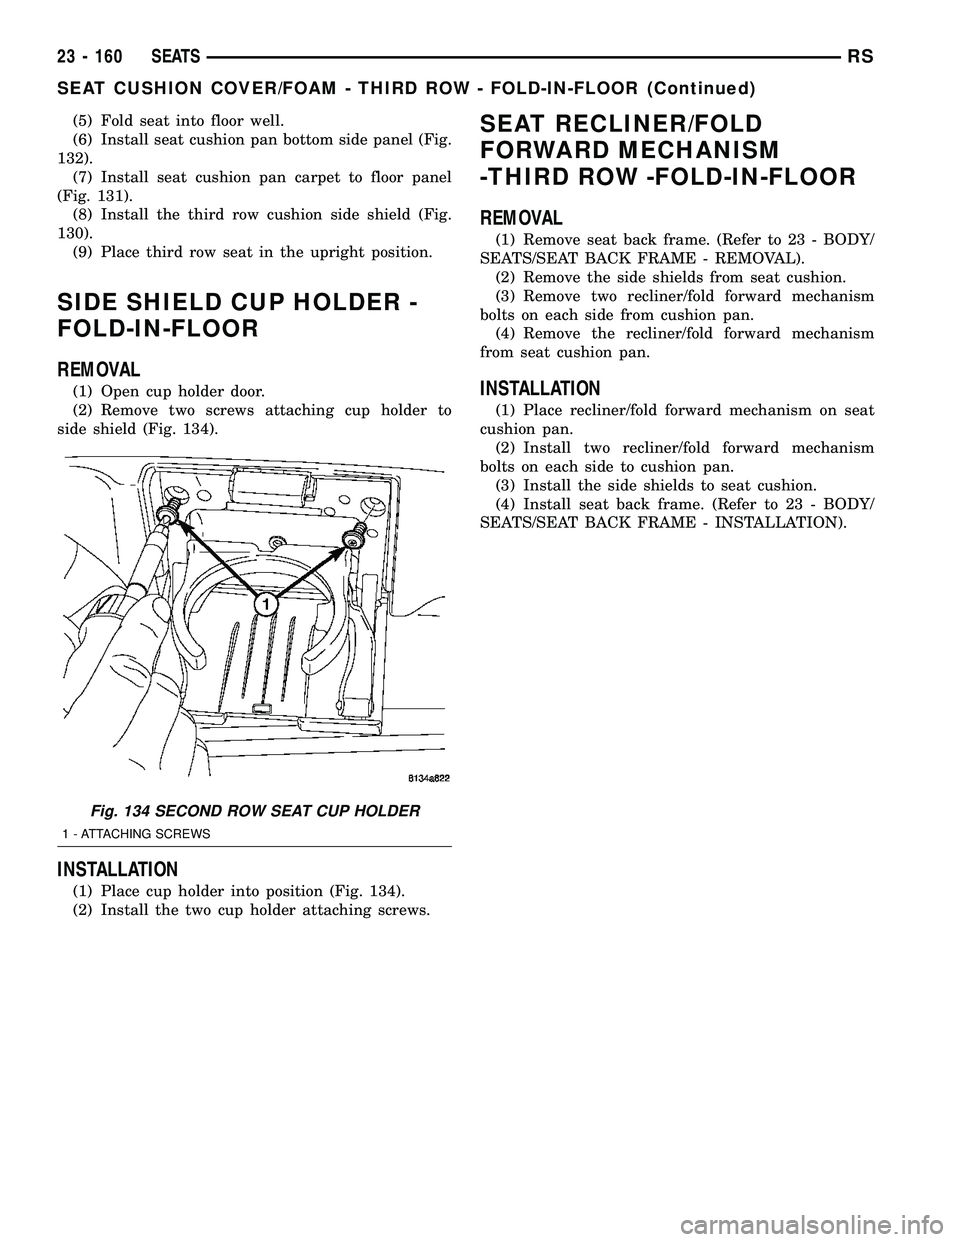
(2) Remove two screws attaching cup holder to
side shield (Fig. 134).
INSTALLATION
(1) Place cup holder into position (Fig. 134).
(2) Install the two cup holder attaching screws.
SEAT RECLINER/FOLD
FORWARD MECHANISM
-THIRD ROW -FOLD-IN-FLOOR
REMOVAL
(1) Remove seat back frame. (Refer to 23 - BODY/
SEATS/SEAT BACK FRAME - REMOVAL).
(2) Remove the side shields from seat cushion.
(3) Remove two recliner/fold forward mechanism
bolts on each side from cushion pan.
(4) Remove the recliner/fold forward mechanism
from seat cushion pan.
INSTALLATION
(1) Place recliner/fold forward mechanism on seat
cushion pan.
(2) Install two recliner/fold forward mechanism
bolts on each side to cushion pan.
(3) Install the side shields to seat cushion.
(4) Install seat back frame. (Refer to 23 - BODY/
SEATS/SEAT BACK FRAME - INSTALLATION).
Fig. 134 SECOND ROW SEAT CUP HOLDER
1 - ATTACHING SCREWS
23 - 160 SEATSRS
SEAT CUSHION COVER/FOAM - THIRD ROW - FOLD-IN-FLOOR (Continued)
Page 1942 of 2339
(16) Apply 150 mm (6 in.) lengths of 50 mm (2 in.)
masking tape spaced 250 mm (10 in.) apart to hold
molding in place until urethane cures.
(17) Install A-pillar trim panels.
(18) Install cowl cover and wipers.
(19) Install inside rear view mirror.
(20) After urethane has cured, remove tape strips
and water test windshield to verify repair.SLIDING DOOR GLASS
REMOVAL
The temperature of the vehicle should be at least
21É C (70É F) before removing the stationary quarter/
sliding door glass. Butyl sealer becomes more pliable
at high temperatures.
(1) Remove interior trim as necessary to gain
access attaching locations on back of glass.
(2) Remove nuts holding stationary glass to fence.
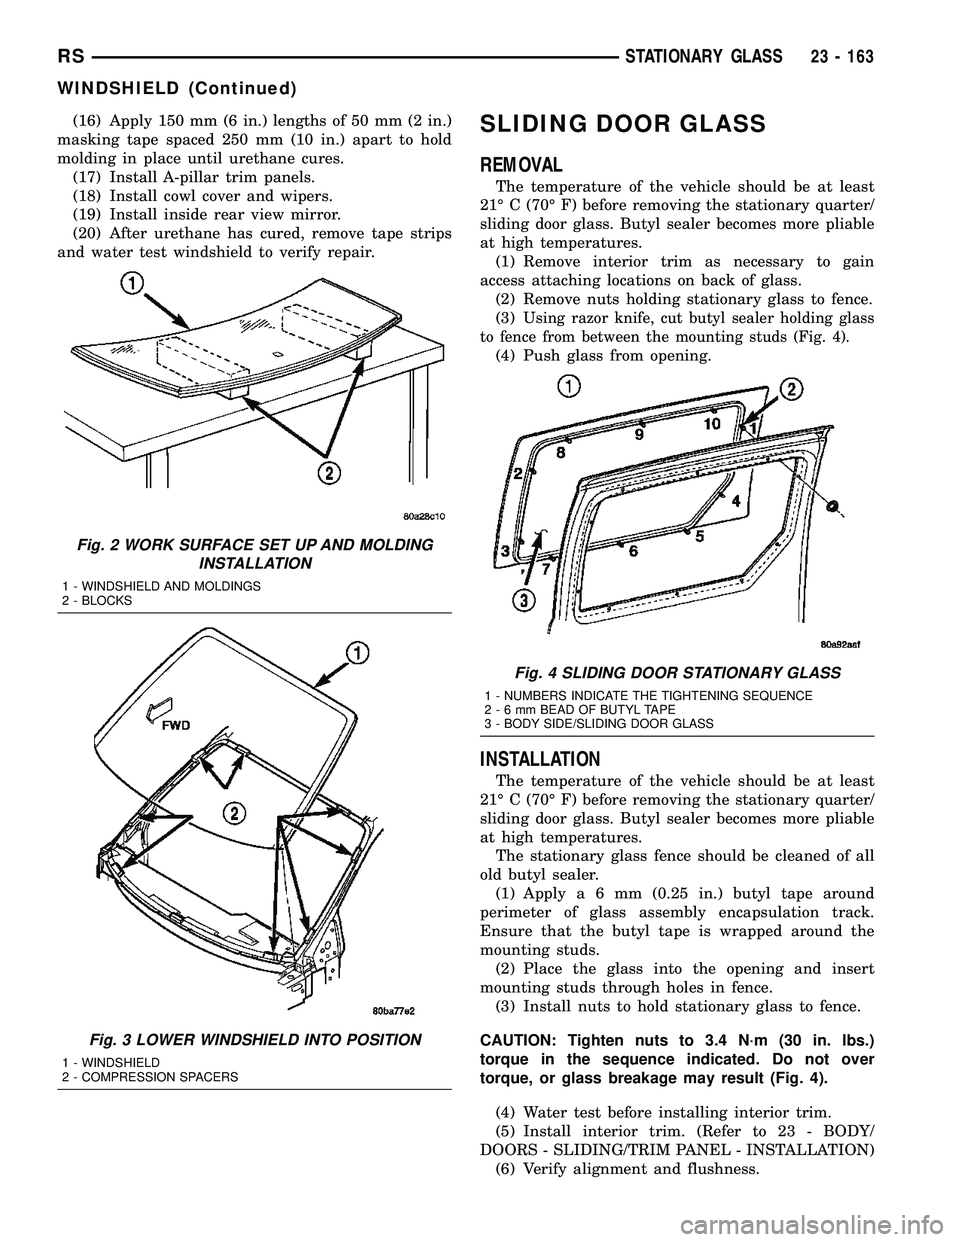
(3)
Using razor knife, cut butyl sealer holding glass
to fence from between the mounting studs (Fig. 4).
(4) Push glass from opening.
INSTALLATION
The temperature of the vehicle should be at least
21É C (70É F) before removing the stationary quarter/
sliding door glass. Butyl sealer becomes more pliable
at high temperatures.
The stationary glass fence should be cleaned of all
old butyl sealer.
(1) Applya6mm(0.25 in.) butyl tape around
perimeter of glass assembly encapsulation track.
Ensure that the butyl tape is wrapped around the
mounting studs.
(2) Place the glass into the opening and insert
mounting studs through holes in fence.
(3) Install nuts to hold stationary glass to fence.
CAUTION: Tighten nuts to 3.4 N´m (30 in. lbs.)
torque in the sequence indicated. Do not over
torque, or glass breakage may result (Fig. 4).
(4) Water test before installing interior trim.
(5) Install interior trim. (Refer to 23 - BODY/
DOORS - SLIDING/TRIM PANEL - INSTALLATION)
(6) Verify alignment and flushness.
Fig. 2 WORK SURFACE SET UP AND MOLDING
INSTALLATION
1 - WINDSHIELD AND MOLDINGS
2 - BLOCKS
Fig. 3 LOWER WINDSHIELD INTO POSITION
1 - WINDSHIELD
2 - COMPRESSION SPACERS
Fig. 4 SLIDING DOOR STATIONARY GLASS
1 - NUMBERS INDICATE THE TIGHTENING SEQUENCE
2-6mmBEAD OF BUTYL TAPE
3 - BODY SIDE/SLIDING DOOR GLASS
RSSTATIONARY GLASS23 - 163
WINDSHIELD (Continued)
Page 1946 of 2339

(6) Install fully the entire A-pillar glass run sec-
tion by indexing the molded corner detail into the
roll frame. Slide the glass run up the A-pillar until
the rubber molded joint just touches the roll frame.
(7) Verify that the tertiary seal is on the correct
side of the roll frame prior to seating the glass run
fully onto the frame. Verify the glass runs is fully
seated for the header, and A-pillar and B-pillar
(8) Install screw attaching glass run weatherstrip
to inner door panel.
(9) Install inner belt weatherstrip.
(10) Install watershed.
(11) Push weatherstrip groove onto lip along top of
door frame.
(12) Engage clip into slot in door frame.
(13) Push weatherstrip into channel at rear of door
frame, working from the top to bottom.
(14) Install door frame closeout moldings.
(15) Install door speaker, if equipped.
(16) Install door trim panel.FRONT DOOR OUTER BELT
MOLDING
REMOVAL
(1) Remove the side view mirror. (Refer to 23 -
BODY/EXTERIOR/SIDE VIEW MIRROR -
REMOVAL)
(2) Remove door trim panel.
(3) Roll door glass down.
(4) Using a hook tool, disengage interlocking lip at
the base of the inward edge of the belt molding (Fig.
1).
(5) Remove belt molding from door.
INSTALLATION
(1) Place belt molding in position on door (Fig. 1).
NOTE: Make sure end of applique is against outer
belt.
(2) Engage interlocking lip at the base of the
inward edge of the belt molding on door panel.
(3) Install door trim panel.
Fig. 1 FRONT DOOR WEATHERSTRIP
1 - DOOR GLASS RUN WEATHERSTRIP
2 - FRONT INNER DOOR
3 - DOOR BELT OUTER WEATHERSTRIP4 - DOOR MOUNTED WEATHERSTRIP
5 - DOOR OUTER BELT WEATHERSTRIP
RSWEATHERSTRIP/SEALS23 - 167
FRONT DOOR GLASS RUN WEATHERSTRIP (Continued)
Page 1948 of 2339
SUNROOF
TABLE OF CONTENTS
page page
SUNROOF
DESCRIPTION........................169
DIAGNOSIS AND TESTING
SUNROOF DIAGNOSIS AND TESTING....169
DRAIN TUBE
REMOVAL............................172
INSTALLATION........................172
GLASS PANEL
REMOVAL............................173
INSTALLATION........................173
ADJUSTMENTS
SUNROOF GLASS PANEL ADJUSTMENT . . 173
SUNROOF ASSEMBLY
REMOVAL............................173
INSTALLATION........................173
SUNSHADE
REMOVAL............................173INSTALLATION........................173
WIND DEFLECTOR
REMOVAL............................174
INSTALLATION........................174
WATER CHANNEL
REMOVAL............................174
INSTALLATION........................174
SUNROOF MOTOR
REMOVAL............................174
INSTALLATION........................174
ADJUSTMENTS
ADJUSTMENT.......................175
SUNROOF SWITCH
REMOVAL............................176
INSTALLATION........................176
SUNROOF
DESCRIPTION
WARNING: Keep fingers and other body parts out
of sunroof opening at all times.
The sun roof features consists of: (Fig. 1)
²Sun roof glass
²Sun roof sun shade
The sunroof power sliding glass panel and sun-
shade can be positioned anywhere along its travel,
rearward of glass panel front edge.
The sunroof is electrically operated from a switch
located in the overhead console. To operate the sun-
roof the ignition switch must be in the Accessory or
On/Run position. Both switchs are a rocker style
design that open or close the sunroof. When pressing
and releasing the open button once, the sunroof will
express open to the comfort stop and the wind deflec-
tor will raise. If the button is pressed a second time,
the sunroof will continue to open to full travel unless
the button is released, at which time it will stop in
that position. Pressing and holding the close button
will close the sunroof. If the close button is released
before the glass fully closes, the sunroof will stop in
that position. The vent switch operates in a similar
manor. The sunroof will also operate for up to fifteen
minutes after the ignition key is turned off for cus-
tomer comfort and convenance while parking.
DIAGNOSIS AND TESTING
SUNROOF DIAGNOSIS AND TESTING
Refer to Sunroof Diagnostic Chart for possible
causes. Before beginning sunroof diagnostics verify
that all other power accessories are in proper operat-
ing condition. If not, a common electrical problem
may exist. Refer to Wiring Diagrams, in this publica-
tion for circuit, splice and component descriptions.
Check the condition of the circuit protection (20 amp
circuit breaker in the Junction Block). Inspect all
wiring connector pins for proper engagement and
continuity. Check for battery voltage at the power
sunroof controller, refer to Wiring Diagrams, for cir-
cuit information. If battery voltage of more than 10
volts is detected at the controller, proceed with the
following tests (the controller will not operate at less
than 10 volts).
Before beginning diagnosis for wind noise or water
leaks, verify that the problem was not caused by
releasing the control switch before the sunroof was
fully closed. The sunroof module has a water-man-
agement system. If however, the sunroof glass is in a
partial closed position, high pressure water may be
forced beyond the water management system bound-
aries and onto the headlining.
RSSUNROOF23 - 169