2005 CHEVROLET VENTURE remote start
[x] Cancel search: remote startPage 97 of 470

Keys...............................................................2-3
Remote Keyless Entry System.........................2-4
Remote Keyless Entry System Operation...........2-5
Doors and Locks.............................................2-8
Door Locks....................................................2-8
Power Door Locks........................................2-10
Last Door Closed Locking..............................2-10
Programmable Automatic Door Locks..............2-11
Lockout Protection........................................2-11
Dual Sliding Doors........................................2-12
Power Sliding Door (PSD)..............................2-15
Liftgate........................................................2-20
Windows........................................................2-22
Manual Windows..........................................2-22
Power Windows............................................2-23
Side Window Latches....................................2-23
Power Rear Quarter Windows........................2-24
Sun Visors...................................................2-24
Theft-Deterrent Systems..................................2-25
Content Theft-Deterrent.................................2-25
PASS-Key
®III ..............................................2-27
PASS-Key®III Operation...............................2-27Starting and Operating Your Vehicle................2-29
New Vehicle Break-In....................................2-29
Ignition Positions..........................................2-30
Retained Accessory Power (RAP)...................2-31
Starting Your Engine.....................................2-31
Engine Coolant Heater..................................2-32
Automatic Transaxle Operation.......................2-33
Parking Brake..............................................2-36
Shifting Into Park (P).....................................2-37
Shifting Out of Park (P).................................2-38
Parking Over Things That Burn.......................2-39
Engine Exhaust............................................2-39
Running Your Engine While You Are Parked.......2-40
Mirrors...........................................................2-41
Manual Rearview Mirror.................................2-41
Outside Power Mirrors...................................2-41
Outside Convex Mirror...................................2-41
Outside Heated Mirrors..................................2-42
OnStar
®System.............................................2-42
HomeLink®Transmitter...................................2-43
Programming the HomeLink®Transmitter.........2-44
Section 2 Features and Controls
2-1
Page 100 of 470

Your vehicle’s key can be used for the ignition as well
as the driver’s door lock and storage compartments.
If you need a new key, contact your dealer, who
can obtain the correct key code.
Your vehicle has the PASS-Key
®III vehicle theft
system. The key has a transponder in the key head that
matches a decoder in the vehicle’s steering column.
If a replacement key or any additional key is needed,
you must purchase this key from your dealer. The
key will have PK3 stamped on it. Keep the bar code tag
that came with the original keys. Give this tag to your
dealer if you need a new key made.
Any new PASS-Key
®III key must be programmed
before it will start your vehicle. SeePASS-Key®III on
page 2-27for more information on programming
your new key.
Notice:If you ever lock your keys in your vehicle,
you may have to damage the vehicle to get in.
Be sure you have spare keys.
If you ever do get locked out of your vehicle, see
Roadside Assistance Program on page 7-6for more
information.
If your vehicle is equipped with the OnStar
®system with
an active subscription and you lock your keys inside
the vehicle, OnStar
®may be able to send a command to
unlock your vehicle. SeeOnStar®System on page 2-42
for more information.
Remote Keyless Entry System
If equipped, the keyless entry system operates on a
radio frequency subject to Federal Communications
Commission (FCC) Rules and with Industry Canada.
This device complies with Part 15 of the FCC Rules.
Operation is subject to the following two conditions:
1. This device may not cause interference.
2. This device must accept any interference received,
including interference that may cause undesired
operation of the device.
This device complies with RSS-210 of Industry Canada.
Operation is subject to the following two conditions:
1. This device may not cause interference.
2. This device must accept any interference received,
including interference that may cause undesired
operation of the device.
Changes or modi�cations to this system by other than
an authorized service facility could void authorization to
use this equipment.
2-4
Page 269 of 470

If the channel switch, located on the right side, is on A,
the headphones will play the DVD or auxiliary device.
See “Stereo RCA Jacks” later in this section for
more information. If the channel switch is on B, the
headphones will play the rear seat audio system. See
Rear Seat Audio (RSA) (Without Entertainment System)
on page 3-114orRear Seat Audio (RSA) (With
Entertainment System) on page 3-116for more
information.
To adjust the volume on the headphones, use the
volume control located on the right side.
Notice:Do not store the headphones in heat or
direct sunlight. This could damage the headphones
and repairs would not be covered by your warranty.
Keep the headphones stored in a cool, dry place.
Battery Replacement
To change the batteries, do the following:
1. Slide open the battery door located on the left side
of the headphones.
2. Replace the two AAA batteries in the compartment.
Make sure that they are installed correctly.
3. Slide the battery door shut.
If the headphones are to be stored for a long period of
time, remove the batteries and keep them in a cool,
dry place.
Stereo RCA Jacks
The RCA jacks are located on the DVD player faceplate.
They allow audio and video signals to be connected
from an auxiliary device such as a camcorder or a video
game unit. Adapter connectors or cables, not included,
may be required to connect the auxiliary device to
the RCA jacks. Refer to the manufacturer’s instructions
for proper usage.
To use the auxiliary function, connect a camcorder or a
video game unit to the RCA jacks and turn on the
auxiliary device. If you want to view a DVD, insert the
DVD into the DVD player. The system will automatically
switch to DVD and start to play. To switch between
the auxiliary device and the DVD, press the SOURCE
button on the DVD player or on the remote control. See
“DVD Player” and “Remote Control” later in this
section for more information.
3-109
Page 271 of 470

If a DVD is playing and the screen is raised to its locked
position, the screen will shut off, but the DVD will
continue to play through the previously selected audio
source.
Notice:Directly touching the video screen may
damage it. Do not touch the screen. See “Cleaning
the Video Screen” later in this section for more
information.
DVD Player
The DVD player is located in the front �oor console.
The DVD player can be controlled by the buttons on the
DVD player and by the buttons on the remote control.
See “Remote Control” later in this section for more
information.
The DVD player works while the ignition is in RUN,
ACCESSORY, or when RAP is active.The entertainment system is only compatible with DVDs
authorized for use in the United States and Canada.
Regular audio CDs can also be played by the DVD
player. Home recorded CDs (CDRs) may not play in this
DVD player. Try the audio system CD player instead.
DVD Player Buttons
SOURCE:Press this button to switch the source for the
entertainment system between the auxiliary device,
connected to the RCA jacks, and the DVD player.
Pressing this button has no effect when there is no
auxiliary device connected.
w/j(Play/Pause):Press this button to start play.
Press while playing to pause. Press it again to continue
playing.
o/Z(Stop/Eject):Press this button to stop playing.
Press the button a second time to eject the disc.
Playing a Disc
To play a disc, gently insert the disc with the label side
up into the loading slot until it stops. The DVD player
will continue loading the disc and the player will
automatically start.
If a disc is already in the player, press the play/pause
button on the DVD player faceplate or on the remote
control.
3-111
Page 272 of 470

Some DVDs will not allow fast forwarding or skipping of
the copyright information or the previews. Some
DVDs will begin playing the movie automatically after
the previews have �nished, there may be a delay of up
to 30 seconds. If the DVD does not begin playing
the movie automatically, press the play/pause button on
the DVD player faceplate or the remote control. If the
DVD still does not play, refer to the on-screen
instructions.
Stopping and Resuming Playback
To stop playing a disc, press the stop/eject button on
the DVD player.
To resume playback, press the play/pause button. The
movie will start playing from where it was last stopped
if the disc has not been ejected. If the disc has
been ejected, the player will start playing at the
beginning.
Ejecting a Disc
Press the stop/eject button on the DVD player once to
stop and a second time to eject the disc.
If a disc is ejected from the player, but not removed,
the DVD player will reload the disc after a short
period of time.
Remote Control
To use the remote control, aim it at the display above
the video screen and press the desired button.
Direct sunlight or very bright light may affect the ability
of the entertainment system to receive signals from
the remote control. Be sure the remote’s batteries are
not discharged, as this will also affect the function of the
remote control. Objects blocking the line of sight may
also affect the function of the remote control.
Notice:Storing the remote control in a hot area or
in direct sunlight may damage it, and the repairs
would not be covered by your warranty. Keep
the remote control stored in a cool, dry place.
3-112
Page 339 of 470

A. Underhood Fuse Block. SeeUnderhood Fuse Block
on page 5-96.
B. Remote Positive (+) Terminal. SeeJump Starting on
page 5-40.
C. Windshield Washer Fluid Reservoir. See “Adding
Washer Fluid” underWindshield Washer Fluid
on page 5-35.
D. Radiator Pressure Cap. SeeRadiator Pressure Cap
on page 5-25.
E. Power Steering Fluid Reservoir. SeePower Steering
Fluid on page 5-34.
F. Engine Oil Fill Cap. See “When to Add Engine Oil”
underEngine Oil on page 5-13.
G. Engine Oil Dipstick. See “Checking Engine Oil”
underEngine Oil on page 5-13.
H. Automatic Transaxle Fluid Dipstick. See “Checking
the Fluid Level” underAutomatic Transaxle Fluid
on page 5-19.
I. Brake Master Cylinder Reservoir. See “Brake Fluid”
underBrakes on page 5-36.
J. Engine Air Cleaner/Filter. SeeEngine Air
Cleaner/Filter on page 5-17.
K. Engine Coolant Recovery Tank. SeeCooling System
on page 5-28.Engine Oil
Checking Engine Oil
It is a good idea to check your engine oil every time you
get fuel. In order to get an accurate reading, the oil
must be warm and the vehicle must be on level ground.
The engine oil dipstick handle is a yellow loop. See
Engine Compartment Overview on page 5-12for
the location of the engine oil dipstick.
1. Turn off the engine and give the oil several minutes
to drain back into the oil pan. If you do not do this,
the oil dipstick might not show the actual level.
2. Pull out the dipstick and clean it with a paper towel
or cloth, then push it back in all the way. Remove it
again, keeping the tip down, and check the level.
5-13
Page 367 of 470

Notice:Ignoring these steps could result in costly
damage to your vehicle that would not be covered
by your warranty.
Trying to start your vehicle by pushing or pulling it
will not work, and it could damage your vehicle.
1. Check the other vehicle. It must have a 12-volt
battery with a negative ground system.
Notice:If the other vehicle’s system is not a 12-volt
system with a negative ground, both vehicles can
be damaged. Only use vehicles with 12-volt systems
with negative grounds to jump start your vehicle.
2. Get the vehicles close enough so the jumper cables
can reach, but be sure the vehicles are not touching
each other. If they are, it could cause a ground
connection you do not want. You would not be able
to start your vehicle, and the bad grounding
could damage the electrical systems.
To avoid the possibility of the vehicles rolling, set
the parking brake �rmly on both vehicles involved in
the jump start procedure. Put an automatic
transaxle in PARK (P) or a manual transaxle in
NEUTRAL before setting the parking brake.Notice:If you leave your radio or other accessories
on during the jump starting procedure, they could
be damaged. The repairs would not be covered
by your warranty. Always turn off your radio and
other accessories when jump starting your vehicle.
3. Turn off the ignition on both vehicles. Unplug
unnecessary accessories plugged into the cigarette
lighter or the accessory power outlet. Turn off
the radio and all lamps that are not needed. This
will avoid sparks and help save both batteries. And
it could save the radio!
4. Open the hoods and locate the batteries. Find the
positive (+) and negative (−) terminal locations on
each vehicle.
You will not need to access your battery for jump
starting. Your vehicle has a remote positive (+) jump
starting terminal for that purpose.
5-41
Page 368 of 470

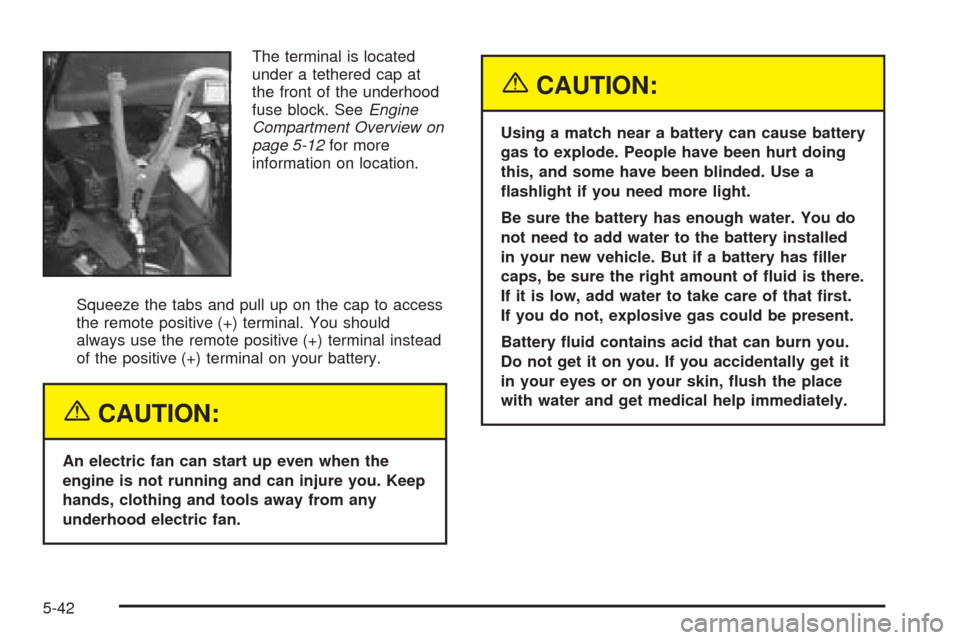
The terminal is located
under a tethered cap at
the front of the underhood
fuse block. SeeEngine
Compartment Overview on
page 5-12for more
information on location.
Squeeze the tabs and pull up on the cap to access
the remote positive (+) terminal. You should
always use the remote positive (+) terminal instead
of the positive (+) terminal on your battery.
{CAUTION:
An electric fan can start up even when the
engine is not running and can injure you. Keep
hands, clothing and tools away from any
underhood electric fan.
{CAUTION:
Using a match near a battery can cause battery
gas to explode. People have been hurt doing
this, and some have been blinded. Use a
�ashlight if you need more light.
Be sure the battery has enough water. You do
not need to add water to the battery installed
in your new vehicle. But if a battery has �ller
caps, be sure the right amount of �uid is there.
If it is low, add water to take care of that �rst.
If you do not, explosive gas could be present.
Battery �uid contains acid that can burn you.
Do not get it on you. If you accidentally get it
in your eyes or on your skin, �ush the place
with water and get medical help immediately.
5-42