2005 CHEVROLET VENTURE hood release
[x] Cancel search: hood releasePage 115 of 470
{CAUTION:
If your vehicle is facing downward on a steep
grade (15 percent or more), the door may not
stay open and could slam shut, possibly
injuring someone. To make sure the door does
not slam shut, turn on the power sliding door
feature. Then if the door closes, it will close
under the control of the power door system.
If you want to close the power sliding door(s) when the
override switch(es) is turned off, pull the inside or
outside handle or the edge of the door. Move the door
about 4 inches (10 cm) toward the closed position
and release it. The door will close completely and latch
for you.
To close the power sliding door(s) when the override
switch(es) is turned on, pull the inside or outside handle
and slide the door all the way forward to the latched
position.
Resetting the Power Sliding Door
The power sliding door may operate incorrectly or not at
all because of the following conditions:
A low voltage or dead battery
A disconnected battery
If the instrument panel PWR/HEATED SEAT PSD
fuse or the underhood fuse 8, 27, or 29 are
removed or blown.
SeeFuses and Circuit Breakers on page 5-92for more
information about your fuse panel.
If any of these conditions occur, the power sliding door
will need to be reset. If your vehicle has the dual
power sliding doors, both doors will have to be reset.
To reset a door, do the following:
1. Check to be sure the power sliding door is unlocked
and securely closed.
2. Turn the ignition key to OFF.
2-19
Page 165 of 470
The main components of the instrument panel are the following:
A. Side Outlets. SeeOutlet Adjustment on page 3-26.
B. Front Outlets. SeeOutlet Adjustment on page 3-26.
C. Turn Signal/Multifunction Lever. SeeTurn
Signal/Multifunction Lever on page 3-7.
D. Hazard Warning Flasher Switch. SeeHazard
Warning Flashers on page 3-6.
E. Instrument Panel Cluster. SeeInstrument Panel
Cluster on page 3-33.
F. Center Outlets. SeeOutlet Adjustment on page 3-26.
G. Audio System. SeeAudio System(s) on page 3-56.
H. Side Outlets. SeeOutlet Adjustment on page 3-26.
I. Exterior Lamps Control. SeeExterior Lamps on
page 3-14.
J. Hood Release. SeeHood Release on page 5-11.
K. Horn. SeeHorn on page 3-6.L. Ignition Switch. SeeIgnition Positions on page 2-30.
M. Climate Controls. SeeClimate Control System on
page 3-24.
N. Rear Fan Controls. SeeRear Climate Control
System (Without Entertainment System) on
page 3-27orRear Climate Control System (With
Entertainment System) on page 3-29.
O. Cupholder Tray. SeeCupholder(s) on page 2-48.
P. Accessory Power Outlet. SeeAccessory Power
Outlets on page 3-23.
Q. Instrument Panel Switchbank. SeeInstrument Panel
Switchbank on page 3-19.
R. Glove Box. SeeGlove Box on page 2-47.
S. Front Outlets. SeeOutlet Adjustment on page 3-26.
T. Instrument Panel Fuse Block. SeeFuses and
Circuit Breakers on page 5-92.
3-5
Page 327 of 470

Service............................................................5-3
Doing Your Own Service Work.........................5-4
Adding Equipment to the Outside of
Your Vehicle..............................................5-5
Fuel................................................................5-5
Gasoline Octane............................................5-5
Gasoline Speci�cations....................................5-5
California Fuel...............................................5-6
Additives.......................................................5-6
Fuels in Foreign Countries...............................5-7
Filling Your Tank............................................5-8
Filling a Portable Fuel Container.....................5-10
Checking Things Under the Hood....................5-10
Hood Release..............................................5-11
Engine Compartment Overview.......................5-12
Engine Oil...................................................5-13
Engine Oil Life System..................................5-16
Engine Air Cleaner/Filter................................5-17
Automatic Transaxle Fluid..............................5-19
Engine Coolant.............................................5-22
Radiator Pressure Cap..................................5-25
Engine Overheating.......................................5-25
Overheated Engine Protection Operating Mode . . .5-27
Cooling System............................................5-28
Power Steering Fluid.....................................5-34
Windshield Washer Fluid................................5-35Brakes........................................................5-36
Battery........................................................5-39
Jump Starting...............................................5-40
Bulb Replacement..........................................5-45
Halogen Bulbs..............................................5-45
Headlamps..................................................5-46
Front Turn Signal, Sidemarker and
Parking Lamps..........................................5-48
Taillamps, Turn Signal, Stoplamps and
Back-up Lamps.........................................5-50
Replacement Bulbs.......................................5-51
Windshield Wiper Blade Replacement..............5-52
Tires..............................................................5-53
Tire Sidewall Labelling...................................5-54
Tire Terminology and De�nitions.....................5-56
In�ation - Tire Pressure.................................5-59
Tire Inspection and Rotation...........................5-60
When It Is Time for New Tires.......................5-61
Buying New Tires.........................................5-62
Uniform Tire Quality Grading..........................5-63
Wheel Alignment and Tire Balance..................5-64
Wheel Replacement......................................5-64
Tire Chains..................................................5-66
Accessory In�ator.........................................5-66
If a Tire Goes Flat........................................5-68
Changing a Flat Tire.....................................5-69
Section 5 Service and Appearance Care
5-1
Page 337 of 470
Hood Release
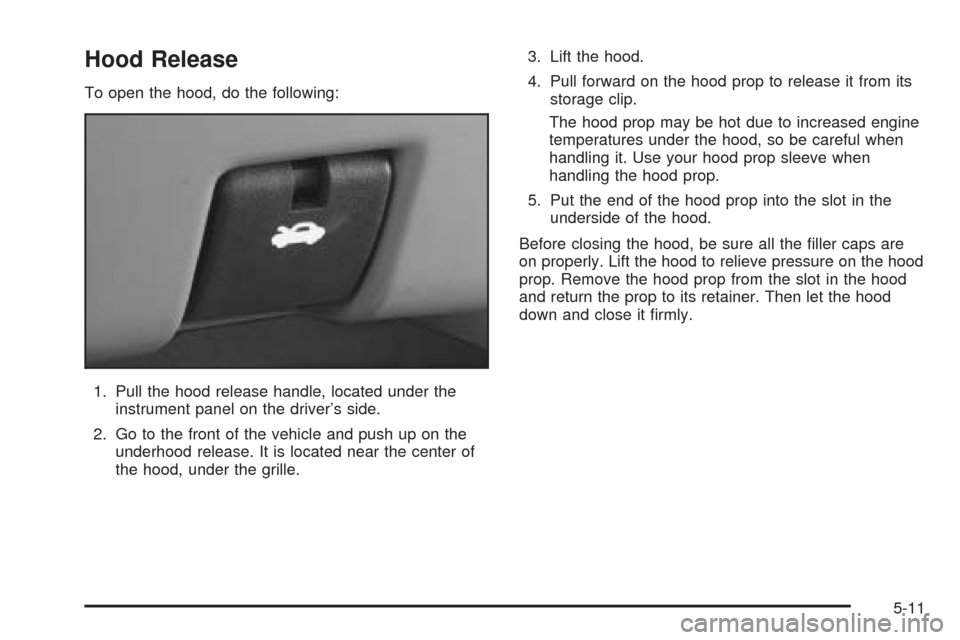
To open the hood, do the following:
1. Pull the hood release handle, located under the
instrument panel on the driver’s side.
2. Go to the front of the vehicle and push up on the
underhood release. It is located near the center of
the hood, under the grille.3. Lift the hood.
4. Pull forward on the hood prop to release it from its
storage clip.
The hood prop may be hot due to increased engine
temperatures under the hood, so be careful when
handling it. Use your hood prop sleeve when
handling the hood prop.
5. Put the end of the hood prop into the slot in the
underside of the hood.
Before closing the hood, be sure all the �ller caps are
on properly. Lift the hood to relieve pressure on the hood
prop. Remove the hood prop from the slot in the hood
and return the prop to its retainer. Then let the hood
down and close it �rmly.
5-11
Page 372 of 470
Headlamps
To replace a headlamp bulb, do the following:
1. Open the hood. SeeHood Release on page 5-11
for more information.
2. Remove the front turn signal/parking lamp
assembly. SeeFront Turn Signal, Sidemarker and
Parking Lamps on page 5-48.
3. Pull the assembly away from the vehicle.
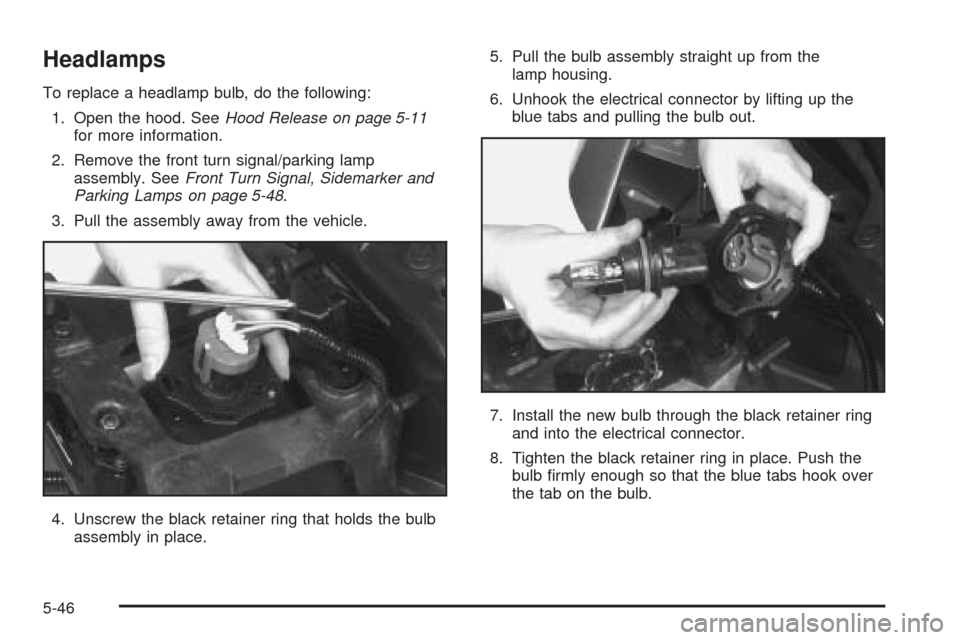
4. Unscrew the black retainer ring that holds the bulb
assembly in place.5. Pull the bulb assembly straight up from the
lamp housing.
6. Unhook the electrical connector by lifting up the
blue tabs and pulling the bulb out.
7. Install the new bulb through the black retainer ring
and into the electrical connector.
8. Tighten the black retainer ring in place. Push the
bulb �rmly enough so that the blue tabs hook over
the tab on the bulb.
5-46
Page 374 of 470
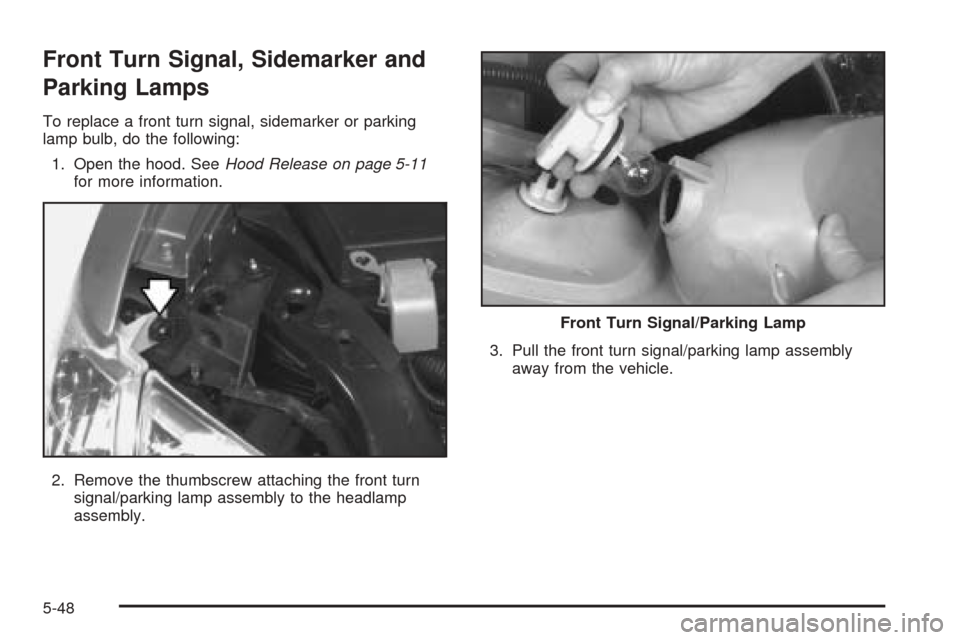
Front Turn Signal, Sidemarker and
Parking Lamps
To replace a front turn signal, sidemarker or parking
lamp bulb, do the following:
1. Open the hood. SeeHood Release on page 5-11
for more information.
2. Remove the thumbscrew attaching the front turn
signal/parking lamp assembly to the headlamp
assembly.3. Pull the front turn signal/parking lamp assembly
away from the vehicle.
Front Turn Signal/Parking Lamp
5-48
Page 419 of 470
If you ever have a problem on the road and do not have
a spare fuse, you can borrow one that has the same
amperage or use one of the spare fuses in the
underhood fuse block. Just pick some feature of your
vehicle that you can get along without – like the radio or
cigarette lighter – and use its fuse, if it is the right
amperage. Replace it as soon as you can.
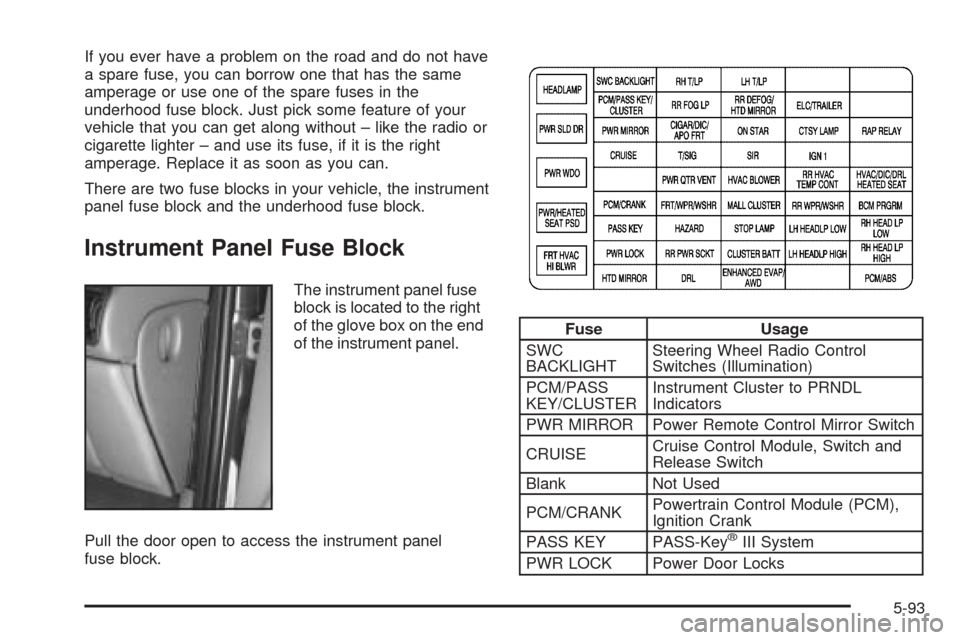
There are two fuse blocks in your vehicle, the instrument
panel fuse block and the underhood fuse block.
Instrument Panel Fuse Block
The instrument panel fuse
block is located to the right
of the glove box on the end
of the instrument panel.
Pull the door open to access the instrument panel
fuse block.
Fuse Usage
SWC
BACKLIGHTSteering Wheel Radio Control
Switches (Illumination)
PCM/PASS
KEY/CLUSTERInstrument Cluster to PRNDL
Indicators
PWR MIRROR Power Remote Control Mirror Switch
CRUISECruise Control Module, Switch and
Release Switch
Blank Not Used
PCM/CRANKPowertrain Control Module (PCM),
Ignition Crank
PASS KEY PASS-Key
®III System
PWR LOCK Power Door Locks
5-93
Page 434 of 470
(c)Visually inspect hoses and have them replaced if they
are cracked, swollen or deteriorated. Inspect all pipes,
�ttings and clamps; replace with genuine GM parts as
needed. To help ensure proper operation, a pressure test
of the cooling system and pressure cap and cleaning the
outside of the radiator and air conditioning condenser is
recommended at least once a year.
(d)Visually inspect wiper blades for wear or cracking.
Replace blade inserts that appear worn or damaged
or that streak or miss areas of the windshield.
(e)Make sure the safety belt reminder light and all your
belts, buckles, latch plates, retractors and anchorages
are working properly. If your vehicle has a built-in
child restraint, make sure the harness straps, latch
plates, buckle, clip, child head restraint and anchorages
are working properly. Look for any other loose or
damaged safety belt system parts. If you see anything
that might keep a safety belt system from doing its
job, have it repaired. Have any torn or frayed safety belts
replaced. Also look for any opened or broken airbag
coverings, and have them repaired or replaced.
(The airbag system does not need regular maintenance.)
(f)Lubricate all key lock cylinders, hood latch assemblies,
secondary latches, pivots, spring anchor and release
pawl, hood and door hinges, rear folding seats, liftgate
hinges, fuel door hinge, power sliding door cable and
sliding door track(s). More frequent lubrication may be
required when exposed to a corrosive environment.Applying silicone grease on weatherstrips with a clean
cloth will make them last longer, seal better and not stick
or squeak.
(g)If you drive regularly under dusty conditions, the
�lter may require replacement more often.
(h)Change automatic transaxle �uid and �lter if the
vehicle is mainly driven under one or more of these
conditions:
�In heavy city traffic where the outside temperature
regularly reaches 90°F (32°C) or higher.
�In hilly or mountainous terrain.
�When doing frequent trailer towing.
�Uses such as found in taxi, police or delivery
service.
(i)Drain, �ush and re�ll cooling system. See Engine
Coolant on page 5-22for what to use. Inspect hoses.
Clean radiator, condenser, pressure cap and �ller neck.
Pressure test the cooling system and pressure cap.
(j)Check system for interference or binding and for
damaged or missing parts. Replace parts as needed.
Replace any components that have high effort or
excessive wear. Do not lubricate accelerator or cruise
control cables.
(k)A �uid loss in any vehicle system could indicate a
problem. Have the system inspected and repaired
and the �uid level checked. Add �uid if needed.
(l)If you drive regularly under dusty conditions, inspect
the �lter at each engine oil change.
6-8