2005 CHEVROLET SILVERADO steering
[x] Cancel search: steeringPage 359 of 580
{CAUTION:
Shifting a four-wheel-drive vehicle’s transfer
case into NEUTRAL can cause your vehicle to
roll even if the transmission is in PARK (P) for
an automatic transmission, or if your vehicle is
in gear, for a manual transmission. You or
others could be injured. Make sure the parking
brake is �rmly set before you shift the transfer
case to NEUTRAL.
5. Shift the transfer case to NEUTRAL. See
Four-Wheel Drive on page 2-37for the proper
procedure to select the neutral position for
your vehicle.
6. Release the parking brake only after the vehicle
being towed is �rmly attached to the towing
vehicle.
7. Turn the ignition off and leave the steering column
unlocked.
All-Wheel-Drive Vehicles
Notice:Towing an all-wheel-drive vehicle with all
four wheels on the ground, or even with only two of
its wheels on the ground, will damage drivetrain
components. Do not tow an all-wheel-drive vehicle if
any of its wheels will be on the ground.
If your vehicle is equipped with all-wheel-drive, and the
Silverado SS package, your vehicle was not designed
to be towed with any of its wheels on the ground. If your
vehicle must be towed, seeTowing Your Vehicle on
page 4-63.
4-65
Page 361 of 580
{CAUTION:
Shifting a four-wheel-drive vehicle’s transfer
case into NEUTRAL can cause your vehicle to
roll even if the transmission is in PARK (P) for
an automatic transmission, or if your vehicle is
in gear, for a manual transmission. You or
others could be injured. Make sure the parking
brake is �rmly set before you shift the transfer
case to NEUTRAL.
6. Shift the transfer case to NEUTRAL. See
Four-Wheel Drive on page 2-37for the proper
procedure to select the neutral position for
your vehicle.
7. Release the parking brake only after the vehicle
being towed is �rmly attached to the towing
vehicle.
8. Turn the ignition off and lock the steering column.
All-Wheel-Drive Vehicles
Notice:Towing an all-wheel-drive vehicle with all
four wheels on the ground, or even with only two of
its wheels on the ground, will damage drivetrain
components. Do not tow an all-wheel-drive vehicle if
any of its wheels will be on the ground.
If your vehicle is equipped with all-wheel-drive, and the
Silverado SS package, your vehicle was not designed
to be towed with any of its wheels on the ground. If your
vehicle must be towed, seeTowing Your Vehicle on
page 4-63.
Rear Towing
(Rear Wheels Off the Ground)
Two-Wheel-Drive Vehicles
Use the following procedure to tow your vehicle from
the rear:
1. Drive the vehicle onto the dolly.
2. Firmly set the parking brake. SeeParking Brake on
page 2-51for more information.
3. Put an automatic transmission in PARK (P) or a
manual transmission in FIRST (1).
4-67
Page 385 of 580
Following Distance
Stay at least twice as far behind the vehicle ahead as
you would when driving your vehicle without a trailer.
This can help you avoid situations that require
heavy braking and sudden turns.
Passing
You’ll need more passing distance up ahead when
you’re towing a trailer. And, because you’re a good deal
longer, you’ll need to go much farther beyond the
passed vehicle before you can return to your lane.
Backing Up
Hold the bottom of the steering wheel with one hand.
Then, to move the trailer to the left, just move that hand
to the left. To move the trailer to the right, move your
hand to the right. Always back up slowly and, if possible,
have someone guide you.
Your vehicle may be equipped with four-wheel steering.
If you use it while backing your trailer, the same
rules apply. However, with four-wheel steering, your rig
will respond more quickly and it may take additional
practice to get used to backing up with four-wheel
steering.
Making Turns
Notice:Making very sharp turns while trailering
could cause the trailer to come in contact with the
vehicle. Your vehicle could be damaged. Avoid
making very sharp turns while trailering.
When you’re turning with a trailer, make wider turns
than normal. Do this so your trailer won’t strike
soft shoulders, curbs, road signs, trees or other objects.
Avoid jerky or sudden maneuvers. Signal well in
advance.
Turn Signals When Towing a Trailer
The arrows on your instrument panel will �ash whenever
you signal a turn or lane change. Properly hooked up,
the trailer lamps will also �ash, telling other drivers
you’re about to turn, change lanes or stop.
When towing a trailer, the arrows on your instrument
panel will �ash for turns even if the bulbs on the trailer
are burned out. Thus, you may think drivers behind
you are seeing your signal when they are not. It’s
important to check occasionally to be sure the trailer
bulbs are still working.
4-91
Page 399 of 580

Service............................................................5-4
Doing Your Own Service Work.........................5-4
Adding Equipment to the Outside of
Your Vehicle..............................................5-5
Fuel................................................................5-5
Gasoline Octane............................................5-6
Gasoline Speci�cations....................................5-6
California Fuel...............................................5-6
Additives.......................................................5-7
Fuel E85 (85% Ethanol)..................................5-8
Fuels in Foreign Countries...............................5-9
Filling the Tank............................................5-10
Filling a Portable Fuel Container.....................5-12
Checking Things Under the Hood....................5-12
Hood Release..............................................5-13
Engine Compartment Overview.......................5-14
Engine Oil (Gasoline Engine)..........................5-20
Engine Oil Life System
(Gasoline Engine)......................................5-23
Engine Air Cleaner/Filter................................5-25
Automatic Transmission Fluid
(Except Allison Transmission
®) ....................5-27
Automatic Transmission Fluid
(Allison Transmission
®) ...............................5-30Manual Transmission Fluid.............................5-33
Hydraulic Clutch...........................................5-34
Engine Coolant.............................................5-35
Coolant Surge Tank Pressure Cap..................5-38
Engine Overheating.......................................5-38
Overheated Engine Protection Operating Mode
(V8 Engines Only)......................................5-40
Cooling System............................................5-40
Engine Fan Noise.........................................5-45
Power Steering Fluid.....................................5-46
Windshield Washer Fluid................................5-47
Brakes........................................................5-48
Battery........................................................5-51
Jump Starting...............................................5-52
All-Wheel Drive..............................................5-57
Rear Axle.......................................................5-58
Four-Wheel Drive............................................5-59
Front Axle......................................................5-60
Noise Control System.....................................5-61
Tampering with Noise Control System
Prohibited.................................................5-61
Section 5 Service and Appearance Care
5-1
Page 411 of 580
Hood Release
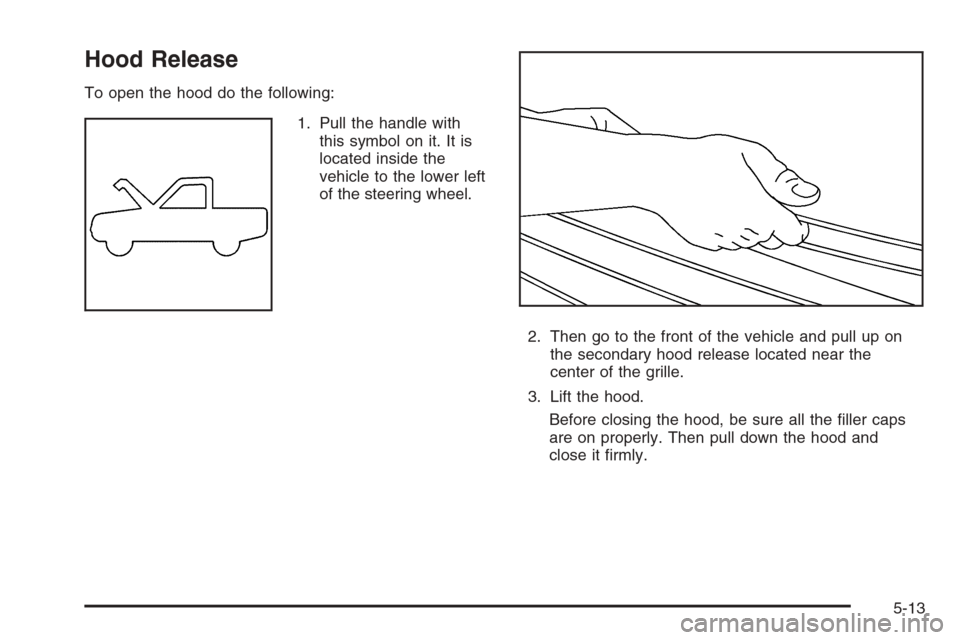
To open the hood do the following:
1. Pull the handle with
this symbol on it. It is
located inside the
vehicle to the lower left
of the steering wheel.
2. Then go to the front of the vehicle and pull up on
the secondary hood release located near the
center of the grille.
3. Lift the hood.
Before closing the hood, be sure all the �ller caps
are on properly. Then pull down the hood and
close it �rmly.
5-13
Page 413 of 580

A. Engine Air Cleaner/Filter. SeeEngine Air
Cleaner/Filter on page 5-25.
B. Coolant Surge Tank and Pressure Cap. SeeEngine
Coolant on page 5-35andCoolant Surge Tank
Pressure Cap on page 5-38.
C. Air Filter Restriction Indicator (If Equipped).
SeeEngine Air Cleaner/Filter on page 5-25.
D. Engine Oil Dipstick. See “Checking Engine Oil”
underEngine Oil (Gasoline Engine) on page 5-20.
E. Automatic Transmission Fluid Dipstick (If Equipped).
See “Checking the Fluid Level” underAutomatic
Transmission Fluid (Except Allison Transmission
®)
on page 5-27orAutomatic Transmission Fluid
(Allison Transmission
®) on page 5-30.
F. Engine Cooling Fan. SeeCooling System on
page 5-40.
G. Engine Oil Fill Cap. See “When to Add Engine Oil”
underEngine Oil (Gasoline Engine) on page 5-20.H. Power Steering Fluid Reservoir. SeePower Steering
Fluid on page 5-46.
I. Remote Negative (−) Terminal (GND). SeeJump
Starting on page 5-52.
J. Remote Positive (+) Terminal. SeeJump Starting on
page 5-52.
K. Brake Fluid Reservoir. See “Brake Fluid” under
Brakes on page 5-48.
L. Clutch Fluid Reservoir (If Equipped). SeeHydraulic
Clutch on page 5-34.
M. Underhood Fuse Block. SeeUnderhood Fuse Block
on page 5-127.
N. Battery. SeeBattery on page 5-51.
O. Windshield Washer Fluid Reservoir. See “Adding
Washer Fluid” underWindshield Washer Fluid
on page 5-47.
5-15
Page 415 of 580
A. Engine Air Cleaner/Filter. SeeEngine Air
Cleaner/Filter on page 5-25.
B. Coolant Surge Tank and Pressure Cap. SeeEngine
Coolant on page 5-35andCoolant Surge Tank
Pressure Cap on page 5-38.
C. Air Filter Restriction Indicator (If Equipped).
SeeEngine Air Cleaner/Filter on page 5-25.
D. Engine Oil Dipstick. See “Checking Engine Oil”
underEngine Oil (Gasoline Engine) on page 5-20.
E. Automatic Transmission Fluid Dipstick (If Equipped).
See “Checking the Fluid Level” underAutomatic
Transmission Fluid (Except Allison Transmission
®)
on page 5-27orAutomatic Transmission Fluid
(Allison Transmission
®) on page 5-30.
F. Engine Oil Fill Cap. See “When to Add Engine Oil”
underEngine Oil (Gasoline Engine) on page 5-20.
G. Engine Cooling Fan. SeeCooling System on
page 5-40.H. Remote Negative (−) Terminal (GND). SeeJump
Starting on page 5-52.
I. Power Steering Fluid Reservoir. SeePower Steering
Fluid on page 5-46.
J. Remote Positive (+) Terminal. SeeJump Starting on
page 5-52.
K. Brake Fluid Reservoir. See “Brake Fluid” under
Brakes on page 5-48.
L. Clutch Fluid Reservoir (If Equipped). SeeHydraulic
Clutch on page 5-34.
M. Underhood Fuse Block. SeeUnderhood Fuse Block
on page 5-127.
N. Battery. SeeBattery on page 5-51.
O. Windshield Washer Fluid Reservoir. See “Adding
Washer Fluid” underWindshield Washer Fluid
on page 5-47.
5-17
Page 417 of 580
A. Engine Air Cleaner/Filter. SeeEngine Air
Cleaner/Filter on page 5-25.
B. Coolant Surge Tank and Pressure Cap. SeeEngine
Coolant on page 5-35andCoolant Surge Tank
Pressure Cap on page 5-38.
C. Air Filter Restriction Indicator (If Equipped).
SeeEngine Air Cleaner/Filter on page 5-25.
D. Engine Oil Dipstick. See “Checking Engine Oil”
underEngine Oil (Gasoline Engine) on page 5-20.
E. Automatic Transmission Fluid Dipstick (If Equipped).
See “Checking the Fluid Level” underAutomatic
Transmission Fluid (Except Allison Transmission
®)
on page 5-27orAutomatic Transmission Fluid
(Allison Transmission
®) on page 5-30.
F. Engine Oil Fill Cap. See “When to Add Engine Oil”
underEngine Oil (Gasoline Engine) on page 5-20.
G. Engine Cooling Fan. SeeCooling System on
page 5-40.H. Remote Negative (−) Terminal (GND). SeeJump
Starting on page 5-52.
I. Remote Positive (+) Terminal. SeeJump Starting on
page 5-52.
J. Power Steering Fluid Reservoir. SeePower Steering
Fluid on page 5-46.
K. Brake Fluid Reservoir. See “Brake Fluid” under
Brakes on page 5-48.
L. Clutch Fluid Reservoir (If Equipped). SeeHydraulic
Clutch on page 5-34.
M. Underhood Fuse Block. SeeUnderhood Fuse Block
on page 5-127.
N. Battery. SeeBattery on page 5-51.
O. Windshield Washer Fluid Reservoir. See “Adding
Washer Fluid” underWindshield Washer Fluid
on page 5-47.
5-19