2005 CHEVROLET MALIBU turn signal
[x] Cancel search: turn signalPage 220 of 434
For XM™ (if equipped), press the DISP knob while
in XM mode to retrieve four different categories
of information related to the current song or
channel: Artist, Song Title, Category or PTY, Channel
Number/Channel Name.
To change the default on the display, press the DISP
knob until you see the display you want, then hold
the knob for two seconds. You will hear a beep and the
selected display will now be the default.
AUTO
u(Automatic Volume):With automatic
volume, the audio system adjusts automatically to make
up for road and wind noise as you drive.
Set the volume at the desired level. Press this button to
select LOW, MEDIUM, or HIGH. AUTO VOL LOW,
AUTO VOL MEDIUM, or AUTO VOL HIGH will appear
on the display. Each higher setting will allow for
more volume compensation at faster vehicle speeds.
Then as you drive, automatic volume increases
the volume, as necessary, to overcome noise at any
speed. The volume level should always sound the same
to you as you drive. AUTO VOL NONE will appear on
the display if the radio cannot determine the vehicle
speed or if the engine is not running. To turn automatic
volume off, press this button until AUTO VOL OFF
appears on the display.
Finding a Station
BAND:Press this button to switch between FM1, FM2,
AM, or XM1 or XM2 (if equipped). The display will
show the selection.
ADJ (Adjust):Turn this knob to select radio stations.
xSEEKw:Press the down or up arrow to go to the
next or to the previous station and stay there.
To scan stations, press and hold either arrow for
two seconds until you hear a beep. The radio will go to
a station, play for a few seconds, then go on to the
next station. Press either arrow again to stop scanning.
To scan preset stations, press and hold either arrow
for more than four seconds until you hear two beeps.
The radio will go to the rst preset station stored on the
pushbuttons, play for a few seconds, then go on to
the next preset station. Press either arrow again to stop
scanning presets.
The radio will only seek and scan stations with a strong
signal that are in the selected band.
3-90
Page 225 of 434
XM™ Radio Messages
Radio Display
MessageCondition Action Required
XL (Explicit Language
Channels)XL on the radio display,
after the channel name,
indicates content with
explicit language.These channels, or any others, can be blocked at a
customer’s request, by calling 1-800-852-XMXM (9696).
Updating Updating encryption code The encryption code in the receiver is being updated, and
no action is required. This process should take no longer
than 30 seconds.
No Signal Loss of signal The system is functioning correctly, but the vehicle is in a
location that is blocking the XM signal. When the vehicle is
moved into an open area, the signal should return.
Loading XM Acquiring channel audio
(after 4 second delay)The audio system is acquiring and processing audio and
text data. No action is needed. This message should
disappear shortly.
Off Air Channel not in service This channel is not currently in service. Tune to another
channel.
CH Unavl Channel no longer
availableThis previously assigned channel is no longer assigned.
Tune to another station. If this station was one of the
presets, choose another station for that preset button.
No Info Artist Name/Feature not
availableNo artist information is available at this time on this
channel. The system is working properly.
No Info Song/Program Title not
availableNo song title information is available at this time on this
channel. The system is working properly.
3-95
Page 233 of 434
Rear Seat Entertainment System
Your vehicle may have a DVD Rear Seat
Entertainment (RSE) system. The RSE system includes
a DVD player, a video display screen, two sets of
wireless headphones, and a remote control.
This system also functions as a rear seat audio (RSA)
system. SeeRear Seat Audio (RSA) (Without Rear Seat
Entertainment) on page 3-118orRear Seat Audio (RSA)
(With Entertainment System) on page 3-120for more
information.
Parental Control
The RSE system may be disabled from the driver’s seat
by pressing the power button on the radio twice. To
resume use of the RSE system press the RSE power
button.
Before You Drive
The RSE is designed for rear seat passengers only.
The driver cannot safely view the video screen
while driving and should not try to do so.
The DVD system is designed to be inoperable when the
vehicle is exposed to extremely low or high
temperatures, in order to protect your system from
damage. Operate the DVD system under normal
or comfortable cabin temperature ranges.
Headphones
The RSE system includes two sets of wireless
headphones.
The wireless headphones have an ON/OFF button and
a volume control. To use the headphones press, the
ON/OFF button. An indicator light on the headphones
will illuminate. If the light does not illuminate, the
batteries may need to be replaced. See “Battery
Replacement” later in this section for more information.
Press the button to turn the headphones OFF when
not in use.
If the RSE system is shut off or if the headphones are
out of range of the transmitters, located at the top of
the DVD player, for more than three minutes, the
headphones will shut off automatically to save the
battery power. If you move too far forward or step out of
the vehicle, the headphones will lose the audio signal.
To adjust the volume on the wireless headphones,
use the volume control on the headphones.
Make sure that the headphones are worn correctly, left
to right, to ensure the signal is received properly.
3-103
Page 234 of 434
Notice:Do not store the headphones in heat or
direct sunlight. This could damage the headphones
and repairs will not be covered by your warranty.
Keep the headphones stored in a cool, dry place.
If your vehicle is the MAXX, your vehicle may have
a rear seat storage compartment. Store the headphones
and the remote control in this compartment when not
in use.
If there is a decreased audio signal during CD or DVD
play, there may be a low hissing noise through the
speakers and/or headphones. If the hissing sound in the
wireless headphones seems excessive, make sure
that the headphone batteries are fully charged. Some
amount of hissing is normal.
Battery Replacement
To change the batteries, do the following:
1. Loosen the screw on the battery compartment door
located on the left side of the headphone earpiece.
2. Replace the two AAA batteries in the compartment.
Make sure that they are installed correctly using the
diagram on the inside of the battery compartment.
3. Replace the battery compartment door and tighten
the screw.
If the headphones are to be stored for a long period of
time, remove the batteries, and keep them in a cool,
dry place.
Stereo RCA Jacks
The RCA jacks are located on the DVD faceplate on the
oor console. The RCA jacks allow audio and video
signals to be connected from an auxiliary device such as
a camcorder or a video game unit to the RSE system.
The yellow RCA jack is used for video inputs, the
red RCA jack for right audio inputs, and the white RCA
jack for left audio inputs. The system requires
standard RCA cables, not included, to connect the
auxiliary device to the RCA jacks. Refer to the
manufacturer’s instructions for proper usage.
To use the auxiliary audio and video inputs, connect an
external auxiliary device such as a camcorder to the
RCA jacks and turn on both the auxiliary device power
and the power on the front of the RSE system. Press
the play and source buttons at the same time or
the AUX button on the remote control to switch to the
auxiliary device. See “DVD Player” and “Remote
Control” later in this section for more information.
3-104
Page 235 of 434
Audio Output
Audio from the DVD player or auxiliary devices can be
heard through the following possible sources:
Wireless Headphones
Vehicle’s Speakers
Wired Headphones (not included)
Only one audio source can be heard through the
vehicles speakers at a time.
The RSE system or an auxiliary device can be heard
through all of the vehicles speakers when the following
occurs:
The RSE system is off
A DVD or auxiliary device is playing
The front audio system is on and the SRCE button
is pressed to enable the RSE system
The headphone symbol will appear on the radio display
when the RSE system is on and the headphone
symbol will disappear from the display when it is off.To turn the vehicles rear speakers on and off, press the
power button on the RSE system or on the remote
control. When the rear speakers are off, the audio from
the RSE system can be heard through both the
wireless headphones and the vehicles front speakers at
the same time.
The RSE system can be heard through the wired
headphones, not included, on the RSE system when
the following occurs:
The RSE system is on
A DVD or auxiliary device is playing
The volume on the radio may vary when switching
between a radio station, CD, DVD, cassette, or auxiliary
device.
If there is a decreased audio signal during CD or DVD
play, there may be a low hissing noise through the
speakers and/or headphones. If the hissing sound in the
wireless headphones seems excessive, make sure
that the headphone batteries are fully charged. Some
amount of hissing is normal.
3-105
Page 239 of 434
Remote Control
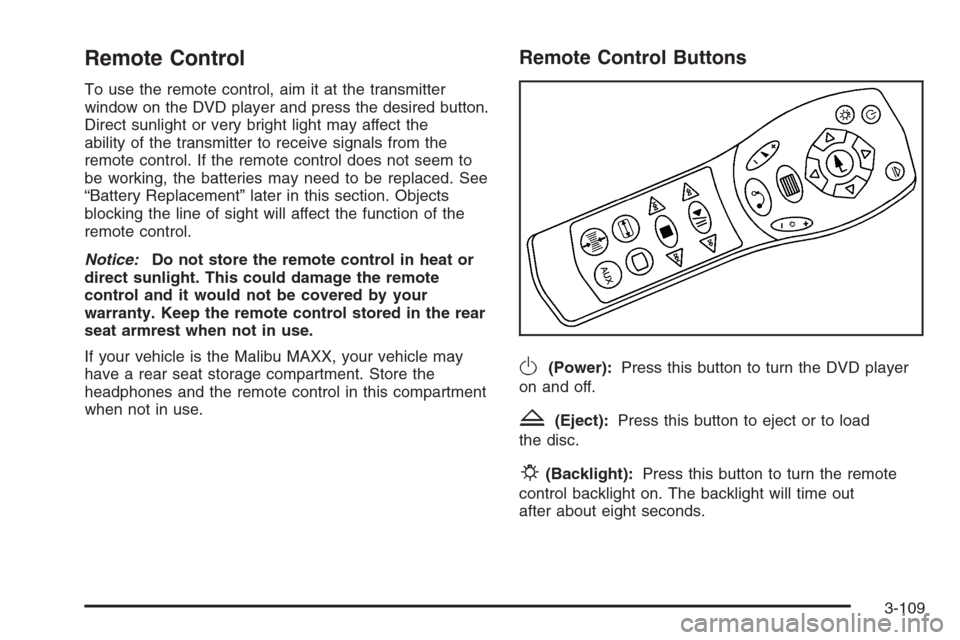
To use the remote control, aim it at the transmitter
window on the DVD player and press the desired button.
Direct sunlight or very bright light may affect the
ability of the transmitter to receive signals from the
remote control. If the remote control does not seem to
be working, the batteries may need to be replaced. See
“Battery Replacement” later in this section. Objects
blocking the line of sight will affect the function of the
remote control.
Notice:Do not store the remote control in heat or
direct sunlight. This could damage the remote
control and it would not be covered by your
warranty. Keep the remote control stored in the rear
seat armrest when not in use.
If your vehicle is the Malibu MAXX, your vehicle may
have a rear seat storage compartment. Store the
headphones and the remote control in this compartment
when not in use.
Remote Control Buttons
O(Power):Press this button to turn the DVD player
on and off.
Z(Eject):Press this button to eject or to load
the disc.
P(Backlight):Press this button to turn the remote
control backlight on. The backlight will time out
after about eight seconds.
3-109
Page 247 of 434
Problem Recommended Action
My disc is stuck in the
player. The eject button
does not work.Press the eject button on
the DVD player. Turn the
power off, then on again,
then press the eject
button on the DVD player.
Do not attempt to force or
remove the disc from the
player. If the problem
persists, return to your
GM dealer for further
assistance.
I lost the remote control
and/or the headphones.Contact your GM dealer
for assistance.
Sometimes the wireless
headphone audio cuts out
or buzzes for a moment,
then it comes back.This could be caused by
blocking the transmitting
area between the
headphones and the
transmitter on the DVD
player. Make sure nothing
is between the
headphones and the
DVD player.Problem Recommended Action
DVD System inoperable. In severe or extreme
temperatures your DVD
system might not be
operable. Temperatures
below−4°F (−20°C) or
above 158°F (70°C) could
damage the DVD system.
Operate the DVD system
under normal or
comfortable cabin
temperature ranges.
The wireless headphones
have audio distortion.Verify that the
headphones are facing to
the front of the vehicle,
left and right sides are
indicated on the
headphones to ensure
that the signal is received
properly.
In auxiliary mode, the
picture moves or scrolls.Check the signal coming
from the auxiliary device
and make sure that the
connection and the signal
are good.
3-117
Page 253 of 434
Audio Steering Wheel Controls
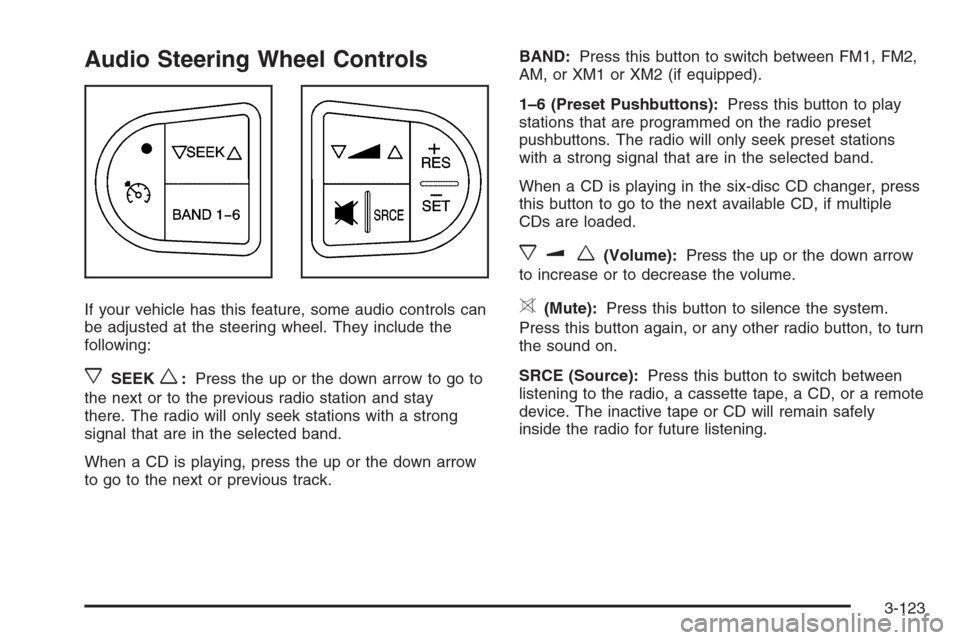
If your vehicle has this feature, some audio controls can
be adjusted at the steering wheel. They include the
following:
xSEEKw:Press the up or the down arrow to go to
the next or to the previous radio station and stay
there. The radio will only seek stations with a strong
signal that are in the selected band.
When a CD is playing, press the up or the down arrow
to go to the next or previous track.BAND:Press this button to switch between FM1, FM2,
AM, or XM1 or XM2 (if equipped).
1–6 (Preset Pushbuttons):Press this button to play
stations that are programmed on the radio preset
pushbuttons. The radio will only seek preset stations
with a strong signal that are in the selected band.
When a CD is playing in the six-disc CD changer, press
this button to go to the next available CD, if multiple
CDs are loaded.
xuw(Volume):Press the up or the down arrow
to increase or to decrease the volume.
>(Mute):Press this button to silence the system.
Press this button again, or any other radio button, to turn
the sound on.
SRCE (Source):Press this button to switch between
listening to the radio, a cassette tape, a CD, or a remote
device. The inactive tape or CD will remain safely
inside the radio for future listening.
3-123