2005 CHEVROLET COLORADO four wheel drive
[x] Cancel search: four wheel drivePage 1 of 414

Seats and Restraint Systems........................... 1-1
Front Seats
............................................... 1-3
Rear Seats
............................................... 1-8
Safety Belts
.............................................1-11
Child Restraints
.......................................1-32
Airbag System
.........................................1-62
Restraint System Check
............................1-75
Features and Controls..................................... 2-1
Keys
........................................................ 2-2
Doors and Locks
....................................... 2-7
Windows
.................................................2-12
Theft-Deterrent Systems
............................2-14
Starting and Operating Your Vehicle
...........2-16
Mirrors
....................................................2-35
OnStar
®System
......................................2-39
Storage Areas
.........................................2-41
Instrument Panel............................................. 3-1
Instrument Panel Overview
.......................... 3-4
Climate Controls
......................................3-19
Warning Lights, Gages, and Indicators
........3-22
Driver Information Center (DIC)
..................3-36
Audio System(s)
.......................................3-42Driving Your Vehicle....................................... 4-1
Your Driving, the Road, and Your Vehicle
..... 4-2
Towing
...................................................4-48
Service and Appearance Care.......................... 5-1
Service
..................................................... 5-3
Fuel
......................................................... 5-5
Checking Things Under the Hood
...............5-10
Rear Axle
...............................................5-44
Four-Wheel Drive
.....................................5-44
Front Axle
...............................................5-45
Bulb Replacement
....................................5-46
Windshield Wiper Blade Replacement
.........5-50
Tires
......................................................5-52
Appearance Care
.....................................5-88
Vehicle Identi�cation
.................................5-97
Electrical System
......................................5-98
Capacities and Speci�cations
...................5-103
Maintenance Schedule..................................... 6-1
Maintenance Schedule
................................ 6-2
Customer Assistance and Information.............. 7-1
Customer Assistance and Information
........... 7-2
Reporting Safety Defects
...........................7-10
Index................................................................ 1
2005 Chevrolet Colorado Owner ManualM
Page 83 of 414
Keys...............................................................2-2
Remote Keyless Entry System.........................2-3
Remote Keyless Entry System Operation...........2-4
Doors and Locks.............................................2-7
Door Locks....................................................2-7
Power Door Locks..........................................2-8
Programmable Automatic Door Locks................2-8
Rear Door Security Locks (Crew Cab)...............2-9
Lockout Protection........................................2-10
Rear Doors (Extended Cab)...........................2-10
Tailgate.......................................................2-10
Windows........................................................2-12
Manual Windows..........................................2-12
Power Windows............................................2-13
Sliding Rear Window.....................................2-14
Sun Visors...................................................2-14
Theft-Deterrent Systems..................................2-14
Content Theft-Deterrent.................................2-14
Passlock
®....................................................2-16
Starting and Operating Your Vehicle................2-16
New Vehicle Break-In....................................2-16
Ignition Positions..........................................2-17
Retained Accessory Power (RAP)...................2-18
Starting the Engine.......................................2-18
Engine Coolant Heater..................................2-20
Automatic Transmission Operation...................2-21Manual Transmission Operation......................2-23
Four-Wheel Drive..........................................2-25
Parking Brake..............................................2-29
Shifting Into Park (P) (Automatic Transmission) . . .2-30
Shifting Out of Park (P)
(Automatic Transmission)............................2-32
Parking Your Vehicle (Manual Transmission).....2-32
Parking Over Things That Burn.......................2-33
Engine Exhaust............................................2-33
Running the Engine While Parked
(Automatic Transmission)............................2-34
Mirrors...........................................................2-35
Manual Rearview Mirror.................................2-35
Manual Rearview Mirror with OnStar
®..............2-35
Automatic Dimming Rearview Mirror with
Compass and Temperature Display..............2-36
Outside Manual Mirrors..................................2-38
Outside Power Mirrors...................................2-38
Outside Convex Mirror...................................2-39
OnStar
®System.............................................2-39
Storage Areas................................................2-41
Glove Box...................................................2-41
Cupholder(s)................................................2-41
Front Armrest Storage Area...........................2-41
Assist Handles.............................................2-42
Rear Storage Area........................................2-42
Section 2 Features and Controls
2-1
Page 106 of 414
THIRD, FOURTH AND FIFTH (3, 4 and 5):Shift into
THIRD (3), FOURTH (4) and FIFTH (5) the same
way you do for SECOND (2). Slowly let up on the
clutch pedal as you press the accelerator pedal.
To stop, let up on the accelerator pedal and press the
brake pedal. Just before the vehicle stops, press
the clutch pedal and the brake pedal, and shift to
NEUTRAL.
NEUTRAL:Use this position when you start or idle
your engine.
REVERSE (R):To back up, press the clutch pedal.
After the vehicle stops, shift into REVERSE (R). Slowly
let up on the clutch pedal as you press the accelerator
pedal. If it is hard to shift, let the shift lever return
to NEUTRAL and release the clutch pedal. Then press
the clutch again and shift into REVERSE (R). Do
not attempt to shift into the �fth gear position prior to
shifting into REVERSE (R). Your transmission has a lock
out feature which prevents a �fth gear to reverse
gear shift.
Notice:Shifting to REVERSE (R) while your vehicle
is moving forward could damage the transmission.
The repairs would not be covered by your warranty.
Shift to REVERSE (R) only after your vehicle is
stopped.
Use REVERSE (R), along with the parking brake, for
parking your vehicle.Up-Shift Light
This light will show you
when to shift to the next
higher gear for best
fuel economy.
When this light comes on, you can shift to the next
higher gear if weather, road and traffic conditions permit.
For the best fuel economy, accelerate slowly and shift
when the light comes on.
While you accelerate, it is normal for the light to go on
and off if you quickly change the position of the
accelerator. Ignore the shift light when you downshift.
If your vehicle has four-wheel drive and is equipped with
a manual transmission, disregard the shift light when
the transfer case is in four-wheel low.
For more information, seeUp-Shift Light (Manual
Transmission) on page 3-28.
2-24
Page 107 of 414
Shift Speeds
{CAUTION:
If you skip a gear when you downshift, you
could lose control of your vehicle. You could
injure yourself or others. Do not shift down
more than one gear at a time when you
downshift.
Four-Wheel Drive
If your vehicle has four-wheel drive, you can send your
engine’s driving power to all four wheels for extra
traction. To get the most satisfaction out of four-wheel
drive, you must be familiar with its operation. Read
the part that follows before using four-wheel drive.
You should use two-wheel-drive high for most normal
driving conditions.
Notice:Driving on clean, dry pavement in
four-wheel drive for an extended period of time may
cause premature wear on your vehicle’s powertrain.
Do not drive on clean, dry pavement in four-wheel
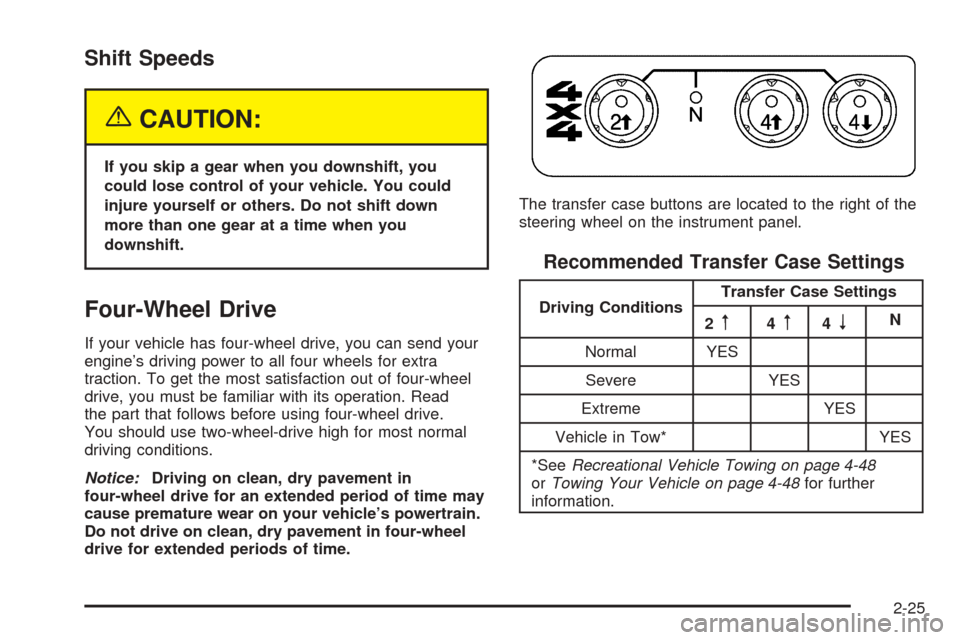
drive for extended periods of time.The transfer case buttons are located to the right of the
steering wheel on the instrument panel.
Recommended Transfer Case Settings
Driving ConditionsTransfer Case Settings
2m4m4nN
Normal YES
Severe YES
Extreme YES
Vehicle in Tow* YES
*SeeRecreational Vehicle Towing on page 4-48
orTowing Your Vehicle on page 4-48for further
information.
2-25
Page 108 of 414
Use these buttons to shift into and out of four-wheel
drive. You can choose from the following:
2
m(Two-Wheel High):This setting is for driving in
most street and highway situations. Your front axle is
not engaged in two-wheel drive.
{CAUTION:
Shifting the transfer case to NEUTRAL
can cause your vehicle to roll even if the
transmission is in PARK (P). You or someone
else could be seriously injured. Be sure to set
the parking brake before placing the transfer
case in NEUTRAL. SeeParking Brake on
page 2-29.
N (NEUTRAL):Shift the vehicle’s transfer case to
NEUTRAL only when towing your vehicle.
4
m(Four-Wheel High):This setting engages your
front axle to help drive your vehicle. Use four-wheel
high when you need extra traction, such as on snowy
or icy roads, or in most off-road situations.4
n(Four-Wheel Low):This setting also engages
your front axle to give you extra traction. It sends the
maximum power to all four wheels. You might
choose four-wheel low if you were driving off-road in
sand, mud, or deep snow and while climbing or
descending steep hills.
Indicator lights in the buttons show you which setting
you are in. The indicator lights will come on brie�y when
you turn on the ignition and one will stay on. If the
lights do not come on, you should take your vehicle in
for service. An indicator light will �ash while shifting.
It will stay on when the shift is completed.
If for some reason the transfer case does not shift, it will
return to the last chosen setting.
Shifting from Two-Wheel High to
Four-Wheel High
Press and release the Four-Wheel High button. This
can be done at any speed, and the front axle will lock
automatically.
Shifting from Four-Wheel High to
Two-Wheel High
Press and release the Two-Wheel High button. This can
be done at any speed, and the front axle will unlock
automatically.
2-26
Page 109 of 414
It is normal to hear and feel your vehicle’s transfer case
shift into Four-Wheel Low. If you shift with the vehicle
stopped, the indicator light may still �ash slowly. It
may be necessary to shift the transmission momentarily
into REVERSE (R) and DRIVE (D), for an automatic
transmission, or REVERSE (R) and FIRST (1) for
a manual transmission to have the light stop �ashing.
Shifting from Two-Wheel High or
Four-Wheel High to Four-Wheel Low
To shift from Two-Wheel High or Four-Wheel High
to Four-Wheel Low, the vehicle must be stopped
or moving less than 3 mph (5 km/h) with the
transmission in NEUTRAL (N) for an automatic
transmission or the clutch pedal engaged in for a
manual transmission. The preferred method for
shifting into Four-Wheel Low is to have your vehicle
moving 1 to 2 mph (1.6 to 3.2 km/h).
Press and release the Four-Wheel Low button. You
must wait for the Four-Wheel Low indicator light to stop
�ashing and stay on before shifting the transmission
into gear or releasing the clutch pedal.
If the Four-Wheel Low button is pressed when
your vehicle is in gear and/or moving faster than
3 mph (5 km/h), the four-wheel low indicator light will
�ash for 30 seconds and not complete the shift.
Shifting from Four-Wheel Low to
Two-Wheel High or Four-Wheel High
To shift from Four-Wheel Low to Two-Wheel High or
Four-Wheel High, your vehicle must be stopped
or moving less than 3 mph (5 km/h) with the
transmission in NEUTRAL (N) for an automatic
transmission or the clutch pedal engaged for a manual
transmission. The preferred method for shifting out
of four-wheel low is to have your vehicle moving 1 to
2 mph (1.6 to 3.2 km/h).
Press and release the Four-Wheel High or Two-Wheel
High button. You must wait for the Four-Wheel High
or Two-Wheel High indicator light to stop �ashing and
stay on before shifting the transmission into gear or
releasing the clutch pedal.
If the Four-Wheel High or Two-Wheel High button is
pressed when your vehicle is in gear and/or moving
faster than 3 mph (5km/h), the Four-Wheel High or
Two Wheel High indicator light will �ash for 30 seconds
but not complete the shift.
2-27
Page 110 of 414
Shifting to NEUTRAL
Use NEUTRAL when you plan to tow your vehicle. See
Recreational Vehicle Towing on page 4-48for towing
instructions. To shift the transfer case into NEUTRAL
do the following:
1. Set the parking brake.
2. Turn the ignition to ON but leave the engine off.
3. Press the regular brake pedal and shift the
transmission in NEUTRAL (N), or press in the
clutch for vehicles with a manual transmission.
4. Shift the transfer case to Two-Wheel High.
5. Press and hold the Two-Wheel High and
Four-Wheel Low buttons at the same time for
10 seconds. The NEUTRAL (N) light will come on
when the transfer case shift to NEUTRAL (N)
is complete.
6. Start the engine, by turning the key to the
START position.
7. Press and hold the regular brake pedal and shift the
transmission to REVERSE (R) for one second, then
shift the transmission to DRIVE (D) for one second,
or FIRST (1) for vehicles with manual transmissions,
and let out the clutch to insure the transfer case is in
NEUTRAL. If the vehicle is not in NEUTRAL, repeat
this procedure starting at Step 3.8. Turn the engine off, by turning the key to ACC.
9. Place the transmission shift lever in PARK (P), or
FIRST (1) for vehicles equipped with a manual
transmission.
10. Turn the ignition to LOCK.
Shifting Out of NEUTRAL
After towing your vehicle, you will have to shift out of
NEUTRAL in order to drive. To shift out of NEUTRAL,
do the following:
1. Set the parking brake and apply the regular brake
pedal.
2. Turn the ignition to ON with the engine off.
3. Shift the transmission to NEUTRAL (N), or press
the clutch pedal for vehicles with a manual
transmission.
4. Press the button for the desired transfer case shift
position (Two-Wheel High, Four-Wheel High, or
Four-Wheel Low).
5. After the transfer case has shifted out of NEUTRAL,
the indicator light will go out.
6. Release the parking brake.
7. You may start the engine and shift the transmission
to the desired position.
2-28
Page 112 of 414
Shifting Into Park (P)
(Automatic Transmission)
{CAUTION:
It can be dangerous to get out of your vehicle
if the shift lever is not fully in PARK (P) with
the parking brake �rmly set. Your vehicle can
roll. If you have left the engine running, the
vehicle can move suddenly. You or others
could be injured. To be sure your vehicle will
not move, even when you are on fairly level
ground, use the steps that follow. If you are
pulling a trailer, seeTowing a Trailer on
page 4-54.
1. Hold the brake pedal down with your right foot
and set the parking brake.
{CAUTION:
If you have four-wheel drive, your vehicle
will be free to roll — even if your shift lever
is in PARK (P) — if your transfer case is in
NEUTRAL. So, be sure the transfer case is in a
drive gear, two-wheel high (2H) or four-wheel
high (4H) or four-wheel low (4L) — not in
NEUTRAL.
2. Move the shift lever into PARK (P) by pulling
the lever toward you and moving it up as far
as it will go.
3. Turn the ignition key to LOCK.
4. Remove the key and take it with you. If you can
leave your vehicle with the key, your vehicle is in
PARK (P).
2-30