2005 CHEVROLET COLORADO change time
[x] Cancel search: change timePage 2 of 414

GENERAL MOTORS, GM, the GM Emblem,
CHEVROLET, the CHEVROLET Emblem, and the
name COLORADO are registered trademarks of General
Motors Corporation.
This manual includes the latest information at the time
it was printed. We reserve the right to make changes
after that time without further notice. For vehicles
�rst sold in Canada, substitute the name “General
Motors of Canada Limited” for Chevrolet Motor Division
whenever it appears in this manual.
Keep this manual in the vehicle, so it will be there if it
is needed while you are on the road. If the vehicle
is sold, leave this manual in the vehicle.
Canadian Owners
A French language copy of this manual can be obtained
from your dealer or from:
Helm, Incorporated
P.O. Box 07130
Detroit, MI 48207
How to Use This Manual
Many people read the owner manual from beginning to
end when they �rst receive their new vehicle. If this
is done, it can help you learn about the features
and controls for the vehicle. Pictures and words work
together in the owner manual to explain things.
Index
A good place to quickly locate information about the
vehicle is the Index in the back of the manual. It is an
alphabetical list of what is in the manual and the
page number where it can be found.
Litho in U.S.A.
Part No. 05COLORADO B First Edition
©2004 General Motors Corporation. All Rights Reserved.
ii
Page 41 of 414
Infants and Young Children
Everyone in a vehicle needs protection! This includes
infants and all other children. Neither the distance
traveled nor the age and size of the traveler changes
the need, for everyone, to use safety restraints. In fact,
the law in every state in the United States and in
every Canadian province says children up to some age
must be restrained while in a vehicle.
Every time infants and young children ride in vehicles,
they should have the protection provided by appropriate
restraints. Young children should not use the vehicle’s
adult safety belts alone, unless there is no other choice.
Instead, they need to use a child restraint.
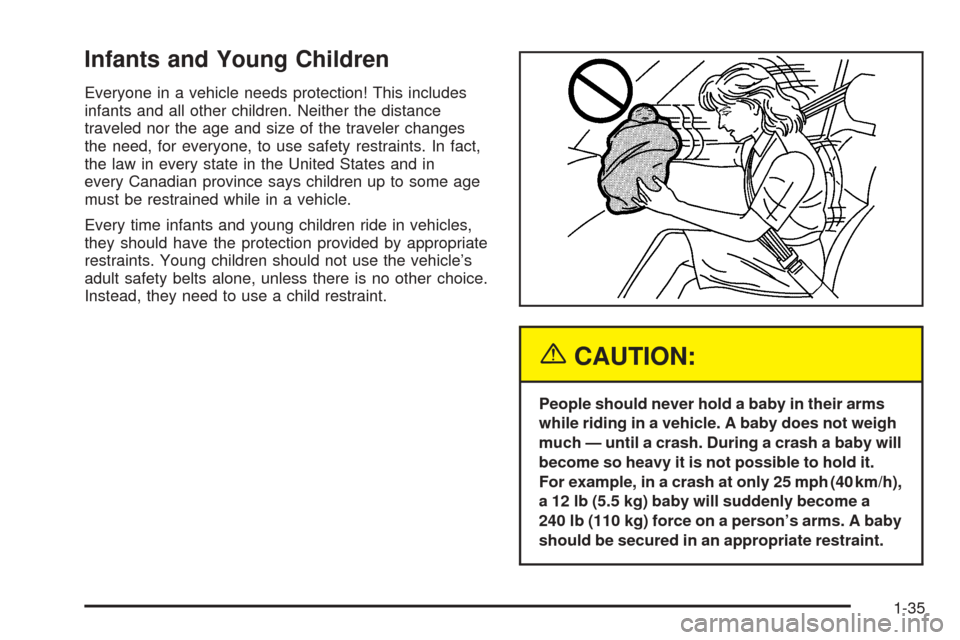
{CAUTION:
People should never hold a baby in their arms
while riding in a vehicle. A baby does not weigh
much — until a crash. During a crash a baby will
become so heavy it is not possible to hold it.
For example, in a crash at only 25 mph (40 km/h),
a 12 lb (5.5 kg) baby will suddenly become a
240 lb (110 kg) force on a person’s arms. A baby
should be secured in an appropriate restraint.
1-35
Page 88 of 414
Battery Replacement
Under normal use, the battery in your remote keyless
entry transmitter should last about two years.
You can tell the battery is weak if the transmitter will not
work at the normal range in any location. If you have
to get close to your vehicle before the transmitter works,
it is probably time to change the battery.
Notice:When replacing the battery, use care not to
touch any of the circuitry. Static from your body
transferred to these surfaces may damage the
transmitter.To replace the battery, do the following:
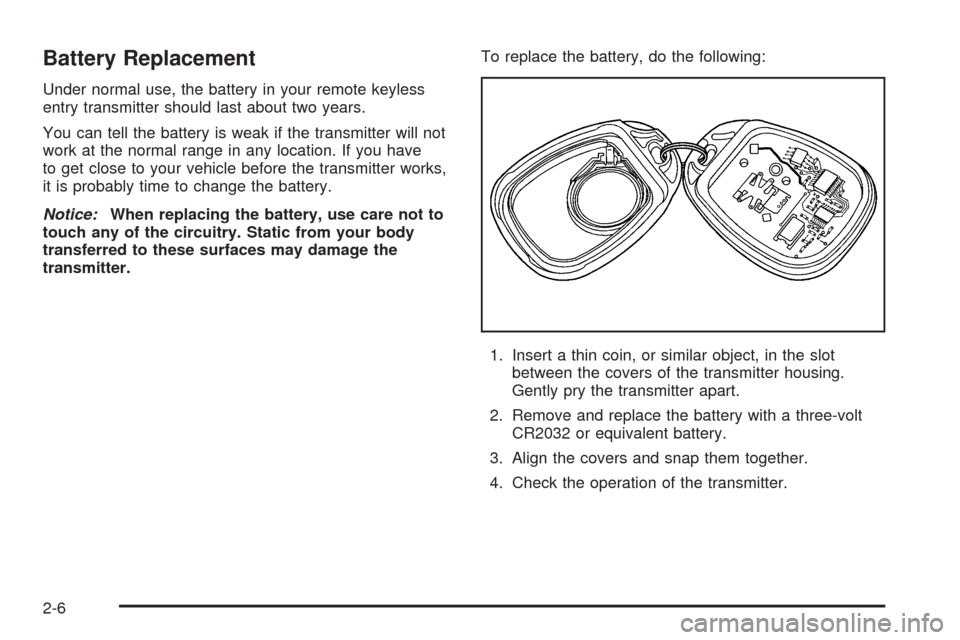
1. Insert a thin coin, or similar object, in the slot
between the covers of the transmitter housing.
Gently pry the transmitter apart.
2. Remove and replace the battery with a three-volt
CR2032 or equivalent battery.
3. Align the covers and snap them together.
4. Check the operation of the transmitter.
2-6
Page 101 of 414
Starting Your Engine
1. With your foot off the accelerator pedal, turn the
ignition key to START. When the engine starts,
let go of the key. The idle speed will go down
as your engine gets warm.
Notice:Holding your key in START for longer
than 15 seconds at a time will cause your battery
to be drained much sooner. And the excessive
heat can damage your starter motor. Wait about
15 seconds between each try to help avoid draining
your battery or damaging your starter.
2. If the engine does not start within 10 seconds, push
the accelerator pedal all the way to the �oor, while
you hold the ignition key in START. When the
engine starts, let go of the key and let up on the
accelerator pedal. Wait about 15 seconds between
each try.
Depending on the outside temperature, the engine
starter may continue cranking the engine up to
approximately four seconds after you release the
ignition key. This is normal.When starting your engine in very cold weather
(below 0°F or 18°C), do this:
1. With your foot off the accelerator pedal, turn
the ignition key to START and hold it there up
to 15 seconds. When the engine starts, let go
of the key.
2. If your engine still will not start, or starts but then
stops, it could be �ooded with too much gasoline.
Try pushing your accelerator pedal all the way to the
�oor and holding it there as you hold the key in
START for about three seconds. When the engine
starts, let go of the key and accelerator. If the
vehicle starts brie�y but then stops again, do the
same thing, but this time keep the pedal down
for �ve or six seconds. This clears the extra
gasoline from the engine.
Notice:Your engine is designed to work with the
electronics in your vehicle. If you add electrical
parts or accessories, you could change the way the
engine operates. Before adding electrical equipment,
check with your dealer. If you do not, your engine
might not perform properly. Any resulting damage
would not be covered by your vehicle’s warranty.
2-19
Page 118 of 414
Automatic Dimming Rearview Mirror
with Compass and Temperature
Display
The vehicle may have an automatic dimming rearview
mirror with a compass, temperature display, and
map lamps.
Mirror Operation
The mirror automatically changes to reduce glare from
headlamps behind you. A time delay feature prevents
rapid changing from the day to night positions while
driving under lights and through traffic.
P(On/Off):The automatic dimming feature is
automatically activated when the vehicle is started.
The automatic dimming feature is turned on or off by
pressing this button located on the lower part of
the mirror. Press and hold the button for up to
three seconds to turn this feature on or off.
T(Indicator Light):This light will turn on when the
automatic dimming feature is active.
Map Lamps
The mirror has map lamps located at the bottom of the
mirror. To manually turn the lamps on or off, press
the button next to each lamp.
Compass Operation
The mirror has an eight-point compass display in the
bottom of the mirror face.
When the ignition and the compass feature are on,
the compass will show two character boxes for
approximately two seconds. After two seconds, the
mirror will display the current compass heading.
For example, NE is displayed for north-east.
Compass Calibration
If after two seconds the display does not show a
compass heading, there may be a strong magnetic �eld
interfering with the compass. Such interference may
be caused by a magnetic antenna mount, note
pad holder or similar object. If the letter C appears in
the compass window, the compass needs calibration.
The mirror compass can be calibrated by driving
the vehicle in circles at 5 mph (8 km/h) or less until the
display reads a direction.
The compass can be placed in calibration mode by
pressing and holding the left map light button until a C
appears on the compass display.
2-36
Page 127 of 414

Instrument Panel Overview...............................3-4
Hazard Warning Flashers................................3-6
Other Warning Devices...................................3-6
Horn.............................................................3-6
Tilt Wheel.....................................................3-6
Turn Signal/Multifunction Lever.........................3-7
Turn and Lane-Change Signals........................3-8
Headlamp High/Low-Beam Changer..................3-8
Flash-to-Pass.................................................3-9
Windshield Wipers..........................................3-9
Windshield Washer.......................................3-10
Cruise Control..............................................3-10
Exterior Lamps.............................................3-13
Headlamps on Reminder................................3-14
Daytime Running Lamps (DRL).......................3-14
Automatic Headlamp System..........................3-15
Fog Lamps..................................................3-16
Exterior Cargo Lamps....................................3-16
Interior Lamps..............................................3-16
Instrument Panel Brightness...........................3-17
Dome Lamp.................................................3-17
Dome Lamp Override....................................3-17
Exit Lighting.................................................3-17
Battery Run-Down Protection..........................3-17
Accessory Power Outlets...............................3-17
Ashtrays and Cigarette Lighter........................3-18Climate Controls............................................3-19
Climate Control System.................................3-19
Outlet Adjustment.........................................3-21
Warning Lights, Gages, and Indicators............3-22
Instrument Panel Cluster................................3-23
Speedometer and Odometer...........................3-24
Trip Odometer..............................................3-24
Tachometer.................................................3-24
Safety Belt Reminder Light.............................3-24
Airbag Readiness Light..................................3-25
Airbag Off Light............................................3-26
Battery Warning Light....................................3-27
Up-Shift Light (Manual Transmission)...............3-28
Brake System Warning Light..........................3-28
Anti-Lock Brake System Warning Light.............3-29
Engine Coolant Temperature Gage..................3-30
Malfunction Indicator Lamp.............................3-30
Oil Pressure Light.........................................3-33
Security Light...............................................3-34
Cruise Control Light......................................3-34
Highbeam On Light.......................................3-34
Daytime Running Lamps (DRL)
Indicator Light...........................................3-35
Fuel Gage...................................................3-35
Section 3 Instrument Panel
3-1
Page 141 of 414

When the DRL are on, only those lamps will be on.
The taillamps, sidemarkers, and other lamps will not be
on. The instrument panel will not be lit up either.
When it begins to get dark, the automatic headlamp
system will switch from DRL to the headlamps.
As with any vehicle, you should turn on the regular
headlamp system when you need it.
Automatic Headlamp System
When it is dark enough outside, your automatic
headlamp system will turn on your headlamps at the
normal brightness along with other lamps such as
the taillamps, sidemarker, parking lamps, roof marker
lamps and the instrument panel lights. The radio
lights will become more dim when the headlights are
off compared to when the headlights are on.
Your vehicle has a light sensor located on the top of
the instrument panel. Be sure it is not covered, or
the system will be on whenever the ignition is on.
The system may also turn on your headlamps when
driving through a parking garage, heavy overcast
weather or a tunnel. This is normal.There is a delay in the transition between the daytime
and nighttime operation of the Daytime Running
Lamps (DRL) and the automatic headlamp system so
that driving under bridges or bright overhead street lights
does not affect the system. The DRL and automatic
headlamp system will only be affected when the
light sensor sees a change in lighting lasting longer than
the delay.
If you start your vehicle in a dark garage, the automatic
headlamp system will come on immediately. Once
you leave the garage, it will take approximately
one minute for the automatic headlamp system to
change to DRL if it is light outside. During that delay,
your instrument panel cluster may not be as bright
as usual. Make sure your instrument panel brightness
control is in the full bright position. SeeInstrument Panel
Brightness on page 3-17.
3-15
Page 146 of 414
Mode Buttons
@
(Recirculation):If your vehicle has air
conditioning, you will have the recirculation feature. This
mode recirculates air inside the cabin, and prevents
outside air from coming in the vehicle. It can be used to
prevent outside odors from entering your vehicle and
cool the air inside your vehicle more quickly. Press this
button to turn the recirculation mode on or off. An
indicator light on the button will come on to let you know
the recirculation mode is activated.
Recirculation is available only in the bi-level and vent
modes. If you push the recirculation button in any other
mode, the light will not come on.
#(Air Conditioning):Your vehicle may have air
conditioning. Press this button to turn the air-conditioning
system on or off. An indicator light on the button will
come on to let you know the air conditioning is activated.
When the system is on, this setting cools and
dehumidi�es the air entering your vehicle.
The air conditioning will not function if the fan is
turned off.You may notice a slight change in engine performance
when the air conditioning compressor shuts off and
turns on again. This is normal. The system is designed
to make adjustments to help with fuel economy while
still maintaining the selected temperature.
The air conditioning system removes moisture from the
air, so you may sometimes notice a small amount of
water dripping underneath your vehicle while idling
or after turning off the engine. This is normal.
Defogging and Defrosting
Fog on the inside of windows is a result of high humidity
(moisture) condensing on the cool window glass. This
can be minimized if the climate control system is
used properly. There are two modes to clear fog or
frost from your windshield and side windows. Use the
defog mode to clear the windows of fog or moisture
and warm the passengers. Use the defrost mode
to remove fog or frost from the windshield more quickly.
For best results, clear all snow and ice from the
windshield before defrosting.
3-20