Page 212 of 414

While driving on a surface with reduced traction, try
your best to avoid sudden steering, acceleration,
or braking, including engine braking by shifting to a
lower gear. Any sudden changes could cause the tires
to slide. You may not realize the surface is slippery
until your vehicle is skidding. Learn to recognize warning
clues — such as enough water, ice, or packed snow
on the road to make a mirrored surface — and
slow down when you have any doubt.
Remember: Any anti-lock brake system (ABS) helps
avoid only the braking skid.
Off-Road Driving with Your
Four-Wheel-Drive Vehicle
This off-road guide is for vehicles that have four-wheel
drive. Also, seeBraking on page 4-5andAnti-Lock
Brake System (ABS) on page 4-6. If your vehicle does
not have four-wheel drive, you should not drive
off-road unless you are on a level, solid surface.
Off-road driving can be great fun. But it does have some
de�nite hazards. The greatest of these is the terrain
itself.“Off-roading” means you have left the great North
American road system behind. Traffic lanes are not
marked. Curves are not banked. There are no
road signs. Surfaces can be slippery, rough, uphill or
downhill. In short, you have gone right back to nature.
Off-road driving involves some new skills. And that
is why it is very important that you read this guide. You
will �nd many driving tips and suggestions. These
will help make your off-road driving safer and more
enjoyable.
Before You Go Off-Roading
There are some things to do before you go out. For
example, be sure to have all necessary maintenance
and service work done. Check to make sure all
underbody shields (if equipped) are properly attached.
Be sure you read all the information about your
four-wheel-drive vehicle in this manual. Is there enough
fuel? Is the spare tire fully in�ated? Are the �uid
levels up where they should be? What are the local
laws that apply to off-roading where you will be driving?
If you do not know, you should check with law
enforcement people in the area. Will you be on
someone’s private land? If so, be sure to get the
necessary permission.
4-14
Page 268 of 414

Buying New Tires.........................................5-62
Uniform Tire Quality Grading..........................5-63
Wheel Alignment and Tire Balance..................5-64
Wheel Replacement......................................5-64
Tire Chains..................................................5-66
If a Tire Goes Flat........................................5-67
Changing a Flat Tire.....................................5-68
Removing the Spare Tire and Tools................5-69
Removing the Flat Tire and Installing
the Spare Tire..........................................5-73
Secondary Latch System...............................5-80
Storing a Flat or Spare Tire and Tools............5-83
Spare Tire...................................................5-86
Appearance Care............................................5-88
Cleaning the Inside of Your Vehicle.................5-88
Fabric/Carpet...............................................5-90
Leather.......................................................5-90
Instrument Panel, Vinyl, and Other Plastic
Surfaces..................................................5-91
Care of Safety Belts......................................5-91
Weatherstrips...............................................5-91
Washing Your Vehicle...................................5-92Cleaning Exterior Lamps/Lenses.....................5-92
Finish Care..................................................5-92
Windshield and Wiper Blades.........................5-93
Aluminum Wheels.........................................5-93
Tires...........................................................5-94
Sheet Metal Damage.....................................5-94
Finish Damage.............................................5-95
Underbody Maintenance................................5-95
Chemical Paint Spotting.................................5-95
Vehicle Care/Appearance Materials..................5-96
Vehicle Identi�cation......................................5-97
Vehicle Identi�cation Number (VIN).................5-97
Service Parts Identi�cation Label.....................5-97
Electrical System............................................5-98
Add-On Electrical Equipment..........................5-98
Windshield Wiper Fuses................................5-98
Power Windows and Other Power Options.......5-98
Fuses and Circuit Breakers............................5-99
Engine Compartment Fuse Block....................5-99
Capacities and Speci�cations........................5-103
Section 5 Service and Appearance Care
5-2
Page 326 of 414

Tire Inspection and Rotation
Tires should be rotated every 5,000 to 8,000 miles
(8 000 to 13 000 km).
Any time you notice unusual wear, rotate your tires as
soon as possible and check wheel alignment. Also
check for damaged tires or wheels. SeeWhen It Is Time
for New Tires on page 5-61andWheel Replacement
on page 5-64for more information.
Make sure the spare tire is stored securely. Push,
pull, and then try to rotate or turn the tire. If it moves,
use the wheel wrench to tighten the cable. See
Changing a Flat Tire on page 5-68.
The purpose of regular rotation is to achieve more
uniform wear for all tires on the vehicle. The �rst rotation
is the most important, seeScheduled Maintenance
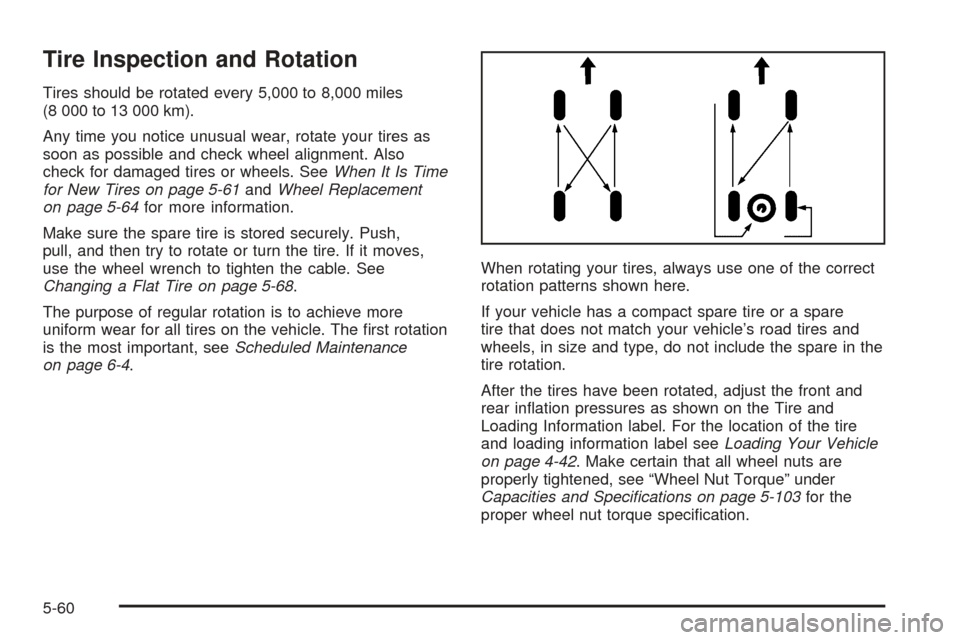
on page 6-4.When rotating your tires, always use one of the correct
rotation patterns shown here.
If your vehicle has a compact spare tire or a spare
tire that does not match your vehicle’s road tires and
wheels, in size and type, do not include the spare in the
tire rotation.
After the tires have been rotated, adjust the front and
rear in�ation pressures as shown on the Tire and
Loading Information label. For the location of the tire
and loading information label seeLoading Your Vehicle
on page 4-42. Make certain that all wheel nuts are
properly tightened, see “Wheel Nut Torque” under
Capacities and Speci�cations on page 5-103for the
proper wheel nut torque speci�cation.
5-60
Page 328 of 414

Buying New Tires
To �nd out what kind and size of tires you need, look
at the Tire and Loading Information label. For more
information about this label and its location on
your vehicle, SeeLoading Your Vehicle on page 4-42.
The tires installed on your vehicle when it was new had
a Tire Performance Criteria Speci�cation (TPC Spec)
number on each tire’s sidewall. When you get new tires,
GM recommends that you get tires with that same
TPC Spec number. That way your vehicle will continue
to have tires that are designed to give proper
endurance, handling, speed rating, traction, ride and
other things during normal service on your vehicle.
If your tires have an all-season tread design, the TPC
number will be followed by an “MS” (for mud and snow).
If you ever replace your tires with those not having
a TPC Spec number, make sure they are the same
size, load range, speed rating and construction
type (bias, bias-belted or radial) as your original tires.{CAUTION:
Mixing tires could cause you to lose control
while driving. If you mix tires of different sizes
or types (radial and bias-belted tires), the
vehicle may not handle properly, and you
could have a crash. Using tires of different
sizes may also cause damage to your vehicle.
Be sure to use the same size and type tires on
all wheels. It’s all right to drive with your
compact spare (if you have one). It was
developed for use on your vehicle.
{CAUTION:
If you use bias-ply tires on your vehicle, the
wheel rim �anges could develop cracks after
many miles of driving. A tire and/or wheel
could fail suddenly, causing a crash. Use only
radial-ply tires with the wheels on your vehicle.
5-62
Page 335 of 414
When you have a �at tire, use the following as a guide
to assist you in the placement of the wheel blocks.
The following information will tell you next how to use
the jack and change a tire.Removing the Spare Tire and Tools
The tools you will need are located under the
passenger’s seat.
For crew cab models, the jack and wheel blocks are
located under the driver’s side rear seat.
Crew Cab
5-69
Page 337 of 414
3. Remove the wheel blocks and the wheel block
retainer by turning the wing nut counterclockwise.
4. Put the wheel blocks at the front and rear of the tire
farthest away from the one being changed. That
would be the tire on the other side, at the opposite
end of the vehicle.
5. Locate the wing nut used to retain the storage bag
and tools which is under the front passenger’s seat.
Remove it by turning the wing nut counterclockwise.You will use the jack handle extensions and the wheel
wrench to remove the underbody-mounted spare tire.
A. Jack Handle Extensions
B. Jack
C. Extension ToolD. Wheel Wrench
E. Wheel Blocks
1. Assemble the wheel wrench (D) and the jack
handle extensions (A) as shown.
5-71
Page 338 of 414
2. Insert the hoist end (chiseled end) of the extension
tool (C) through the hole in the rear bumper and
into the funnel-shaped guide. The chiseled end of
the extension is used to lower the spare tire.
3. Turn the wheel wrench (D) counterclockwise to
lower the spare tire to the ground. Continue to
turn the wheel wrench until the spare tire can be
pulled out from under the vehicle.
If the spare tire does not lower to the ground, the
secondary latch is engaged causing the tire
not to lower. SeeSecondary Latch System on
page 5-80.4. Tilt the retainer when
the tire has been
lowered, and slide it up
the cable so it can
be pulled up through
the wheel opening.
5. Put the spare tire near the �at tire.
5-72
Page 339 of 414
Removing the Flat Tire and
Installing the Spare Tire
Use the following pictures and instructions as a guide in
removing the �at tire and raising the vehicle.
The tools you will be using include the jack (A), the
wheel blocks (B), the extension tool (C), the jack handle
extensions (D), and the wheel wrench (E).1. Remove the center cap by placing the chisel end of
the wheel wrench (E) into one of the slots on the
wheel and gently prying the cap out.
If your vehicle has the Xtreme package, remove
each wheel nut cap with the wheel wrench
and remove the center cap by hand.
5-73