2005 CADILLAC SRX reset
[x] Cancel search: resetPage 206 of 442

Setting the Tone (Bass/Treble)
To adjust the bass, midrange, and treble, perform the
following steps:
1. Press the TUNE/SEL knob to enter the main menu.
2. Turn the TUNE/SEL knob until BASS-MID-TREBLE
appears on the display.
3. Press the TUNE/SEL knob to enter the tone settings.
4. Press the TUNE/SEL knob to scroll through the
settings.
5. Turn the TUNE/SEL knob to increase or to decrease
the bass, midrange, or treble. If a station is weak or
noisy, decrease the treble.
6. Press the TUNE/SEL knob to set the adjustment.
7. Press the CLR button to exit the display. To
return to the original display repeatedly press
the CLR button or wait for the display to time out.AUDIO EQUALIZER:This feature allows you to select
customized equalization settings. To choose an
equalization setting (EQ0 through EQ5), perform the
following steps:
1. Press the TUNE/SEL knob to enter the main menu.
2. Turn the TUNE/SEL knob until EQUALIZER
appears on the display.
3. Press the TUNE/SEL knob to set the equalization
setting. The equalization setting will appear on the
display.
4. Press the CLR button to exit the display. To return
to the original display, repeatedly press the CLR
button or wait for the display to time out.
The equalization settings are preset to EQ0 (Normal),
EQ1 (Pop), EQ2 (Rock), EQ3 (Jazz), EQ4 (Talk),
and EQ5 (Country).
3-86
Page 207 of 442

Adjusting the Speakers (Balance/Fade)
To adjust the balance or fade, perform the
following steps:
1. Press the TUNE/SEL knob to enter the main menu.
2. Turn the TUNE/SEL knob until BASS-MID-TREBLE
appears on the display.
3. Press the TUNE/SEL knob to enter the tone settings.
4. Press the TUNE/SEL knob to scroll to BALANCE or
FADER.
5. Turn the TUNE/SEL knob to adjust the BALANCE
to the right or the left speakers and the FADER to
the front or the rear speakers.
6. Press the TUNE/SEL knob to set the adjustment.
7. Press the CLR button to exit the display. To
return to the original display, repeatedly press
the CLR button or wait for the display to time out.
EQ0 will not appear on the display when in this mode.
Using DSP
Available only with the premium Bose®audio system, this
feature is used to provide a choice of �ve different
listening experiences: DSP normal, talk, spacious, rear
seat, and driver seat. DSP can be used while listening to
the radio or the CD player. The radio keeps separate
DSP settings for each band, preset, and source.
To select a DSP choice, perform the following steps:
1. Press the TUNE/SEL knob to enter the main menu.
2. Turn the TUNE/SEL knob until one of the �ve
settings appears on the display.
3. Press the TUNE/SEL knob to select a DSP setting.
4. Press the CLR button to exit the display. To
return to the original display, repeatedly press
the CLR button or wait for the display to time out.
DSP NORMAL:This setting provides the best overall
audio performance for all passengers. DSP NORMAL
will not appear on the display when in this mode.
3-87
Page 210 of 442

Activating Program Type (PTY)
Stations (RDS and XM™)
PTY allows you to search for stations with speci�c types
of music. The selectable PTYs are POP, EASY,
TALK, CNTRY (Country), CLASS (Classical), and JAZZ.
To activate program types, perform the following steps:
1. Press the TUNE/SEL knob to enter the main menu.
2. Turn the TUNE/SEL knob until PROGRAM TYPE
MODE appears on the display.
3. Press the TUNE/SEL knob to select ON or OFF.
An X will appear in the box when PTY is selected on.
4. Press the CLR button to exit the display. To return
to the original display, repeatedly press the CLR
button or wait for the display to time out.
Once program type is activated the PTYs will appear on
the display above the pushbuttons, in place of the
preset stations (if programmed). Press the pushbutton
for the PTY that you would like to listen to. Not all
stations support PTYs. The radio may not go to all of
the stations with that music type when pressing the
pushbutton.AF (Alternate Frequency):Alternate frequency allows
the radio to switch to a stronger station with the
same program type.
To turn AF on or off, perform the following steps:
1. Press the TUNE/SEL knob to enter the main menu.
2. Turn the TUNE/SEL knob until ALTERNATE
FREQ. appears on the display.
3. Press the TUNE/SEL knob to select AF OFF,
AF ON, or AF REG. An X will appear in the box
when AF is selected on.
4. Press the CLR button to exit the display. To return
to the original display, repeatedly press the CLR
button or wait for the display to time out.
Radio Message
THEFTLOCK:This message is displayed when the
THEFTLOCK®system has been activated. Take
the vehicle to the dealer for service.
3-90
Page 211 of 442

XM™ Radio Messages
Radio Display
MessageCondition Action Required
XL (Explicit Language
Channels)XL on the radio display,
after the channel name,
indicates content with
explicit language.These channels, or any others, can be blocked at a
customer’s request, by calling 1-800-852-XMXM (9696).
XM Updating Updating
encryption codeThe encryption code in the receiver is being updated, and
no action is required. This process should take no longer
than 30 seconds.
No XM Signal Loss of signal The system is functioning correctly, but the vehicle is in a
location that is blocking the XM signal. When the vehicle is
moved into an open area, the signal should return.
Loading XM Acquiring channel audio
(after 4 second delay)The audio system is acquiring and processing audio and
text data. No action is needed. This message should
disappear shortly.
Channel Off Air Channel not in service This channel is not currently in service. Tune in to another
channel.
Channel Unavail Channel no longer
availableThis previously assigned channel is no longer assigned.
Tune to another station. If this station was one of the
presets, choose another station for that preset button.
No Artist Info Artist Name/Feature not
availableNo artist information is available at this time on this channel.
The system is working properly.
No Title Info Song/Program Title not
availableNo song title information is available at this time on this
channel. The system is working properly.
3-91
Page 213 of 442

Using the Single CD Player
Insert a CD partway into the slot, label side up. The
player will pull it in. If the ignition and the radio are on the
CD will begin playing. A CD may be loaded with the radio
off but it will not start playing until the radio is on.
If the ignition or radio is turned off with a CD in the
player, it will stay in the player. When the ignition
or radio is turned on, the CD will start to play where it
stopped, if it was the last selected audio source.
When the CD is inserted, CD will appear on the display.
As each new track starts to play, the track number
will appear on the display.
The CD player can play the smaller 3 inch (8 cm) single
CDs with an adapter ring. Full-size CDs and the
smaller CDs are loaded in the same manner.
If playing a CD-R the sound quality may be reduced
due to CD-R quality, the method of recording, the quality
of the music that has been recorded, and the way the
CD-R has been handled. There may be an increase
in skipping, difficulty in �nding tracks, and/or difficulty in
loading and ejecting. If these problems occur try a
known good CD.Do not add paper labels to CDs, they could get caught
in the CD player.
If an error appears on the display, see “CD Messages”
later in this section.
When a CD is inserted the CD functions will appear on
the display above the pushbuttons, in place of the
preset stations (if programmed).
F1 PREV (Previous):Press this pushbutton to go to
the previous track. Press and hold this pushbutton
to reverse quickly within a track. Release the pushbutton
to play the passage. The elapsed time of the track will
appear on the display.
F2 NEXT:Press this pushbutton to go to the next track.
Press and hold this pushbutton to advance quickly
within a track. Release the pushbutton to play the
passage. The elapsed time of the track will appear on
the display.
F3 RDM (Random):Press this pushbutton to listen to
the tracks in random, rather than sequential, order.
RANDOM will appear on the display. Press RDM again
to turn off random play. RANDOM will disappear
from the display.
3-93
Page 214 of 442

F4 RPT (Repeat):Press this pushbutton to hear a track
over again. REPEAT will appear on the display. Press
RPT again to turn off repeat play. REPEAT will
disappear from the display.
F6 DISP (Display):Press this pushbutton to display the
time of the track. Press this pushbutton again to
remove the time of the track from the display.
QSEEKR:Press the up or the down arrow to go to
the next or to the previous track on the CD.
QSCANR:Press this button to listen to each track
for 10 seconds. The CD will go to a track, play for
10 seconds, then go on to the next track. Press this
button again to stop scanning.
X(Eject):Press this button to stop a CD when it is
playing or to eject a CD when it is not playing. Eject may
be activated with the ignition and the radio off.
Using the Six-Disc CD Changer
The CD player can play the smaller 3 inch (8 cm) single
CDs with an adapter ring. Full-size CDs and the
smaller CDs are loaded in the same manner.
If playing a CD-R the sound quality may be reduced
due to CD-R quality, the method of recording, the quality
of the music that has been recorded, and the way the
CD-R has been handled. There may be an increase
in skipping, difficulty in �nding tracks, and/or difficulty in
loading and ejecting. If these problems occur try a
known good CD.
Do not add paper labels to CDs, they could get caught
in the CD player.
If an error appears on the display, see “CD Messages”
later in this section.
When a CD is inserted the CD functions will appear on
the display above the pushbuttons, in place of the
preset stations (if programmed).
3-94
Page 220 of 442

How to Change the Video Format when in
the Auxiliary Mode
The auxiliary input video format is preset to NTSC. In
some countries, the video format may be in PAL system.
To change the video format, perform the following:
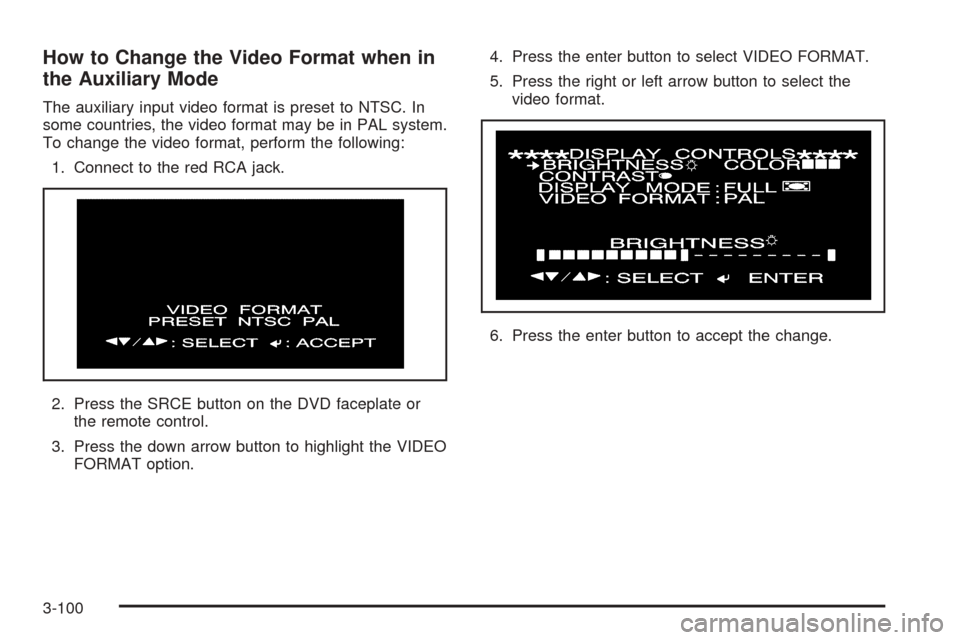
1. Connect to the red RCA jack.
2. Press the SRCE button on the DVD faceplate or
the remote control.
3. Press the down arrow button to highlight the VIDEO
FORMAT option.4. Press the enter button to select VIDEO FORMAT.
5. Press the right or left arrow button to select the
video format.
6. Press the enter button to accept the change.
3-100
Page 232 of 442

g(OnStar/Voice Recognition):If your vehicle has
the Radio with CD or Radio with Six-Disc CD audio
system, press this button to interact with the OnStar
®
system. See the OnStar®manual provided with
your vehicle for more information.
If your vehicle has the navigation system, press this
button to initiate voice recognition. See “Voice
Recognition” in the Navigation System manual for more
information. You may be able to interact with the
OnStar
®system using this button. See the OnStar®
manual provided with your vehicle for more information.
1–6 (Preset Stations):Press this button to play
stations that are programmed on the radio preset
pushbuttons. The radio will only seek preset stations
with a strong signal that are in the selected band.
When a CD is playing, press this button to go to the
next track.
When a CD is playing in the six-disc CD changer, press
this button to go to the next available CD, if multiple
CDs are loaded.+
u— (Volume):Press this button to increase or to
decrease the volume.
+
tu— (Seek):Press either arrow to go to the
next or the previous radio station and stay there.
The radio will only seek stations with a strong signal
that are in the selected band.
When a CD is playing, press the minus sign to go to the
start of the current track, if more than 10 seconds
have played. Press the plus sign to go to the next track.
If either the minus or the plus button are pressed
more than once, the player will continue moving
backward or forward through the CD.
Press and hold the SEEK plus or minus button, until
you hear a beep. The CD will fast forward or fast reverse
through the CD. Press either button again to play the
passage.
If you have the navigation system, some of the audio
steering wheel controls work when a DVD is playing in
the navigation radio. See the Navigation System
manual for more information.
3-112