2005 BUICK LACROSSE radio
[x] Cancel search: radioPage 149 of 410

If the word OFF is lit on the airbag status indicator, it
means that the passenger sensing system has turned off
the right front passenger’s frontal airbag. SeePassenger
Sensing System on page 1-60for more on this,
including important safety information.
If, after several seconds, all status indicator lights
remain on, or if there are no lights at all, there may be a
problem with the lights or the passenger sensing
system. See your dealer for service.
{CAUTION:
If the off indicator and the airbag readiness
light ever come on together, it means that
something may be wrong with the airbag
system. If this ever happens, have the vehicle
serviced promptly, because an adult-size
person sitting in the right front passenger seat
may not have the protection of the frontal
airbag. SeeAirbag Readiness Light on
page 3-33.
Charging System Light
The charging system light
will come on brie�y when
the ignition is turned
on, as a check to show
that it is working. Then it
should go out.
If it stays on, or comes on while the vehicle is being
driven, a chime will sound and there may be a problem
with the charging system. It could indicate that the
vehicle has a loose accessory belt or another electrical
problem. Have it checked right away. Driving while
this light is on could drain the battery.
If the vehicle must be driven a short distance with the
light on, be certain to turn off all the accessories,
such as the radio and air conditioner.
3-35
Page 185 of 410
DIC Vehicle Personalization
Your vehicle may have customization capabilities that
allow you to program certain features to one preferred
setting. Customization features can only be programmed
to one setting on the vehicle and cannot be programmed
to a preferred setting for two different drivers. The
customization features include the following:
Exterior lighting delay
Interior lighting delay
Delayed locking
Content theft
Remote keyless entry feedback
Remote start
Your vehicle may also have personalization capabilities
that allow you to program certain features to a
preferred setting for up to two drivers. The �rst
personalized key corresponds to driver 1 and the second
personalized key corresponds to driver 2. The
personalization features include the following:
Radio station presets
Auto door lock preferences
Auto door unlock preferences
Remote keyless entry unlock preferencesAll of the customization and personalization options may
not be available on your vehicle. Only the options
available will be displayed on your DIC.
The default settings for the customization and
personalization features were set when your vehicle left
the factory, but may have been changed from their
default state since then.
The customization preferences are automatically
recalled.
The driver’s personalization preferences are recalled by
using the key programmed for driver 1 or 2.
To change customization and personalization
preferences, use the following procedure.
Entering the Personal Program Menu
1. Turn the ignition on and place the vehicle in
PARK (P).
2. Press the option button until PERSONAL
PROGRAM displays.
If the vehicle is not in PARK (P), PERSONAL
PROGRAM ONLY IN PARK will display.
If the vehicle is not able to enter the personal
program menu, PERSONAL PROGRAM NOT
AVAILABLE will display.
3-71
Page 190 of 410
REPLACE KEY
This screen displays only if YES was selected for the
PERSONALIZE KEY feature, keys 1 and 2 have already
been personalized, and the current key being used is
not key 1 or 2. This feature allows you to program a key
to be recognized as key 1 or 2 in the event that the
previously programmed key needs to be replaced.
1:The key will be programmed to be recognized
as key 1.
2:The key will be programmed to be recognized
as key 2.
CANCEL (default):The key will not be programmed.
RADIO STATIONS PERSONALIZED
This screen displays only if YES was selected for the
PERSONALIZE KEY feature. This feature allows you to
set the radio station presets to be recognized for the
key, 1 or 2, that is being used. You may notice a change
to the radio after this message displays. Once this
message displays, set the radio station presets. If the
presets are not set at this time, the presets will not
be recognized for key 1 or 2, however, the vehicle radio
station presets will be maintained.
AUTO DOOR LOCK
This feature allows automatic door locking to be turned
OFF or ON.
Press the option button until AUTO DOOR LOCK
appears on the DIC display. Press the set/reset button
to scroll through the following choices:
OFF:All automatic door locking is disabled. The doors
will always need to be locked manually before driving,
to increase occupant safety.
ON (default):The vehicle’s doors automatically lock
when the doors are closed and the vehicle is shifted into
DRIVE (D).
Select one of the available choices and press the option
button while it is displayed on the DIC to select it and
move on to the next feature.
3-76
Page 193 of 410
Audio System(s)
Notice:Before adding any sound equipment to
your vehicle, like a tape player, CB radio, mobile
telephone, or two-way radio, make sure that it can
be added by checking with your dealer. Also,
check federal rules covering mobile radio and
telephone units. If sound equipment can be added,
it is very important to do it properly. Added
sound equipment may interfere with the operation
of your vehicle’s engine, radio, or other systems,
and even damage them. Your vehicle’s systems may
interfere with the operation of sound equipment
that has been added improperly.
Figure out which audio system is in your vehicle, �nd
out what your audio system can do, and how to operate
all of its controls.
Your vehicle has a feature called Retained Accessory
Power (RAP). With RAP, the audio system can be played
even after the ignition is turned off. SeeRetained
Accessory Power (RAP) on page 2-22for more
information.
Setting the Time
Press and hold H until the correct hour appears on the
display. AM or PM will appear on the display (Radio
with CD (UpLevel, MP3, and Six-Disc CD)). Press and
hold M until the correct minute appears on the
display. The time can be set with the ignition on or off.
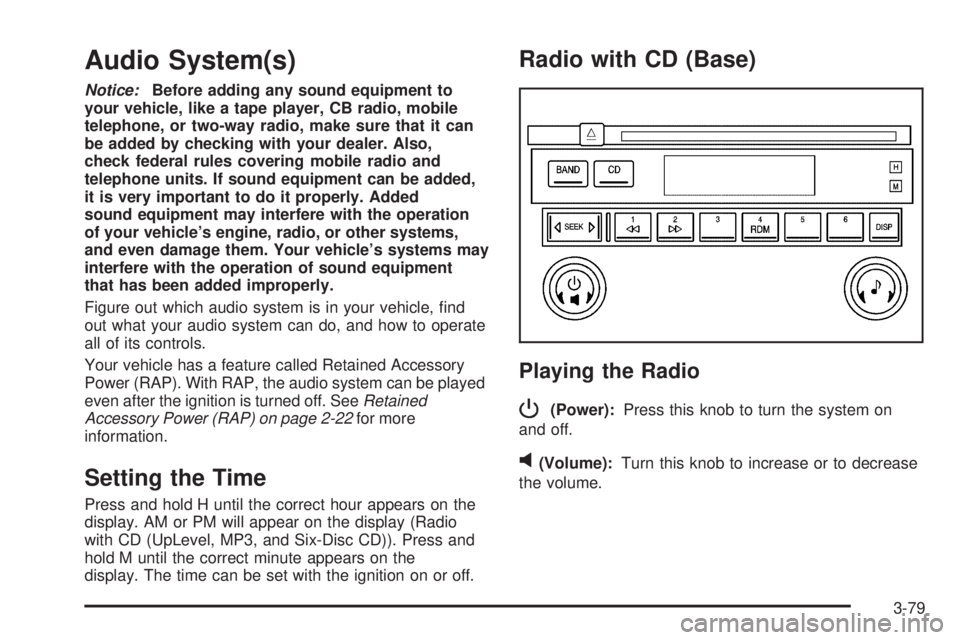
Radio with CD (Base)
Playing the Radio
P
(Power):Press this knob to turn the system on
and off.
v(Volume):Turn this knob to increase or to decrease
the volume.
3-79
Page 194 of 410
DISP (Display):Press this button to switch the display
between the radio station frequency, band, and time
of day. When the ignition is turned off, press this knob to
display the time.
To change the default on the display, press the DISP
button until you see the display you want, then hold
this button for two seconds. The radio will produce
one beep and the selected display will now be
the default.
Finding a Station
BAND:Press this button to switch between FM1, FM2,
and AM. The display will show the selection.
e(Tune):Turn this knob to select radio stations.
oSEEKp:Press and release the right or the left
arrow to go to the next or to the previous station
and stay there.
To scan stations, press and hold either arrow for more
than two seconds. SCN will appear on the display
and the radio will produce one beep. The radio will go
to a station, play for a few seconds, then go on to
the next station. Press either arrow again or one of the
pushbuttons to stop scanning presets.To scan preset stations, press and hold either arrow for
more than four seconds. PSC will appear on the
display and the radio will produce two beeps. The radio
will go to a preset station, play for a few seconds,
then go on to the next preset station. Press either
arrow again or one of the pushbuttons to stop
scanning presets.
The radio will only seek and scan stations with a strong
signal that are in the selected band.
Setting Preset Stations
Up to 18 stations (six FM1, six FM2, and six AM), can
be programmed on the six numbered pushbuttons,
by performing the following steps:
1. Turn the radio on.
2. Press BAND to select FM1, FM2, or AM.
3. Tune in the desired station.
4. Press and hold one of the six numbered
pushbuttons until you hear a beep. Whenever that
numbered pushbutton is pressed, the station
that was set will return.
5. Repeat the steps for each pushbutton.
3-80
Page 195 of 410
Setting the Tone (Bass/Treble)
e
(Bass/Treble):Push and release this knob until
BAS or TRE appears on the display. Turn this knob to
increase or to decrease. The display will show the
bass or the treble level. If a station is weak or noisy,
decrease the treble.
To adjust the bass and the treble to the middle position,
push and hold the tone knob. The radio will produce
one beep.
To adjust all tone and speaker controls to the middle
position, push and hold the tone knob when no tone or
speaker control is displayed. CEN will appear on the
display and you will hear a beep.
Adjusting the Speakers (Balance/Fade)
e
(Balance/Fade):To adjust the balance between
the right and the left speakers, push and release
this knob until BAL appears on the display. Turn the
knob to move the sound toward the right or the
left speakers.
To adjust the fade between the front and the rear
speakers, push and release the speaker knob until FAD
appears on the display. Turn the knob to move the
sound toward the front or the rear speakers.To adjust the balance and the fade to the middle
position, push the speaker knob, then push it again and
hold it until you hear one beep.
To adjust all tone and speaker controls to the middle
position, push and hold the speaker knob when no tone
or speaker control is displayed. CEN will appear on
the display and you will hear a beep.
Radio Messages
CAL (Calibration):The audio system has been
calibrated for your vehicle from the factory. If CAL
appears on the display it means that the radio has not
been con�gured properly for your vehicle and it must be
returned to your GM dealer for service.
LOC (Locked):This message is displayed when the
THEFTLOCK
®system has locked up. Take your vehicle
to your GM dealer for service.
If any error occurs repeatedly or if an error cannot be
corrected, contact your GM dealer.
3-81
Page 196 of 410
Playing a CD
Insert a CD partway into the slot, label side up. The
player will pull it in and the CD should begin playing. If
you want to insert a CD with the ignition off, �rst
press the eject button or the DISP knob.
If the ignition or radio is turned off with a CD in the
player it will stay in the player. When the ignition or radio
is turned on, the CD will start to play where it stopped,
if it was the last selected audio source.
When the CD is inserted, CD will appear on the display.
As each new track starts to play, the track number
will appear on the display.
The CD player can play the smaller 3 inch (8 cm) single
CDs with an adapter ring. Full-size CDs and the
smaller CDs are loaded in the same manner.
If playing a CD-R the sound quality may be reduced
due to CD-R quality, the method of recording, the quality
of the music that has been recorded, and the way the
CD-R has been handled. There may be an increase
in skipping, difficulty in �nding tracks, and/or difficulty in
loading and ejecting. If these problems occur try a
known good CD.Do not add paper labels to CDs, they could get caught
in the CD player.
If an error appears on the display, see “CD Messages”
later in this section.
1
s(Reverse):Press this button to reverse within
the current track.
2
\(Fast Forward):Press this button to fast forward
within the current track.
4 RDM (Random):Press this pushbutton to hear the
tracks in random, rather than sequential, order. RND will
appear on the display. Press this pushbutton again to
turn off random play.
oSEEKp:Press the left arrow to go to the start of
the current or the previous track. Press the right
arrow to go to the start of the next track.
To scan tracks, press either arrow for more than
two seconds until SCN appears on the display. The CD
will search the previous or next tracks at two seconds
per track. Press either arrow to stop scanning.
3-82
Page 197 of 410
DISP (Display):Press this button to see how long the
current track has been playing. The elapsed time of
the track will appear on the display. To change
the default on the display, track, elapsed time, or time of
day, press this button until you see the display you
want, then hold the button for two seconds. The radio
will produce one beep and the selected display will now
be the default.
BAND:Press this button to listen to the radio when a
CD is playing. The inactive CD will remain safely
inside the radio for future listening.
CD:Press this button to play a CD when listening to
the radio. The CD symbol will appear on the display
when a CD is loaded.
Z(Eject):Press this button to eject a CD. Eject may
be activated with either the ignition or radio off. CDs
may be loaded with the ignition and radio off if this
button is pressed �rst.
CD Messages
CHECK CD:If this message appears on the display
and/or the CD comes out, it could be for one of the
following reasons:
It is very hot. When the temperature returns to
normal, the CD should play.
You are driving on a very rough road. When the
road becomes smoother, the CD should play.
The CD is dirty, scratched, wet, or upside down.
The air is very humid. If so, wait about an hour and
try again.
There may have been a problem while burning
the CD.
The label may be caught in the CD player.
If the CD is not playing correctly, for any other reason,
try a known good CD.
If any error occurs repeatedly or if an error cannot be
corrected, contact your GM dealer. If the radio displays
an error message, write it down and provide it to
your GM dealer when reporting the problem.
3-83