2005 BMW Z4 ROADSTER 2.5I ESP
[x] Cancel search: ESPPage 8 of 120

Notes
6
For your own safety
Maintenance and repair
Advanced technology, e. g. the use of
modern materials and high-performance
electronics, requires specially adapted mainte-
nance and repair methods. Therefore, only have
corresponding work on your BMW carried out
by a BMW center or a workshop that works
according to BMW repair procedures with cor-
respondingly trained personnel. If work is car-
ried out improperly there is a danger of conse-
quential damage and the related safety risks.<
California Proposition 65 warning
California laws require us to state the following
warning:
Engine exhaust and a wide variety of
automobile components and parts,
including components found in the interior fur-
nishings in a vehicle, contain or emit chemicals
known to the State of California to cause cancer
and birth defects and reproductive harm. In
addition, certain fluids contained in vehicles and
certain products of component wear contain or
emit chemicals known to the State of CA to
cause cancer and birth defects or other repro-
ductive harm.
Battery posts, terminals and related accesso-
ries contain lead and lead compounds. Batter-
ies also contain other chemicals known to the
State of California to cause cancer. Wash your
hands after handling.
Used engine oil contains chemicals that have
caused cancer in laboratory animals. Always
protect your skin by washing thoroughly with
soap and water.<
Parts and accessories
For your own safety, use parts and acces-
sories approved by BMW.
When you purchase accessories tested and
approved by BMW and Original BMW Parts, you
simultaneously acquire the assurance that they
have been thoroughly tested by BMW to ensure
optimum performance when installed on your
vehicle. BMW warrants these parts to be free from
defects in material and workmanship.
BMW will not accept any liability for damage
resulting from installation of parts and accesso-
ries not approved by BMW.
BMW cannot test every product made by other
manufacturers to verify if it can be used on a
BMW safely and without risk to either the vehi-
cle, its operation, or its occupants.
Original BMW Parts, BMW Accessories and
other products approved by BMW, together
with professional advice on using these items,
are available from all BMW retailers.
Installation and operation of non-BMW
approved accessories such as alarms, radios,
amplifiers, radar detectors, wheels, suspension
components, brake dust shields, telephones,
including operation of any portable cellular
phone from within the vehicle without using an
externally mounted antenna, or transceiver
equipment, e.g. C.B., walkie-talkie, ham radio or
similar, may cause extensive damage to the
vehicle, compromise its safety, interfere with
the vehicle's electrical system or affect the
validity of the BMW Limited Warranty. See your
BMW center for additional information.
Do not use key or remote control to lock doors
or trunk with anyone inside the vehicle. Refer to
the Owner's Manual for more details.<
Maintenance, replacement or repair of
the emission control devices and sys-
tems may be performed by any automotive
repair establishment or individual using any cer-
tified automotive part.<
Page 14 of 120

Cockpit
12
Instrument cluster
1Speedometer
2Indicator and warning lamps12
3Tachometer46
with indicator and warning lamps12
4Engine coolant temperature gauge46
5Fuel gauge46
6Button for
>Time47
>Service interval display47
7Display field for selector lever and program
indicator
>Automatic transmission
*38
>Sequential manual gearbox SMG
*40
8Button for
>Trip odometer, reset to zero46
>Setting time47
9Display for
>Trip odometer/Odometer46
>Clock47
>Service interval47
>Computer
*48
Indicator and warning lamps
Technology that monitors itself
Indicator and warning lamps that are identified
by
+ are tested for proper functioning whenever
the ignition key is turned. They each light up
once for different periods of time.
If a malfunction occurs in one of the monitored
systems, the corresponding light does not go
out after the engine has started, or it lights up
again while the vehicle is in motion. You can find
more information about each system on the
specified pages.
Safety belt reminder +30
Airbags
+53
Battery charge current
+94
Page 19 of 120

Reference
At a glance
Controls
Driving tips
Mobility
17
Press the button once to unlock the driver’s
door and the fuel filler door; press a second time
to disengage all vehicle locks.
Convenience opening mode
Keep the button pressed:
The windows and the fully automatic convert-
ible top are opened.
To lock and secure
Press the button.
The hazard warning flashers light up once.
If you wish, you can have this special fea-
ture activated/deactivated.<
To switch on the interior lamps
With the vehicle locked:
Press the button.
With this function, you can also search for your
vehicle when parked in an underground garage,
for instance.
To open the luggage compartment
Press button briefly.
The luggage compartment lid will open slightly,
regardless of whether it was locked or
unlocked.
Before and after a trip, be sure that the
luggage compartment lid has not been
opened unintentionally.<
Panic mode*
By pressing and holding button for more
than approx. two seconds, you can trigger the
alarm systems
* in response to any impending
danger.
To switch off the alarm: press any of the but-
tons.
Malfunction
Local radio waves can impede the functioning
of the remote control.
Should this occur, open and close the vehicle
using the master key in either a door or the lug-
gage compartment lock.If it is no longer possible to lock the vehicle with
the remote control, the battery is discharged.
Use this remote control key while driving for an
extended period in order to recharge the bat-
tery, refer to page16.
For US owners only
The transmitter and receiver units comply with
part 15 of the FCC, Federal Communications
Commission, regulations. Operation is gov-
erned by the following:
FCC ID: LX8EWS
LX8FZVS
LX8FZVE
Compliance statement:
This device complies with part 15 of the FCC
Rules. Operation is subject to the following two
conditions:
>This device may not cause harmful interfer-
ence, and
>this device must accept any interference
received, including interference that may
cause undesired operation.
Any unauthorized modifications to these
devices could void the user's authority to
operate the equipment.<
At the door lock
One turn of the key in the driver's door lock
unlocks the driver's door and the fuel filler door.
Turn the key a second time to disengage all
other vehicle locks.
When the vehicle is locked, the hazard warning
flashers light up once.
If you wish, you can have this special fea-
ture activated/deactivated.<
Page 22 of 120

Opening and closing
20
Windows
To open and close a window
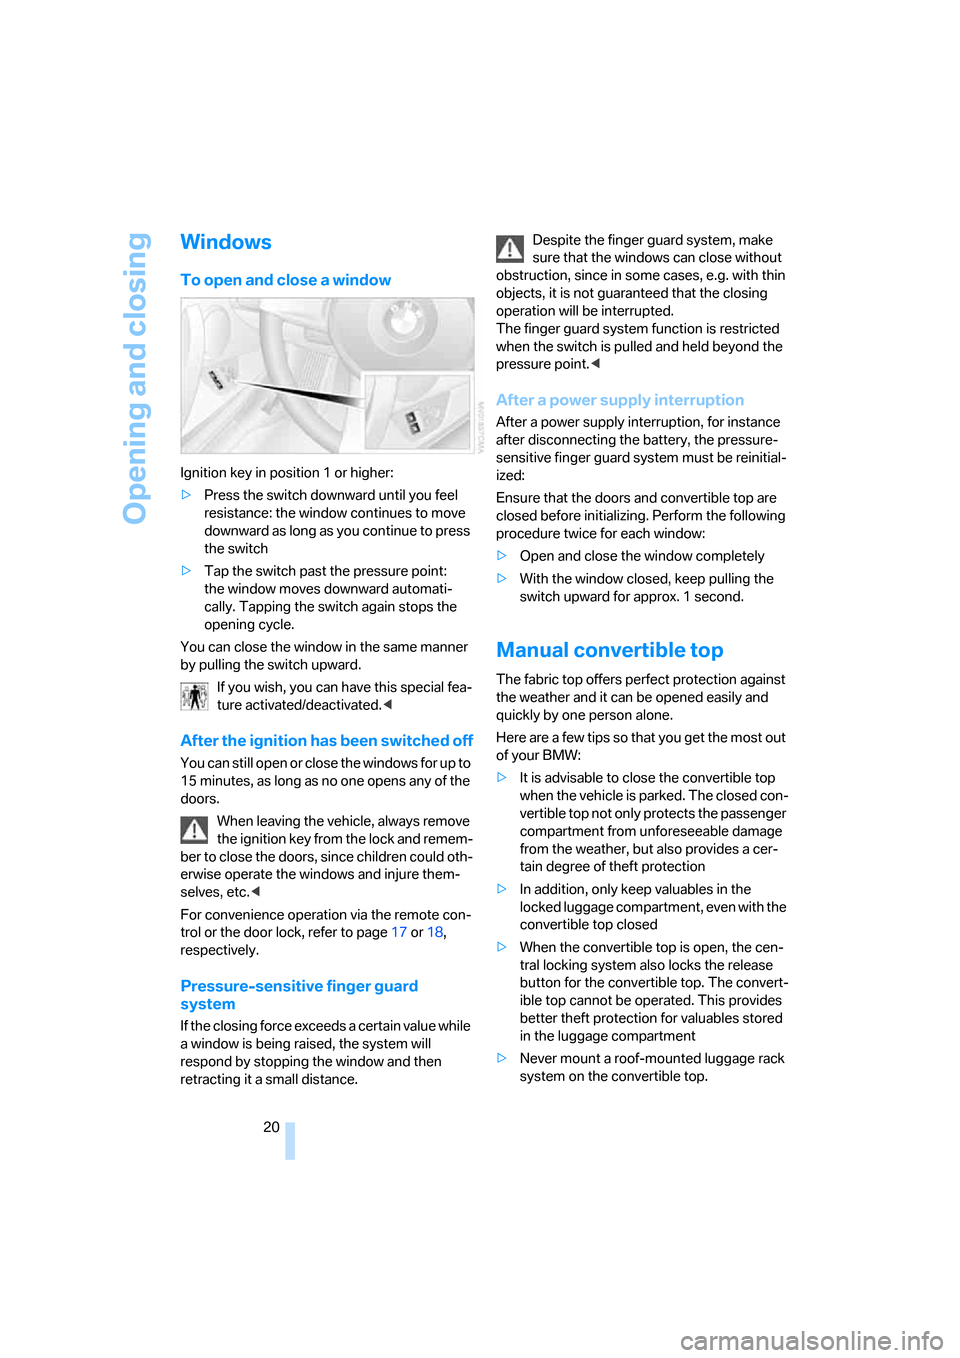
Ignition key in position 1 or higher:
>Press the switch downward until you feel
resistance: the window continues to move
downward as long as you continue to press
the switch
>Tap the switch past the pressure point:
the window moves downward automati-
cally. Tapping the switch again stops the
opening cycle.
You can close the window in the same manner
by pulling the switch upward.
If you wish, you can have this special fea-
ture activated/deactivated.<
After the ignition has been switched off
You can still open or close the windows for up to
15 minutes, as long as no one opens any of the
doors.
When leaving the vehicle, always remove
the ignition key from the lock and remem-
ber to close the doors, since children could oth-
erwise operate the windows and injure them-
selves, etc.<
For convenience operation via the remote con-
trol or the door lock, refer to page17 or18,
respectively.
Pressure-sensitive finger guard
system
If the closing force exceeds a certain value while
a window is being raised, the system will
respond by stopping the window and then
retracting it a small distance.Despite the finger guard system, make
sure that the windows can close without
obstruction, since in some cases, e.g. with thin
objects, it is not guaranteed that the closing
operation will be interrupted.
The finger guard system function is restricted
when the switch is pulled and held beyond the
pressure point.<
After a power supply interruption
After a power supply interruption, for instance
after disconnecting the battery, the pressure-
sensitive finger guard system must be reinitial-
ized:
Ensure that the doors and convertible top are
closed before initializing. Perform the following
procedure twice for each window:
>Open and close the window completely
>With the window closed, keep pulling the
switch upward for approx. 1 second.
Manual convertible top
The fabric top offers perfect protection against
the weather and it can be opened easily and
quickly by one person alone.
Here are a few tips so that you get the most out
of your BMW:
>It is advisable to close the convertible top
when the vehicle is parked. The closed con-
vertible top not only protects the passenger
compartment from unforeseeable damage
from the weather, but also provides a cer-
tain degree of theft protection
>In addition, only keep valuables in the
locked luggage compartment, even with the
convertible top closed
>When the convertible top is open, the cen-
tral locking system also locks the release
button for the convertible top. The convert-
ible top cannot be operated. This provides
better theft protection for valuables stored
in the luggage compartment
>Never mount a roof-mounted luggage rack
system on the convertible top.
Page 24 of 120

Opening and closing
22 the top not only guards the passenger com-
partment from unforeseeable damage from
the weather, but also affords a degree of
protection against theft. In addition, only
keep valuables in the locked luggage com-
partment, even with the convertible top
closed
>Never mount a roof-mounted luggage rack
system on the convertible top
>To avoid damage, do not operate the con-
vertible top at temperatures below 147/
–106.
To avoid permanent damage from mois-
ture, never store the convertible top while
it is wet.
Driving when the opening or closing process
has not been completed can cause vehicle
damage or personal injury.
Do not lay objects on the convertible top, since
they could fall off when the convertible top is
operated and cause damage or injuries.
Do not reach into the convertible top mecha-
nism during opening and closing. Keep children
away from the moving parts of the convertible
top during operation.<
If possible, only operate the convertible
top with the vehicle stopped, as other-
wise the process may be interrupted.
If you set the convertible top in motion while the
vehicle is stationary and then have to start sud-
denly, for instance at a traffic light, you can still
complete the procedure by driving as slowly as
possible and again holding the corresponding
button pressed.
At higher speeds, a vacuum effect in the pas-
senger compartment can cause the convertible
top to begin fluttering. Increase the air supply
so that a low pressure draft does not occur in
the vehicle.<
Opening and closing
1To close
2To open
If at all possible, only operate the convert-
ible top if the engine is running. This
saves unnecessary battery wear.
Before closing the convertible top, remove any
objects from the windshield frame that could
keep the convertible top from closing prop-
erly.<
Ignition key in position 1 or higher.
With the vehicle standing.
1.Read and comply with the preceding safety
precautions
2.Make sure that the convertible top com-
partment panel in the luggage compart-
ment is lowered; refer to page19. Other-
wise the convertible top cannot be opened
3.Ensure that the luggage compartment lid is
closed
4.Press and hold the corresponding button
for convertible top operation.
If the convertible top should halt right before the
closing phase is completed, press against the
front part of the convertible top frame from the
outside to help the closing process along. Keep
pressing the button while doing so until the top
starts up again on its own.
Indicator lamps
>The red indicator lamp in the button will
light up while the convertible top is in
motion. It goes out as soon as the opening
or closing operation has been completed
>If the red indicator lamp in the button
flashes after the button has been released,
Page 27 of 120

Reference
At a glance
Controls
Driving tips
Mobility
25
Clothes hooks
Clothes hooks1 are located on the wind deflec-
tor panels in the rollover bars.
Do not hang heavy objects on the hooks.
If you do, they could endanger the pas-
sengers, for example during braking or evasive
maneuvers.<
Storage
For storage, e.g. to achieve a better view to the
rear when the convertible top is closed, there
are two brackets on the inside of the luggage
compartment lid.
Insert the wind deflector into the brackets.
Make sure that the wind deflector cannot
be damaged by objects in the luggage
compartment.<
Alarm system*
The concept
The vehicle alarm system responds:
>When a door, the hood or the luggage com-
partment lid is opened
>When attempts are made to start the vehi-
cle
>When there are movements in the vehicle
interior: interior motion sensor, refer to
page26
>To alterations in the vehicle tilt, e.g. as
would occur during attempts to steal the
wheels or tow the vehicle
>To interruption of battery voltage.
The alarm produced by the system in the event
of unauthorized vehicle entry and attempted
theft depends on the country version:
>Sounding of an acoustical alarm for
30 seconds
>Activation of the hazard warning flashers for
approx. five minutes.
Arming and disarming the alarm
system
When the vehicle is locked or unlocked either
with the remote control or at the driver's door
lock, the alarm system is simultaneously armed
or disarmed.
The hazard warning flashers blink once when
the alarm system has been properly armed.
You can have different acknowledgment
signals set to confirm arming and disarm-
ing.<
You can still open the luggage compartment
even when the system is armed by pressing the
button on the remote control, refer to
page17. When it is closed, the lid is once again
secured.
Manual operation of the luggage com-
partment lid triggers the alarm. Refer to
page18.<
Page 30 of 120

Adjustments
28
Seats
Before adjusting your seat, always
observe the following precautions
Never try to adjust your seat while operat-
ing the vehicle. The seat could respond
with an unexpected movement, and the ensu-
ing loss of vehicle control could result in an
accident.
Never ride with the backrest inclined to an
extreme angle – this also applies to the passen-
ger seat. If you do, there is a risk that you will
slide under the safety belt in the event of an
accident, thus reducing the protection provided
by the safety belt.<
In addition, observe the instructions regarding
damaged safety belts on page30.
Seat adjustment
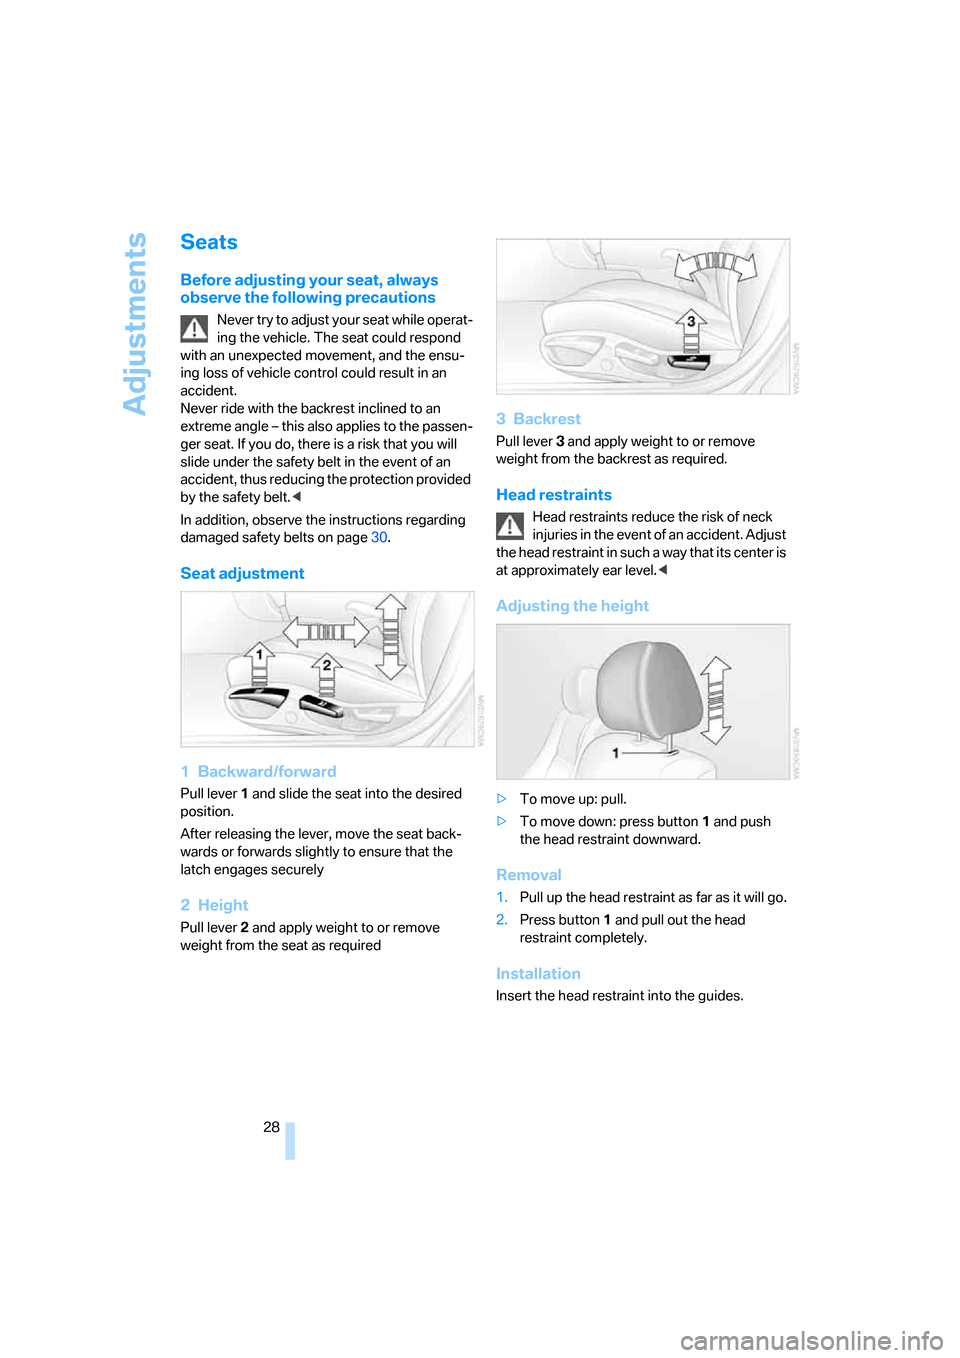
1 Backward/forward
Pull lever1 and slide the seat into the desired
position.
After releasing the lever, move the seat back-
wards or forwards slightly to ensure that the
latch engages securely
2Height
Pull lever 2 and apply weight to or remove
weight from the seat as required
3Backrest
Pull lever3 and apply weight to or remove
weight from the backrest as required.
Head restraints
Head restraints reduce the risk of neck
injuries in the event of an accident. Adjust
the head restraint in such a way that its center is
at approximately ear level.<
Adjusting the height
>To move up: pull.
>To move down: press button1 and push
the head restraint downward.
Removal
1.Pull up the head restraint as far as it will go.
2.Press button1 and pull out the head
restraint completely.
Installation
Insert the head restraint into the guides.
Page 33 of 120

Reference
At a glance
Controls
Driving tips
Mobility
31
Steering wheel
Adjustments
Never attempt to adjust the steering
wheel while driving the vehicle. It could
respond with unexpected movement, posing a
potential accident hazard.<
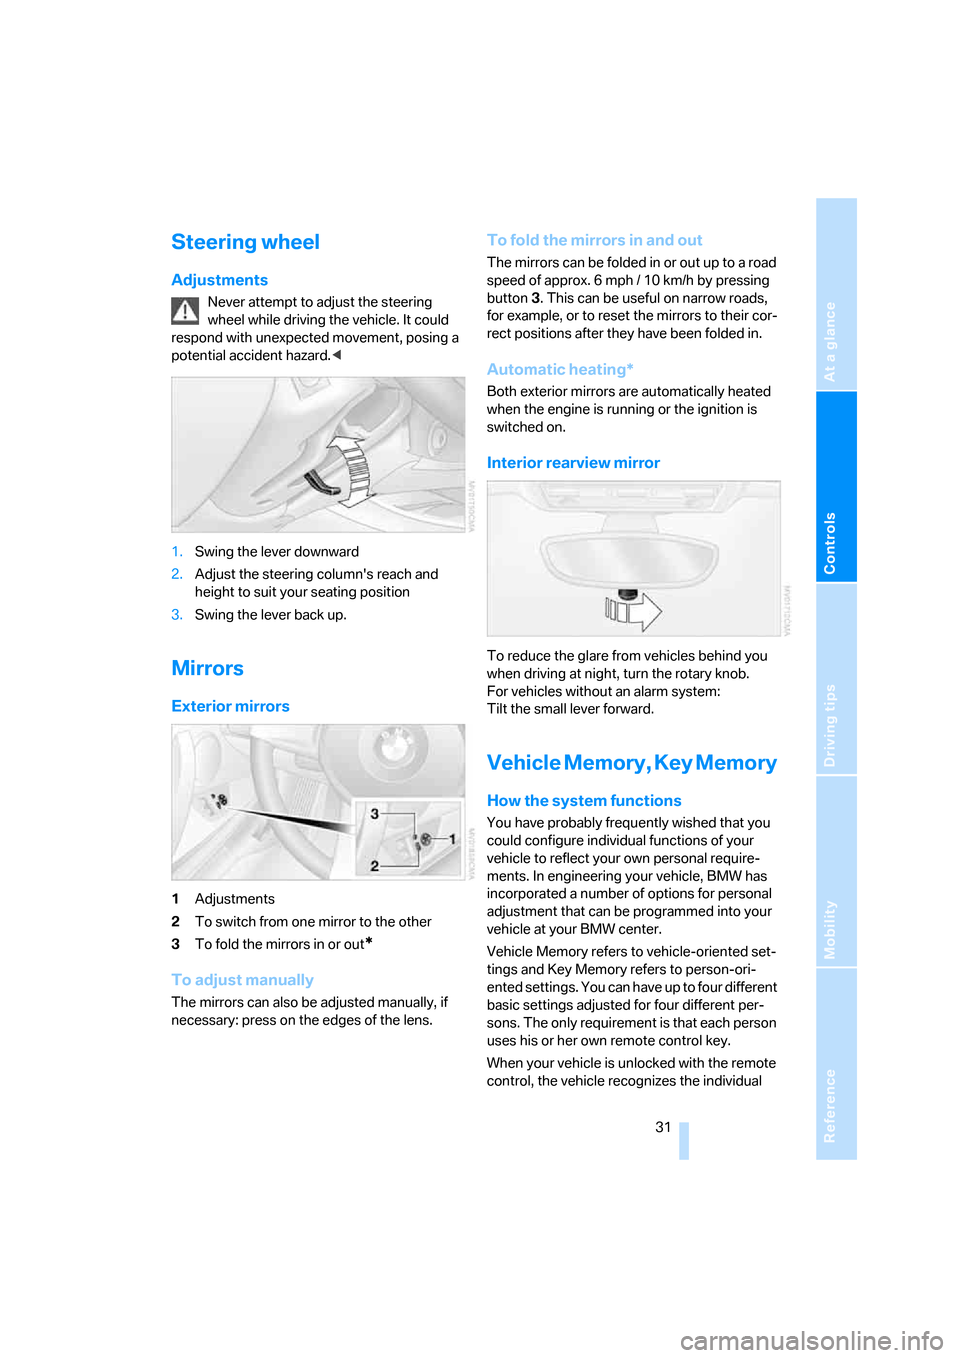
1.Swing the lever downward
2.Adjust the steering column's reach and
height to suit your seating position
3.Swing the lever back up.
Mirrors
Exterior mirrors
1Adjustments
2To switch from one mirror to the other
3To fold the mirrors in or out
*
To adjust manually
The mirrors can also be adjusted manually, if
necessary: press on the edges of the lens.
To fold the mirrors in and out
The mirrors can be folded in or out up to a road
speed of approx. 6 mph / 10 km/h by pressing
button3. This can be useful on narrow roads,
for example, or to reset the mirrors to their cor-
rect positions after they have been folded in.
Automatic heating*
Both exterior mirrors are automatically heated
when the engine is running or the ignition is
switched on.
Interior rearview mirror
To reduce the glare from vehicles behind you
when driving at night, turn the rotary knob.
For vehicles without an alarm system:
Tilt the small lever forward.
Vehicle Memory, Key Memory
How the system functions
You have probably frequently wished that you
could configure individual functions of your
vehicle to reflect your own personal require-
ments. In engineering your vehicle, BMW has
incorporated a number of options for personal
adjustment that can be programmed into your
vehicle at your BMW center.
Vehicle Memory refers to vehicle-oriented set-
tings and Key Memory refers to person-ori-
ented settings. You can have up to four different
basic settings adjusted for four different per-
sons. The only requirement is that each person
uses his or her own remote control key.
When your vehicle is unlocked with the remote
control, the vehicle recognizes the individual