Page 17 of 200
17n
OverviewControlsMaintenanceRepairsDataIndex
Instrument cluster X5 3.0i, 4.4i
*
1 Fuel gage78
2 Indicator lamp for turn signals22
3 Speedometer
4 Indicator and warning lamps19
to22
5 Tachometer77
Energy control77
6 Coolant temperature gage797 Indicator and warning lamps19
to22
8 Reset button for trip odometer76
9 Service Interval Display79
10 Indicator for
>Trip odometer/odometer76
>Outside temperature76
11 Indicator for Check Control8012 Selector lever and program display
for automatic transmission
*
67
13 CHECK button80
14 Indicator and warning lamps19
to22
530us251
Page 18 of 200
18n
Instrument cluster X5 4.8is 1Fuel gage78
2 Indicator lamp for turn signals22
3 Speedometer
4 Indicator and warning lamps19
to22
5 Tachometer77
Engine oil thermometer
6 Coolant temperature gage797 Indicator and warning lamps19
to22
8 Reset button for trip odometer76
9 Service Interval Display79
10 Indicator for
>Trip odometer/odometer76
>Outside temperature76
11 Indicator for Check Control8012 Selector lever and program display
for automatic transmission67
13 CHECK button80
14 Indicator and warning lamps19
to22
530us252
Page 19 of 200

19n
OverviewControlsMaintenanceRepairsDataIndex
Indicator and warning lamps Technology that monitors itself Indicator and warning lamps that are
identified by
+ are tested for proper
functioning whenever the ignition key is
turned. They each light up once for dif-
ferent periods of time.
If a fault should occur in one of the
monitored systems, the corresponding
lamp does not go out after the engine is
started or it lights up while the vehicle is
moving. You will see how to react to
this in the following section.
Red: stop immediately
Battery charge current
+
The battery is not being
charged. There is a malfunction
of the alternator drive belt or in the
charging circuit of the alternator. Have
the system checked immediately.
If the drive belt is defective, do not
continue driving. The engine could
be damaged due to overheating. If the
drive belt is defective, increased steer-
ing effort is also required.<
Engine oil pressure
+
Stop immediately and switch off
the engine. Check the engine oil
level; top up as required. If the oil level
is correct: have the system checked
immediately.
Do not continue driving. The
engine could be damaged
because of inadequate lubrication.<
Handbrake
*/
brake hydraulic system
+
Lights up with handbrake
engaged.
For additional information, refer to
page66
Comes on although the handbrake is
released: stop immediately. The brake
fluid in the reservoir has fallen to below
the minimum level. At the same time, a
considerably longer brake pedal travel
may be noticeable. Have the system
checked immediately.
During continued driving
increased brake pedal pressure
may be necessary, and considerably
longer braking distances may result.
Please remember to adapt your driving
style accordingly.<
Before continuing your journey, be sure
to read the notes on pages140
and153.
Also comes on in the Check Control
with the message CHECK BRAKE
LININGS.
Indication of the malfunction in
Canadian models described
above.
Page 20 of 200

20n
Indicator and warning lamps
Transmission temperature
* +
The transmission is overheated.
Reduce speed immediately and
stop at a suitable location so that the
system can cool down again. Have the
system checked immediately.
Yellow: stop immediately
Flat Tire Monitor
+
An acoustic signal also sounds:
there is a flat tire or extensive
inflation pressure loss. Reduce speed
immediately for stopping while avoiding
extreme braking and steering maneu-
vers.
For additional information, refer to
page102
Red or yellow: continue to drive
cautiously
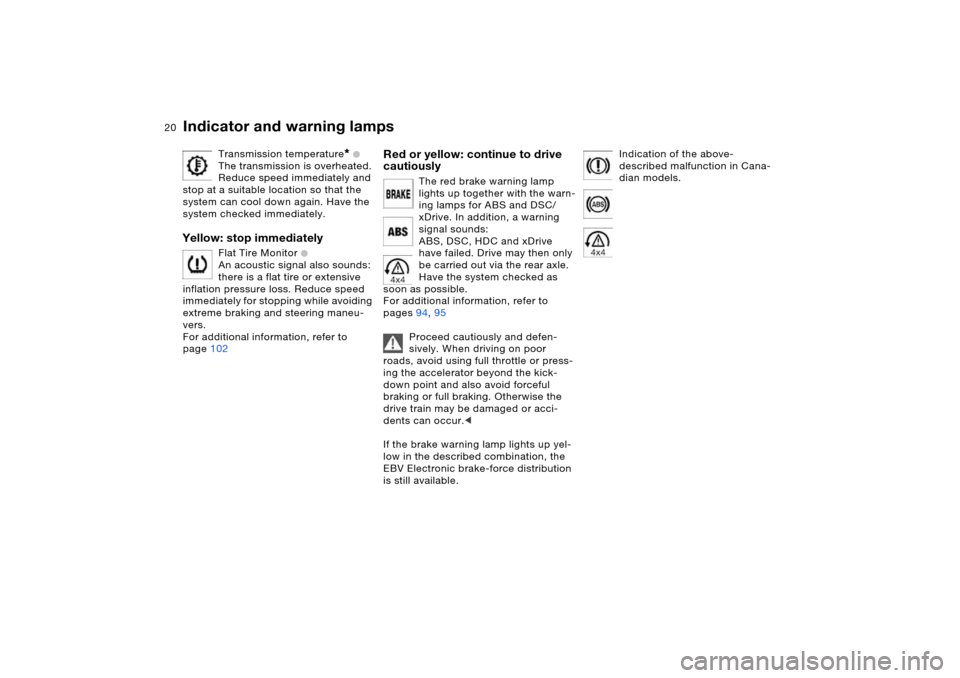
The red brake warning lamp
lights up together with the warn-
ing lamps for ABS and DSC/
xDrive. In addition, a warning
signal sounds:
ABS, DSC, HDC and xDrive
have failed. Drive may then only
be carried out via the rear axle.
Have the system checked as
soon as possible.
For additional information, refer to
pages94, 95
Proceed cautiously and defen-
sively. When driving on poor
roads, avoid using full throttle or press-
ing the accelerator beyond the kick-
down point and also avoid forceful
braking or full braking. Otherwise the
drive train may be damaged or acci-
dents can occur.<
If the brake warning lamp lights up yel-
low in the described combination, the
EBV Electronic brake-force distribution
is still available.
Indication of the above-
described malfunction in Cana-
dian models.
Page 21 of 200

21n
OverviewControlsMaintenanceRepairsDataIndex
Indicator and warning lamps Red: an important reminder
Handbrake
*
Lights up with handbrake
engaged.
For additional information, refer to
page66
Handbrake warning lamp
* for
Canadian models
Please fasten safety belts +
Indicator lamp flashes or lights
up. In addition, a signal sounds
and, depending on the equipment, a
message* appears in the Check Con-
trol. Please check safety belts for cor-
rect placement.
The belt memory is activated when the
safety belt on the driver's side has not
yet been fastened.
The belt memory is also active from a
speed of approx. 5 mph/8 km/h when
the passenger belt has not yet been
fastened, heavy objects are placed on
the front passenger seat or passengers
sitting in the front remove their safety
belts.
For additional information on safety
belts, refer to page49
Airbags
+
Malfunction in airbag system.
Have the system checked as
soon as possible.
For additional information, refer to
page57
Yellow: check as soon as possible
DBC Dynamic Brake Control
+
Malfunction in the DBC system.
Please have the system
checked as soon as possible.
For details on DBC, refer to page94
Indication of the above-
described malfunction in Cana-
dian models.
Engine oil level
Comes on while driving: the oil
level is at the absolute minimum;
refill as soon as possible. Do not drive
more than approx. 30 miles/50 km until
you do.
For additional information, refer to
page150
Engine oil level
Comes on after the engine has
been switched off: add engine
oil at your earliest opportunity, e.g.
when you stop to refuel.
For additional information, refer to
page150
Automatic transmission
*
The automatic transmission
switches into the emergency
program due to a fault. Have the system
checked as soon as possible.
For additional information, refer to
page69
Brake pads
* +
Have the condition of the brake
pads checked.
For additional information, refer to
page140
Self-leveling suspension
* +
The self-leveling suspension is
inactive. Have the system
checked as soon as possible.
For additional information, refer to
page98
Page 22 of 200

22n
Indicator and warning lamps
DSC Dynamic Stability Control/
xDrive
+
The warning lamp lights up con-
tinuously and a warning signal sounds:
DSC and HDC or the xDrive 4-wheel
drive system have failed.
The stabilizing interventions of DSC or
the xDrive 4-wheel drive system are no
longer available. Drive may then only be
carried out via the rear axle.
Have the system checked as soon as
possible.
For additional information, refer to
page95
Proceed cautiously and defen-
sively. When driving on poor
roads, avoid using full throttle or press-
ing the accelerator beyond the kick-
down point and also avoid forceful
braking or full braking. Otherwise the
drive train may be damaged or acci-
dents can occur.<
Engine electronics
*
Malfunction in the engine elec-
tronics. You can continue to
drive with reduced engine output or
engine speed. Have the system
checked as soon as possible.
Service Engine Soon
+
If the indicator lamp lights up
continuously or intermittently,
there is a fault in the exhaust-relevant
electronic systems. Although the vehi-
cle remains operable, the system must
be checked as soon as possible.
For additional information, refer to
page155
Indication of the above-
described malfunction in Cana-
dian models.
Check Gas Cap
* +
Warning lamp lights up. Fuel
filler cap is not properly closed
or is missing. Check whether the fuel
filler cap is properly closed.
For additional information, refer to
page25
Green: for your information
Turn signals
Flashes when the turn signals
are operated. Rapid flashing
indicates a system malfunction.
For additional information, refer to
page70
Cruise control
*
Lights up when system is
switched on: ready for operation
using the buttons on the steering
wheel.
For additional information, refer to
page74
Fog lamps
Lights up when fog lamps are
switched on.
For additional information, refer to
page105
Blue: for your information
High beams
Lights up when the high beams
are on or the headlamp flasher
is actuated.
For additional information, refer to
pages70, 104
Page 23 of 200

23n
OverviewControlsMaintenanceRepairsDataIndex
Buttons on steering wheel
*
The buttons integrated in the steering
wheel are provided so that you can
operate a number of accessories
quickly and without being distracted
from traffic conditions. You may oper-
ate:
>selected functions of the audio
sources
*
>the recirculated-air mode of the air
conditioner
* or the steering-wheel
heater
*
>the cruise control
>selected phone functions
* and
>the voice command system*.
In order to operate a system, the
corresponding system must be
switched on.<
Press briefly:
Accept incoming call, start dialing, ter-
minate call.
Extended pressure:
Switch voice command system on and
off
Display/hide phonebook. Display the
entries consecutively with the buttons
for forward/back
Forward:
>Radio
Press briefly: next stored station
Extended pressure: station search
function
>CD
Press briefly: track search
Extended pressure: fast forward in
track
>Cassette
Press briefly: stop track search or
fast forward
Extended pressure: fast forward
>Portable phone
Scroll through list of names
Reverse: functions as for fast forward
Volume
On the sports steering wheel
*, there
are +/– buttons for volume on the left
side of the steering wheel.
Cruise control: call up
Cruise control: store and accelerate
+
as well as decelerate and store
–
On the sports steering wheel
*, there
are +/– buttons on the right side of the
steering wheel for the cruise control.
Cruise control: activate/interrupt/deac-
tivate
Recirculated-air mode
* and AUC auto-
matic recirculated-air control or steer-
ing wheel heater
*: switch on/off
Page 24 of 200

24n
Warning triangle
*
First-aid kit
*
Refueling
1. Open the cover on the left in the
cargo area: lift the handle on the
cover
2. Pull the tab of the retaining strap,
refer to arrow, and remove the haz-
ard warning triangle from the support
bracket
3. To install: slide the hazard warning
triangle into the support bracket and
press on the retaining strap.
Comply with legal requirements
requiring you to carry a hazard
warning triangle in the vehicle.< 530us005
The first-aid kit is located under the
front passenger's seat.
To open: pull the handle and fold the
cover down.
To close: fold the cover up.
Some of the articles in the first-aid
kit may be used within a limited
time only. Therefore, check the expira-
tion dates of the contents regularly and
replace the contents concerned in good
time if necessary. You can find replace-
ments in any pharmacy.
Always observe all legal regulations
requiring a first-aid kit to be carried in
the vehicle.< 530de242
Fuel filler door
Before filling the tank, switch off
the engine. If you do not, fuel can-
not be filled into the tank and the Ser-
vice Engine Soon lamp may come on.<
To open the fuel filler door, press on the
front edge.
In the event of an electrical malfunction,
you can also open the fuel filler door
manually:
1. Open the cover on the right in the
cargo area: lift the handle on the
cover
2 Pull the knob with the fuel pump sym-
bol.
530de243