Page 89 of 239

Controls
87Reference
At a glance
Driving tips
Communications
Navigation
Entertainment
Mobility
Time of arrival
A display of your estimated time of arrival is
available whenever you enter a destination
in the navigation system, refer to page132,
or enter the distance manually in the com-
puter, refer to page87, prior to departure.
A requirement is that you have cor-
rectly set the time in the Control Cen-
ter, refer to page90.<
Control Display screen contents
You can activate the computer function at
any time by selecting it from the "Car data"
menu.
You have two possibilities to display infor-
mation of the computer:
>Computer
>Trip computer
Use this, for example, for driving on
vacation, as when you reset the values
to zero, all the functions are reset
together and then restart.
Computer
>Time of arrival
>Distance to destination.
Enter a destination in the navigation
system, or enter a distance in the com-
puter manually, refer to page132 or87
>Cruising range
>Average fuel consumption
>Average speed.
You can reset calculations of both
average speed and average fuel con-
sumption to zero. Select the menu item and
confirm your selection.<
Trip computer
Reset all data to zero:
Select "START / RESET" and confirm your
selection.
>Time of departure
>Driving time
>Elapsed distance
>Average fuel consumption since
"START / RESET"
>Average speed since "START /
RESET".
Entering a distance manually
1.Select "BC"
2.Select and activate the "Distance" entry
function. Turn the controller to the left
or right to select the distance to your
destination
3.Press the controller to confirm your
entry.
Speed limit
You can enter a speed and a Check Control
message indicates when you have reached
this speed. This enables you, for example,
to receive warnings if you exceed a speed
limit in an urban area.
Page 90 of 239

Everything under control
88 You are only warned of reaching this speed
a second time if you again drive at least
3 mph/5 km/h slower.
Adjusting, changing
1.Select "Limit" and confirm your selec-
tion
2.Select "SET" and confirm your selection
3.Turn the controller to the left or right to
select the preset speed
4.Press the controller to confirm your
entry. The speed limit function is now
active.
Switching on or off
1.Select "Limit" and confirm your selec-
tion
2.Select "ON / OFF" and confirm your
selection. "ON / OFF" is highlighted
when the speed limit function is acti-
vated.
Applying your current speed as limit
1.Select "Limit" and confirm your selec-
tion
2.Select and confirm your selec-
tion. The system applies your current
speed as the limit.
Limit on Info Display
If, for instance, the warning sector in the
tachometer is visible, refer to page81, the
speed limit will be indicated by a warning
sector in the speedometer, refer to arrow.
Stopwatch
Starting and stopping
1.Select and confirm your selection
2.Select and confirm your selection.
The stopwatch is reset to 0 and starts
3.Select and confirm your selection.
This stops the timer.
Confirm again to reset the stopwatch to
zero.
Taking an intermediate time reading
Select "INTERM. TIME" and confirm your
selection. This intermediate time appears
below the ongoing primary stopwatch
count.
All of the remaining functions remain
available at all times while the stop-
watch is running. The stopwatch continues
operation in the background.<
Page 91 of 239

Controls
89Reference
At a glance
Driving tips
Communications
Navigation
Entertainment
Mobility
Assistance window* for "Car data"
You can select any of the following com-
puter functions for display in the assistance
window:
>Computer
>Trip computer
>Speed limit
>Stopwatch.
Applying display
1.Select the desired function and confirm
– here, computer "BC"
2.Select and confirm your selec-
tion. The function appears in the assis-
tance window.
The symbol is highlighted if the
function displayed in the assis-
tance window is selected on the Con-
trol Display.<
You can also choose to view brief help
texts explaining selected menu items, refer
to page22, or the travel route on vehicles
equipped with a GPS navigation system,
refer to page131.
Changing settings
Units of measure and display format
You can select the units of measure used
in the displays of fuel consumption, dis-
tances, temperatures and pressures as
well as the display format for the time and
date. 1.Select and confirm your
selection
2.Select the menu item that you wish to
adjust. Press repeatedly to view a list-
ing of your selection options.
Language
You can select a different language for the
text displays.
1.Select and confirm your selection
2.Select and activate the desired lan-
guage.
Page 92 of 239

Everything under control
90
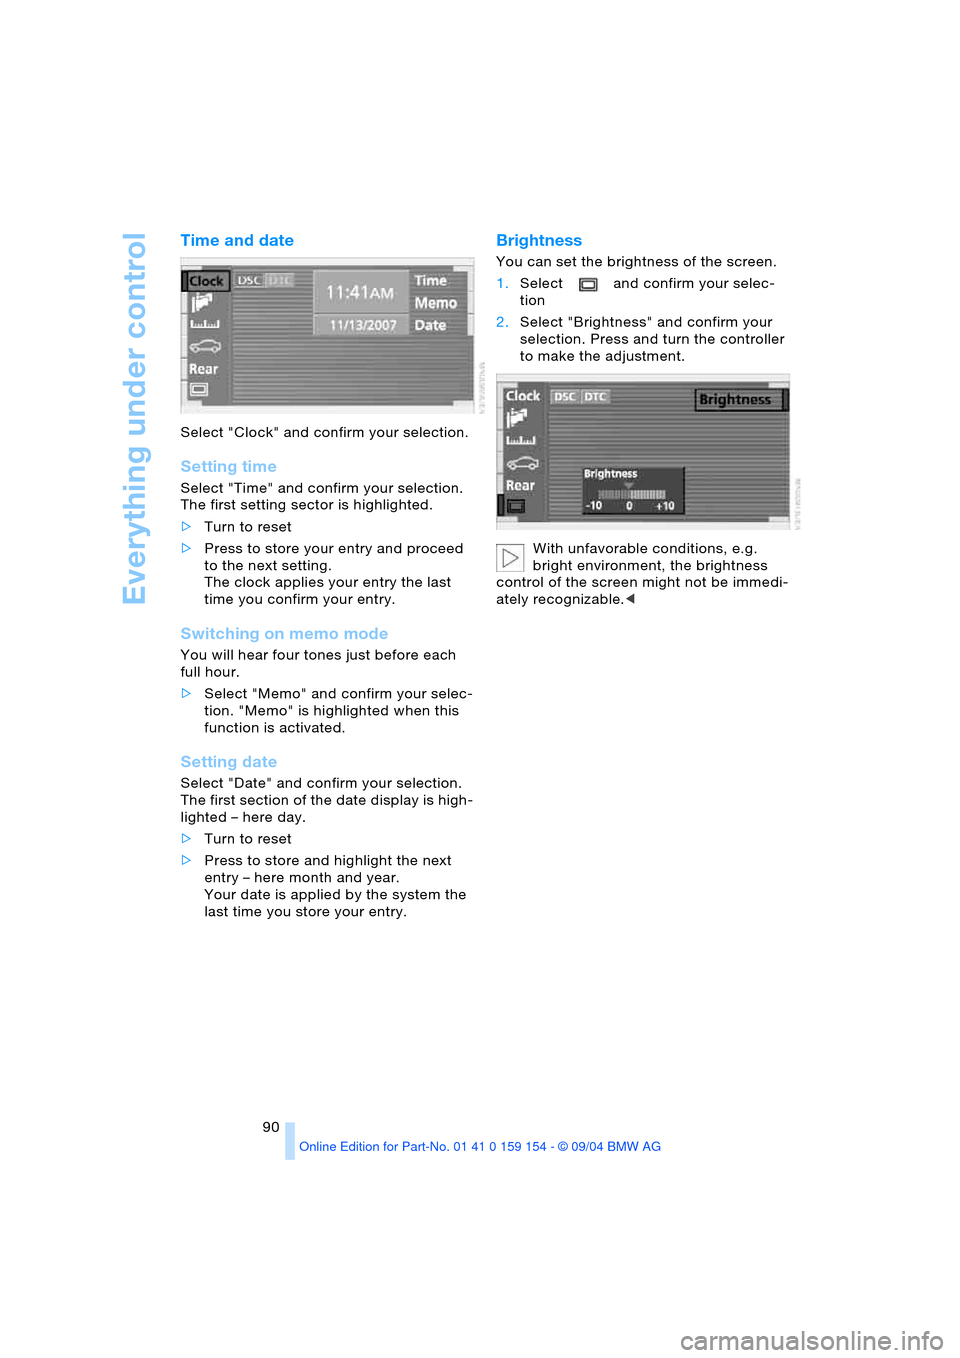
Time and date
Select "Clock" and confirm your selection.
Setting time
Select "Time" and confirm your selection.
The first setting sector is highlighted.
>Turn to reset
>Press to store your entry and proceed
to the next setting.
The clock applies your entry the last
time you confirm your entry.
Switching on memo mode
You will hear four tones just before each
full hour.
>Select "Memo" and confirm your selec-
tion. "Memo" is highlighted when this
function is activated.
Setting date
Select "Date" and confirm your selection.
The first section of the date display is high-
lighted – here day.
>Turn to reset
>Press to store and highlight the next
entry – here month and year.
Your date is applied by the system the
last time you store your entry.
Brightness
You can set the brightness of the screen.
1.Select and confirm your selec-
tion
2.Select "Brightness" and confirm your
selection. Press and turn the controller
to make the adjustment.
With unfavorable conditions, e.g.
bright environment, the brightness
control of the screen might not be immedi-
ately recognizable.<
Page 93 of 239

Controls
91Reference
At a glance
Driving tips
Communications
Navigation
Entertainment
Mobility
Technology for comfort, convenience
and safety
PDC Park Distance Control*
The concept
The PDC assists you when you are parking.
Signal tones indicate the current distance
to an object behind or in front of your vehi-
cle. Four ultrasonic sensors in both the
bumpers monitor the distance to the near-
est object. The sensors at the front and at
the two rear corners have a range of
approx. 2 ft/60 cm; the rear middle sensors
have approx. 5 ft/1.50 m.
PDC is a parking aid that can indicate
objects when they are approached
slowly, as is usually the case when parking.
Avoid approaching an object at high speed,
as otherwise the physical circumstances
would mean that the system warning was
too late.<
Automatic function
Whenever the ignition is on the system
automatically assumes operational status
after a few seconds each time you engage
the transmission position R.
Wait this short period before revers-
ing.<
Switching on manually
Press the button, the indicator lamp lights
up.
Manual deactivation
Press the button again; the indicator lamp
goes out.
Automatic deactivation
The system is automatically deactivated
once the vehicle travels approx. 165 ft/
50 m or exceeds a speed of roughly
20 mph/30 km/h; the indicator lamp goes
out. You can reactivate the system manu-
ally as needed.
Signal tones
The signal indicating the distance to the
nearest obstacle is directional. Thus, an
object detected to the left rear of the vehi-
cle will be indicated by a signal tone from
the left rear speaker, etc. As the distance
between vehicle and object decreases, the
intervals between the tones become
shorter. The signal tone becomes continu-
ous once the distance to the nearest object
falls to below roughly 1 ft/30 cm.
The warning signal is canceled after
approx. 3 seconds if you are moving paral-
lel to a wall.
Malfunction
The indicator lamp within the button flashes
and a status message appears in the Check
Control. PDC has failed. Switch off PDC.
Have the system checked.
To prevent this problem, keep the sensors
clean and free of ice or snow in order to
ensure that they will continue to operate
effectively.
Page 94 of 239

Technology for comfort, convenience and safety
92
PDC with visual warning
You also enjoy the option of having the sys-
tem show distances to objects on the Con-
trol Display. The Control Display will also
indicate the presence of objects in green
before they are close enough to generate a
signal tone.
Select "PDC pic." from the "Settings" menu
and confirm your selection. This activates
the PDC display.
The display then appears on the Control
Display whenever the PDC is automatically
or manually activated.
The previous display automatically reap-
pears after the system is deactivated.
confirm to return to the previous dis-
play.
System limits
Even with PDC, final responsibility for
estimating the distance between the
vehicle and any obstructions always
remains with the driver. Even when sensors
are involved, there is a blind spot in which
objects cannot be detected. The system is
also subject to the physical limits that apply
to all forms of ultrasonic measurement,
such as those encountered with tow bars
and trailer couplings, as well as thin and wedge-shaped objects, etc. Low objects
already displayed, e.g. a curb, can also dis-
appear from the detection area of the sen-
sors again before a continuous tone
sounds.
Loud noises from outside and inside the
vehicle may prevent you from hearing the
PDC's signal tone.<
Keep the sensors clean and free of ice
or snow in order to ensure that they
will continue to operate effectively.
Do not apply high pressure spray to the
sensors for a prolonged period of time.
Keep the spray at least 4 in/10 cm away
from the sensors.<
Driving stability control
systems
Your BMW is equipped with an extended
array of systems designed to enhance and
maintain vehicle stability under extreme
conditions. The following section describes
these functions based on DSC and ABS.
ABS Antilock Brake System
ABS enhances active safety by preventing
the wheels from locking under braking.
ABS incorporates CBC and EBV.
Malfunction
The warning lamp lights up yellow
and ABS is switched off. Conven-
tional braking efficiency remains
available without limitations. Have the sys-
tem checked as soon as possible.
CBC Cornering Brake Control
CBC is a supplement to ABS. It provides
further enhancements in vehicle stability
and steering response during lane changes
and cornering at high rates of lateral accel-
eration.
Page 95 of 239

Controls
93Reference
At a glance
Driving tips
Communications
Navigation
Entertainment
Mobility
EBV Electronic brake-force
distribution
EBV controls the brake system's applica-
tion pressure at the rear wheels to ensure
stable deceleration.
DSC Dynamic Stability Control
The system optimizes vehicle stability dur-
ing acceleration and when starting from a
full stop, as well as optimizing traction.
The system recognizes any tendency for
the vehicle to assume an unstable attitude
such as oversteer or understeer; it then
counteracts this tendency with a combina-
tion of graduated reductions in engine
torque and selective braking intervention at
individual wheels. DSC provides optimized
stability within the limits defined by the
laws of physics.
The DSC is operational every time you start
the engine. DSC contains the functions
DTC Dynamic Traction Control and DBC
Dynamic Brake Control.
Indicator lamp
The indicator lamp goes out shortly
after the engine starts.
The indicator lamp flashes:
DSC controls the drive and braking forces.
The indicator lamp stays lit:
DSC has been switched off using the Con-
trol Center.
Activating DTC Dynamic Traction
Control
In particular driving situations, in deep
snow, for example, DTC ensures the maxi-
mum forward momentum. The gain in for-
ward momentum in these situations
involves a reduction in vehicle stability.
DTC is active up to 45 mph/70 km/h.You may find it useful to briefly activate
DTC under the following special circum-
stances:
>When rocking the vehicle and starting
off in deep snow or on loose road sur-
faces
>When ascending snow-covered hills,
and when driving in deep or on hard-
packed snow
>When driving with snow chains.
Select "Settings". Select "DTC" and con-
firm your selection. DTC is now activated.
The DTC indicator lamp in the Info Display
lights up permanently.
When DTC is active, DSC provides
only limited system response up to a
speed of approximately 45 mph/70 km/h.
Intervention for stability enhancement is
reduced.<
Deactivating DTC again
Select "Settings". Select "DTC" and con-
firm your selection. DTC is now deacti-
vated. The DTC indicator lamp in the Info
Display goes out. DSC is once again avail-
able without restriction.
Page 96 of 239

Technology for comfort, convenience and safety
94
Switching off DSC
Select "Settings". Select "DSC" and con-
firm your selection. DSC is deactivated.
The indicator lamp in the Info Display
remains on continuously.
Deactivating DSC automatically deacti-
vates DTC as well. The systems for
enhancing stability and traction are deacti-
vated, and there is no active braking inter-
vention or torque control.
A status report appears in the Check Con-
trol. Please take note of the additional infor-
mation on the Control Display.
To maintain optimized stability, drive
with the system on whenever possi-
ble.<
Reactivating DSC
Select "Settings". Select "DSC" and con-
firm your selection. DSC is now activated.
The indicator lamp in the Info Display goes
out.
The laws of physics cannot be
repealed, even with DSC. An appro-
priate driving style always remains the
responsibility of the driver. Avoid using the
additional safety margin provided by the
system as an excuse for taking unneces-
sary risks.
When DTC is active, DSC provides only
limited system response up to a speed of
approximately 45 mph/70 km/h. Interven-
tion for stability enhancement is reduced.
Do not make any modifications to the DSC
system. Never allow anyone other than
authorized professional technicians to
carry out service or repairs on the DSC sys-
tem.<
DBC Dynamic Brake Control
When you apply the brakes rapidly, this
system automatically produces the maxi-
mum braking force boost and thus helps to
achieve the shortest possible braking dis-
tance during panic stops. This system
exploits all of the benefits provided by ABS.
Do not reduce the pressure on the brake
pedal for the duration of the brake applica-
tion. When the brake pedal is released, the
DBC is deactivated.
Malfunction in vehicle stability
control systems
The brake system warning lamp
lights up in red, appearing together
with the indicator lamps for ABS
and DSC. A status report appears in
the Check Control. Please take note
of the additional information on the
Control Display. Driving stability
control and ABS have failed. Con-
ventional braking efficiency remains avail-
able without limitations.
While you may continue, you should
remember to proceed cautiously and drive
defensively while avoiding full brake appli-
cations. Have the system checked as soon
as possible.
Display of the previously described
malfunction on Canadian models.
The DSC warning lamp lights up.
DSC and DTC have failed. Their sta-
bilizing interventions are no longer
available. The vehicle will remain com-
pletely operational, however, without DSC.
Have the system checked as soon as pos-
sible.
The brake system warning lamp
lights up yellow and a message
appears in the Check Control.
Please take note of the additional informa-
tion on the Control Display. DBC has failed.