2005 BMW 645I CONVERTIBLE ignition
[x] Cancel search: ignitionPage 99 of 217
A congenial climate
98
Independent ventilation
The independent ventilation blows air into the
passenger compartment to lower interior tem-
peratures.
The independent ventilation is controlled using
the Control Center. You can set two different
times for the system to start.
The independent ventilation remains on for
30 minutes. It can also be switched on and off
directly. Since the system uses a substantial
amount of electrical current, you should refrain
from activating it twice in succession without
allowing the battery to be recharged in normal
operation between use.
The independent ventilation is ready for use at
any outside temperature up to ignition key
position 1.
The air emerges through the upper body region
vent outlets in the instrument panel. These vent
outlets must be open for the system to operate.
Switching on and off directly
Ignition key in position 2:
Control Center, for principle details, refer to
page16.
1.Open "Climate".
2.Select "Parked car operation" and press the
controller.
3.Select "Automatic ventilation" and press
the controller.
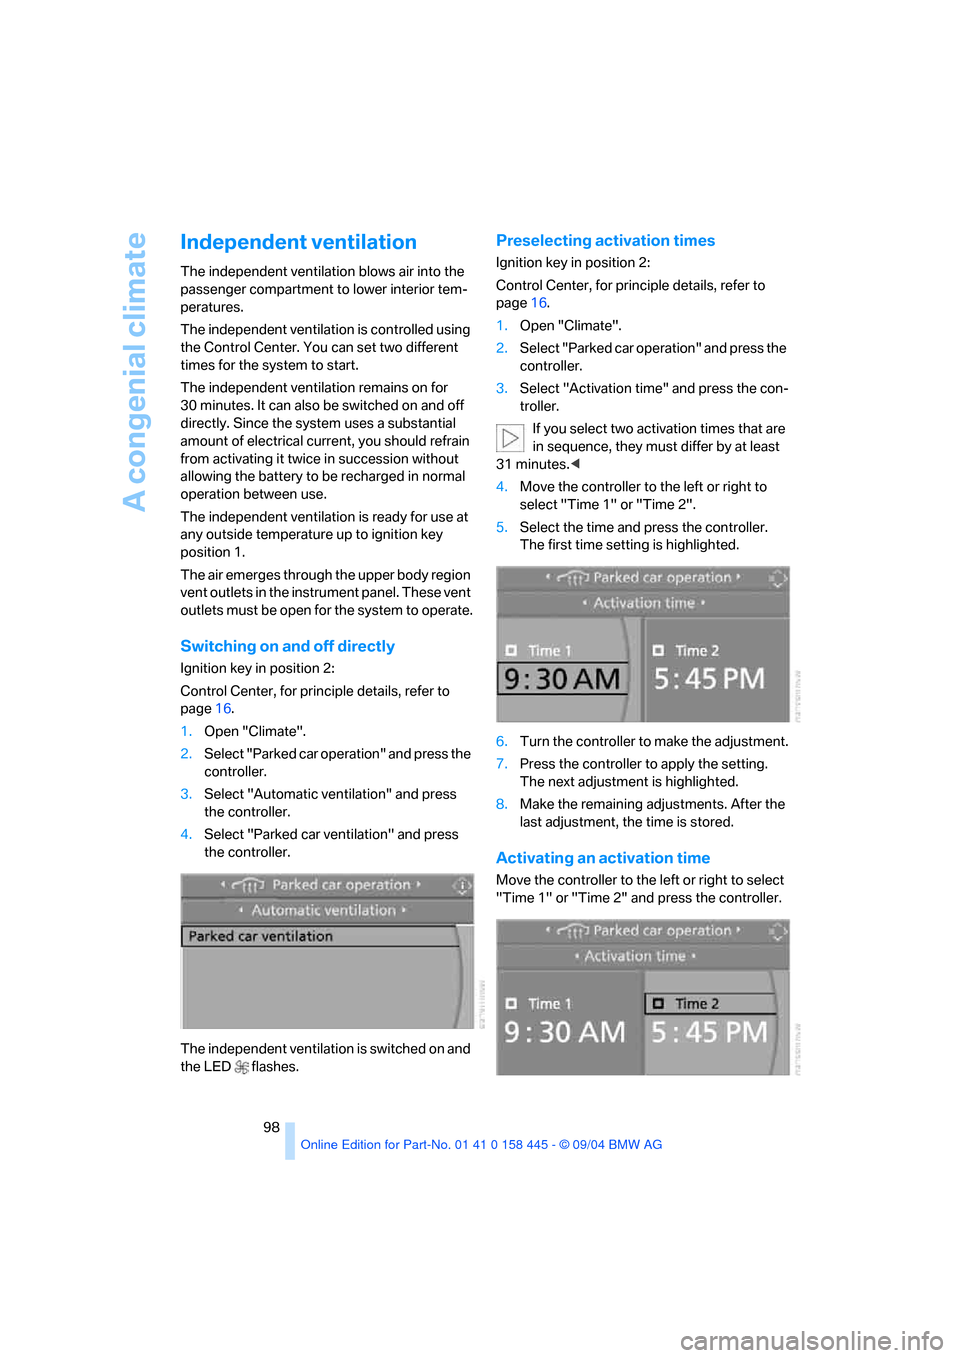
4.Select "Parked car ventilation" and press
the controller.
The independent ventilation is switched on and
the LED flashes.
Preselecting activation times
Ignition key in position 2:
Control Center, for principle details, refer to
page16.
1.Open "Climate".
2.Select "Parked car operation" and press the
controller.
3.Select "Activation time" and press the con-
troller.
If you select two activation times that are
in sequence, they must differ by at least
31 minutes.<
4.Move the controller to the left or right to
select "Time 1" or "Time 2".
5.Select the time and press the controller.
The first time setting is highlighted.
6.Turn the controller to make the adjustment.
7.Press the controller to apply the setting.
The next adjustment is highlighted.
8.Make the remaining adjustments. After the
last adjustment, the time is stored.
Activating an activation time
Move the controller to the left or right to select
"Time 1" or "Time 2" and press the controller.
Page 101 of 217
Practical interior accessories
100
Practical interior accessories
Integrated universal remote
control*
The concept
The integrated universal remote control
replaces up to three different hand-held trans-
mitters for various items of radio-controlled
equipment such as door openers and house
alarm systems. The integrated universal remote
control registers and stores signals from the
original hand-held transmitters.
The signal of an original hand-held transmitter
can be programmed into one of the three mem-
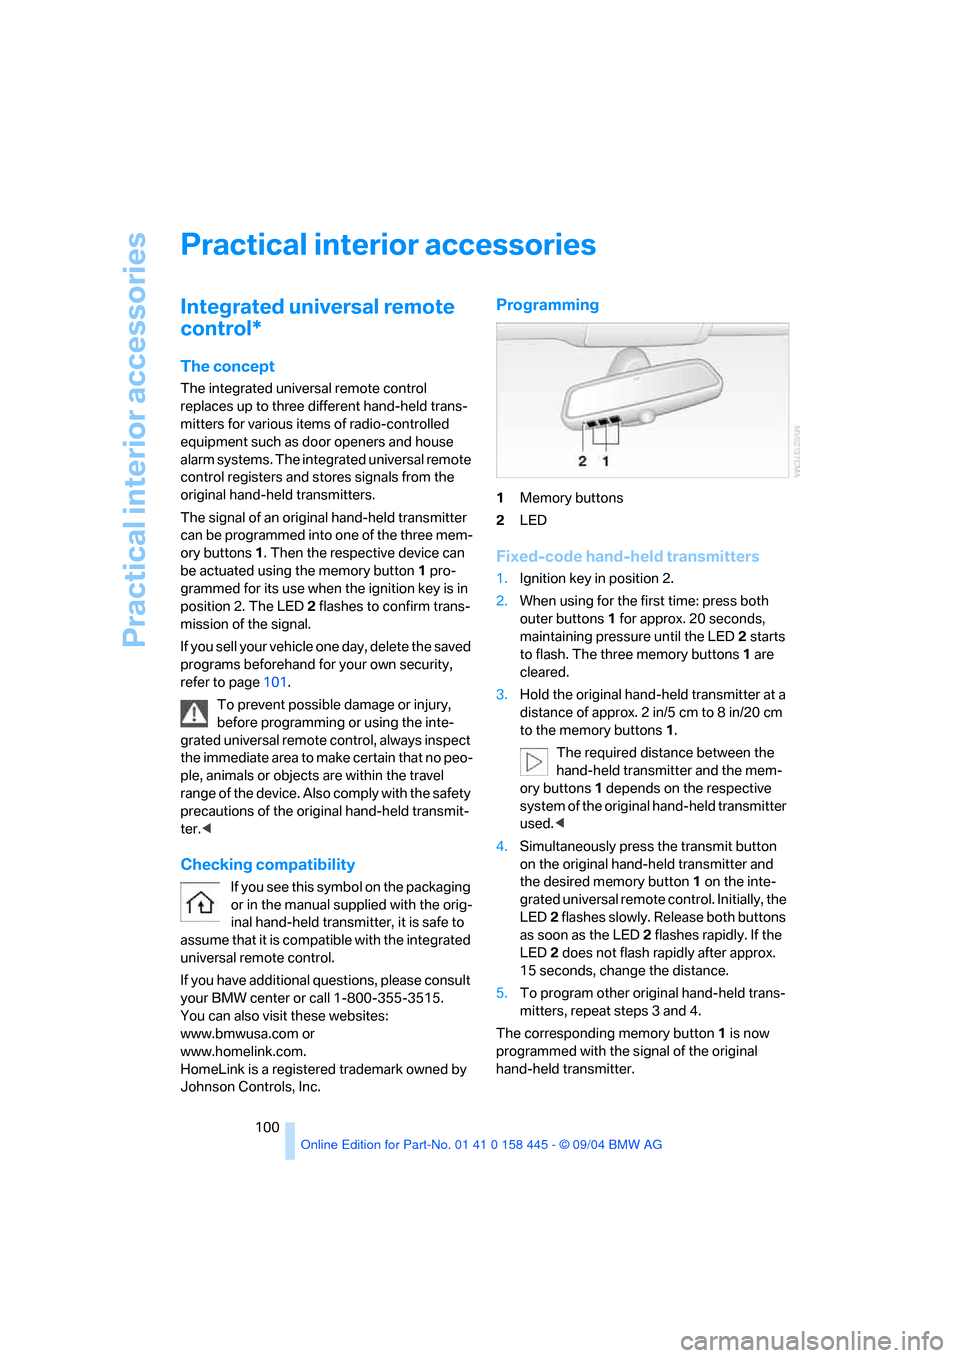
ory buttons1. Then the respective device can
be actuated using the memory button1 pro-
grammed for its use when the ignition key is in
position 2. The LED2 flashes to confirm trans-
mission of the signal.
If you sell your vehicle one day, delete the saved
programs beforehand for your own security,
refer to page101.
To prevent possible damage or injury,
before programming or using the inte-
grated universal remote control, always inspect
the immediate area to make certain that no peo-
ple, animals or objects are within the travel
range of the device. Also comply with the safety
precautions of the original hand-held transmit-
ter.<
Checking compatibility
If you see this symbol on the packaging
or in the manual supplied with the orig-
inal hand-held transmitter, it is safe to
assume that it is compatible with the integrated
universal remote control.
If you have additional questions, please consult
your BMW center or call 1-800-355-3515.
You can also visit these websites:
www.bmwusa.com or
www.homelink.com.
HomeLink is a registered trademark owned by
Johnson Controls, Inc.
Programming
1Memory buttons
2LED
Fixed-code hand-held transmitters
1.Ignition key in position 2.
2.When using for the first time: press both
outer buttons 1 for approx. 20 seconds,
maintaining pressure until the LED 2 starts
to flash. The three memory buttons1 are
cleared.
3.Hold the original hand-held transmitter at a
distance of approx. 2 in/5 cm to 8 in/20 cm
to the memory buttons1.
The required distance between the
hand-held transmitter and the mem-
ory buttons1 depends on the respective
system of the original hand-held transmitter
used.<
4.Simultaneously press the transmit button
on the original hand-held transmitter and
the desired memory button1 on the inte-
grated universal remote control. Initially, the
LED2 flashes slowly. Release both buttons
as soon as the LED 2 flashes rapidly. If the
LED2 does not flash rapidly after approx.
15 seconds, change the distance.
5.To program other original hand-held trans-
mitters, repeat steps 3 and 4.
The corresponding memory button1 is now
programmed with the signal of the original
hand-held transmitter.
Page 102 of 217
Controls
101Reference
At a glance
Driving tips
Communications
Navigation
Entertainment
Mobility
You can operate the system when the ignition
key is in position 2.
If the device cannot be used after
repeated programming, check whether
the original hand-held transmitter uses an alter-
nating-code system. To do so, either read the
instructions for the original hand-held transmit-
ter or press the programmed memory button1
of the integrated universal remote control
longer. If the LED 2 on the integrated universal
remote control flashes rapidly for a short time
then lights up for approx. 2 seconds, this indi-
cates that the original hand-held transmitter
uses an alternating-code system. In the case of
an alternating-code system, program the mem-
ory buttons1 as described at Alternating-code
hand-held transmitters.<
Alternating-code hand-held
transmitters
To program the integrated universal remote
control, consult the operating instructions for
the equipment to be set. You will find informa-
tion there on the possibilities for synchroniza-
tion.
When programming hand-held transmitters
that employ an alternating code, please observe
the following supplementary instructions:
P r o g ra m m in g w i ll b e ea s i er w it h t h e a i d o f
a second person.<
1.Park your vehicle within the range of the
remote-controlled equipment.
2.Program the integrated universal remote
control as described above at Fixed-code
hand-held transmitters.
3.Locate the button at the receiver of the
equipment to be set, e.g. on the drive.
4.Press the button on the receiver of the
equipment to be set. After step 4, you have
approx. 30 seconds for step 5.
5.Press the programmed memory button1 of
the integrated universal remote control
three times.
The corresponding memory button1 is now
programmed with the signal of the original
hand-held transmitter.
Clearing memory buttons
Press both outer buttons 1 for approx. 20 sec-
onds, maintaining pressure until the LED 2
starts to flash: All of the memory buttons are
cleared.
The memory of individual memory buttons1
cannot be cleared.
Glove compartment
Opening
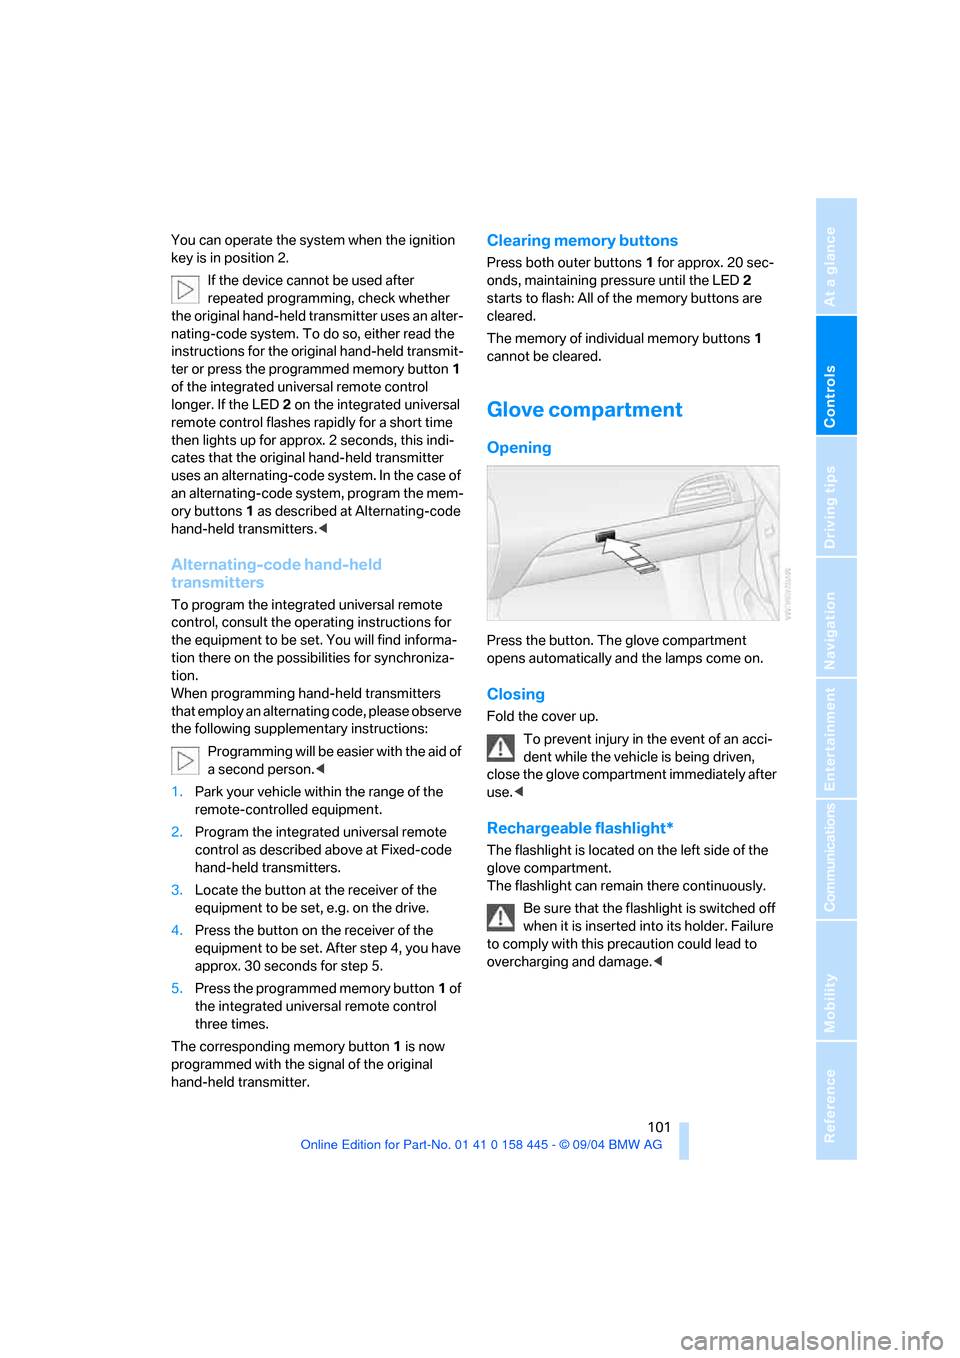
Press the button. The glove compartment
opens automatically and the lamps come on.
Closing
Fold the cover up.
To prevent injury in the event of an acci-
dent while the vehicle is being driven,
close the glove compartment immediately after
use.<
Rechargeable flashlight*
The flashlight is located on the left side of the
glove compartment.
The flashlight can remain there continuously.
Be sure that the flashlight is switched off
when it is inserted into its holder. Failure
to comply with this precaution could lead to
overcharging and damage.<
Page 104 of 217
Controls
103Reference
At a glance
Driving tips
Communications
Navigation
Entertainment
Mobility
Cup holders
The compartment of the rear center console
contains a built-in and removable cup holder.
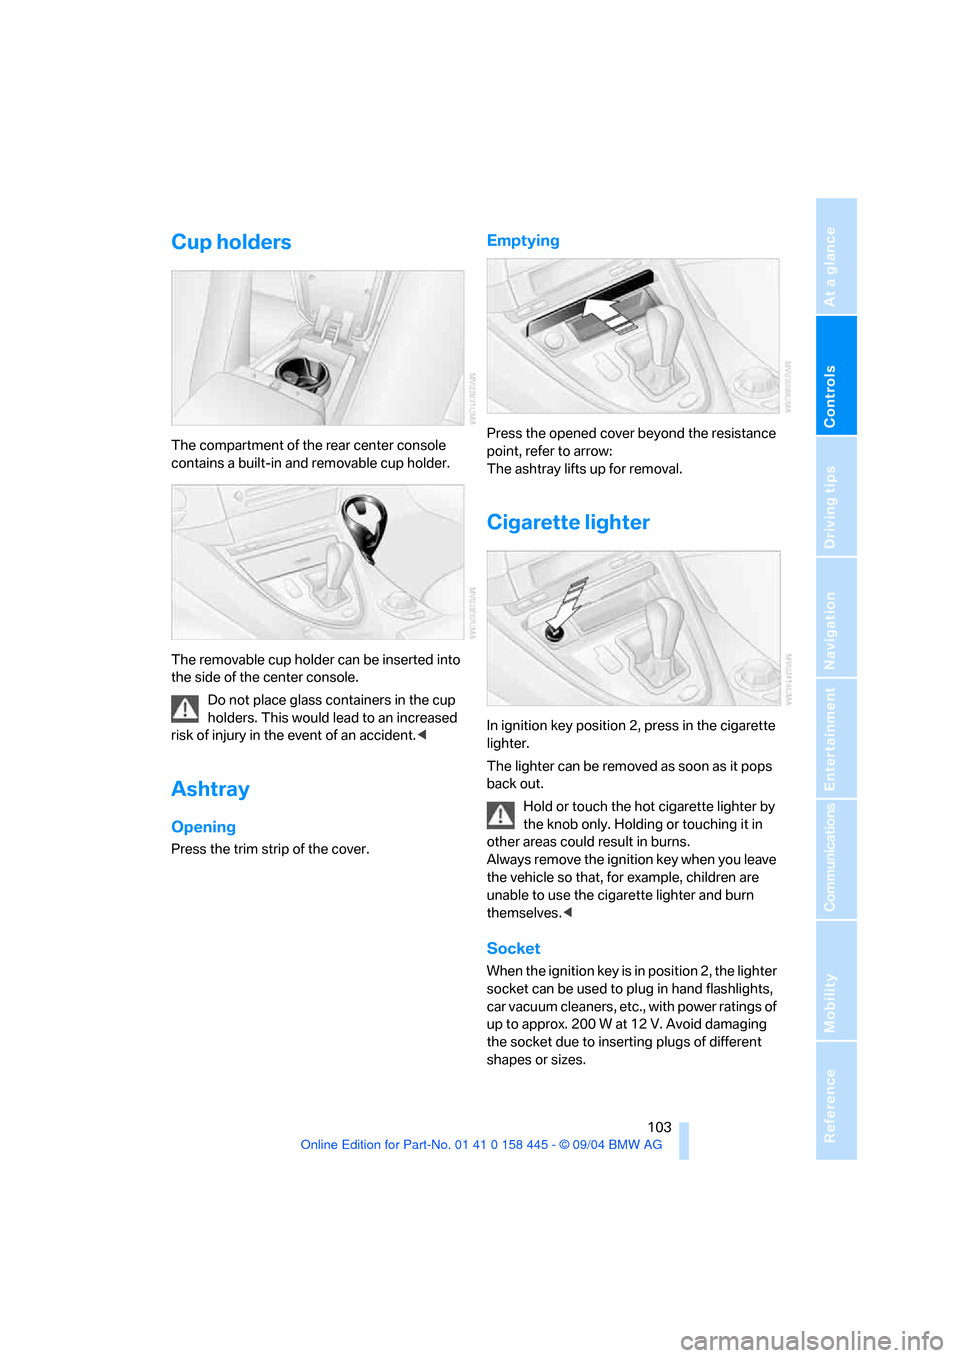
The removable cup holder can be inserted into
the side of the center console.
Do not place glass containers in the cup
holders. This would lead to an increased
risk of injury in the event of an accident.<
Ashtray
Opening
Press the trim strip of the cover.
Emptying
Press the opened cover beyond the resistance
point, refer to arrow:
The ashtray lifts up for removal.
Cigarette lighter
In ignition key position 2, press in the cigarette
lighter.
The lighter can be removed as soon as it pops
back out.
Hold or touch the hot cigarette lighter by
the knob only. Holding or touching it in
other areas could result in burns.
Always remove the ignition key when you leave
the vehicle so that, for example, children are
unable to use the cigarette lighter and burn
themselves.<
Socket
When the ignition key is in position 2, the lighter
socket can be used to plug in hand flashlights,
car vacuum cleaners, etc., with power ratings of
up to approx. 200 W at 12 V. Avoid damaging
the socket due to inserting plugs of different
shapes or sizes.
Page 157 of 217
Telephoning
156 2.Select "Options" and press the controller.
3.Select "Call sender" and press the control-
ler.
The selected sender is called.
Deleting text messages/SMS
1.Select the desired text message and press
the controller.
The text message is displayed.
2.Select "Options" and press the controller.
3.Select "Delete" and press the controller.
The text message of the portable phone is
deleted.
Operation by voice
commands*
The concept
You can operate your portable phone without
having to remove your hands from the steering
wheel. The system operates on the basis of
voice commands that you will learn easily after
using them a few times. In addition, you are also
supported by instructions or questions.
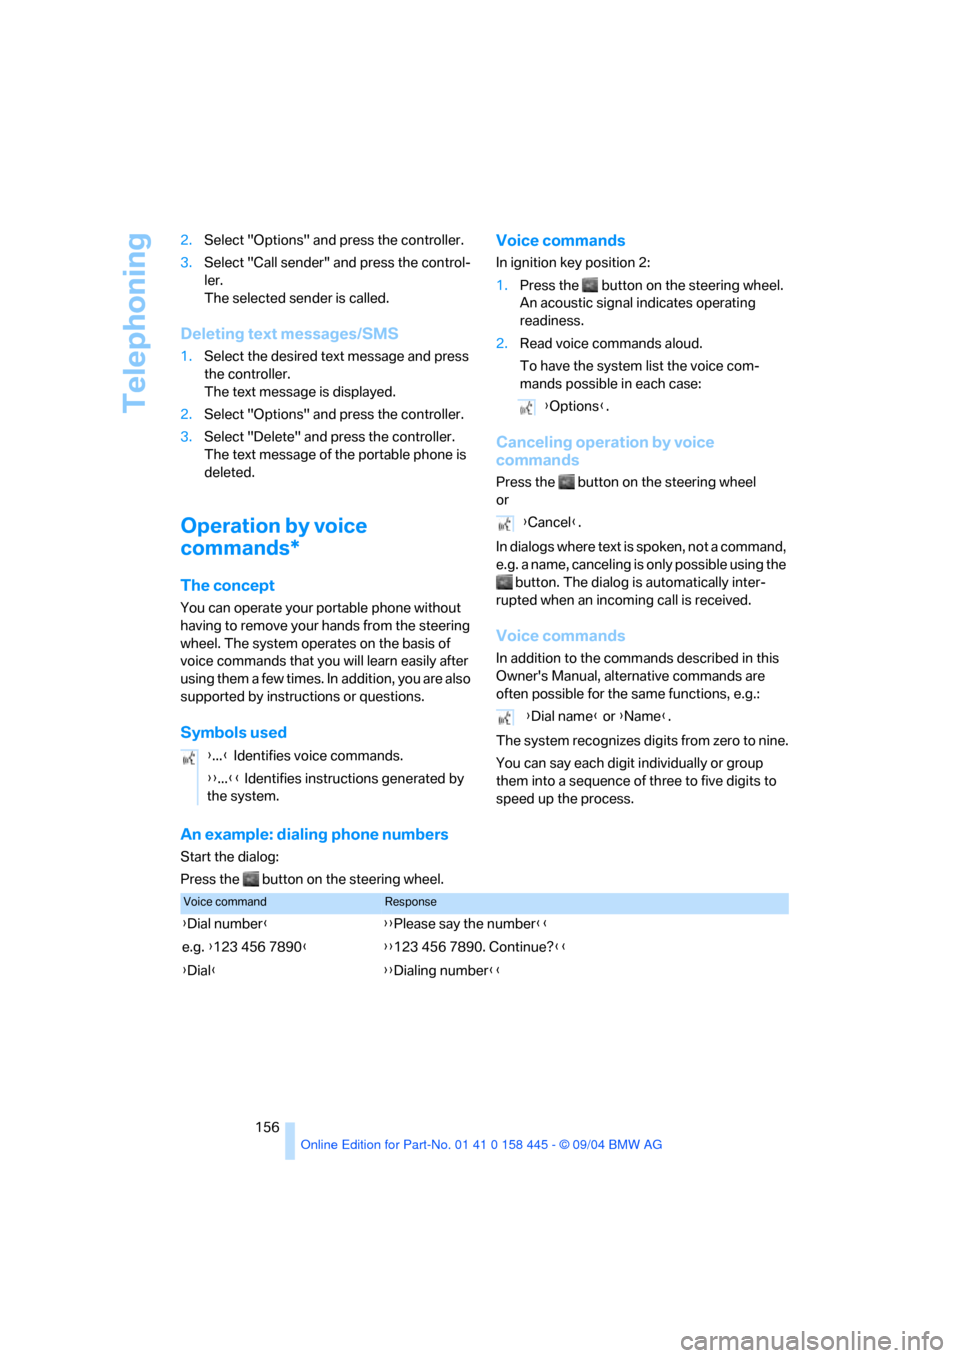
Symbols usedVoice commands
In ignition key position 2:
1.Press the button on the steering wheel.
An acoustic signal indicates operating
readiness.
2.Read voice commands aloud.
To have the system list the voice com-
mands possible in each case:
Canceling operation by voice
commands
Press the button on the steering wheel
or
In dialogs where text is spoken, not a command,
e.g. a name, canceling is only possible using the
button. The dialog is automatically inter-
rupted when an incoming call is received.
Voice commands
In addition to the commands described in this
Owner's Manual, alternative commands are
often possible for the same functions, e.g.:
The system recognizes digits from zero to nine.
You can say each digit individually or group
them into a sequence of three to five digits to
speed up the process.
An example: dialing phone numbers
Start the dialog:
Press the button on the steering wheel.{...} Identifies voice commands.
{{...}} Identifies instructions generated by
the system.
{Options}.
{Cancel}.
{Dial name} or {Name}.
Voice commandResponse
{Dial number}{{Please say the number}}
e.g. {123 456 7890}{{123 456 7890. Continue?}}
{Dial}{{Dialing number}}
Page 160 of 217
159
Entertainment
Reference
At a glance
Controls
Driving tips Communications
Navigation
Mobility
TeleService , BMW Assist
TeleService
TeleService supports you in communicating
with your BMW center. The installed car phone
can be used to transmit data on the service sta-
tus of your vehicle or on legally mandated
inspections directly to your BMW center. These
are the same data which are stored in the mas-
ter key for CBS Condition Based Service. Your
BMW center can then contact you, and you can
make an appointment that suits you while you
are still on the road. Your advantage is that your
BMW center can prepare in advance for the
required maintenance work. The TeleService
functions are country-specific and depend on
the contract: the data on the service status of
your vehicle or on legally mandated inspections
is transmitted on a country-specific basis either
automatically before they fall due or simulta-
neously when you call your BMW center. Your
BMW center will be glad to provide more
detailed information.
BMW Assist
With BMW Assist, other services are available
to you in addition TeleService, e.g. the your
vehicle's position data can be transmitted to the
BMW Assist response center when an emer-
gency call
* has been initiated.
Many functions of BMW Assist depend on the
individually agreed contract. The data transmis-
sion, e.g. of CBS Condition Based Service, is
different in individual countries.
The subscriber agreement must be completed
successfully before using the BMW Assist ser-
vices.
Requirements
The installed car phone is logged on to a porta-
ble telephone network. This network must be
capable of transmitting the services.To transmit position data, the vehicle must be
able to determine the current position. This is
displayed on the Control Display. In order to
enable and update TeleService or BMW Assist,
a GPS signal must be present.
Enabling TeleService or BMW Assist
For you to be able to use the services of
TeleService or BMW Assist, these must be
enabled.
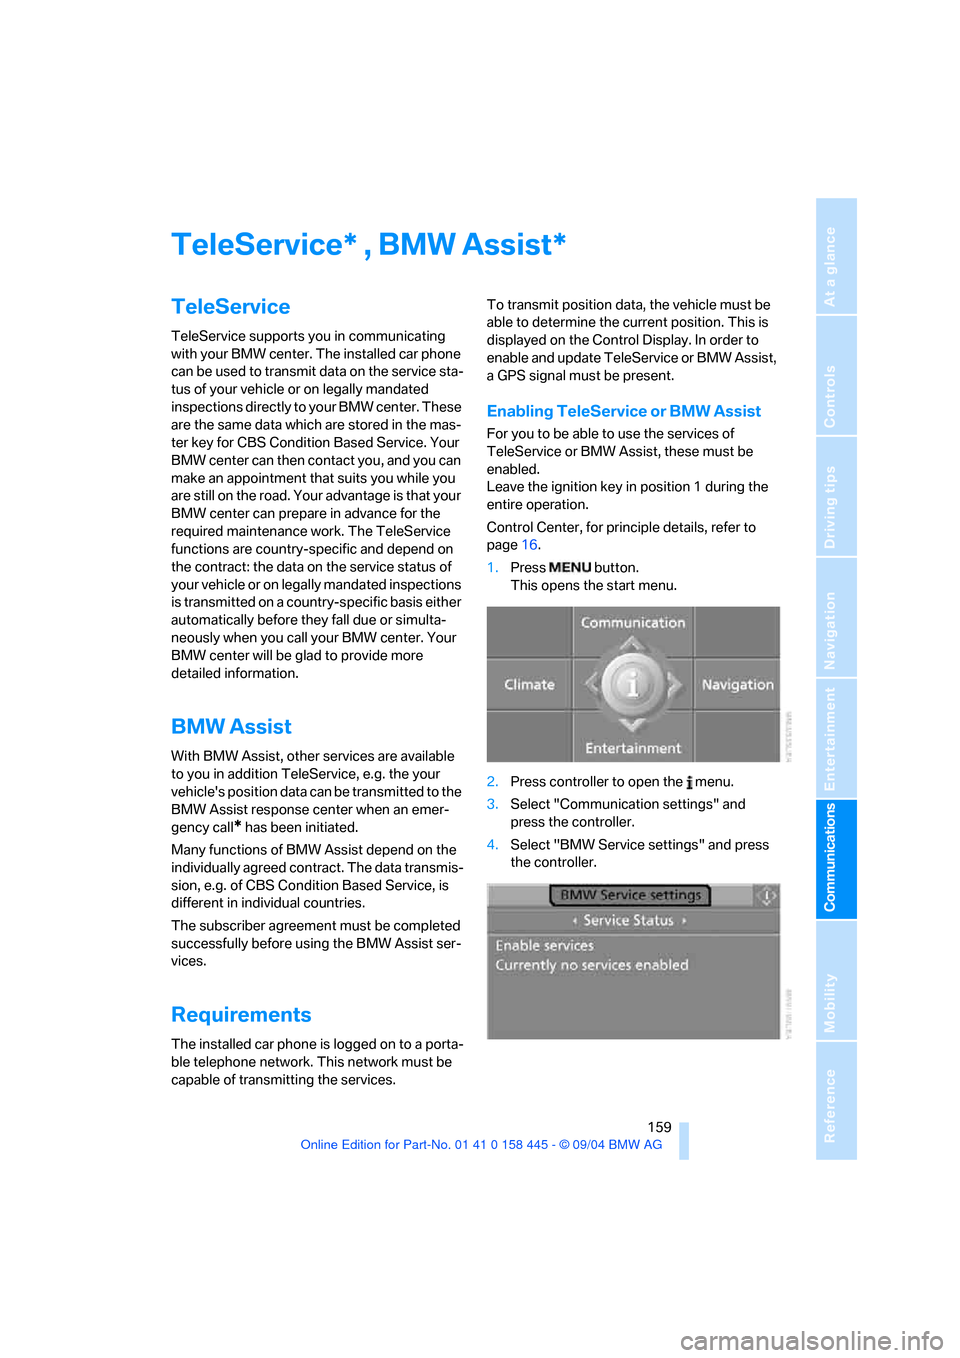
Leave the ignition key in position 1 during the
entire operation.
Control Center, for principle details, refer to
page16.
1.Press button.
This opens the start menu.
2.Press controller to open the menu.
3.Select "Communication settings" and
press the controller.
4.Select "BMW Service settings" and press
the controller.
**
Page 182 of 217
Mobility
181Reference
At a glance
Controls
Driving tips
Communications
Navigation
Entertainment
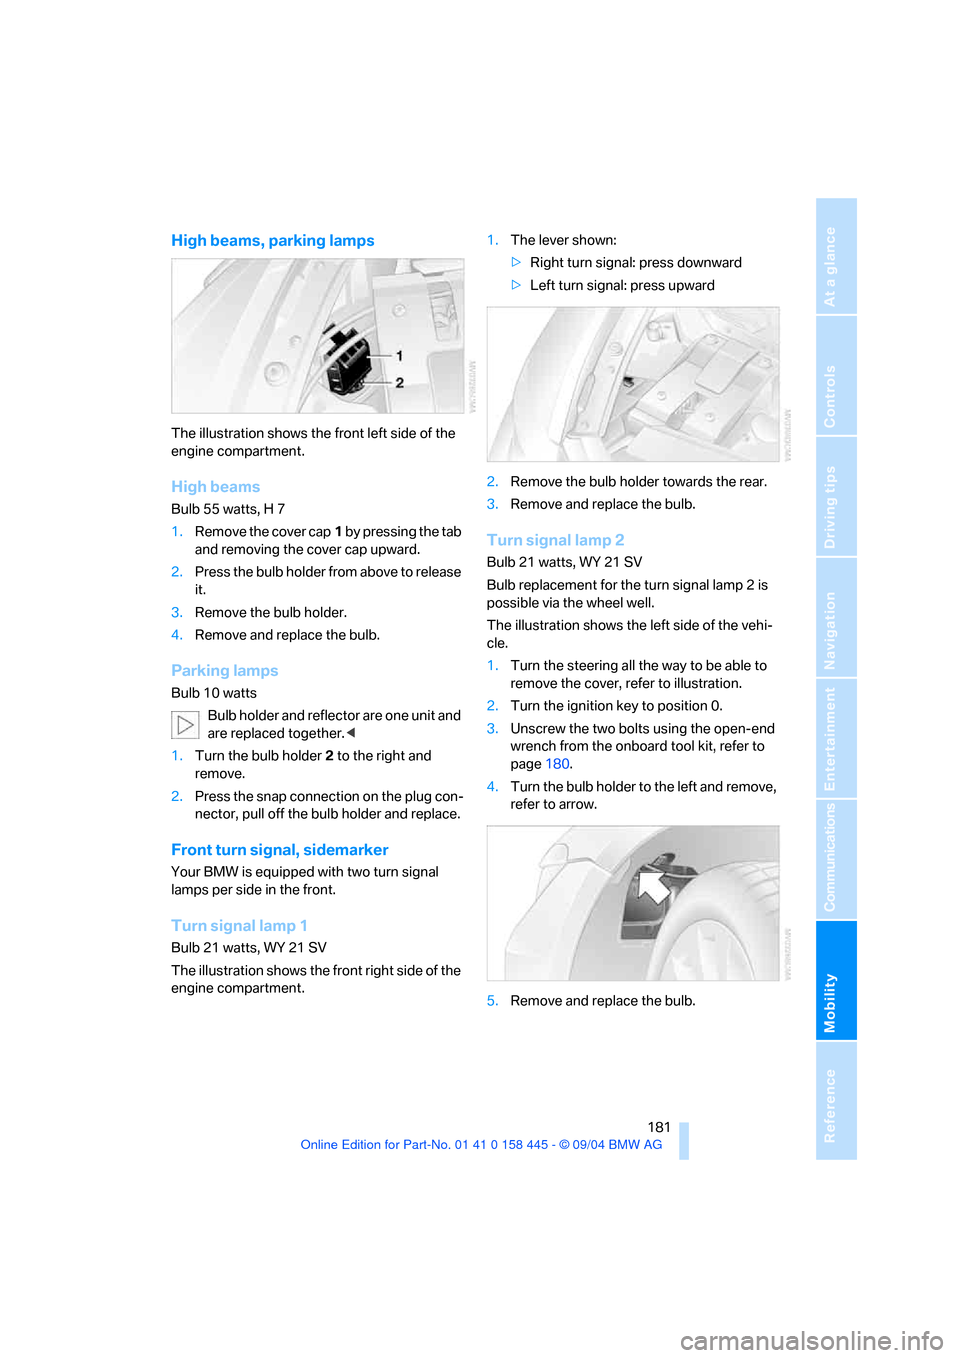
High beams, parking lamps
The illustration shows the front left side of the
engine compartment.
High beams
Bulb 55 watts, H 7
1.Remove the cover cap1 by pressing the tab
and removing the cover cap upward.
2.Press the bulb holder from above to release
it.
3.Remove the bulb holder.
4.Remove and replace the bulb.
Parking lamps
Bulb 10 watts
Bulb holder and reflector are one unit and
are replaced together.<
1.Turn the bulb holder2 to the right and
remove.
2.Press the snap connection on the plug con-
nector, pull off the bulb holder and replace.
Front turn signal, sidemarker
Your BMW is equipped with two turn signal
lamps per side in the front.
Turn signal lamp 1
Bulb 21 watts, WY 21 SV
The illustration shows the front right side of the
engine compartment.1.The lever shown:
>Right turn signal: press downward
>Left turn signal: press upward
2.Remove the bulb holder towards the rear.
3.Remove and replace the bulb.
Turn signal lamp 2
Bulb 21 watts, WY 21 SV
Bulb replacement for the turn signal lamp 2 is
possible via the wheel well.
The illustration shows the left side of the vehi-
cle.
1.Turn the steering all the way to be able to
remove the cover, refer to illustration.
2.Turn the ignition key to position 0.
3.Unscrew the two bolts using the open-end
wrench from the onboard tool kit, refer to
page180.
4.Turn the bulb holder to the left and remove,
refer to arrow.
5.Remove and replace the bulb.
Page 186 of 217
Mobility
185Reference
At a glance
Controls
Driving tips
Communications
Navigation
Entertainment
Giving and receiving assistance
Emergency call*
Conditions for an emergency call:
>Ignition key in position 1 or greater.
>The car phone is logged on to a portable
telephone network.
>The emergency call system is operable.
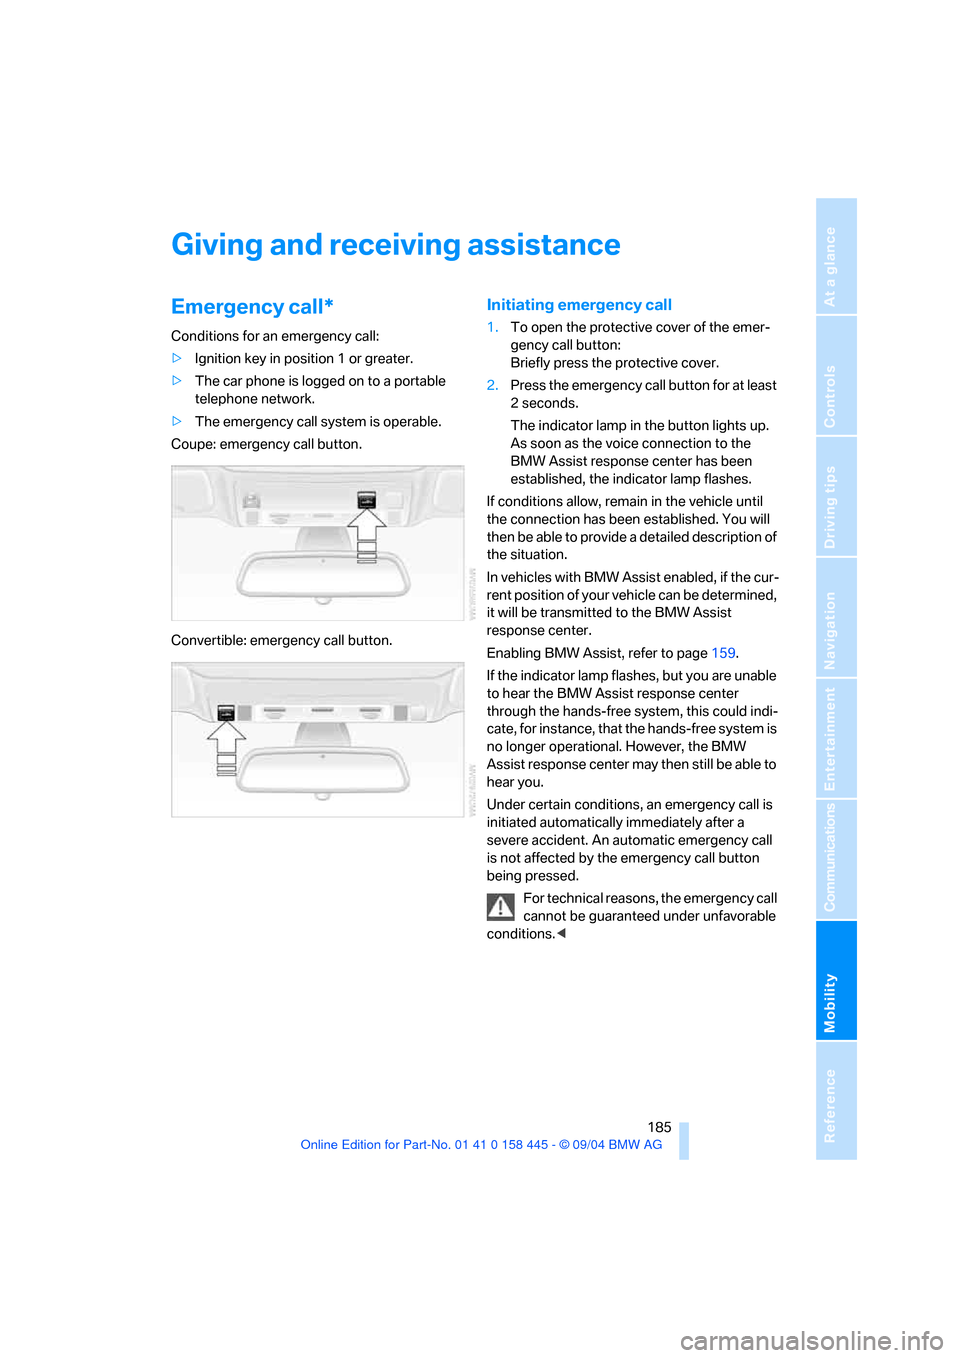
Coupe: emergency call button.
Convertible: emergency call button.
Initiating emergency call
1.To open the protective cover of the emer-
gency call button:
Briefly press the protective cover.
2.Press the emergency call button for at least
2seconds.
The indicator lamp in the button lights up.
As soon as the voice connection to the
BMW Assist response center has been
established, the indicator lamp flashes.
If conditions allow, remain in the vehicle until
the connection has been established. You will
then be able to provide a detailed description of
the situation.
In vehicles with BMW Assist enabled, if the cur-
r en t p o s it i o n o f y o u r v eh i c le c a n b e d et e r m in e d ,
it will be transmitted to the BMW Assist
response center.
Enabling BMW Assist, refer to page159.
If the indicator lamp flashes, but you are unable
to hear the BMW Assist response center
through the hands-free system, this could indi-
cate, for instance, that the hands-free system is
no longer operational. However, the BMW
Assist response center may then still be able to
hear you.
Under certain conditions, an emergency call is
initiated automatically immediately after a
severe accident. An automatic emergency call
is not affected by the emergency call button
being pressed.
For technical reasons, the emergency call
cannot be guaranteed under unfavorable
conditions.<