2005 BMW 645I CONVERTIBLE ignition
[x] Cancel search: ignitionPage 74 of 217
Controls
73Reference
At a glance
Driving tips
Communications
Navigation
Entertainment
Mobility
Displaying stored messages
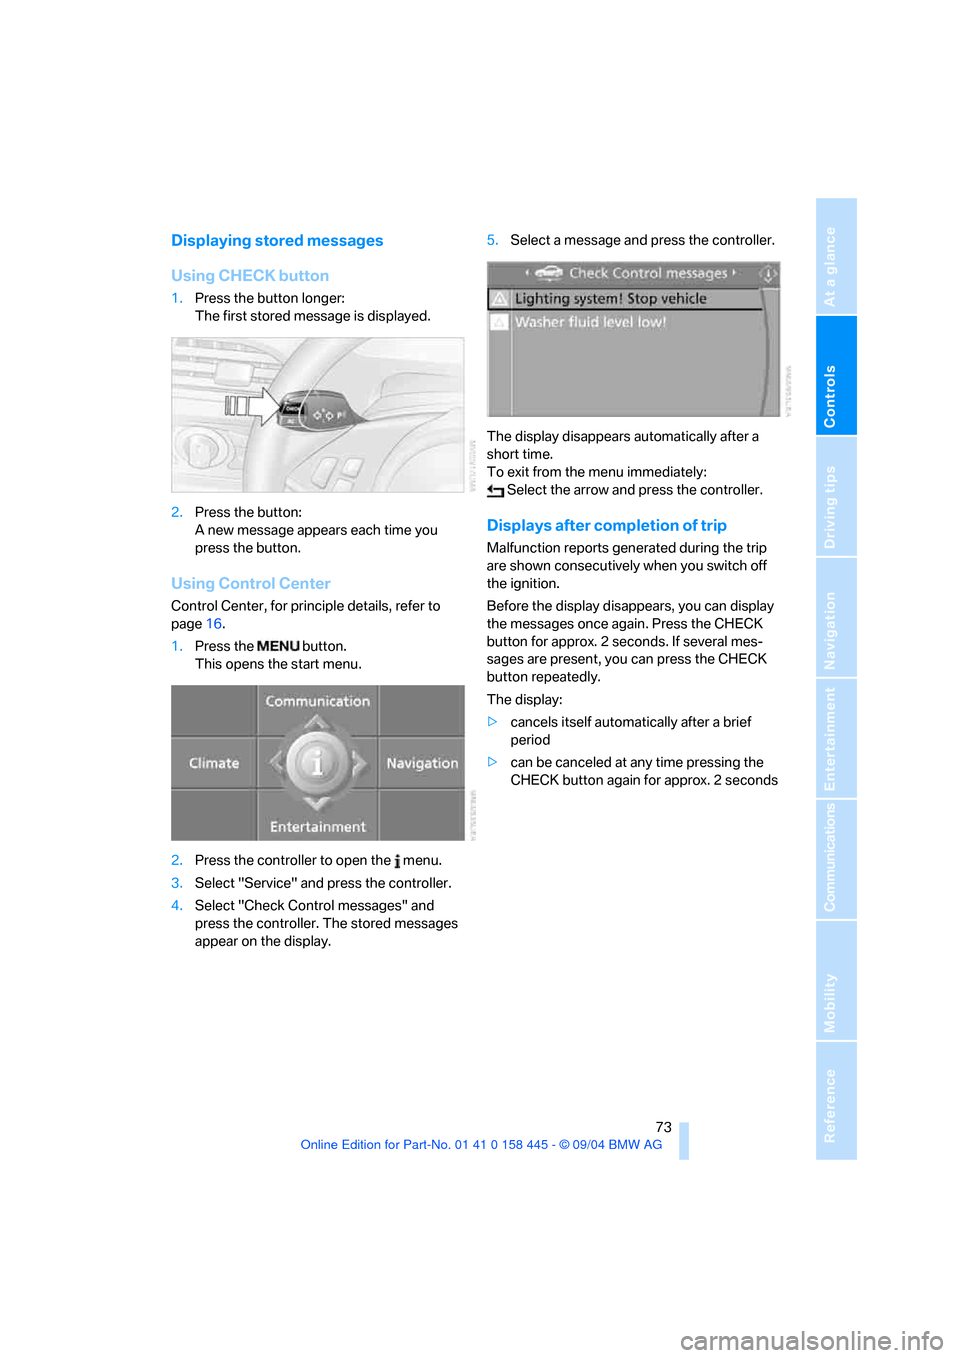
Using CHECK button
1.Press the button longer:
The first stored message is displayed.
2.Press the button:
A new message appears each time you
press the button.
Using Control Center
Control Center, for principle details, refer to
page16.
1.Press the button.
This opens the start menu.
2.Press the controller to open the menu.
3.Select "Service" and press the controller.
4.Select "Check Control messages" and
press the controller. The stored messages
appear on the display.5.Select a message and press the controller.
The display disappears automatically after a
short time.
To exit from the menu immediately:
Select the arrow and press the controller.
Displays after completion of trip
Malfunction reports generated during the trip
are shown consecutively when you switch off
the ignition.
Before the display disappears, you can display
the messages once again. Press the CHECK
button for approx. 2 seconds. If several mes-
sages are present, you can press the CHECK
button repeatedly.
The display:
>cancels itself automatically after a brief
period
>can be canceled at any time pressing the
CHECK button again for approx. 2 seconds
Page 75 of 217
Everything under control
74
Computer
Requesting information
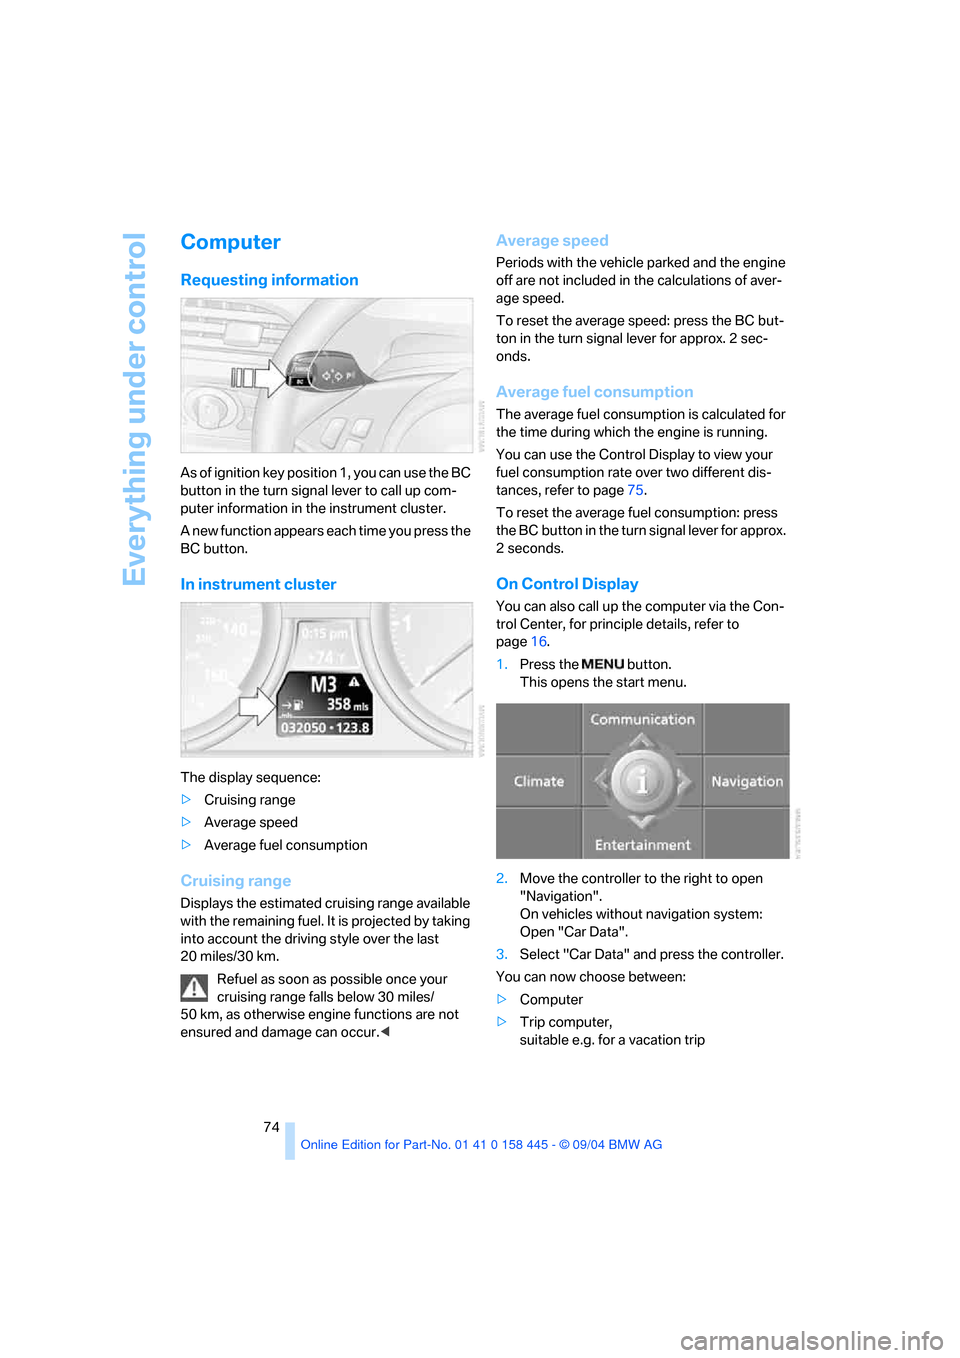
As of ignition key position 1, you can use the BC
button in the turn signal lever to call up com-
puter information in the instrument cluster.
A new function appears each time you press the
BC button.
In instrument cluster
The display sequence:
>Cruising range
>Average speed
>Average fuel consumption
Cruising range
Displays the estimated cruising range available
with the remaining fuel. It is projected by taking
into account the driving style over the last
20 miles/30 km.
Refuel as soon as possible once your
cruising range falls below 30 miles/
50 km, as otherwise engine functions are not
ensured and damage can occur.<
Average speed
Periods with the vehicle parked and the engine
off are not included in the calculations of aver-
age speed.
To reset the average speed: press the BC but-
ton in the turn signal lever for approx. 2 sec-
onds.
Average fuel consumption
The average fuel consumption is calculated for
the time during which the engine is running.
You can use the Control Display to view your
fuel consumption rate over two different dis-
tances, refer to page75.
To reset the average fuel consumption: press
the BC button in the turn signal lever for approx.
2seconds.
On Control Display
You can also call up the computer via the Con-
trol Center, for principle details, refer to
page16.
1.Press the button.
This opens the start menu.
2.Move the controller to the right to open
"Navigation".
On vehicles without navigation system:
Open "Car Data".
3.Select "Car Data" and press the controller.
You can now choose between:
>Computer
>Trip computer,
suitable e.g. for a vacation trip
Page 81 of 217

Technology for comfort, convenience and safety
80
Technology for comfort, convenience and
safety
PDC Park Distance Control*
The concept
The PDC assists you when you are parking.
Audible signals and an optical display
* indicate
that you are approaching an object in front of or
behind your vehicle. To measure the distance,
there are four ultrasonic sensors in each
bumper. The sensors at the front and at the two
rear corners have a range of approx. 24 in/
60 cm; the rear middle sensors have approx.
5ft/1.50m.
PDC is a parking aid that can indicate
objects when they are approached
slowly, as is usually the case when parking.
Avoid approaching an object at high speed, as
otherwise the physical circumstances would
mean that the system warning was too late.<
Automatic mode
In ignition key position 2, the system automati-
cally assumes operational status after approx.
1 second each time you shift into reverse or
move the selector-lever to position R.
Wait this short period before driving. The sys-
tem switches off when you disengage the
reverse gear.
Manual mode
Press the button; the LED lights up.
Deactivating manual mode
Press the button again; the LED goes out.
The system is automatically deactivated once
the vehicle travels approx. 165 ft/50 m or
exceeds a speed of roughly 20 mph/30 km/h;
the LED goes out. You can reactivate the sys-
tem manually as needed.
Signal tones
An intermittent signal indicates the distance of
the vehicle from an object being approached.
Thus, an object detected to the left rear of the
vehicle will be indicated by a signal tone from
the left rear speaker, etc. As the distance
between vehicle and object decreases, the
intervals between the tones become shorter.
The signal tone becomes continuous once the
distance to the nearest object falls to below
roughly 1 ft/30 cm.
The warning signal is canceled after approx.
3 seconds if you are moving parallel to a wall.
Malfunction
The LED in the button flashes and a message
appears on the Control Display. PDC is mal-
functioning. Have the system checked.
As a preventive measure, keep the sensors
clean and free of ice or snow in order to ensure
that they will continue to operate effectively.
PDC with visual warning*
You also enjoy the option of having the system
show the approach to an object on the Control
Display. The Control Display also indicates the
presence of objects before they are close
enough to trigger a signal tone.
Control Center, for principle details, refer to
page16.
Page 88 of 217
Controls
87Reference
At a glance
Driving tips
Communications
Navigation
Entertainment
Mobility
Do not apply adhesive materials to the
cover panels of the airbags, cover them or
modify them in any other way.
Do not attempt to remove the airbag retention
system from the vehicle. Never modify or
tamper with either the wiring or the individual
components in the airbag system. This cate-
gory includes the upholstery in the center of the
steering wheel, on the instrument panel, the
side trim panels on the doors and on the Coupe,
the roof pillars along with the sides of the head-
liner. Do not attempt to remove or dismantle the
steering wheel.
Do not touch the individual components
directly after the system has been triggered,
because there is a danger of burns.
If you note any indication of system malfunc-
tion, if you wish to have an airbag deactivated,
or if the airbag retention system is triggered in
response to an accident, you should always
entrust all inspection, repair and dismantling
operations to your BMW center. Unprofessional
attempts to service the system could lead to
failure in an emergency or undesired airbag
activation, either of which could result in per-
sonal injury.<
Airbag warning information is also provided on
the sun visors.
Operational readiness of airbag system
From ignition key position 1 the warning lamp
lights up briefly, indicating the operational
readiness of the entire airbag system and the
belt tensioners.
Airbag system malfunction
>The warning lamp does not light up as of
ignition key position 1.>The warning lamp lights up continuously.
Have the airbag system checked immedi-
ately if a malfunction occurs, as otherwise
there is a danger of the system not responding
in the expected manner to an impact occurring
within its normal response range.<
Convertible:
Rollover protection system
The rollover protection system is automatically
activated in the event of an accident or a critical
driving situation, extreme inclination on the lon-
gitudinal or transverse axis, or loss of ground
contact. The rollover bars located behind the
rear head restraints are deployed within frac-
tions of a second.
As a supplement to the rollover bar integrated
into the windshield frame, the rollover protec-
tion system ensures that all vehicle occupants
have the necessary headroom.
Always keep the path of movement of the
rollover protection system clear.
In less severe accidents, you are protected by
the fastened safety belt and, depending on the
severity of the accident, the belt tensioner and
the multistage airbag restraint system.<
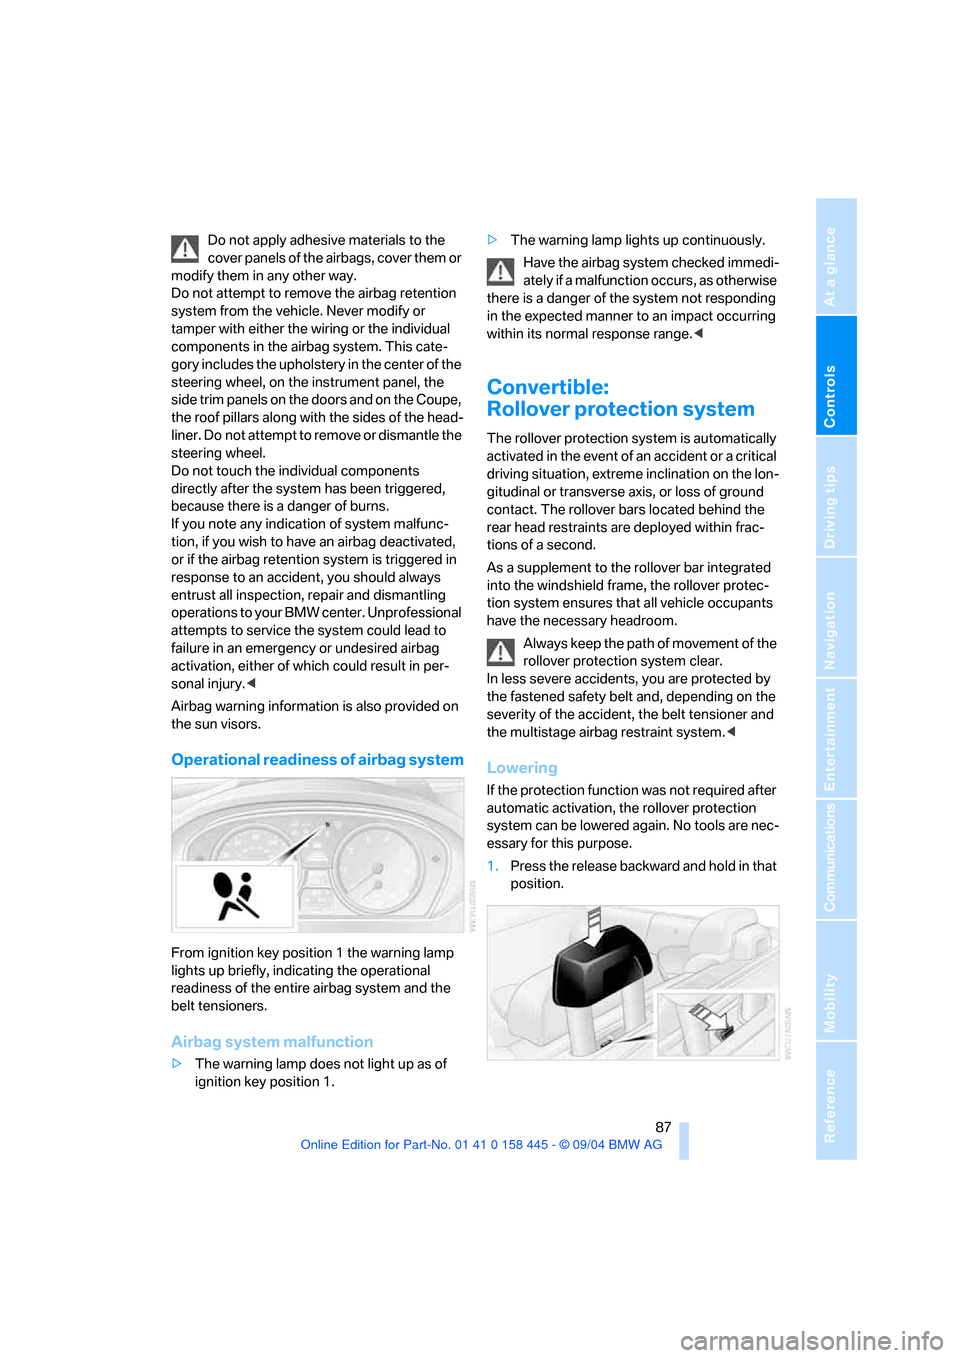
Lowering
If the protection function was not required after
automatic activation, the rollover protection
system can be lowered again. No tools are nec-
essary for this purpose.
1.Press the release backward and hold in that
position.
Page 89 of 217
Technology for comfort, convenience and safety
88 2.Press the rollover protection unit halfway
down from above.
3.Let go of the release.
4.Press the rollover protection unit down until
it snaps into place.
5.Use the same procedure for the second roll-
over protection unit.
Have the rollover protection system checked
after unexpected triggering.
Never move the convertible top when the
rollover protection system is raised.
No changes of any nature may be made to the
individual components of the rollover protec-
tion system and wiring.
Work on the rollover protection system may
only be performed at a BMW center. Unprofes-
sional attempts to service the system can lead
to failure or malfunction.
For a system check and to ensure long-term
functioning, you must comply with the mainte-
nance intervals of the service requirement dis-
play.<
Head-Up Display*
The concept
With the Head-Up Display important informa-
tion is projected into the driver's field of view,
e.g. navigation instructions. This enables you to
take in this information without looking away
from the road.
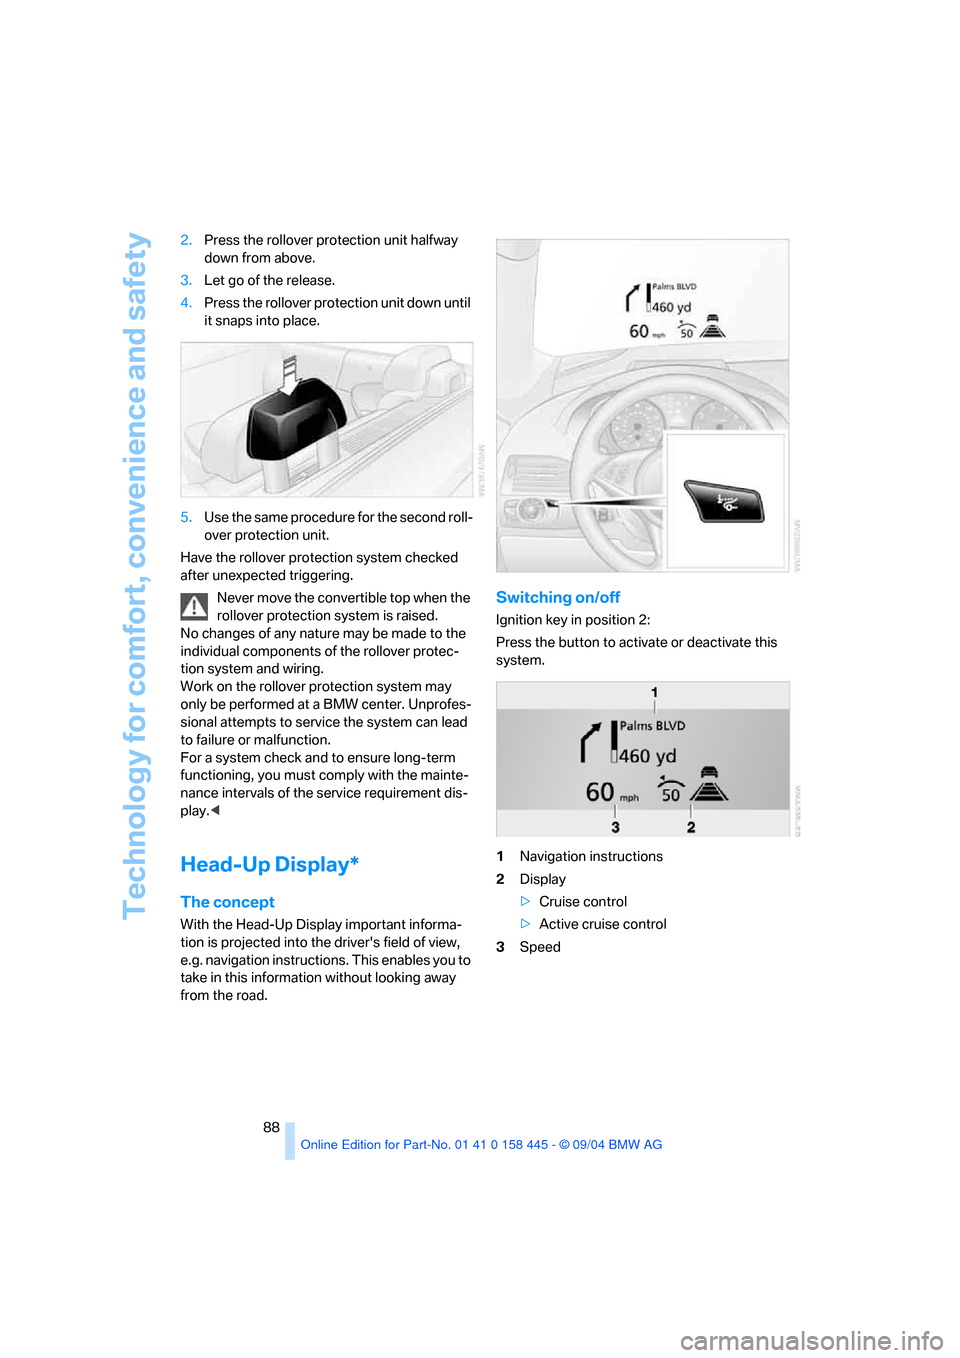
Switching on/off
Ignition key in position 2:
Press the button to activate or deactivate this
system.
1Navigation instructions
2Display
>Cruise control
>Active cruise control
3Speed
Page 92 of 217
Controls
91Reference
At a glance
Driving tips
Communications
Navigation
Entertainment
Mobility
Lamps
Parking lamps/low beams
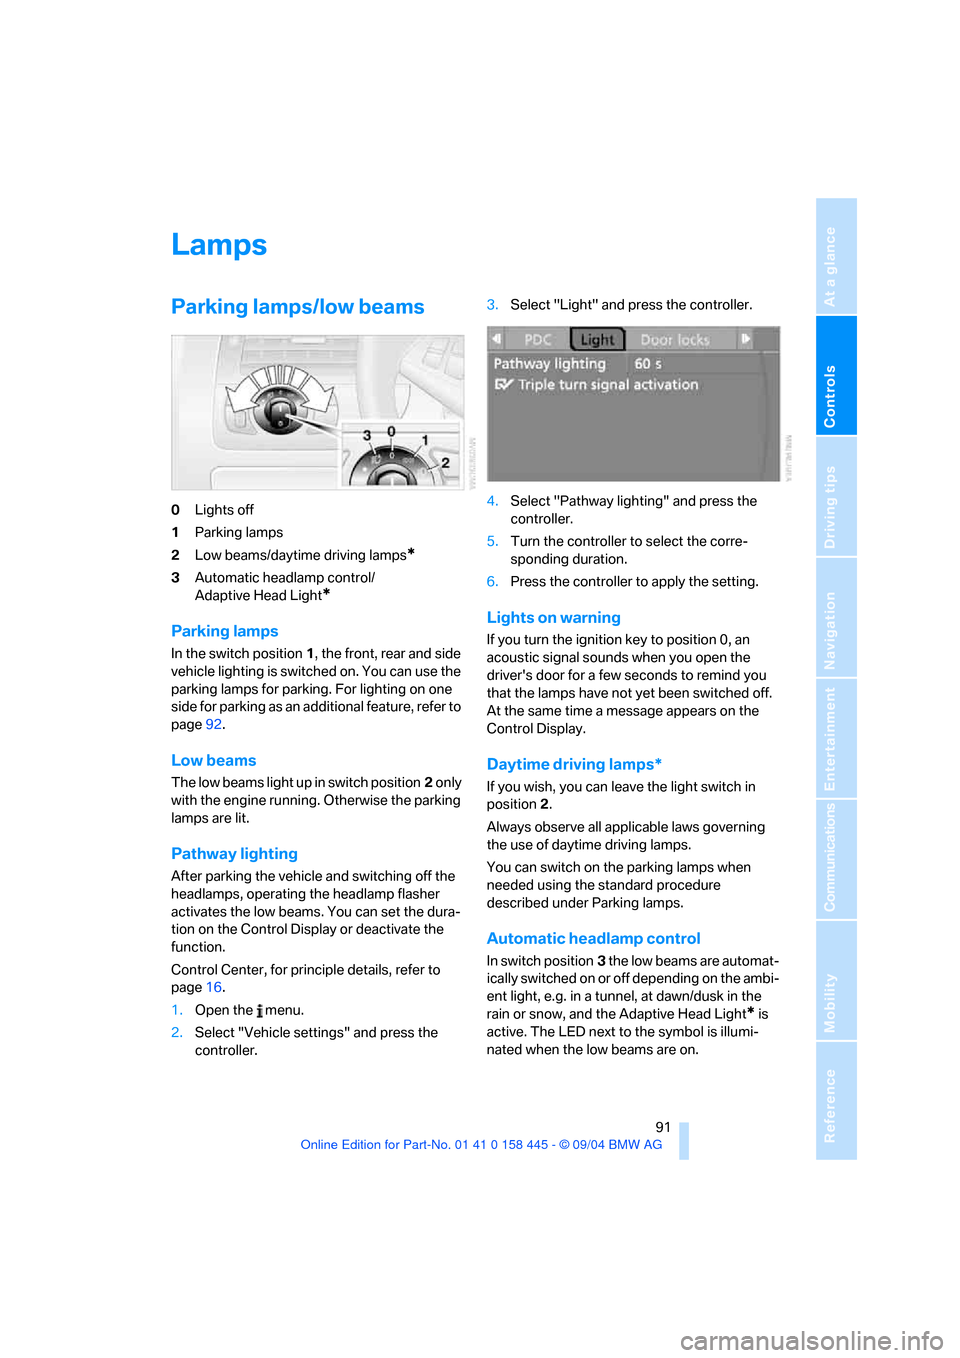
0Lights off
1Parking lamps
2Low beams/daytime driving lamps
*
3Automatic headlamp control/
Adaptive Head Light
*
Parking lamps
In the switch position1, the front, rear and side
vehicle lighting is switched on. You can use the
parking lamps for parking. For lighting on one
side for parking as an additional feature, refer to
page92.
Low beams
The low beams light up in switch position2 only
with the engine running. Otherwise the parking
lamps are lit.
Pathway lighting
After parking the vehicle and switching off the
headlamps, operating the headlamp flasher
activates the low beams. You can set the dura-
tion on the Control Display or deactivate the
function.
Control Center, for principle details, refer to
page16.
1.Open the menu.
2.Select "Vehicle settings" and press the
controller.3.Select "Light" and press the controller.
4.Select "Pathway lighting" and press the
controller.
5.Turn the controller to select the corre-
sponding duration.
6.Press the controller to apply the setting.
Lights on warning
If you turn the ignition key to position 0, an
acoustic signal sounds when you open the
driver's door for a few seconds to remind you
that the lamps have not yet been switched off.
At the same time a message appears on the
Control Display.
Daytime driving lamps*
If you wish, you can leave the light switch in
position2.
Always observe all applicable laws governing
the use of daytime driving lamps.
You can switch on the parking lamps when
needed using the standard procedure
described under Parking lamps.
Automatic headlamp control
In switch position3 the low beams are automat-
ically switched on or off depending on the ambi-
ent light, e.g. in a tunnel, at dawn/dusk in the
rain or snow, and the Adaptive Head Light
* is
active. The LED next to the symbol is illumi-
nated when the low beams are on.
Page 93 of 217
Lamps
92 The low beams remain on independent of
the ambient lighting conditions when you
switch on the fog lamps.
With the daytime driving lamps activated, the
low beams are always switched on in this switch
position with the ignition key in position 2.<
The automatic headlamp control cannot
serve as a substitute for your personal
judgment in determining when the lamps
should be switched on in response to ambient
lighting conditions. For example, the system
cannot detect fog. To avoid safety risks, you
should always switch on the lamps manually
under these conditions.<
Adaptive Head Light*
The concept
Adaptive Head Light is a variable headlamp
control system that enables better illumination
of the road surface. Depending on the steering
angle and other assumptions, the light from the
headlamp follows the course of the road.
Activating Adaptive Head Light
In switch position3 the Adaptive Head Light is
active and the automatic headlamp control is
switched on.
To avoid blinding oncoming traffic, the Adaptive
Head Light
>is not active when driving in reverse
>i s o n l y a c t i v e t o w a r d p a s s e n g e r ' s s i d e w h e n
stationary
Malfunction
The LED beside the symbol for automatic head-
lamp control flashes. The Adaptive Head Light
is malfunctioning or has failed. Have the system
checked as soon as possible.
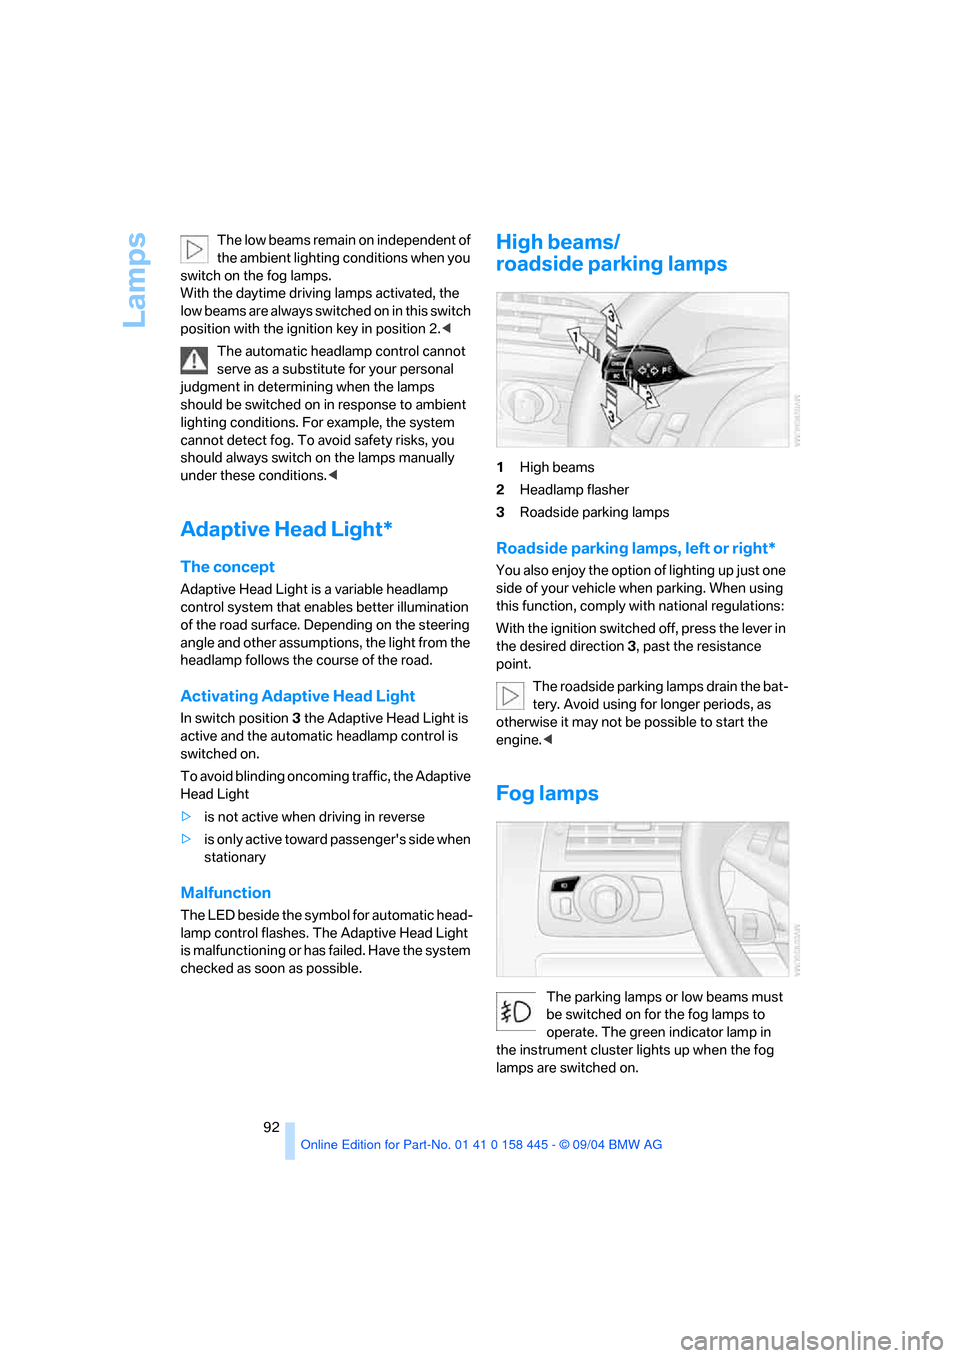
High beams/
roadside parking lamps
1High beams
2Headlamp flasher
3Roadside parking lamps
Roadside parking lamps, left or right*
You also enjoy the option of lighting up just one
side of your vehicle when parking. When using
this function, comply with national regulations:
With the ignition switched off, press the lever in
the desired direction3, past the resistance
point.
The roadside parking lamps drain the bat-
tery. Avoid using for longer periods, as
otherwise it may not be possible to start the
engine.<
Fog lamps
The parking lamps or low beams must
be switched on for the fog lamps to
operate. The green indicator lamp in
the instrument cluster lights up when the fog
lamps are switched on.
Page 97 of 217
A congenial climate
96 it off while also increasing the air volume as
required.
The recirculated-air mode should not be used
over a longer period of time, as the air quality
inside the vehicle deteriorates continuously.<
Residual heat mode
Press the button when the motor is
switched off and warm.
The heat stored in the engine is
used to heat the passenger com-
partment, e.g. when stopped at a school to pick
up a child.
You can adjust the automatic climate control
settings as of ignition key position 1.
Provided that the engine has warmed to its nor-
mal operating temperature and the battery is
charged, you can use this function for up to
15 minutes after switching off the ignition. The
LED in the button lights up to confirm compli-
ance with both of these conditions.
Switching off automatic climate control
The air volume, the heater and the
cooling function are all switched
off.
You can restart the automatic cli-
mate control by pressing any of its buttons
except the REST button.
Settings using Control Center
Ignition key:
>In vehicles with separate drives for audio
CDs and navigation DVDs, ignition key in
position 2.
>In vehicles with one drive for audio CDs,
ignition key in position 1.
Control Center, for principle details, refer to
page16.1.Press the button.
This opens the start menu.
2.Move the controller to the left to open "Cli-
mate".
You can set the following:
>Manual air distribution, separate for driver's
side and passenger side
>Adapting temperature in upper body region
>Intensity of the AUTO program
The settings are stored for the remote control
currently in use.
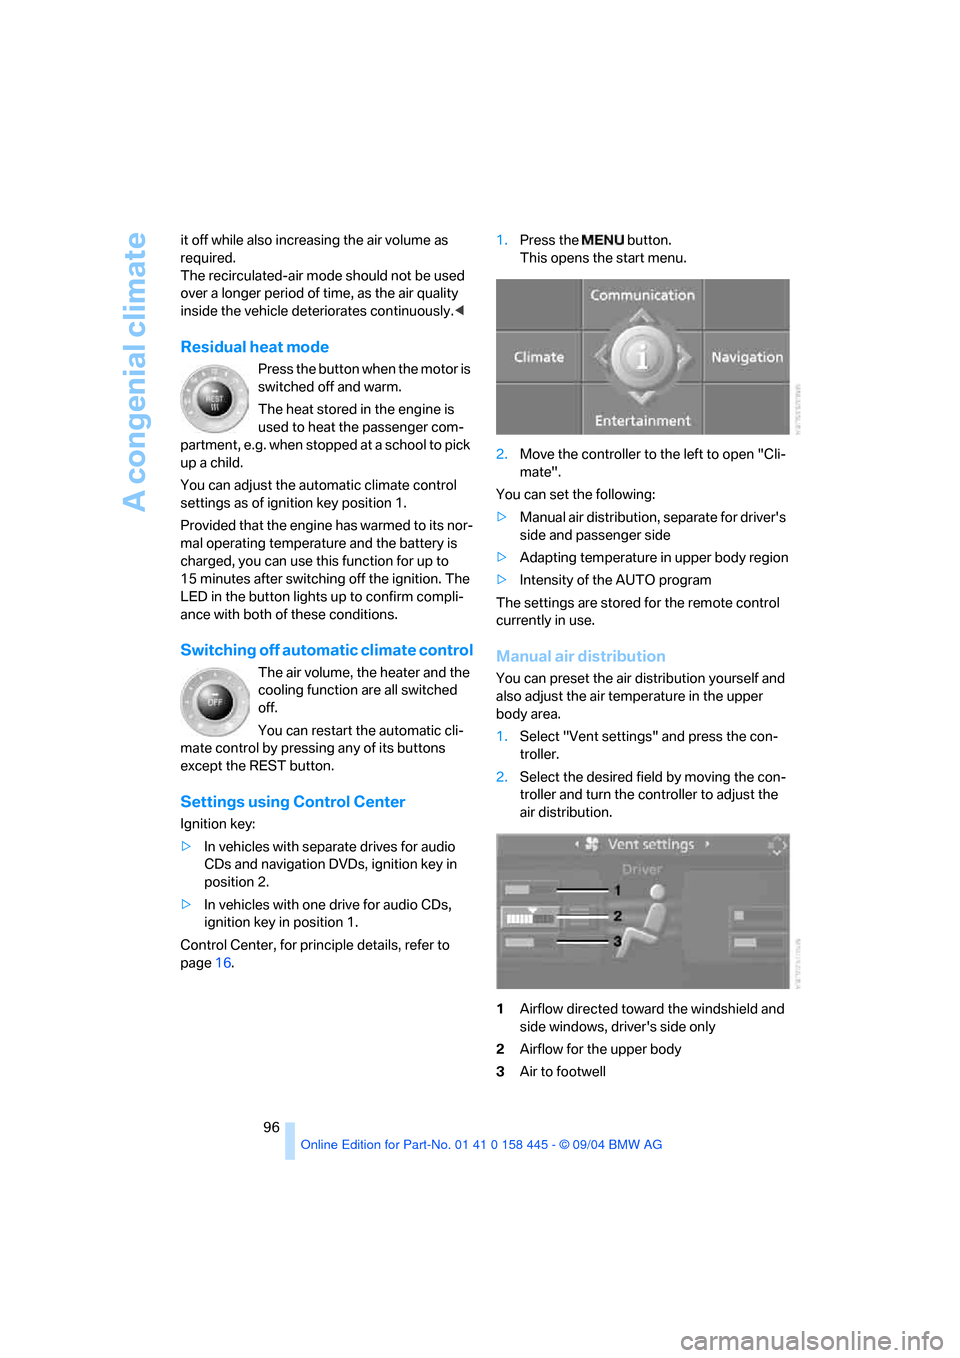
Manual air distribution
You can preset the air distribution yourself and
also adjust the air temperature in the upper
body area.
1.Select "Vent settings" and press the con-
troller.
2.Select the desired field by moving the con-
troller and turn the controller to adjust the
air distribution.
1Airflow directed toward the windshield and
side windows, driver's side only
2Airflow for the upper body
3Air to footwell