2005 BMW 645I CONVERTIBLE navigation system
[x] Cancel search: navigation systemPage 66 of 217
Controls
65Reference
At a glance
Driving tips
Communications
Navigation
Entertainment
Mobility
Deactivate system
Press the lever up or down while the system is
active3. The displays in the instrument cluster
disappear. You can use the system again as
required.
In addition, the system is deactivated automati-
cally:
>When you apply pressure to the brake pedal
>When you select the automatic transmis-
sion's/SMG neutral position N
>When the manual transmission is in neutral
>When you deactivate the DSC Dynamic
Stability Control
>When you actuate the parking brake during
driving
>When the system reduces the speed to
below 20 mph/30 km/h due to a traffic situ-
ation
The system deactivates automatically
when the speed is set to below 20 mph/
30 km/h. An acoustic signal sounds and a mes-
sage appears on the Control Display. The active
intervention of the driver is required.<
When you switch off the ignition, the stored
desired speed is deleted.
Resume to stored desired speed and
distance setting
Press button4 when the system is deactivated.
The displays appear in the instrument cluster.
The system is reactivated and uses the last
stored desired speed and distance setting.
Fine adjustment of desired speed
In the activated state, the desired speed
increases by 1 mph/1 km/h each time button4
is pressed briefly.
Select distance
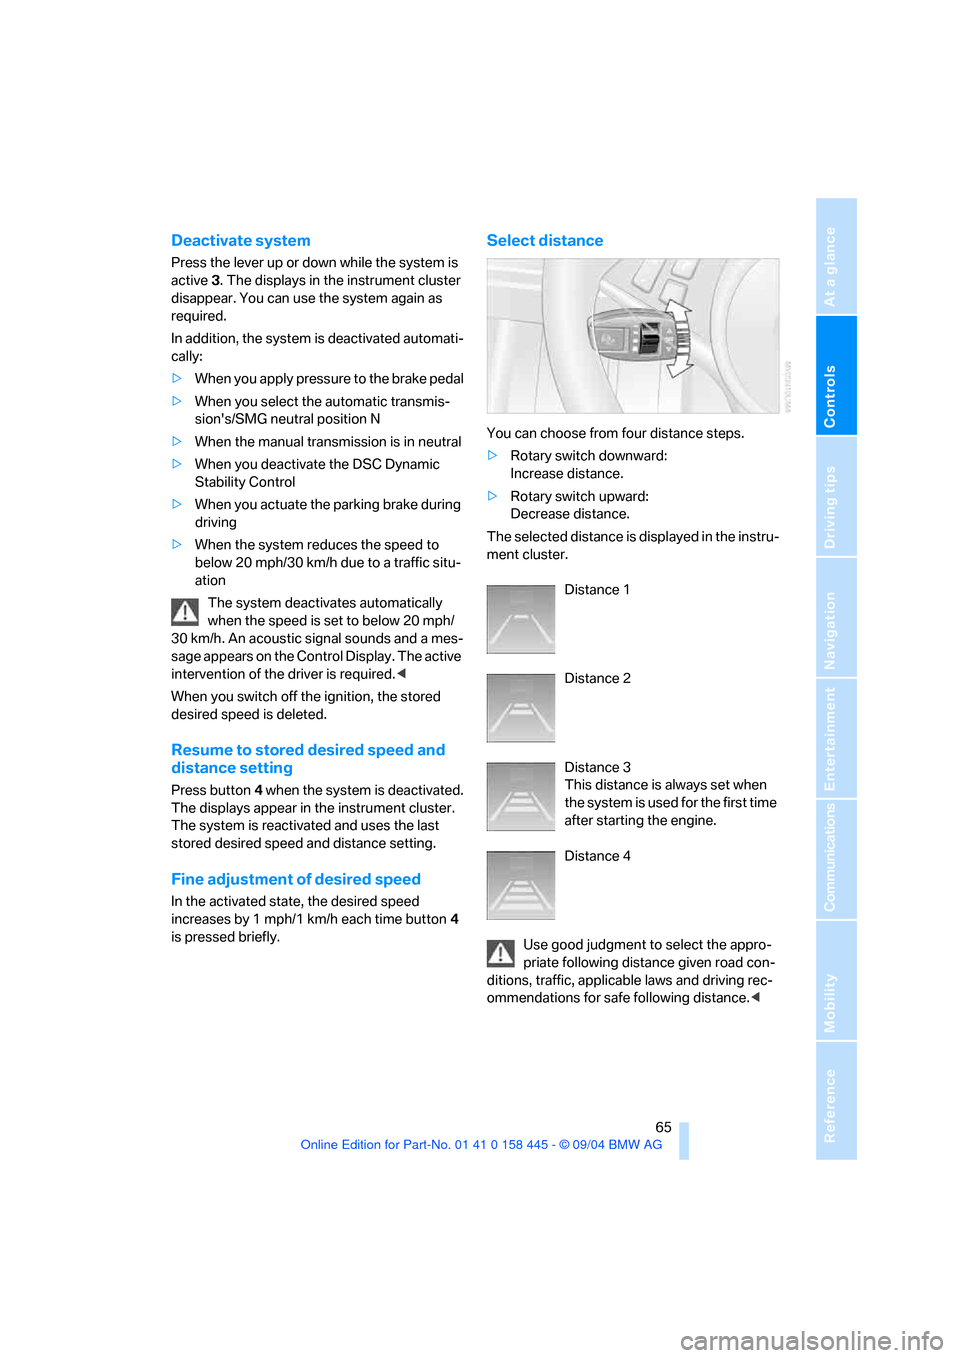
You can choose from four distance steps.
>Rotary switch downward:
Increase distance.
>Rotary switch upward:
Decrease distance.
The selected distance is displayed in the instru-
ment cluster.
Distance 1
Distance 2
Distance 3
This distance is always set when
the system is used for the first time
after starting the engine.
Distance 4
Use good judgment to select the appro-
priate following distance given road con-
ditions, traffic, applicable laws and driving rec-
ommendations for safe following distance.<
Page 68 of 217
Controls
67Reference
At a glance
Driving tips
Communications
Navigation
Entertainment
Mobility
Active cruise control may brake when you
reduce the stored desired speed; however, the
driver must constantly monitor traffic and inter-
vene if necessary.
When you switch off the engine or ignition,
active cruise control is fully switched off, too,
and any settings you have selected are can-
celed.
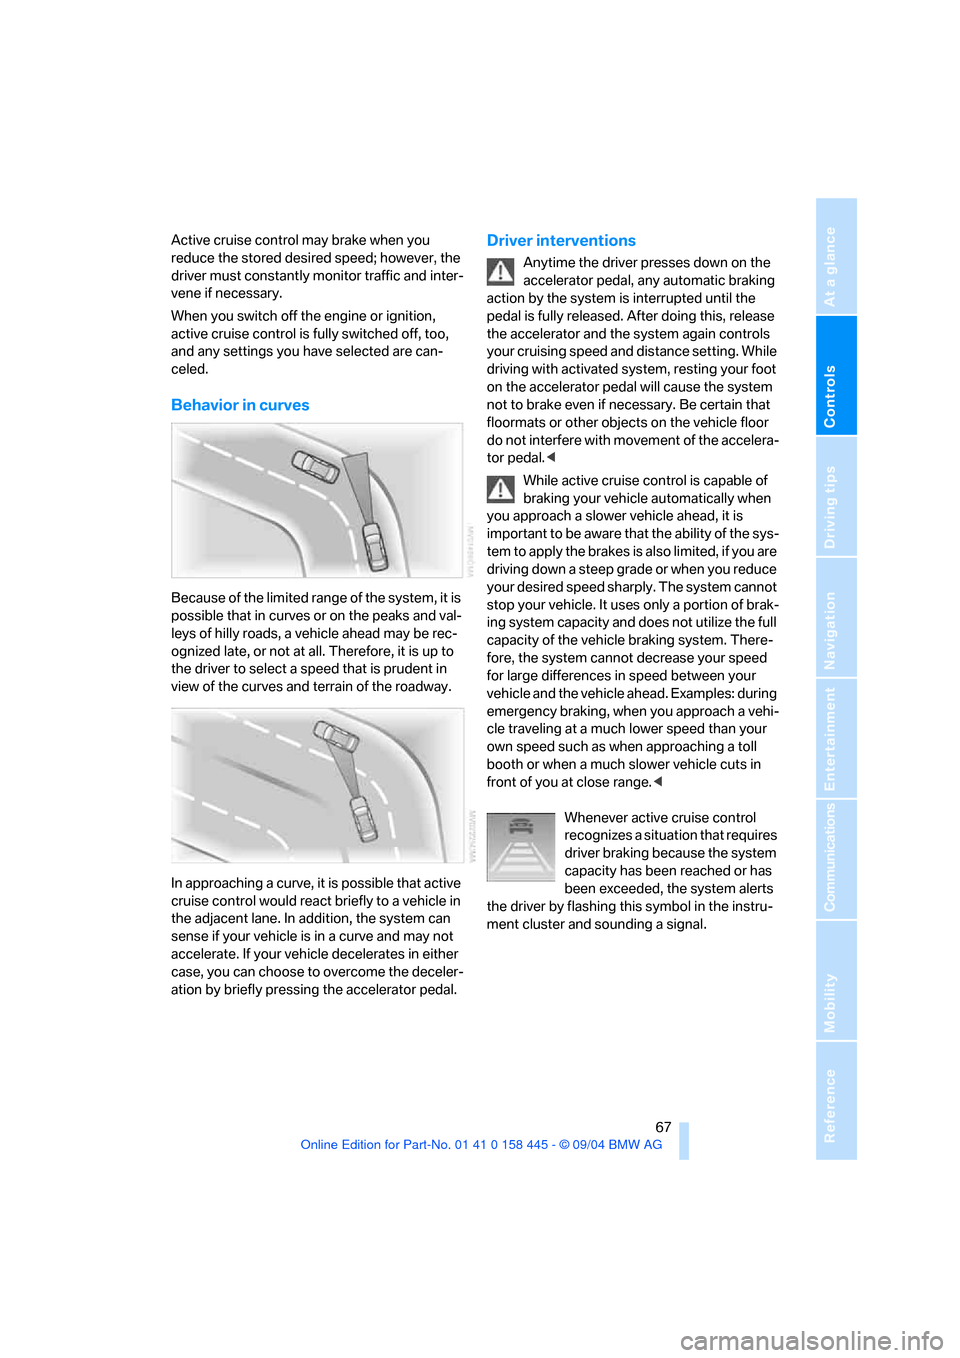
Behavior in curves
Because of the limited range of the system, it is
possible that in curves or on the peaks and val-
leys of hilly roads, a vehicle ahead may be rec-
ognized late, or not at all. Therefore, it is up to
the driver to select a speed that is prudent in
view of the curves and terrain of the roadway.
In approaching a curve, it is possible that active
cruise control would react briefly to a vehicle in
the adjacent lane. In addition, the system can
sense if your vehicle is in a curve and may not
accelerate. If your vehicle decelerates in either
case, you can choose to overcome the deceler-
ation by briefly pressing the accelerator pedal.
Driver interventions
Anytime the driver presses down on the
accelerator pedal, any automatic braking
action by the system is interrupted until the
pedal is fully released. After doing this, release
the accelerator and the system again controls
your cruising speed and distance setting. While
driving with activated system, resting your foot
on the accelerator pedal will cause the system
not to brake even if necessary. Be certain that
floormats or other objects on the vehicle floor
do not interfere with movement of the accelera-
tor pedal.<
While active cruise control is capable of
braking your vehicle automatically when
you approach a slower vehicle ahead, it is
important to be aware that the ability of the sys-
tem to apply the brakes is also limited, if you are
driving down a steep grade or when you reduce
your desired speed sharply. The system cannot
stop your vehicle. It uses only a portion of brak-
ing system capacity and does not utilize the full
capacity of the vehicle braking system. There-
fore, the system cannot decrease your speed
for large differences in speed between your
vehicle and the vehicle ahead. Examples: during
emergency braking, when you approach a vehi-
cle traveling at a much lower speed than your
own speed such as when approaching a toll
booth or when a much slower vehicle cuts in
front of you at close range.<
Whenever active cruise control
recognizes a situation that requires
driver braking because the system
capacity has been reached or has
been exceeded, the system alerts
the driver by flashing this symbol in the instru-
ment cluster and sounding a signal.
Page 72 of 217
Controls
71Reference
At a glance
Driving tips
Communications
Navigation
Entertainment
Mobility
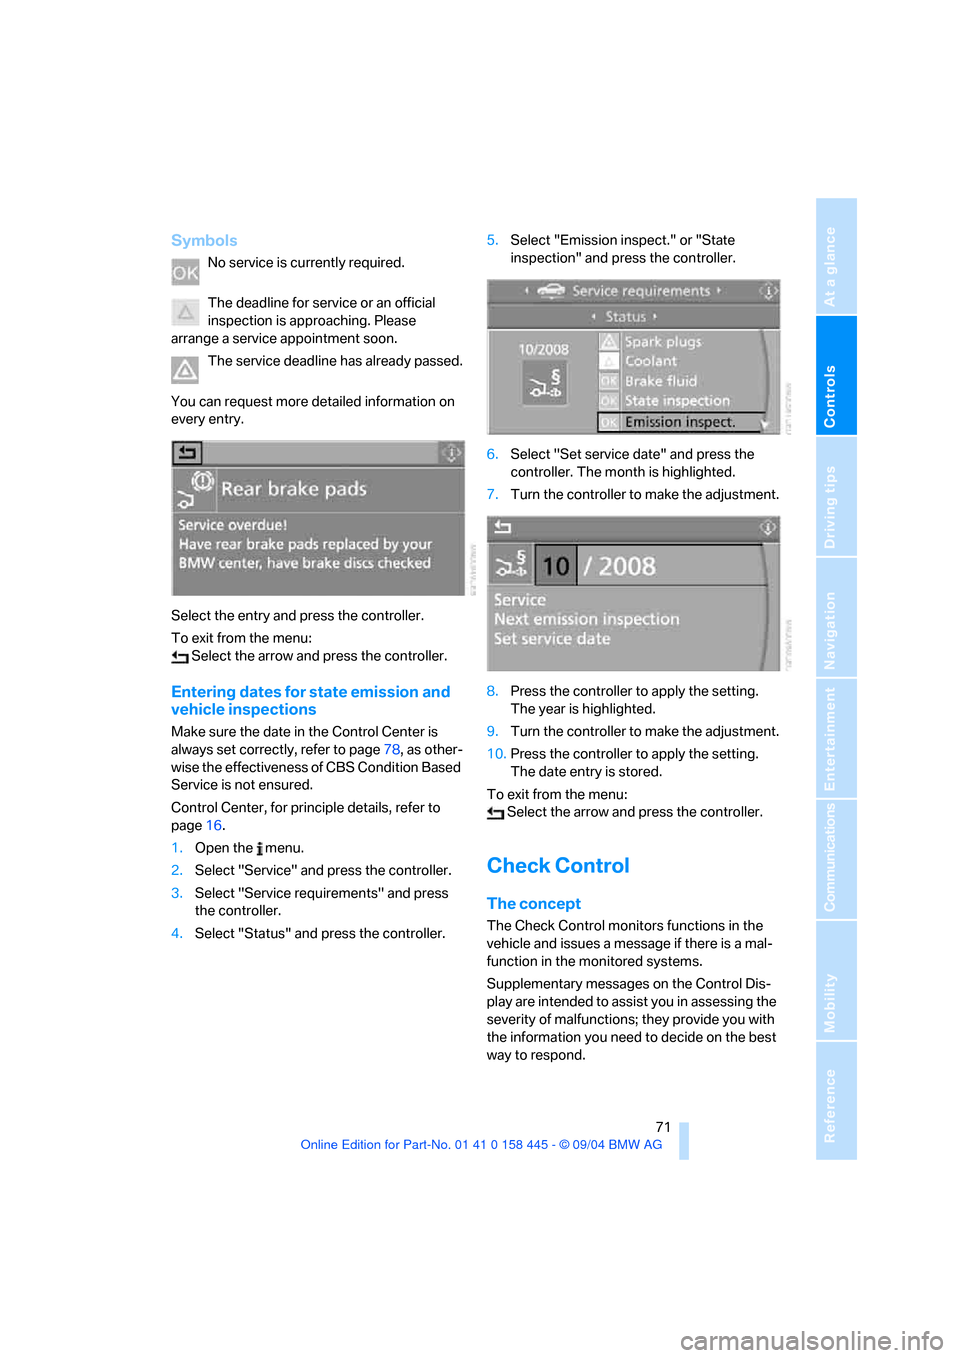
Symbols
No service is currently required.
The deadline for service or an official
inspection is approaching. Please
arrange a service appointment soon.
The service deadline has already passed.
You can request more detailed information on
every entry.
Select the entry and press the controller.
To exit from the menu:
Select the arrow and press the controller.
Entering dates for state emission and
vehicle inspections
Make sure the date in the Control Center is
always set correctly, refer to page78, as other-
wise the effectiveness of CBS Condition Based
Service is not ensured.
Control Center, for principle details, refer to
page16.
1.Open the menu.
2.Select "Service" and press the controller.
3.Select "Service requirements" and press
the controller.
4.Select "Status" and press the controller.5.Select "Emission inspect." or "State
inspection" and press the controller.
6.Select "Set service date" and press the
controller. The month is highlighted.
7.Turn the controller to make the adjustment.
8.Press the controller to apply the setting.
The year is highlighted.
9.Turn the controller to make the adjustment.
10.Press the controller to apply the setting.
The date entry is stored.
To exit from the menu:
Select the arrow and press the controller.
Check Control
The concept
The Check Control monitors functions in the
vehicle and issues a message if there is a mal-
function in the monitored systems.
Supplementary messages on the Control Dis-
play are intended to assist you in assessing the
severity of malfunctions; they provide you with
the information you need to decide on the best
way to respond.
Page 75 of 217
Everything under control
74
Computer
Requesting information
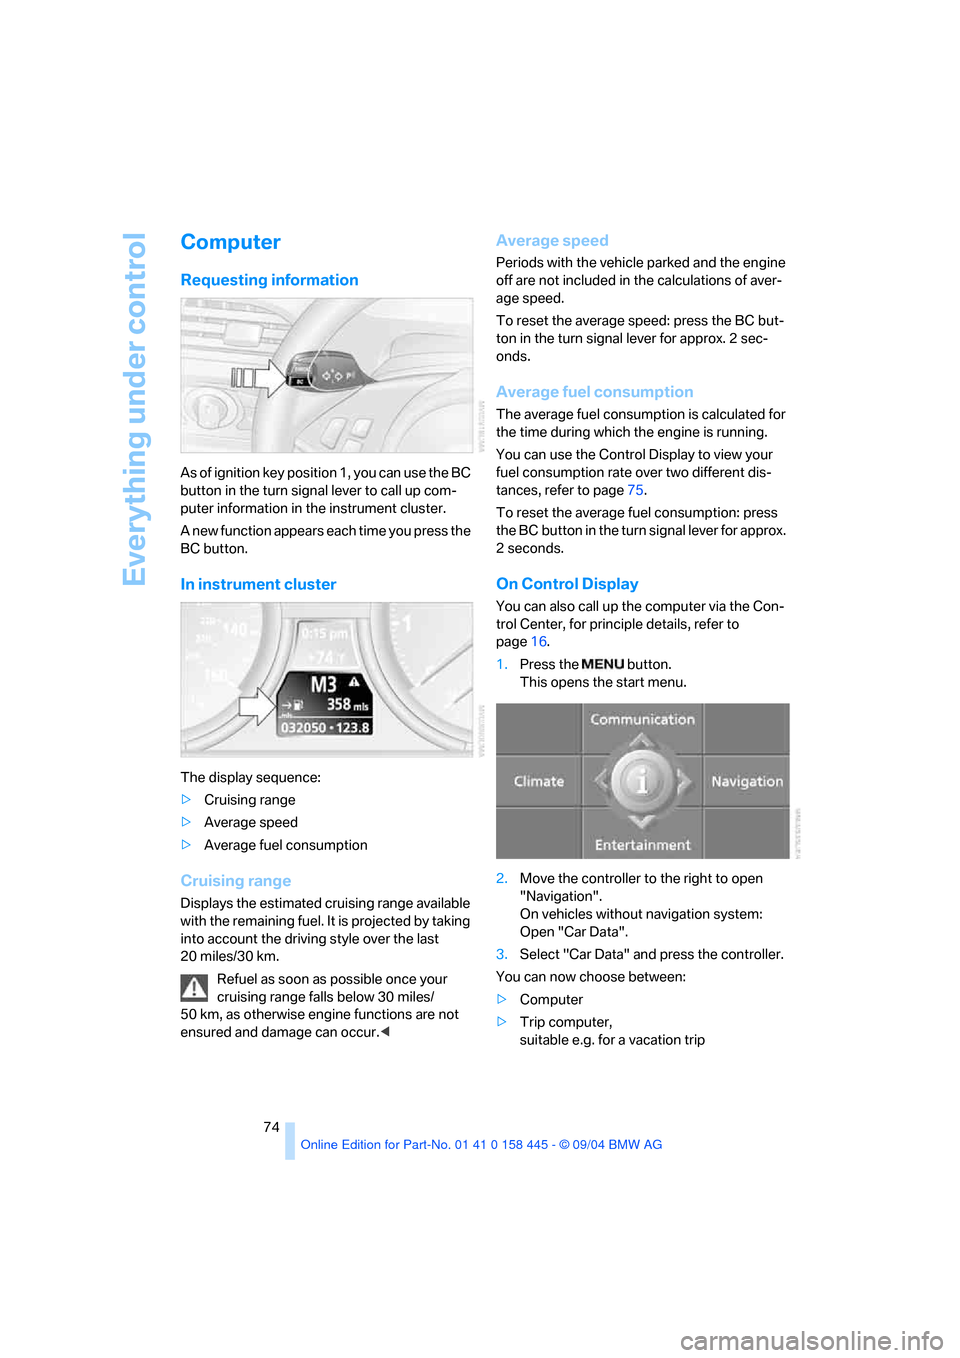
As of ignition key position 1, you can use the BC
button in the turn signal lever to call up com-
puter information in the instrument cluster.
A new function appears each time you press the
BC button.
In instrument cluster
The display sequence:
>Cruising range
>Average speed
>Average fuel consumption
Cruising range
Displays the estimated cruising range available
with the remaining fuel. It is projected by taking
into account the driving style over the last
20 miles/30 km.
Refuel as soon as possible once your
cruising range falls below 30 miles/
50 km, as otherwise engine functions are not
ensured and damage can occur.<
Average speed
Periods with the vehicle parked and the engine
off are not included in the calculations of aver-
age speed.
To reset the average speed: press the BC but-
ton in the turn signal lever for approx. 2 sec-
onds.
Average fuel consumption
The average fuel consumption is calculated for
the time during which the engine is running.
You can use the Control Display to view your
fuel consumption rate over two different dis-
tances, refer to page75.
To reset the average fuel consumption: press
the BC button in the turn signal lever for approx.
2seconds.
On Control Display
You can also call up the computer via the Con-
trol Center, for principle details, refer to
page16.
1.Press the button.
This opens the start menu.
2.Move the controller to the right to open
"Navigation".
On vehicles without navigation system:
Open "Car Data".
3.Select "Car Data" and press the controller.
You can now choose between:
>Computer
>Trip computer,
suitable e.g. for a vacation trip
Page 76 of 217
Controls
75Reference
At a glance
Driving tips
Communications
Navigation
Entertainment
Mobility
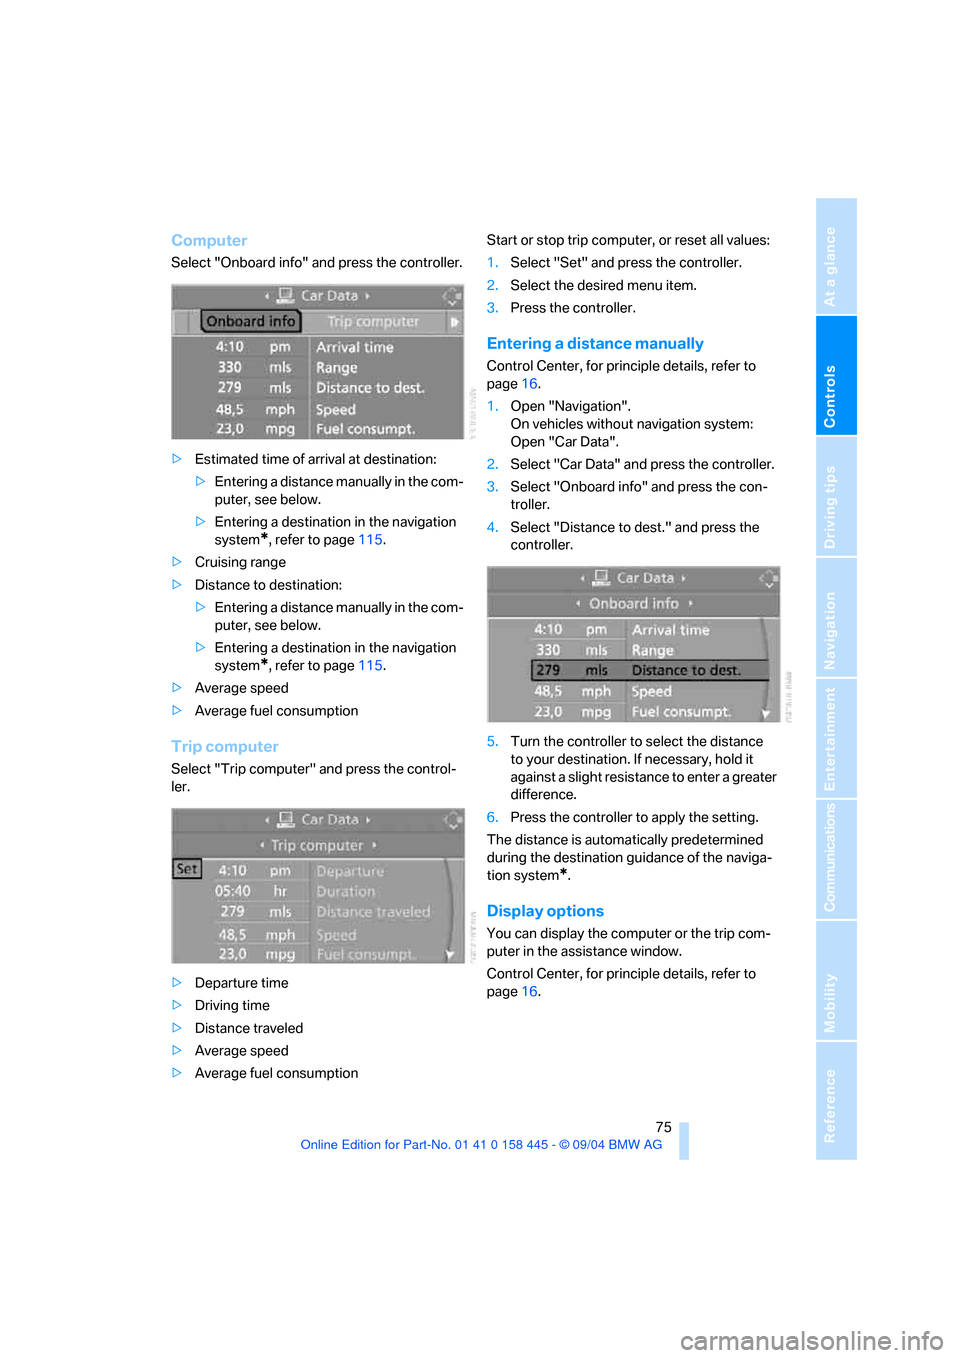
Computer
Select "Onboard info" and press the controller.
>Estimated time of arrival at destination:
>Entering a distance manually in the com-
puter, see below.
>Entering a destination in the navigation
system
*, refer to page115.
>Cruising range
>Distance to destination:
>Entering a distance manually in the com-
puter, see below.
>Entering a destination in the navigation
system
*, refer to page115.
>Average speed
>Average fuel consumption
Trip computer
Select "Trip computer" and press the control-
ler.
>Departure time
>Driving time
>Distance traveled
>Average speed
>Average fuel consumptionStart or stop trip computer, or reset all values:
1.Select "Set" and press the controller.
2.Select the desired menu item.
3.Press the controller.
Entering a distance manually
Control Center, for principle details, refer to
page16.
1.Open "Navigation".
On vehicles without navigation system:
Open "Car Data".
2.Select "Car Data" and press the controller.
3.Select "Onboard info" and press the con-
troller.
4.Select "Distance to dest." and press the
controller.
5.Turn the controller to select the distance
to your destination. If necessary, hold it
against a slight resistance to enter a greater
difference.
6.Press the controller to apply the setting.
The distance is automatically predetermined
during the destination guidance of the naviga-
tion system
*.
Display options
You can display the computer or the trip com-
puter in the assistance window.
Control Center, for principle details, refer to
page16.
Page 77 of 217
Everything under control
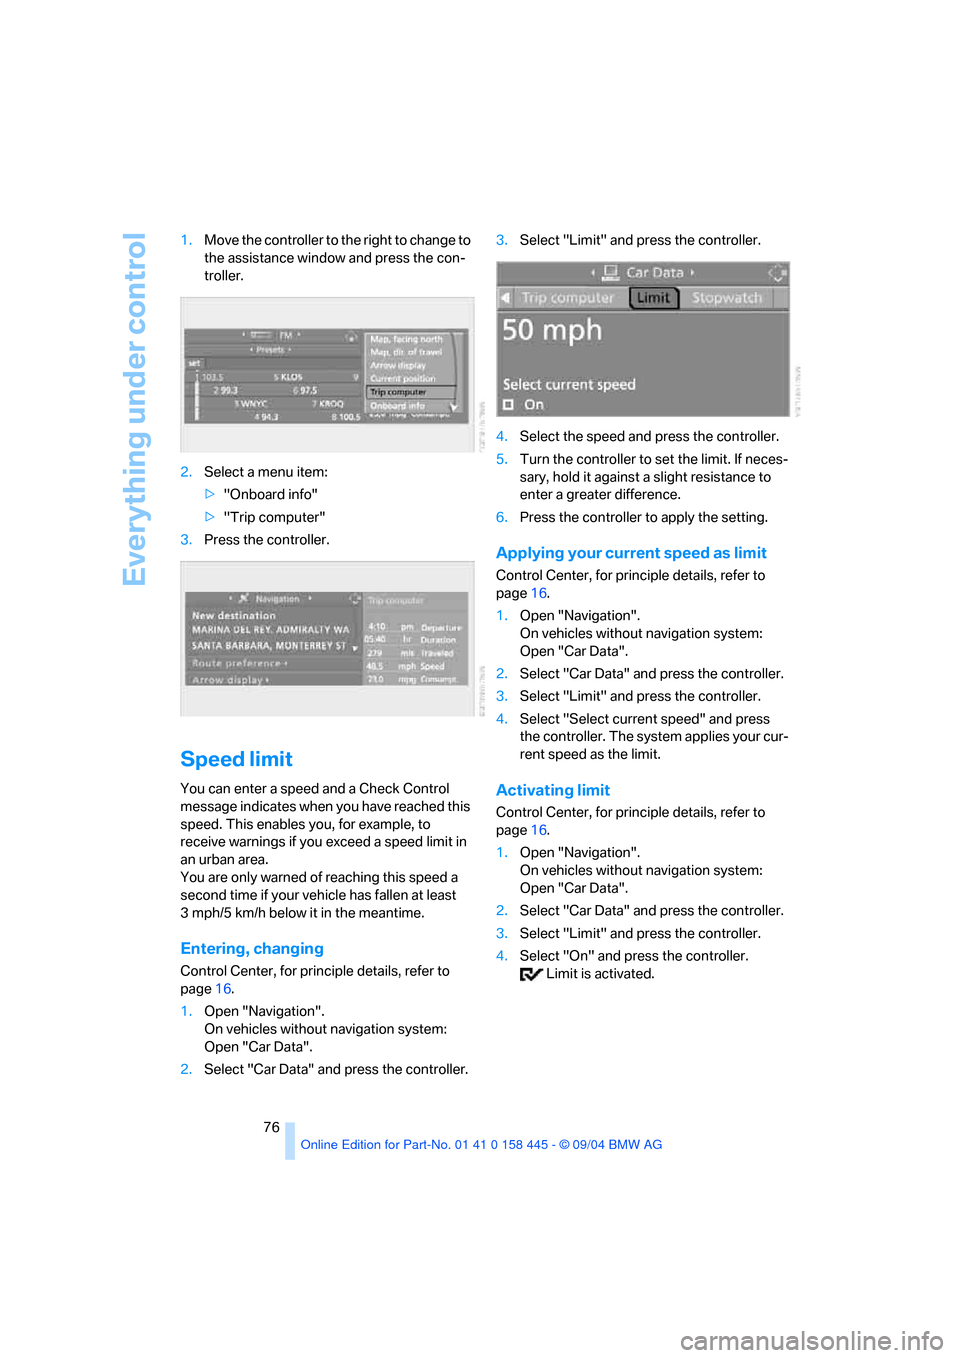
76 1.Move the controller to the right to change to
the assistance window and press the con-
troller.
2.Select a menu item:
>"Onboard info"
>"Trip computer"
3.Press the controller.
Speed limit
You can enter a speed and a Check Control
message indicates when you have reached this
speed. This enables you, for example, to
receive warnings if you exceed a speed limit in
an urban area.
You are only warned of reaching this speed a
second time if your vehicle has fallen at least
3 mph/5 km/h below it in the meantime.
Entering, changing
Control Center, for principle details, refer to
page16.
1.Open "Navigation".
On vehicles without navigation system:
Open "Car Data".
2.Select "Car Data" and press the controller.3.Select "Limit" and press the controller.
4.Select the speed and press the controller.
5.Turn the controller to set the limit. If neces-
sary, hold it against a slight resistance to
enter a greater difference.
6.Press the controller to apply the setting.
Applying your current speed as limit
Control Center, for principle details, refer to
page16.
1.Open "Navigation".
On vehicles without navigation system:
Open "Car Data".
2.Select "Car Data" and press the controller.
3.Select "Limit" and press the controller.
4.Select "Select current speed" and press
the controller. The system applies your cur-
rent speed as the limit.
Activating limit
Control Center, for principle details, refer to
page16.
1.Open "Navigation".
On vehicles without navigation system:
Open "Car Data".
2.Select "Car Data" and press the controller.
3.Select "Limit" and press the controller.
4.Select "On" and press the controller.
Limit is activated.
Page 78 of 217
Controls
77Reference
At a glance
Driving tips
Communications
Navigation
Entertainment
Mobility
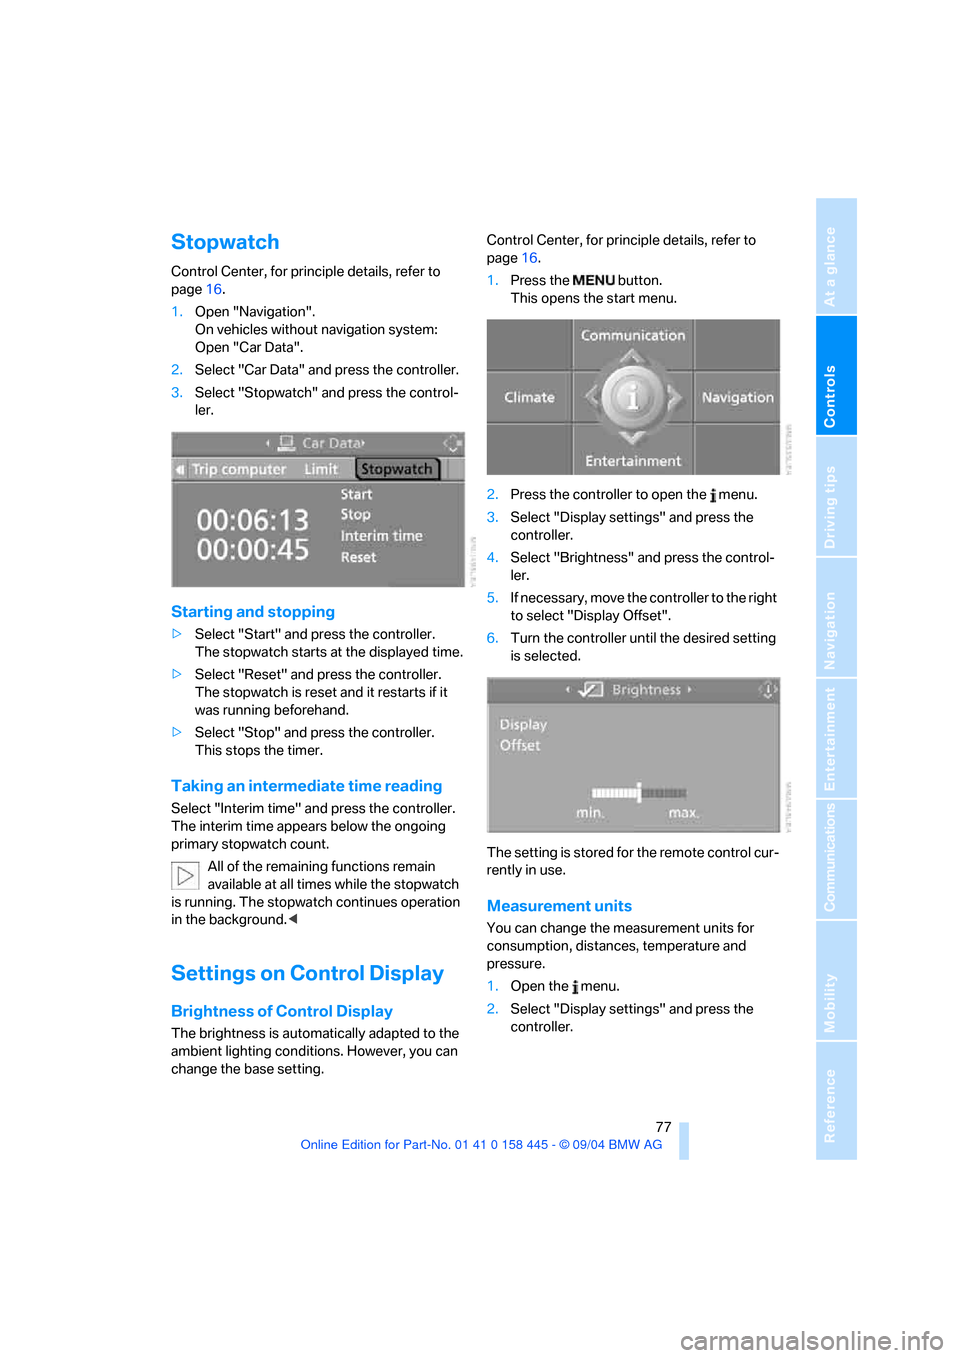
Stopwatch
Control Center, for principle details, refer to
page16.
1.Open "Navigation".
On vehicles without navigation system:
Open "Car Data".
2.Select "Car Data" and press the controller.
3.Select "Stopwatch" and press the control-
ler.
Starting and stopping
>Select "Start" and press the controller.
The stopwatch starts at the displayed time.
>Select "Reset" and press the controller.
The stopwatch is reset and it restarts if it
was running beforehand.
>Select "Stop" and press the controller.
This stops the timer.
Taking an intermediate time reading
Select "Interim time" and press the controller.
The interim time appears below the ongoing
primary stopwatch count.
All of the remaining functions remain
available at all times while the stopwatch
is running. The stopwatch continues operation
in the background.<
Settings on Control Display
Brightness of Control Display
The brightness is automatically adapted to the
ambient lighting conditions. However, you can
change the base setting.Control Center, for principle details, refer to
page16.
1.Press the button.
This opens the start menu.
2.Press the controller to open the menu.
3.Select "Display settings" and press the
controller.
4.Select "Brightness" and press the control-
ler.
5.If necessary, move the controller to the right
to select "Display Offset".
6.Turn the controller until the desired setting
is selected.
The setting is stored for the remote control cur-
rently in use.
Measurement units
You can change the measurement units for
consumption, distances, temperature and
pressure.
1.Open the menu.
2.Select "Display settings" and press the
controller.
Page 82 of 217

Controls
81Reference
At a glance
Driving tips
Communications
Navigation
Entertainment
Mobility
1.Press button.
This opens the start menu.
2.Press the controller to open the menu.
3.Select "Vehicle settings" and press the
controller.
4.Select "PDC" and press the controller.
5.Select "Monitor display on" and press the
controller.
The PDC screen is activated.
The display appears on the Control Display as
soon as PDC is activated.
The setting is stored for the remote control cur-
rently in use.
System limits
Even with PDC, final responsibility for
estimating the distance between the
vehicle and any obstructions always remains
with the driver. Even when sensors are involved,
there is a blind spot in which objects cannot be
detected. The system is also subject to the
physical limits that apply to all forms of ultra-
sonic measurement, such as those encoun-
tered with thin and wedge-shaped objects, etc.
Low objects already displayed, e.g. a curb, can
also disappear from the detection area of the sensors again before a continuous tone
sounds.
Loud noises from outside and inside your vehi-
cle may prevent you from hearing the PDC sig-
nal tone.<
Do not apply high pressure spray to the
sensors for a prolonged period of time.
Keep the spray at least 4 in/10 cm away from
the sensors.<
Driving stability control
systems
Your BMW is equipped with an extended array
of systems designed to enhance and maintain
vehicle stability under extreme conditions.
ABS Antilock Brake System
ABS prevents the wheels from locking during
braking. Safe steering response is maintained
even during hard braking. This increases active
driving safety.
ABS is operational every time you start the
engine. For information on safe braking, refer to
page109.
CBC Cornering Brake Control
This system provides further enhancements to
vehicle stability and steering response when
braking while cornering or when braking during
a lane change.
Electronic brake-force distribution
This system controls the brake system's appli-
cation pressure at the rear wheels to ensure
stable deceleration.
DBC Dynamic Brake Control
When you apply the brakes rapidly, this system
automatically produces the maximum braking
force boost and thus helps to achieve the short-
est possible braking distance during panic
stops. This system exploits all of the benefits
provided by ABS.