2005 BMW 325I lock
[x] Cancel search: lockPage 94 of 166
Practical interior accessories
92
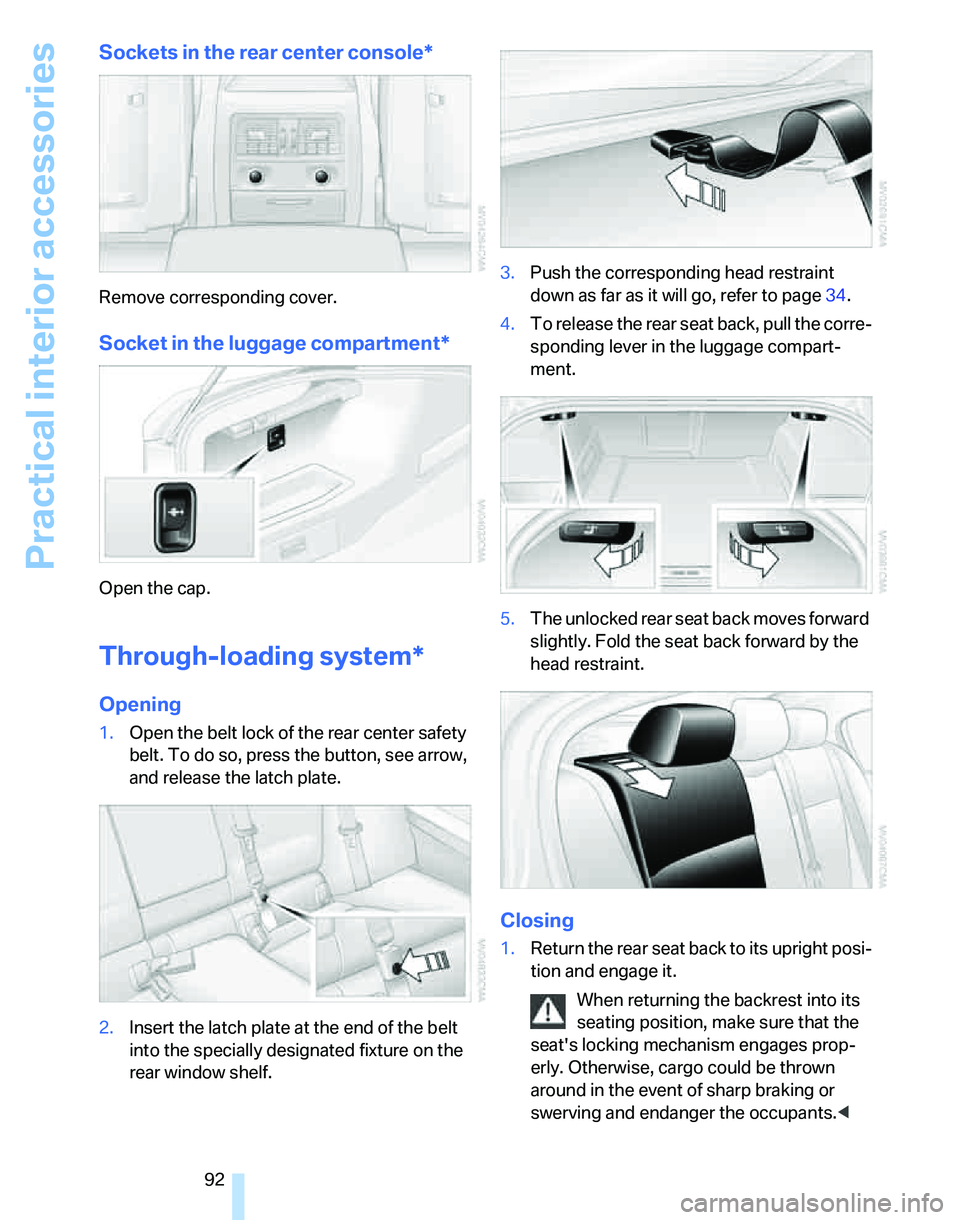
Sockets in the rear center console*
Remove corresponding cover.
Socket in the luggage compartment*
Open the cap.
Through-loading system*
Opening
1.Open the belt lock of the rear center safety
belt. To do so, press the button, see arrow,
and release the latch plate.
2.Insert the latch plate at the end of the belt
into the specially designated fixture on the
rear window shelf.3.Push the corresponding head restraint
down as far as it will go, refer to page34.
4.To release the rear seat back, pull the corre-
sponding lever in the luggage compart-
ment.
5.The unlocked rear seat back moves forward
slightly. Fold the seat back forward by the
head restraint.
Closing
1.Return the rear seat back to its upright posi-
tion and engage it.
When returning the backrest into its
seating position, make sure that the
seat's locking mechanism engages prop-
erly. Otherwise, cargo could be thrown
around in the event of sharp braking or
swerving and endanger the occupants.<
Page 95 of 166
Reference
At a glance
Controls
Driving tips
Mobility
93
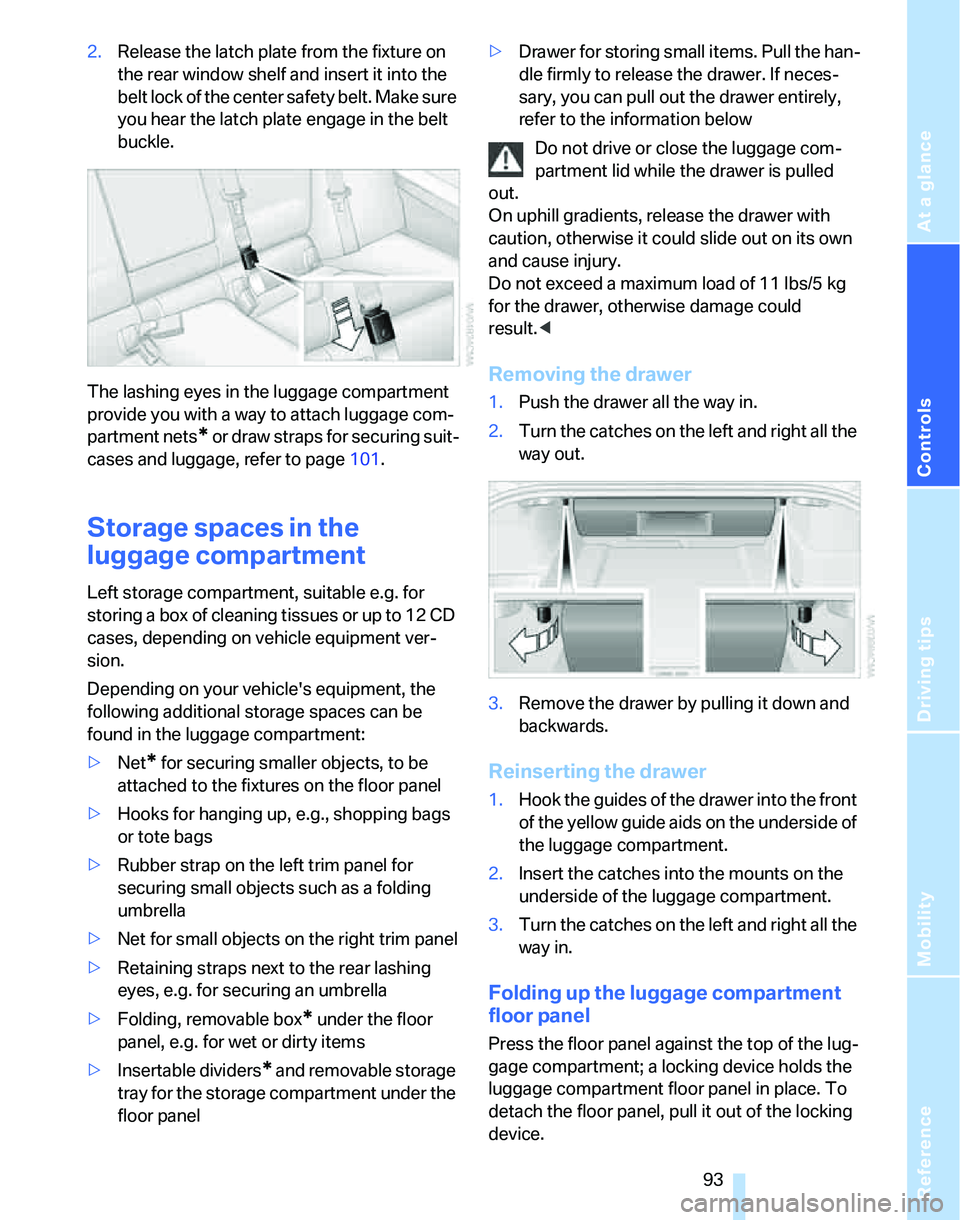
2.Release the latch plate from the fixture on
the rear window shelf and insert it into the
belt lock of the center safety belt. Make sure
you hear the latch plate engage in the belt
buckle.
The lashing eyes in the luggage compartment
provide you with a way to attach luggage com-
partment nets
* or draw straps for securing suit-
cases and luggage, refer to page101.
Storage spaces in the
luggage compartment
Left storage compartment, suitable e.g. for
storing a box of cleaning tissues or up to 12 CD
cases, depending on vehicle equipment ver-
sion.
Depending on your vehicle's equipment, the
following additional storage spaces can be
found in the luggage compartment:
>Net
* for securing smaller objects, to be
attached to the fixtures on the floor panel
>Hooks for hanging up, e.g., shopping bags
or tote bags
>Rubber strap on the left trim panel for
securing small objects such as a folding
umbrella
>Net for small objects on the right trim panel
>Retaining straps next to the rear lashing
eyes, e.g. for securing an umbrella
>Folding, removable box
* under the floor
panel, e.g. for wet or dirty items
>Insertable dividers
* and removable storage
tray for the storage compartment under the
floor panel>Drawer for storing small items. Pull the han-
dle firmly to release the drawer. If neces-
sary, you can pull out the drawer entirely,
refer to the information below
Do not drive or close the luggage com-
partment lid while the drawer is pulled
out.
On uphill gradients, release the drawer with
caution, otherwise it could slide out on its own
and cause injury.
Do not exceed a maximum load of 11 lbs/5 kg
for the drawer, otherwise damage could
result.<
Removing the drawer
1.Push the drawer all the way in.
2.Turn the catches on the left and right all the
way out.
3.Remove the drawer by pulling it down and
backwards.
Reinserting the drawer
1.Hook the guides of the drawer into the front
of the yellow guide aids on the underside of
the luggage compartment.
2.Insert the catches into the mounts on the
underside of the luggage compartment.
3.Turn the catches on the left and right all the
way in.
Folding up the luggage compartment
floor panel
Press the floor panel against the top of the lug-
gage compartment; a locking device holds the
luggage compartment floor panel in place. To
detach the floor panel, pull it out of the locking
device.
Page 108 of 166
Refueling
106
Refueling
Always switch off the engine before refu-
eling, otherwise, fuel cannot be added to
the tank and a message will be displayed.<
Take all precautionary measures and
observe all applicable regulations when
handling fuel. Do not carry any spare fuel con-
tainers in your vehicle. They can develop a leak
and cause an explosion or cause a fire in the
event of an accident.<
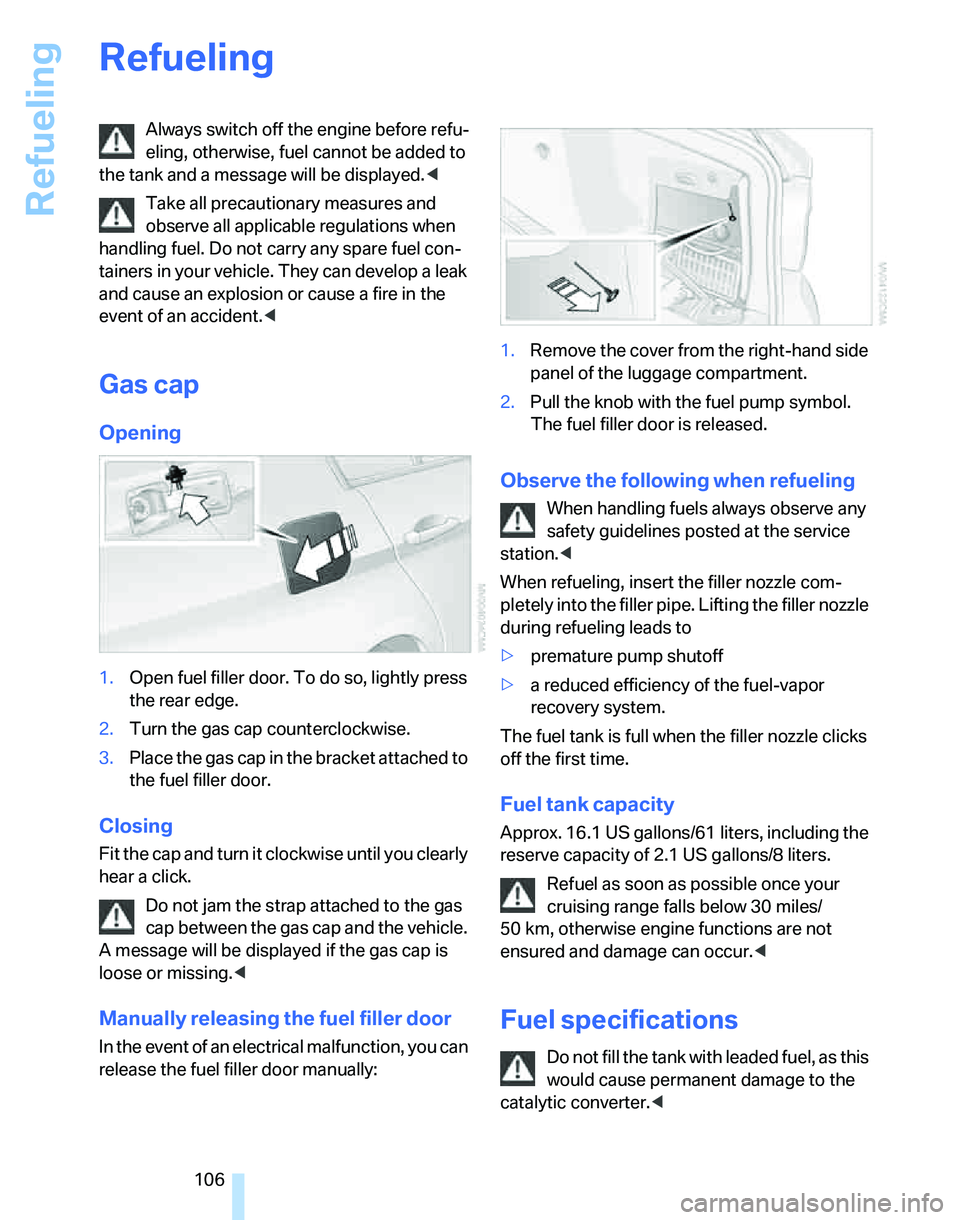
Gas cap
Opening
1.Open fuel filler door. To do so, lightly press
the rear edge.
2.Turn the gas cap counterclockwise.
3.Place the gas cap in the bracket attached to
the fuel filler door.
Closing
Fit the cap and turn it clockwise until you clearly
hear a click.
Do not jam the strap attached to the gas
cap between the gas cap and the vehicle.
A message will be displayed if the gas cap is
loose or missing.<
Manually releasing the fuel filler door
In the event of an electrical malfunction, you can
release the fuel filler door manually:1.Remove the cover from the right-hand side
panel of the luggage compartment.
2.Pull the knob with the fuel pump symbol.
The fuel filler door is released.
Observe the following when refueling
When handling fuels always observe any
safety guidelines posted at the service
station.<
When refueling, insert the filler nozzle com-
pletely into the filler pipe. Lifting the filler nozzle
during refueling leads to
>premature pump shutoff
>a reduced efficiency of the fuel-vapor
recovery system.
The fuel tank is full when the filler nozzle clicks
off the first time.
Fuel tank capacity
Approx. 16.1 US gallons/61 liters, including the
reserve capacity of 2.1 US gallons/8 liters.
Refuel as soon as possible once your
cruising range falls below 30 miles/
50 km, otherwise engine functions are not
ensured and damage can occur.<
Fuel specifications
Do not fill the tank with leaded fuel, as this
would cause permanent damage to the
catalytic converter.<
Page 123 of 166
Reference
At a glance
Controls
Driving tips
Mobility
121
If BMW High Performance Synthetic Oil is not
available, you can add small quantities of other
synthetic oils in between oil changes. Only use
oils with the API SH specification or higher.
Your BMW Center will be glad to answer
any questions regarding BMW High Per-
formance Synthetic Oil or approved synthetic
oils.<
You can also call BMW of North America at
1-800-831-1117 or visit the website
www.bmwusa.com to obtain this information.
Viscosity ratings
Viscosity is a measure of an oil's flow rating and
is categorized in SAE classes.
Selecting the appropriate SAE class depends
on the regional climatic conditions in which you
normally drive your BMW.
Approved oils belong to the 5W-40 and
5W-30 classes.<
These oils can be used for driving at all outside
temperatures.
Coolant
Do not add coolant to the cooling system
when the engine is hot. Escaping coolant
can cause burns.<
Coolant is a mixture of water and an additive.
Not all commercially available additives are suit-
able for your BMW. Ask your BMW Center for
suitable additives.
Only use suitable additives, otherwise
engine damage may result. The additives
are hazardous to your health.<
Comply with the appropriate environ-
mental protection regulations when dis-
posing of coolant additives.<
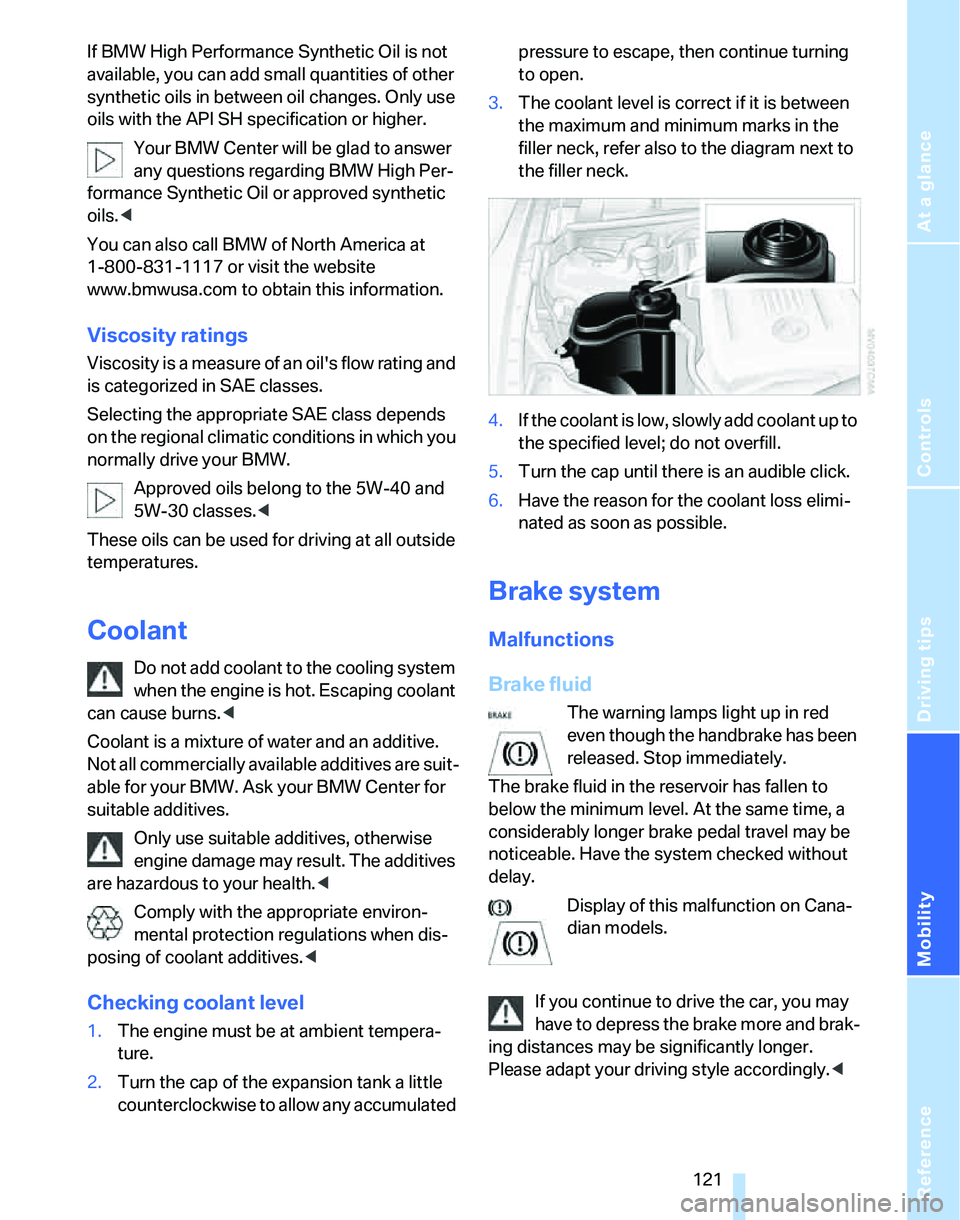
Checking coolant level
1.The engine must be at ambient tempera-
ture.
2.Turn the cap of the expansion tank a little
counterclockwise to allow any accumulated pressure to escape, then continue turning
to open.
3.The coolant level is correct if it is between
the maximum and minimum marks in the
filler neck, refer also to the diagram next to
the filler neck.
4.If the coolant is low, slowly add coolant up to
the specified level; do not overfill.
5.Turn the cap until there is an audible click.
6.Have the reason for the coolant loss elimi-
nated as soon as possible.
Brake system
Malfunctions
Brake fluid
The warning lamps light up in red
even though the handbrake has been
released. Stop immediately.
The brake fluid in the reservoir has fallen to
below the minimum level. At the same time, a
considerably longer brake pedal travel may be
noticeable. Have the system checked without
delay.
Display of this malfunction on Cana-
dian models.
If you continue to drive the car, you may
have to depress the brake more and brak-
ing distances may be significantly longer.
Please adapt your driving style accordingly.<
Page 128 of 166
Replacing components
126 lasers, are officially designated as Class 1 light-
emitting diodes.
Do not remove the covers or expose the
eyes directly to the unfiltered light source
for several hours at a time, otherwise this could
cause irritation to the retina.<
Xenon lamps*
The service life of these bulbs is very long and
the probability of a failure is very low, provided
that they are not switched on and off an unusual
number of times. If a xenon lamp fails neverthe-
less, switch on the fog lamps and continue the
journey with great care, provided that local leg-
islation does not prohibit this.
Have work on the xenon lighting system
performed only by your BMW Center or a
workshop that works according to BMW repair
procedures with correspondingly trained per-
sonnel. Due to the high electrical voltages
present, there is a risk of potentially fatal acci-
dents if work is performed inappropriate.<
Parking lamps, roadside parking lamps
In the event of a malfunction, please contact
your BMW Center or a workshop that works
according to BMW repair procedures with cor-
respondingly trained personnel.
Halogen lamps
H7 bulb, 55 watts
Always wear gloves and eye protection;
the atmosphere within the H7 bulb is
pressurized. Otherwise there is a risk of injury if
the bulb is damaged.<
There are separate headlamp covers for low-
beam headlamps and high-beam headlamps.
Be careful when installing the covers, oth-
erwise leaks could occur and cause dam-
age to the headlamp system.<
For checking and adjusting headlamp
aim, please contact your BMW Center.<
Access to the lamps
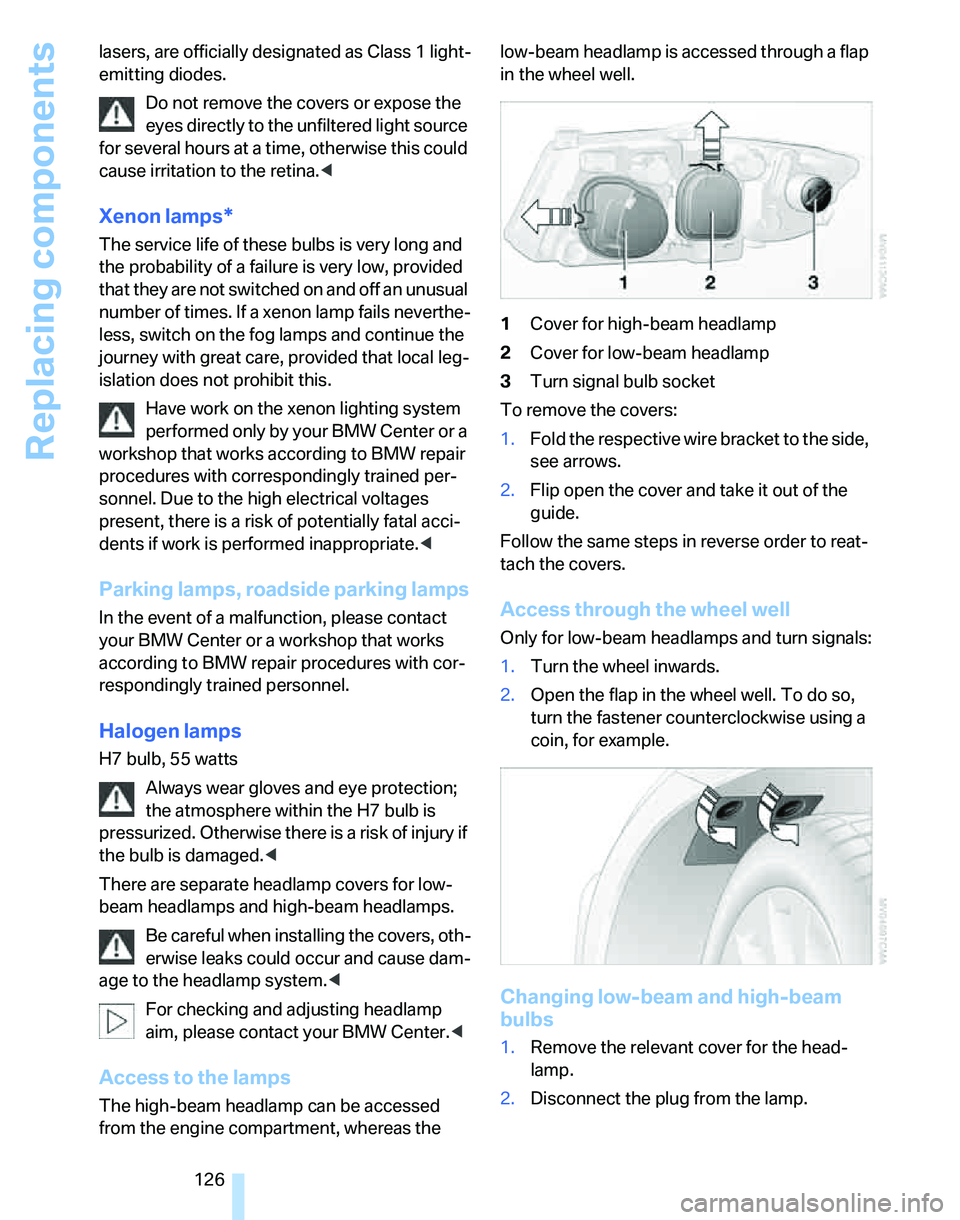
The high-beam headlamp can be accessed
from the engine compartment, whereas the low-beam headlamp is accessed through a flap
in the wheel well.
1Cover for high-beam headlamp
2Cover for low-beam headlamp
3Turn signal bulb socket
To remove the covers:
1.Fold the respective wire bracket to the side,
see arrows.
2.Flip open the cover and take it out of the
guide.
Follow the same steps in reverse order to reat-
tach the covers.
Access through the wheel well
Only for low-beam headlamps and turn signals:
1.Turn the wheel inwards.
2.Open the flap in the wheel well. To do so,
turn the fastener counterclockwise using a
coin, for example.
Changing low-beam and high-beam
bulbs
1.Remove the relevant cover for the head-
lamp.
2.Disconnect the plug from the lamp.
Page 130 of 166
Replacing components
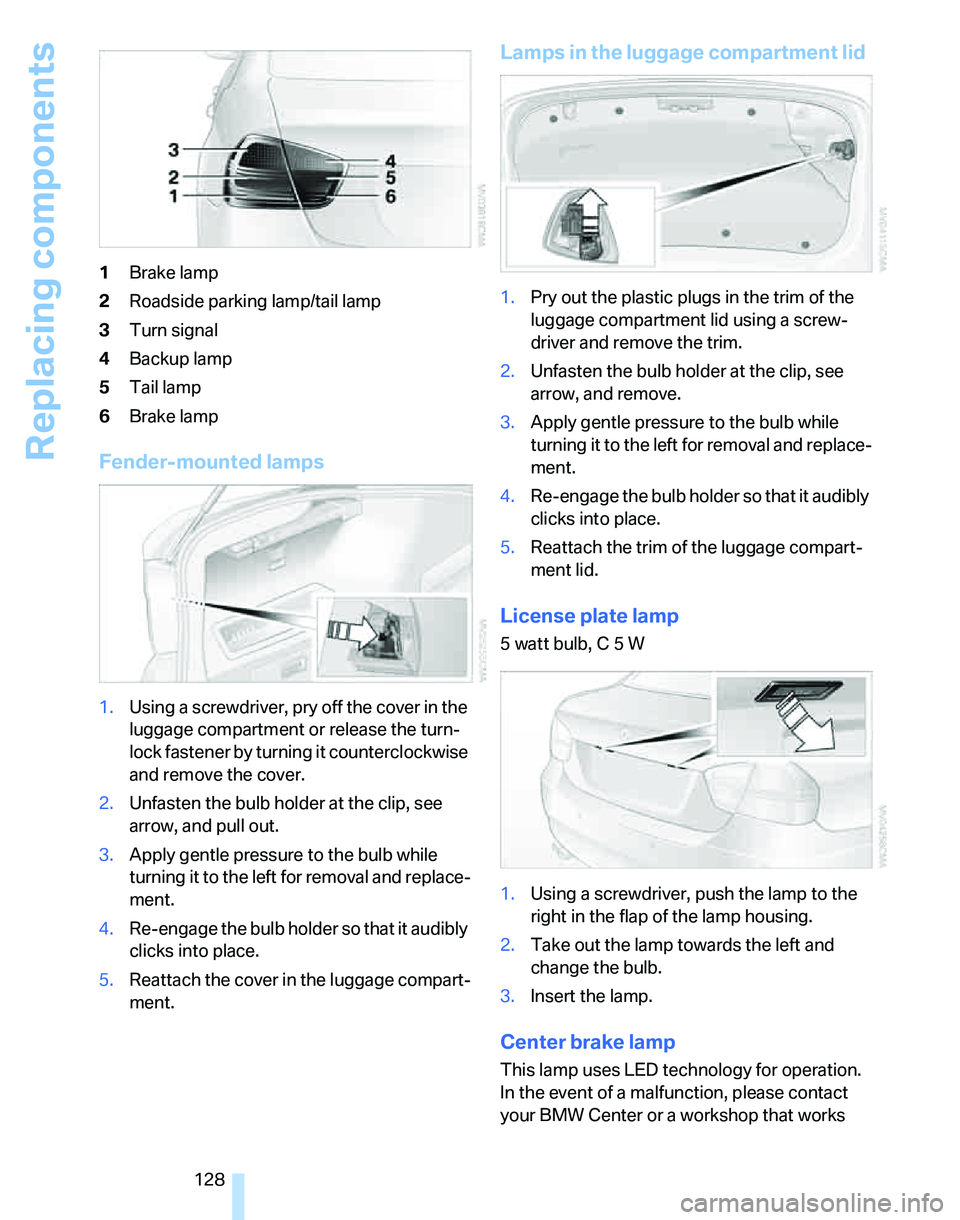
128 1Brake lamp
2Roadside parking lamp/tail lamp
3Turn signal
4Backup lamp
5Tail lamp
6Brake lamp
Fender-mounted lamps
1.Using a screwdriver, pry off the cover in the
luggage compartment or release the turn-
lock fastener by turning it counterclockwise
and remove the cover.
2.Unfasten the bulb holder at the clip, see
arrow, and pull out.
3.Apply gentle pressure to the bulb while
turning it to the left for removal and replace-
ment.
4.Re-engage the bulb holder so that it audibly
clicks into place.
5.Reattach the cover in the luggage compart-
ment.
Lamps in the luggage compartment lid
1.Pry out the plastic plugs in the trim of the
luggage compartment lid using a screw-
driver and remove the trim.
2.Unfasten the bulb holder at the clip, see
arrow, and remove.
3.Apply gentle pressure to the bulb while
turning it to the left for removal and replace-
ment.
4.Re-engage the bulb holder so that it audibly
clicks into place.
5.Reattach the trim of the luggage compart-
ment lid.
License plate lamp
5 watt bulb, C 5 W
1.Using a screwdriver, push the lamp to the
right in the flap of the lamp housing.
2.Take out the lamp towards the left and
change the bulb.
3.Insert the lamp.
Center brake lamp
This lamp uses LED technology for operation.
In the event of a malfunction, please contact
your BMW Center or a workshop that works
Page 133 of 166
Reference
At a glance
Controls
Driving tips
Mobility
131
Giving and receiving assistance
Emergency calling*
Conditions for an emergency call:
>Full preparation package mobile phone
>BMW Assist is enabled. Enabling
BMW Assist, refer to separate Owner's
Manual.
>Radio readiness is on.
>The car phone is logged on to a mobile tele-
phone network.
>The emergency call system is operable.
If your subscription contract with BMW Assist
expires, the car phone can be deactivated by a
BMW Center without having to schedule an
appointment at a workshop. Once the car
phone has been deactivated, emergency calls
are not possible. The car phone can be reacti-
vated by a BMW Center after signing a new
contract.
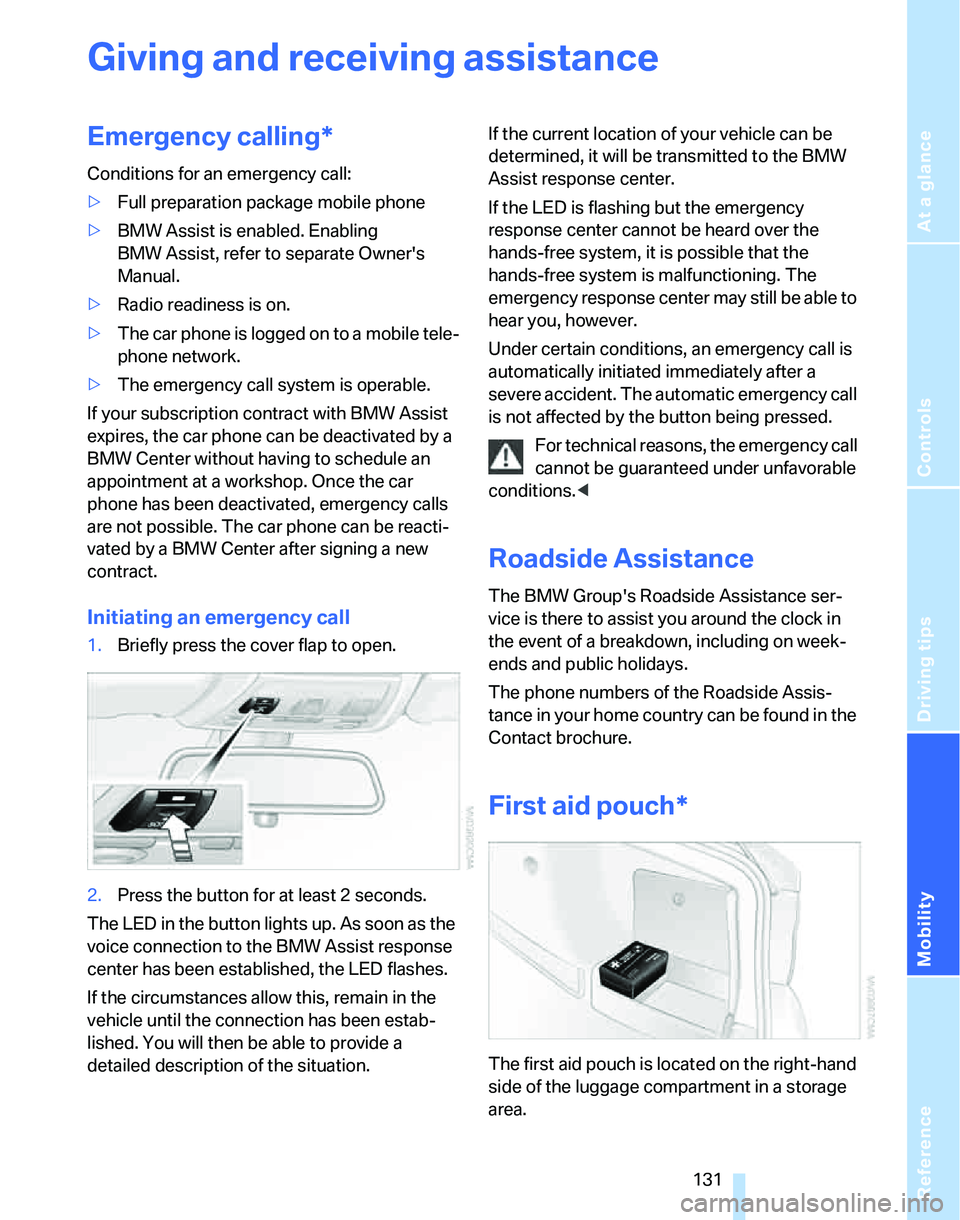
Initiating an emergency call
1.Briefly press the cover flap to open.
2.Press the button for at least 2 seconds.
The LED in the button lights up. As soon as the
voice connection to the BMW Assist response
center has been established, the LED flashes.
If the circumstances allow this, remain in the
vehicle until the connection has been estab-
lished. You will then be able to provide a
detailed description of the situation.If the current location of your vehicle can be
determined, it will be transmitted to the BMW
Assist response center.
If the LED is flashing but the emergency
response center cannot be heard over the
hands-free system, it is possible that the
hands-free system is malfunctioning. The
emergency response center may still be able to
hear you, however.
Under certain conditions, an emergency call is
automatically initiated immediately after a
severe accident. The automatic emergency call
is not affected by the button being pressed.
For technical reasons, the emergency call
cannot be guaranteed under unfavorable
conditions.<
Roadside Assistance
The BMW Group's Roadside Assistance ser-
vice is there to assist you around the clock in
the event of a breakdown, including on week-
ends and public holidays.
The phone numbers of the Roadside Assis-
tance in your home country can be found in the
Contact brochure.
First aid pouch*
The first aid pouch is located on the right-hand
side of the luggage compartment in a storage
area.
Page 135 of 166
Reference
At a glance
Controls
Driving tips
Mobility
133
Your BMW has a special nut as body ground
or negative pole.
5.Attach the second terminal clamp of the
minus/– jumper cable to the negative termi-
nal of the battery or to the engine or body
ground of the vehicle to be started.
Starting the engine
1.Start the engine of the donor vehicle and
allow it to run for a few minutes at slightly
increased idle speed.
2.Start the engine on the other vehicle in the
usual way.
If the first start attempt is not successful,
wait a few minutes before another attempt
in order to allow the discharged battery to
recharge.
3.Let the engines run for a few minutes.
4.Disconnect the jumper cables by reversing
the above connecting sequence.
If necessary, have the battery checked and
recharged.
Never use spray fluids to start the
engine.<
Tow-starting, towing away
Observe the applicable laws and regula-
tions for tow-starting and towing vehi-
cles.<
Do not transport any occupants other
than the driver in a vehicle that is being
towed.<
Using a tow fitting
The screw-in tow fitting must always be carried
in the car. It can be screwed in at the front or
rear of the BMW.
It is stored in the onboard tool kit underneath
the cover on the right-hand side of the luggage
compartment, refer to page125.
Use only the tow fitting provided with the
vehicle and screw it all the way in. Use the
tow fitting for towing on paved roads only. Avoid
lateral loading of the tow fitting, e.g. do not lift
the vehicle by the tow fitting. Otherwise the tow
fitting and the vehicle could be damaged.<
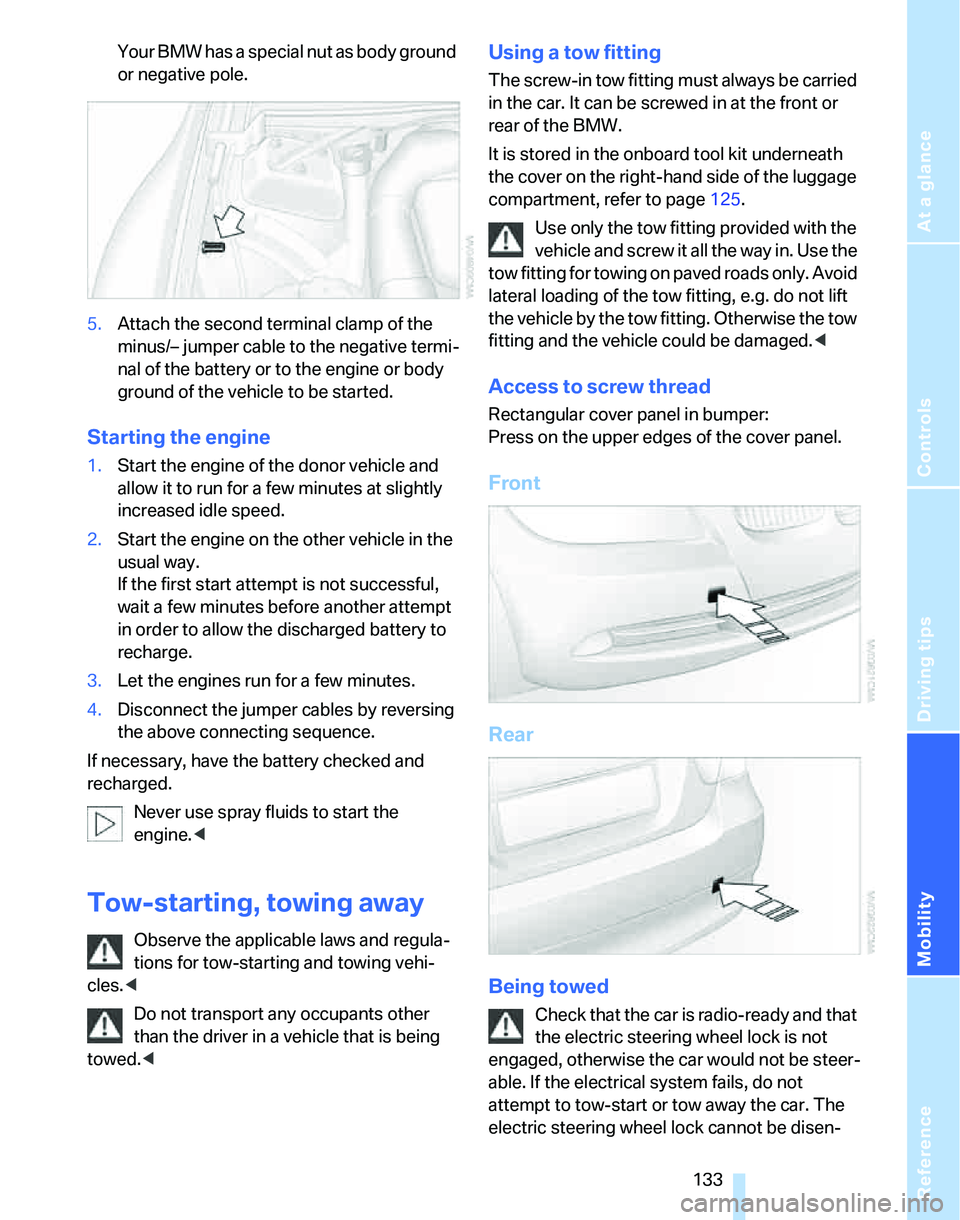
Access to screw thread
Rectangular cover panel in bumper:
Press on the upper edges of the cover panel.
Front
Rear
Being towed
Check that the car is radio-ready and that
the electric steering wheel lock is not
engaged, otherwise the car would not be steer-
able. If the electrical system fails, do not
attempt to tow-start or tow away the car. The
electric steering wheel lock cannot be disen-