Page 271 of 457
5-49
CLUTCHENG
Order Job / Part Q’ty Remarks
13
14
15
16
17
18Clutch boss nut
Washer
Clutch boss
Thrust plate
Clutch housing
Bearing1
1
1
1
1
1
For installation, reverse the removal
procedure.
10 Nm (1.0 m�kg, 7.2 ft�lb)
95 Nm (9.5 m�kg, 69 ft�lb)
ProCarManuals.com
Page 272 of 457
5-50
CLUTCHENG
NOTE:
EAS00276
REMOVING THE CLUTCH
1. Remove:
�clutch cover
1
�gasket
Loosen each bolt 1 / 4 of a turn at a time, in
stages and in a crisscross pattern.
After all of the bolts are fully loosened, remove
them.
2. Remove:
�compression spring bolts
1
�compression springs
�pressure plate
2
�pull rod 3
3. Remove:
�friction plate 1
4. Remove:
�clutch plate 1
1
�friction plate 2
5. Straighten the clutch boss nut rib
1.
ProCarManuals.com
Page 273 of 457
5-51
CLUTCHENG
NOTE:
NOTE: 6. Loosen:
�clutch boss nut
1
While holding the clutch boss 2 with the univer-
sal clutch holder
3, loosen the clutch boss nut.
Universal clutch holder
90890-04086, YM-91042
7. Remove:
�clutch boss nut
�washer
�clutch boss assembly
�thrust plate
8. Remove:
�wire clip
1
There is a built-in damper between the clutch
boss and the clutch plate. It is not necessary to
remove the wire circlip
1 and disassemble the
built-in damper unless there is serious clutch
chattering.
9. Remove:
�clutch plate 2
1
�friction plate 3 2
10. Remove:
�clutch damper spring
1
�clutch damper spring seat 2
ProCarManuals.com
Page 274 of 457
5-52
CLUTCHENG
NOTE:
EAS00280
CHECKING THE FRICTION PLATES
The following procedure applies to all of the fric-
tion plates.
1. Check:
�friction plate
Damage / wear � Replace the friction plates
as a set.
2. Measure:
�friction plate thickness
Out of specification � Replace the friction
plates as a set.
Measure the friction plate at four places.
Friction plate thickness
2.9 � 3.1 mm (0.114 � 0.122 in)
: 2.8 mm (0.110 in)
EAS00281
CHECKING THE CLUTCH PLATES
The following procedure applies to all of the
clutch plates.
1. Check:
�clutch plate
Damage � Replace the clutch plates as a
set.
2. Measure:
�clutch plate warpage
(with a surface plate and thickness gauge
1)
Out of specification � Replace the clutch
plates as a set.
Clutch plate warpage limit
0.1 mm (0.0039 in)
ProCarManuals.com
Page 275 of 457
5-53
CLUTCHENG
NOTE:
NOTE:
EAS00282
CHECKING THE CLUTCH SPRINGS
The following procedure applies to all of the
clutch springs.
1. Check:
�clutch spring
Damage � Replace the clutch springs as a
set.
2. Measure:
�clutch spring free length
a
Out of specification � Replace the clutch
springs as a set.
Clutch spring free length
52.5 mm (2.07 in)
: 49.9 mm (1.96 in)
EAS00284
CHECKING THE CLUTCH HOUSING
1. Check:
�clutch housing dogs
Damage / pitting / wear � Deburr the clutch
housing dogs or replace the clutch housing.
Pitting on the clutch housing dogs will cause er-
ratic clutch operation.
2. Check:
�bearing
Damage / wear � Replace the bearing and
clutch housing.
EAS00285
CHECKING THE CLUTCH BOSS
1. Check:
�clutch boss splines
Damage / pitting / wear � Replace the clutch
boss.
Pitting on the clutch boss splines will cause er-
ratic clutch operation.
ProCarManuals.com
Page 276 of 457
5-54
CLUTCHENG
NOTE:
EAS00286
CHECKING THE PRESSURE PLATE
1. Check:
�pressure plate
1
Cracks / damage � Replace.
�bearing
2
Damage / wear � Replace.
EAS00287
CHECKING THE PULL LEVER SHAFT AND
PULL ROD
1. Check:
�pull lever shaft pinion gear teeth
1
�pull rod teeth 2
Damage / wear � Replace the pull rod and
pull lever shaft pinion gear as a set.
2. Check:
�pull rod bearing
Damage / wear � Replace.
INSTALLING THE CLUTCH
1. Install:
�clutch damper spring seat
1
�clutch damper spring 2
2. Install:
�friction plate 3
1
�clutch plate 2 2
Lubricate the engine oil.
ProCarManuals.com
Page 277 of 457
5-55
CLUTCHENG
NOTE:
95 Nm(9.5 m�kg, 69 ft�lb)
NOTE:
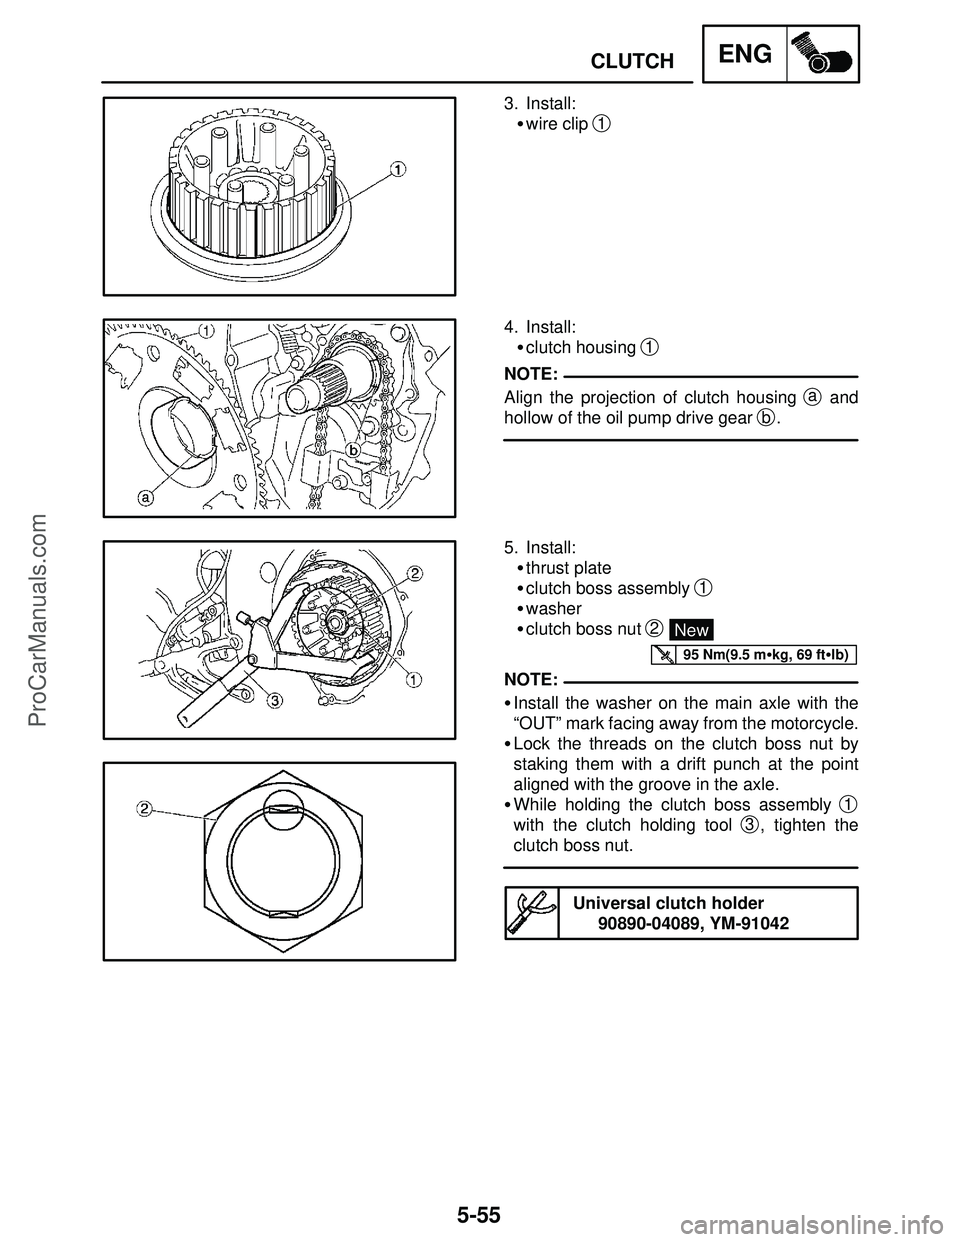
3. Install:
�wire clip
1
4. Install:
�clutch housing
1
Align the projection of clutch housing a and
hollow of the oil pump drive gear
b.
5. Install:
�thrust plate
�clutch boss assembly
1
�washer
�clutch boss nut
2 New
�Install the washer on the main axle with the
“OUT” mark facing away from the motorcycle.
�Lock the threads on the clutch boss nut by
staking them with a drift punch at the point
aligned with the groove in the axle.
�While holding the clutch boss assembly
1
with the clutch holding tool 3, tighten the
clutch boss nut.
Universal clutch holder
90890-04089, YM-91042
ProCarManuals.com
Page 278 of 457
5-56
CLUTCHENG
NOTE:
10 Nm (1.0 m�kg, 7.2 ft�lb)
NOTE:
NOTE: 6. Lubricate:
�friction plates
�clutch plates
(with the recommended lubricant)
Recommended lubricant
Engine oil
7. Install:
�friction plate 2
�clutch plate 1
1
8. Install:
�friction plate 1
1
Install the last friction plate shifting half phase.
9. Install:
�bearing
�pull rod
1
�pressure plate 2
�clutch springs
�clutch spring bolts
3
Tighten the clutch spring bolts in stages and in a
crisscross pattern.
10. Install:
�pull lever
In stall the pull lever with the “�” mark facing to-
ward upper side.
ProCarManuals.com