2004 VOLVO S80 brake
[x] Cancel search: brakePage 63 of 110

tread, these strips become visible and indicate that the tire should be replaced.
Tires with less than 1/16" (1.6 mm) tread have a very poor grip in rain or snow.
When replacing worn tires, it is recommended that the tire be identical in type (radial) and size as the one being
replaced. Using a tire of the same make (manufacturer) will prevent alteration of the driving characteristics of the
vehicle.
To improve tire economy:
Maintain correct tire pressure. See the tire pressure label on the inside of the fuel filler door.
Drive smoothly: avoid fast starts, hard braking and tire screeching.
Tire wear increases with speed.
Correct front wheel alignment is very important.
Unbalanced wheels impair tire economy and driving comfort.
Volvo recommends rotating the tires every 7,500 miles (12,000 km). Tires should be rotated front -to-back/back-to-
front only. Tires must maintain the same direction of rotation throughout their lifetime, and should never be rotated
from one side of the vehicle to the other.
Hitting curbs or potholes can damage the tires and/or wheels permanently.
Flat spots
All tires become warm during use. After cooling, when the vehicle is parked, the tires have a tendency to distort
slightly, forming flat spots. These flat spots can cause vibrations similar to the vibrations caused by unbalanced wheels.
They do, however, disappear when the tire warms up. The degree to which flat spots form depends on the type of cord
used in the tire. In cold weather, it takes longer for the tire to warm up and consequently longer for the flat spot to
disappear.
CAUTION:
The car must not be driven with wheels of different dimensions or with a spare tire other than the one that came with
the car. The use of different size wheels can seriously damage your car's transmission.
pg. 95 Wheels and tires
Snow chains
Snow chains can be used on your Volvo with the following restrictions:
Snow chains should be installed on front wheels only. Use only Volvo approved snow chains.
Special snow chains must be mounted on 215/55 R16, 225/55 R16 and 225/50 R17 tires. Consult your Volvo
retailer.
If accessory, aftermarket or "custom" tires and wheels are installed and are of a size different than the original tires
and wheels, chains in some cases CANNOT be used. Sufficient clearances between chains and brakes, suspension and
body components must be maintained.
Some strap -on type chains will interfere with brake components and therefore CANNOT be used.
Consult your Volvo retailer for additional snow chain information.
CAUTION:
Check local regulations regarding the use of snow chains before installing.
Always follow the chain manufacturer's installation instructions carefully. Install chains as tightly as possible and
retighten periodically.
Never exceed the chain manufacturer's specified maximum speed limit. (Under no circumstances should that limit
be higher than 31 mph (50 km/h).
Avoid bumps, holes or sharp turns when driving with snow chains.
The handling of the vehicle can be adversely affected when driving with chains. Avoid fast or sharp turns as well as
locked wheel braking.
ProCarManuals.com
Page 66 of 110

temperature can lead to sudden tire failure. The grade C corresponds to a minimum level of performance that all
passenger car tires must meet under the Federal Motor Safety Standard No. 109. Grades B and A represent higher
levels of performance on the laboratory test wheel than the minimum required by law.WARNING!
The temperature grade for this tire is established for a tire that is properly inflated and not overloaded. Excessive
speed, under-inflation, or excessive loading, either separately or in combination, can cause heat buildup and possible
tire failure.
pg. 98 Changing wheels
Insert flat end of lug wrench and turn/pull straight out
Changing wheels
The spare wheel is located under the carpet on the trunk floor. The jack and crank are secured in the wheel recess.
There are two jack attachment points on each side of the car.
To change a wheel:
Engage the parking brake.
Put the gear selector in (P)ark.
Remove the wheel cap (where applicable) using the lug wrench in the tool bag.
With the car still on the ground, use the lug wrench to loosen the wheel bolts 1/2 1 turn by exerting downward
pressure. Turn the bolts counterclockwise to loosen.
Loosen wheel bolts
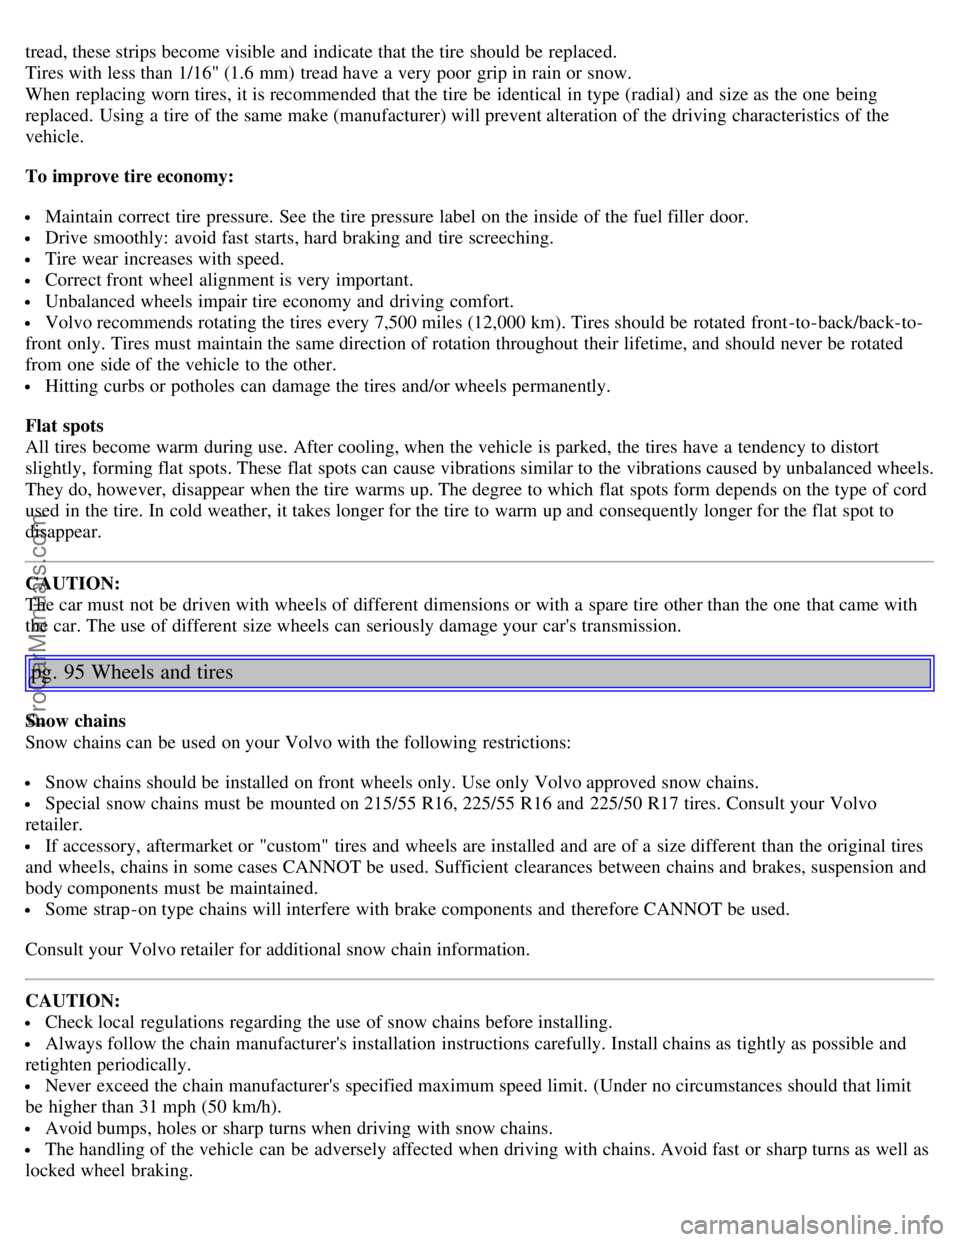
Position the jack on the bar in the attachment ( A in the illustration below) and crank while simultaneously guiding
the base of the jack to the ground. The base of the jack must be flat on a level, firm, non-slippery surface. Before
ProCarManuals.com
Page 67 of 110

raising the car, check that the jack is still correctly positioned in the attachment.
Raise the vehicle until the wheel to be changed is lifted off the ground.
Unscrew the wheel bolts completely and carefully remove the wheel so as not to damage the thread on the studs.
Attaching the jack
NOTE: To avoid excessive wear and the necessity of rebalancing, mark and reinstall wheels in the same location and
position as before removal. To lessen the chance of imbalance, each wheel hub is equipped with a guide stud to ensure
that a removed wheel can be reinstalled in its original position (as when changing over to winter tires/wheels).
pg. 99 Changing wheels
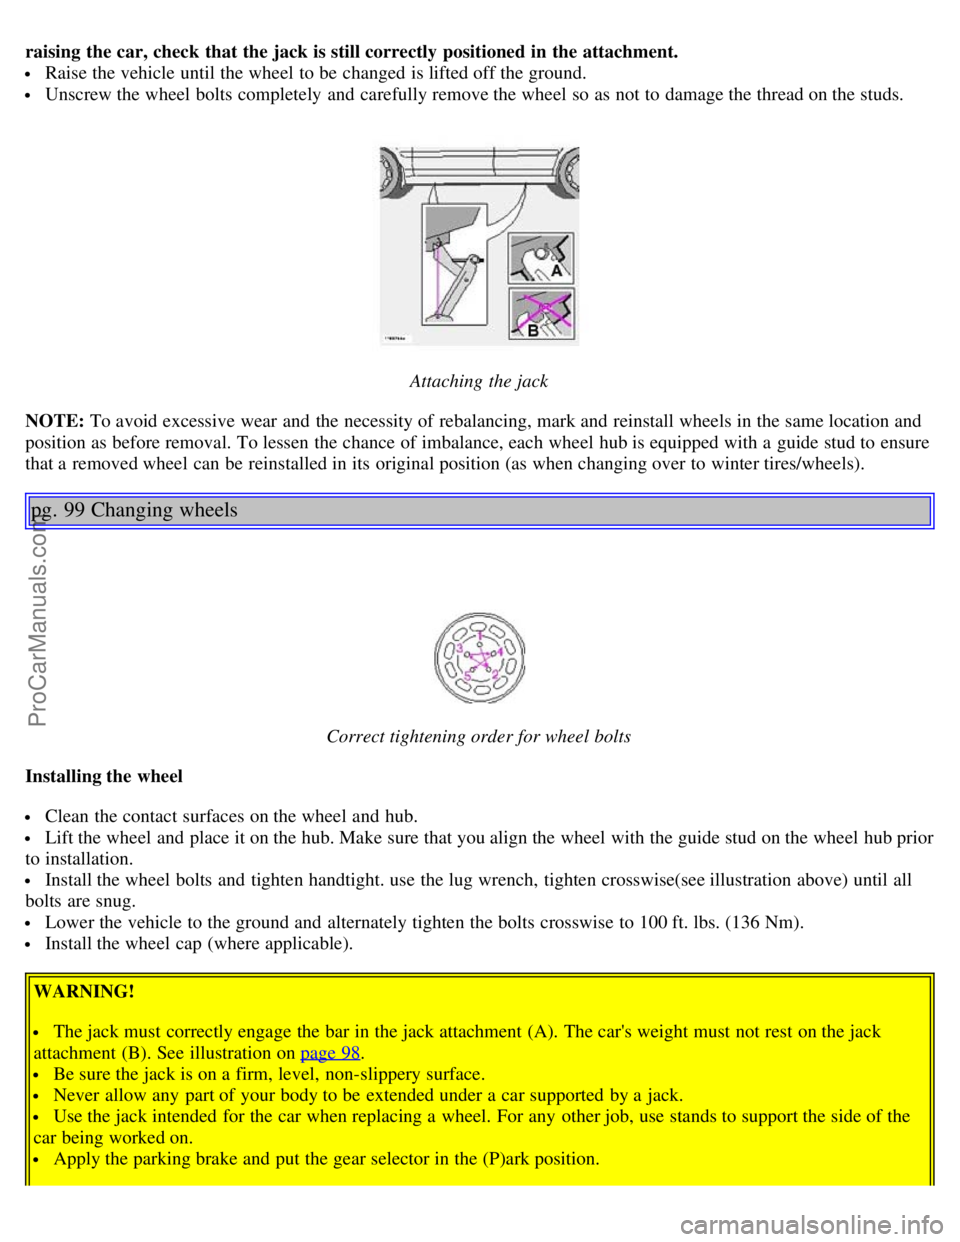
Correct tightening order for wheel bolts
Installing the wheel
Clean the contact surfaces on the wheel and hub.
Lift the wheel and place it on the hub. Make sure that you align the wheel with the guide stud on the wheel hub prior
to installation.
Install the wheel bolts and tighten handtight. use the lug wrench, tighten crosswise(see illustration above) until all
bolts are snug.
Lower the vehicle to the ground and alternately tighten the bolts crosswise to 100 ft. lbs. (136 Nm).
Install the wheel cap (where applicable).
WARNING!
The jack must correctly engage the bar in the jack attachment (A). The car's weight must not rest on the jack
attachment (B). See illustration on page 98
.
Be sure the jack is on a firm, level, non-slippery surface.
Never allow any part of your body to be extended under a car supported by a jack.
Use the jack intended for the car when replacing a wheel. For any other job, use stands to support the side of the
car being worked on.
Apply the parking brake and put the gear selector in the (P)ark position.
ProCarManuals.com
Page 69 of 110

2 0 0 4
VOLVO S80
Chapter 8 - Maintenance/Servicing
pg. 101 Maintenance/Servicing
Fuses102
Replacing bulbs106
Paint touch up113
Washing the car114
Cleaning the upholstery115
Maintenance service, Warranty116
Fuel/emissions systems117
Drive belt, Coolant118
Emissions maintenance119
Washer fluid, Hoisting the car120
Opening the hood, Engine compartment121
Engine oil122
Power steering/Brake fluid reservoirs124
Battery maintenance125
Replacing wiper blades127
pg. 102 Fuses
ProCarManuals.com
Page 71 of 110

Ordinary fuses
LocationAmperage
1 Accessories 25A
2 Auxiliary lamps (option) 20A
3
4 Oxygen sensors 20A
5 Crankcase ventilation heater, solenoid valves 10A
6 Mass airflow sensor, engine control module, injectors 15A
7 Throttle module 10A
8 AC compressor, accelerator pedal position sensor, E-box fan 10A
9 Horn 15A
10 -
11 AC compressor, ignition coils 20A
12 Brake light switch 5A
13 Windshield wipers 25A
14 ABS/STC/DSTC 30A
15 -
16 Windshield washers, headlight wiper/washers (certain models) 15A
17 Low beam, right 10A
18 Low beam, left 10A
19 ABS/STC/DSTC 30A
20 High beam, left 15A
21 High beam, right 15A
22 Starter motor 25A
23 Engine control module 5A
24 -
pg. 104 Fuses in the passenger compartment
ProCarManuals.com
Page 73 of 110

38Alarm siren* 5A
* Please be aware that if this fuse is not intact, or if it is removed, the alarm will sound.
pg. 105 Fuses in the trunk
Fuses in the trunk
The fuses in the trunk are located behind the left panel. When replacing a blown fuse, be sure to replace it with a new
one of the same color and amperage (written on the fuse).
Ordinary fuses
Location Amperage
1 Rear electrical module, trunk lighting 10A
2 Rear fog light 10A
3 Brake lights (cars with trailer hitches only) 15A
4 Backup lights 10A
5 Rear window defroster, relay 15I - accessories 5A
6 Trunk release 10A
7 Folding rear head restraints 10A
8 Central locking rear doors/fuel filler door 15A
9 Trailer hitch (30 feed) 15A
10 CD changer, VNS 10A
11 Accessory control module (AEM) 15A
12 -
13 -
14
15 Trailer hitch (15I feed) 20A
16 Electrical socket in trunk - accessories 15A
17 -
18 -
ProCarManuals.com
Page 82 of 110

6 cyl. turbo3630-3665 Ibs1650-1665 kg
Permissible axle weight, front
6 cyl. 2491 Ibs1130 kg
Permissible axle weight, rear
6 cyl. 2293 lbs1040 kg
Max roof load 220 lbs100 kg
Max trailer weight
(w/o brakes) 1650 lbs750 kg
Max trailer weight
(with brakes)
2" ball 3300 lbs **1500 kg
1 7/8" ball 2000 lbs900 kg
Max tongue weight ***165 lbs 75 kg
WARNING!
When adding accessories, equipment, luggage and other cargo to your vehicle, the total loaded weight capacity of
the vehicle must not be exceeded.
* The max permissible axle loads or the gross vehicle weight must not be exceeded.
** When driving for prolonged periods at temperatures above 86° F (30° C), the maximum recommended weight is
2000 lbs (900 kg).
*** See also section "Trailer towing"
All specifications are subject to change without prior notice.
pg. 132 Engine/transmission specifications
Engine specifications Designation: Volvo B 6294 T
Output 268 hp at 5200 rpm (200 KW/87 rps)
Max torque 280 ft. lbs. at 1800-5000 rpm (380 Nm at 35-83 rps)
Number of cylinders 6
Bore 3.27" (83 mm)
Stroke 3.54" (90 mm)
Displacement 2.92 liters (115 cu. in.)
Compression ratio 8.5:1
Number of valves 24
Charge air cooler (Intercooler)
Turbocharged engines employ a turbo-compressor to force air into the engine inlet manifold and a charge air cooler to
cool the compressed inlet air. The resulting increase in air flow raises pressure in the intake manifold and increases
engine power over that developed by the normally-aspirated engine. The charge air cooler (which resembles a radiator)
is located between the turbo-compressor and inlet manifold. Designation: Volvo B 6294 S
Output 194 hp at 5200 rpm (144 KW/87 rps)
Max. torque 207 ft. lbs. at 3900 rpm (280 Nm at 65 rps)
ProCarManuals.com
Page 83 of 110

Number of cylinders6
Bore3.27" (83 mm)
Stroke 3.54" (90 mm)
Displacement 2.92 liters (115 cu. in)
Compression ratio 10.5:1
Number of valves 24
All specifications are subject to change without prior notice.
pg. 133 Oil/fluid specifications and volumes
Engine oil
Meeting minimum ILSAC specification GF-2, including ACEA A1, API SJ, SJ/CF and SJ/Energy Conserving.
Extra oil additives must not be used.
Volume: (including filter):
Normally-aspirated 6-cylinder engine - 7.3 US qts (6.9 liters).
Turbo 6-cylinder engine - 7.3 US qts (6.9 liters).
Automatic transmission fluid
Geartronic: ATF Dexron® III.
Total Volume: 7.9 US qts (7.5 liters).
Cooling system
Type: Positive pressure, closed system. The thermostat begins to open at 194 °F (90 °C).
Coolant: Volvo original coolant/antifreeze.
Volume: Normally-aspirated 6-cylinder engine - 9.3 US qts (8.8 liters).
Turbo 6-cylinder engine - 10.1 US qts (9.6 liters).
Power steering fluid
ATF fluid.
Volume: 6 cyl engine - 0.95 US qt (0.9 liter).
Brake fluid
DOT 4+ boiling point > 536°F (280° C) P/N 9437433
Volume: 0.6 US qt (0.6 liter)
Climate control system - refrigerant (R 134a)
Oil: PAG
Volume: 2.2 lbs (1000 g) R134a.
Fuel
Minimum octane requirement - AKI 87 (RON 91)
Volume (fuel tank): 21.1 US gals (80 liters)
Washer fluid reservoir
Volume: 6 cyl: 4.7 US qts. (4.5 liters)
All specifications are subject to change without prior notice.
pg. 134 Fuel system, Distributor ignition system, Suspension
ProCarManuals.com