Page 25 of 99

To lower the convertible top:
Start the engine. The car must be at a standstill, the parking brake must be ON and the trunk must be closed
when raising/lowering the convertible top. The gear selector must be in position P (automatic transmission) or in
neutral (manual transmission).
Press and hold down the lower section of the control switch (an indicator lamp will light up and all four windows
will automatically be lowered slightly) until the convertible top is completely lowered. A chime will indicate when the
top is completely down and properly in place in the storage compartment. The windows can then be raised/lowered
with the "All windows" button on the driver's door.
"All windows" control button
To raise the convertible top:
Press and hold down the upper section of the control switch until the convertible top is completely raised. A chime
will indicate when the top is properly in position.
Check that the cover over the convertible top storage compartment closes completely.
Movement of the convertible top can be stopped at any time by releasing the control switch.
WARNING!
The convertible top must not be obstructed in any way when it is being raised or lowered.
The rear seat should not be occupied while the convertible top is being raised or lowered.
Anyone near the car should be well clear of the convertible top's moving parts before it is raised or lowered.
Children should never be allowed to play with the convertible top control switch.
CAUTION: If the cover over the convertible top storage space is not completely closed , the trunk lid should NOT be
opened to help avoid scratching the paint.
NOTE:
The electrically operated convertible top has an overload protecting circuit breaker that is activated when an object
blocks the top when it is in motion. If this occurs, remove the object and wait 20 seconds for the circuit breaker to reset
before trying to raise/lower the top again.
See page 102
for fault tracing information and instructions on manually raising the convertible top.
The trunk cannot be opened and the power windows/power antenna cannot be operated while the convertible top is
being raised/lowered.
pg. 41 Electrically operated convertible top, Wind deflector
CAUTION:
Be sure there is sufficient clearance above the car before raising/lowering the convertible top.
ProCarManuals.com
Page 26 of 99

Volvo recommends that you raise the convertible top and close the windows when you leave the car to help deter
thefts and to protect the interior from rain, windblown dust, etc.
No objects should be placed in the convertible top storage compartment. This could damage the convertible top
mechanism.
Roof racks may not be attached to or placed on the convertible top. See page 74 for information on trunk-mounted
luggage racks.
Ice scrapers should not be used to remove snow from the convertible top.
Do not lower the convertible top if it is frozen. The top should not be raised/lowered if the temperature is below 32°
F (0° C).
The top should be completely dry before it is lowered and stored in the storage compartment to help prevent damage
from mildew.
See page 107
for information on cleaning the convertible top.
Wind deflector (option/accessory)
Installing the wind deflector:
Fold out the panels on the sides of the wind deflector (1).
Slide the two metal slats on the wind deflector under the rear seat head restraints (2). Slide them carefully to avoid
damaging the upholstery.
Press the catches (3) into the holes provided in the side panel until they click into place.
Raise the wind deflector (4) 90°.
NOTE: The panels on the sides of the wind deflector can be folded under so that the deflector can be stored in the
trunk. The catches (3) must be pushed in (toward the center of the car) before the panels can be folded.
WARNING!
The wind deflector must be securely attached to help avoid injury to the occupants of the car or to other motorists.
pg. 42 Storage compartments
WARNING!
Packages on the rear window shelf can obscure vision and may become dangerous projectiles in the event of a
sudden stop or an accident.
ProCarManuals.com
Page 27 of 99
1 Glove compartment
2 Shelf under glove compartment
3 Coin holder
4 Compartment in door
5 Pocket on rear of front seat
6 Compartment between front seats
7 Cup holder
pg. 43 Keys, doors and locks
Master key
This key operates all locks (ignition switch/steering wheel lock, driver's door, trunk and glove compartment).
Service key
This key operates the driver's door and the ignition switch/steering wheel lock.
Doors and locks
Your car is equipped with a central locking system. The key, used on the driver's door, the remote control or central
locking button, will lock/unlock both doors and the trunk.
Turn the key once to unlock the driver's door only.
Turn the key again (within 10 seconds) to unlock both doors and the trunk.
ProCarManuals.com
Page 28 of 99

One turn with the key towards lock in the drivers door locks both doors and the trunk.
Use the switch on the front door armrests to lock/unlock the car from the inside.
Check the action of the button on the other door to verify its function (lock/ unlock).
WARNING!
If the doors are locked while driving, this may hinder rapid access to the occupants of the car in the event of an
accident. (Also see information on "Child safety locks").
NOTE :
If a door is not closed completely, the courtesy lights will stay on and a chime will sound until the door is closed.
As an added anti-theft measure, new keys have been developed which may take slightly longer to copy or replace if
the original keys are misplaced. Duplicate keys may be ordered from your Volvo retailer.
Immobilizer (start inhibitor)
Each of the keys supplied with your car contains a coded transmitter and receiver (transponder). The code in the key is
transmitted to an antenna in the ignition switch where it is compared to the code stored in the start inhibitor module.
The car can only be started if a properly coded key is used.
If you misplace a key, take the other keys to an authorized Volvo retailer. The existing code in the start inhibitor
module and all the keys will be erased as an antitheft measure and a new code will be programmed in.
NOTE: Not more than one of the keys for your car should be kept on the same key ring. This could cause conflicting
signals to be transmitted to the ignition switch, making it impossible to start the car.
This device complies with part 15 of the FCC rules. Operation is subject to the following condition: (1) This device
may not cause harmful interference, and (2) this device must accept any interference received, including interference
that may cause undesired operation.
The key number codes are stamped on a separate tag supplied with the keys. This tag should be separated from the key
ring and kept in a safe place.
pg. 44 Remote keyless entry system
Remote keyless entry system
Your car is equipped with a remote control transmitter. This transmitter uses a radio frequency which will allow
"keyless" entry into the passenger compartment or the trunk. You will be supplied with two coded key ring
ProCarManuals.com
Page 29 of 99
.
On vehicles equipped with an alarm, the alarm will also be activated/deact")
transmitters, which will enable you to lock/unlock both doors and the trunk from a distance of 10-15 feet (3-5 meters).
On vehicles equipped with an alarm, the alarm will also be activated/deactivated by this system.
The car can also be locked/unlocked with the key.
As an extra security precaution in certain situations (valet parking, etc.), Volvo recommends that the transmitter not be
included when the keys are given to anyone. The service key can be used instead. If one of the transmitters is
misplaced, contact the nearest authorized Volvo retailer for assistance.
Using the remote control
Press the LOCK button once to lock both doors and the trunk.
Press the UNLOCK button once to unlock the driver's door only. Press this button again (within 10 seconds) to
unlock both doors and the trunk.
Press the OPEN trunk button twice within 3 seconds to pop open the trunk.
NOTE :
If only the driver's door is unlocked, the lock will automatically re-engage (re-lock) and the alarm will reset after 2
minutes unless the door has been opened.
The lock/unlock and alarm features can also be utilized by using the keys. See page 43.
If the alarm LED glows continuously for 5 seconds, this indicates a fault in the system or that a door is not properly
closed.
To avoid leaving your keys in the car, make a habit of always locking the car with the remote control.
WARNING!
Volvo does not recommend using the transmitter to lock the doors from inside the car. On cars equipped with an
alarm, the alarm would be activated and would sound when one of the doors is opened. The doors must not be
locked using the remote transmitter while the vehicle is occupied. In case of an accident, this may hinder rapid
access to the occupants of the vehicle. The alarm will also sound on models equipped with this feature.
This device complies with part 15 of the FCC rules. Operation is subject to the following conditions: (1) This device
may not cause harmful interference, and (2) this device must accept any interference received, including interference
that may cause undesired operation.
* See also page 45
.
pg. 45 Alarm (certain models)
ProCarManuals.com
Page 30 of 99

LED alarm status indicator
Alarm
The radio signal emitted from the transmitter, which is used to set/unset the alarm, is a "rolling code" signal. This
means that the signal is changed randomly for each transmission and is intended to help prevent unauthorized
recording of the code.
When armed (set), the alarm continuously monitors a number of points on the car. The following conditions will set off
the alarm:
The hood is opened
The trunk is opened
A door is opened
The ignition switch is tampered with
The car is lifted or towed (if the car is equipped with the optional inclination sensor)
The battery is disconnected (if the car is equipped with the optional backup battery siren). The alarm will sound for
ten 30 second intervals, with a 5 second pause between intervals. This function cannot be interrupted.
Arming (setting) the alarm
Press the LOCK button on the remote control, lock the car using the key in the driver's door or press the central lock
button on one of the doors with the door open. One long flash of the turn signals will confirm that the alarm is set.
Disarming the alarm
Press the UNLOCK button on the remote control or unlock the doors with the key.
Turning off (stopping) the alarm
If the alarm is sounding, it can be stopped by pressing the UNLOCK button on the remote control or by unlocking the
driver's door with the key.
If the alarm is stopped with the remote control, this will be confirmed by two short flashes from the turn signals.
"Panic" function
In an emergency situation, this feature can be used to attract attention.
Activate the "panic" function by pressing the red panic button on the remote control for at least 3 seconds or by
pressing this button twice within 3 seconds. The turn signals will flash, the interior lights will go on and the alarm will
sound.
The function can be turned off by pressing any of the buttons on the remote control or will stop automatically after 25
ProCarManuals.com
Page 31 of 99

seconds.
NOTE: This button will NOT unlock the car.
Audible alarm signal
An audible alarm signal is given either by a separate alarm horn or by the optional backup siren. One alarm cycle lasts
for 30 seconds.
Visual alarm signal
The visual alarm signal is given by flashing all turn signals and turning on the interior lighting for approximately 5
minutes.
pg. 46 Alarm
Automatic reset function
If only the driver's door is unlocked with the remote control, the lock will automatically re-engage (re-lock) and the
alarm will reset after 2 minutes unless the door has been opened.
Temporarily disconnecting the alarm sensor(s)
In certain situations it may be desirable to disconnect the optional alarm sensors, particularly the inclination sensor, if,
for example, you drive your car onto a ferry where the rocking of the boat could trigger the alarm.
To temporarily disconnect the sensor(s) from the alarm system:
With both doors closed, switch off the ignition and remove the key from the ignition switch
Press the locking (left) side of the central locking button on the driver's door for at least 3 seconds
The doors will first lock and then unlock after 3 seconds to confirm that the sensors have been disconnected
The car can then be locked in the usual way to set the alarm.
NOTE: The sensors will automatically be reconnected to the alarm system the next time the ignition is switched on.
LED alarm status signals
The status of the alarm system is indicated by the red LED at the top center of the dash:
LED off - the alarm is not armed (set)
LED flashes once per second - the alarm is armed (set)
LED flashes rapidly before the ignition is switched on - the alarm has been triggered
LED flashes rapidly for 15 seconds after the ignition has been switched on - a fault has been detected in the alarm
system. Contact a Volvo retailer.
ProCarManuals.com
Page 32 of 99
Battery
Each remote transmitter is powered by a three-volt battery, type CR 2016. If the range of the transmitter is noticeably
reduced, this indicates that the battery is weak and should be replaced.
Replacement: Remove the battery cover on the back of the transmitter with a coin. Replace the battery. Reinstall the
cover, making sure it is secured tightly to help protect the transmitter.
CAUTION: Do not attempt to service or repair any components of the alarm system yourself. This should only be
done by an authorized Volvo retailer.
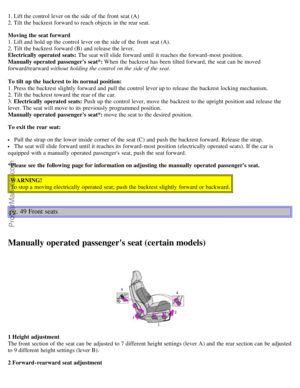
pg. 47 Front seats
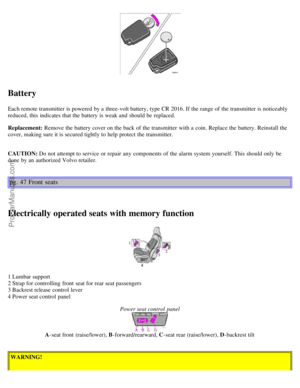
Electrically operated seats with memory function
1 Lumbar support
2 Strap for controlling front seat for rear seat passengers
3 Backrest release control lever
4 Power seat control panel
Power seat control panel
A-seat front (raise/lower), B -forward/rearward, C-seat rear (raise/lower), D -backrest tilt
WARNING!
ProCarManuals.com