Page 324 of 506

318
2004 SIENNA from Aug. ’04 Prod. (OM45422U)
“MODE” button
This button is used to select the item.
Every time you push the “MODE” button,
the display toggles.
For m")
04 SIENNA_U (L/O 0408)
318
2004 SIENNA from Aug. ’04 Prod. (OM45422U)
“MODE” button
This button is used to select the item.
Every time you push the “MODE” button,
the display toggles.
For more details, see “—Outside tempera-
ture and cruise information display” on
page 321.
CAUTION
Do not adjust the display while the
vehicle is moving. Be sure to adjust
the display only when the vehicle is
stopped.
The garage door opener (\b
Universal Transceiver) is manufactured
under license from HomeLink\b and can
be programmed to operate garage
doors, gates, entry doors, door locks,
home lighting systems, and security
systems, etc.
(a) Programming the HomeLink
\b
The HomeLink\b in your vehicle has 3
buttons and you can store one program
for each button.
To ensure correct programming into the
HomeLink
\b, install a new battery in the
hand− held transmitter prior to program-
ming.
The battery side of the hand −held trans-
mitter must be pointed away from the
HomeLink
\b during the programming pro-
cess.
For Canadian users, follow the procedure
in “Programming an entrance gate/Pro-
gramming all devices in the Canadian
market”.
—Garage door opener
Page 325 of 506

319
2004 SIENNA from Aug. ’04 Prod. (OM45422U)
1. Decide which of 3 HomeLink\b buttons
you want to program. Push and hold
down one of the buttons until the indi-
cator corres")
04 SIENNA_U (L/O 0408)
319
2004 SIENNA from Aug. ’04 Prod. (OM45422U)
1. Decide which of 3 HomeLink\b buttons
you want to program. Push and hold
down one of the buttons until the indi-
cator corresponding to the selected
channel begins to flash.
2. Place your hand− held garage transmit-
ter 25 to 75 mm (1 to 3 in.) away from
the surface of the HomeLink
\b.
Keep the indicator light on the HomeLink
\b
in view while programming.
3. Simultaneously press and hold the hand− held garage transmitter button
along with the selected HomeLink
\b but-
ton.
4. When the indicator light on the HomeLink
\b changes from a slow to a
rapid flash after 20 seconds, you can
release both buttons.
5. Test the operation of the HomeLink
\b by
pressing the newly programmed button.
If programming a garage door opener,
check to see if the garage door opens
and closes. If the garage door does not operate, iden-
tify if your garage transmitter is of the
“Rolling Code” type. Press and hold the
programmed HomeLink
\b button. The ga-
rage door has the rolling code feature if
the indicator light (on the HomeLink
\b)
flashes rapidly and then remains lit after
2 seconds. If your garage transmitter is
the “Rolling Code” type, proceed to the
heading “Programming a ro lling code sys-
tem”.
6. Repeat steps 2 through 5 for each re- maining HomeLink
\b button to program
another device.
Programming a rolling code system
If your device is “Rolling Code”
equipped, it is necessary to follow
steps 1 through 4 under the heading
“Programming the HomeLink
\b” before
proceeding with the steps listed below.
1. Locate the “training” button on the ceil- ing mounted garage door opener motor.
The exact location and color of the
button may vary by brand of garage
door opener. Refer to the owner ’s
guide supplied by the garage door
opener manufacturer for the location of
this “training” button. 2. Press the “training” button on the ceil-
ing mounted garage door opener motor.
Following this step, you have 30 seconds
in which to initiate step 3 below. 3. Press and release the vehicle’s pro- grammed HomeLink
\b button twice. The
garage door may open. If the door
does open, the programming process is
complete. If the door does not open,
press and release the button a third
time. This third press and release will
complete the programming process by
opening the garage door.
The ceiling mounted garage door opener
motor should now recognize the
HomeLink
\b unit and be able activate the
garage door up/down.
4. Repeat steps 1 through 3 for each re- maining HomeLink
\b button to program
another rolling code system.
Page 326 of 506

320
2004 SIENNA from Aug. ’04 Prod. (OM45422U)
Programming an entrance gate/program-
ming all devices in the Canadian market1. Decide which of the 3 HomeLink
\b but-
tons you")
04 SIENNA_U (L/O 0408)
320
2004 SIENNA from Aug. ’04 Prod. (OM45422U)
Programming an entrance gate/program-
ming all devices in the Canadian market1. Decide which of the 3 HomeLink
\b but-
tons you want to program.
2. Place your hand− held gate/device
transmitter 25 to 75 mm (1 to 3 in.)
away from the surface of the
HomeLink
\b.
Keep the indicator light on the HomeLink
\b
in view while programming. 3. Press and hold the selected HomeLink
\b button.
4. Continuously press and release ( cycle)
the hand− held gate/device transmitter
button every two seconds until step 5
is complete.
5. When the indicator light on the HomeLink
\b changes from a slow to a
rapid flash after 20 seconds, you can
release both buttons.
6. Test the operation of the HomeLink
\b by
pressing the newly programmed button.
Check to see if the gate/device oper-
ates correctly.
7. Repeat steps 1 through 6 for each re- maining HomeLink
\b button to program
another device. Programming other devices
To program other devices such as home
security systems, home door locks or
lighting, contact your authorized Toyota
dealer for assistance.
Reprogramming a button
Individual HomeLink
\b
buttons cannot be
erased, however, to reprogram a single
button, follow the procedure “Programming
the HomeLink
\b”.
(b) Operating the HomeLink
\b
To operate the HomeLink\b, press the
appropriate HomeLink\b button to activate
the programmed device. The HomeLink\b
indicator light should come on. The
HomeLink\b continues to send the signal
for up to 20 seconds as long as the
button is pressed. (c) Erasing the entire HomeLink
\b
memory (all three programs)
To erase all previously programmed codes
at one time, press and hold down the 2
outside buttons for 20 seconds until the
indicator light flashes.
If you sell your vehicle, be sure to erase
the programs stored in the HomeLink
\b
memory.
Page 334 of 506
04 SIENNA_U (L/O 0408)
328
2004 SIENNA from Aug. ’04 Prod. (OM45422U)
To reset the hour: Push the “H” button.
To reset the minutes: Push the “M” button.
The key must be in the “ACC” or “ON”
position.
If the electrical power source has been
disconnected from the clock, the time dis-
play will automatically be set to 1:00 (one
o’clock).
When the instrument panel lights are
turned on, the brightness of the time in-
dication will be reduced.The conversation mirror is designed for
the driver and front passenger to be
able to look at the rear passengers
without turning around.
CAUTION
Do not adjust the mirror while the
vehicle is moving. Be sure to adjust
the mirror only when the vehicle is
stopped.
To use the mirror, push it down.
Conversation mirror
Page 344 of 506
04 SIENNA_U (L/O 0408)
338
2004 SIENNA from Aug. ’04 Prod. (OM45422U)
�If the back of the vehicle is hit, the
position and mounting angle of the
camera may change. Be sure to
have the camera’s position and
mounting angle checked at your
Toyota dealer.
�If the temperature changes rapidly,
such as when hot water is poured
on the vehicle in cold weather, the
system may not operate normally.
�If the camera lens becomes dirty, it
cannot transmit a clear image. If
water droplets, snow, or mud ad-
here to the lens, rinse with water
and wipe with a soft cloth. If the
lens is extremely dirty, wash it with
a mild cleanser and rinse.
�The displayed image may become
darker and moving images may be
slightly distorted when the system
is cold. When backing up, be sure
to check behind and all around the
vehicle visually and with mirror be-
fore proceeding.
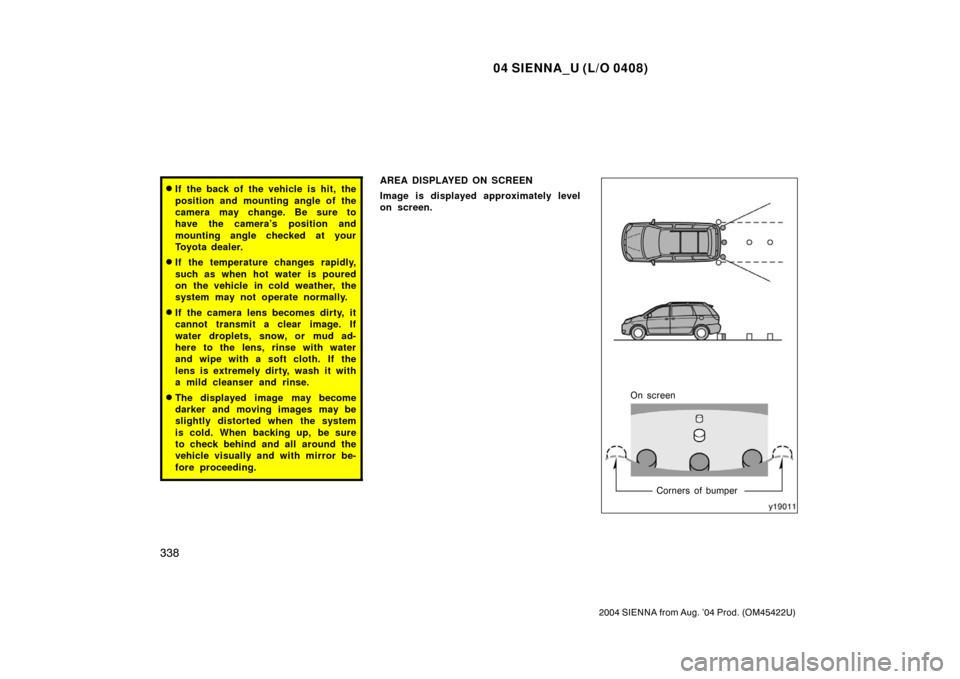
AREA DISPLAYED ON SCREEN
Image is displayed approximately level
on screen.
On screenCorners of bumper
Page 345 of 506

339
2004 SIENNA from Aug. ’04 Prod. (OM45422U)
�The area detected by the camera is
limited. The camera does not detect
objects which are close to either
corner of the bumper")
04 SIENNA_U (L/O 0408)
339
2004 SIENNA from Aug. ’04 Prod. (OM45422U)
�The area detected by the camera is
limited. The camera does not detect
objects which are close to either
corner of the bumper or under the
bumper.
�The area displayed on the screen
may vary according to vehicle orien-
tation or road conditions.
THE REAR VIEW MONITOR SYSTEM
CAMERA
The rear view monitor system camera is
located on the back door as shown in the
illustration. The camera uses a special
lens. The distance of the image that ap-
pears on the screen differs from the actu-
al distance.
In the following cases, it may become
difficult to see the images on the screen,
even when the system is functioning.
�In the dark (for example, at night)
�When the temperature near the lens is
high or low
�When water droplets are adhering to
the camera, or when humidity is high
(for example, when it rains)
�When foreign matter (for example,
snow or mud) is adhering to the cam-
era
�When the sun or the beam of head-
lights is shining directly into the cam-
era lens
Page 346 of 506

340
2004 SIENNA from Aug. ’04 Prod. (OM45422U)
If a bright light (for example, sunlight re-
flected off the vehicle body) is picked up
by the camera, the smear effect
∗ pe")
04 SIENNA_U (L/O 0408)
340
2004 SIENNA from Aug. ’04 Prod. (OM45422U)
If a bright light (for example, sunlight re-
flected off the vehicle body) is picked up
by the camera, the smear effect
∗ peculiar
to the camera may occur.
∗: Smear effect—A phenomenon that oc-
curs when a bright light (for example, sun-
light reflected off the vehicle body) is
picked up by the camera; when trans-
mitted by the camera, the light source
appears to have a vertical streak above
and below it.
Front
Rear
The power outlets (12 VDC) are de-
signed for power supply for car acces-
sories.
The key must be in the “ACC” or “ON”
position for the power outlets to be used.
NOTICE
� To prevent the fuse from being
blown, do not use the electricity
over the total vehicle capacity of 12
VDC/120W (front and rear outlets
together).
� To prevent the battery from being
discharged, do not use the power
outlets longer than necessary when
the engine is not running.
� Close the power outlet lids when
the power outlets are not in use.
Inserting anything other than an ap-
propriate plug that fits the outlet,
or allowing any liquid to get into
the outlet may cause electrical fail-
ure or short circuits.
Power outlets (12 VDC)
Page 347 of 506
04 SIENNA_U (L/O 0408)
341
2004 SIENNA from Aug. ’04 Prod. (OM45422U)
Beside second seat
Beside third seat
The power outlets (115 VAC) are de-
signed for use as a power supply for
electric appliances in the vehicle.
The key must be in the “ON” position for
the power outlet to be used.
The maximum capacity for this power out-
let is 115 VAC/100W. If you attempt to
use an appliance that requires more than
115 VAC or 100W, the protection circuit
will activate and cut the power supply.
The power supply will restart automatically
when you use an appliance that operates
within the 115 VAC/100W limits.
Main switch
To use the power outlet, push the main
switch on the instrument panel.
An indicator light will illuminate to indicate
that the power outlet is ready for use.
Push the main switch once again to turn
the power outlet off. When the power out-
let is not in use, make sure that the main
switch is turned off.
Power outlets (115 VAC)

328
2004 SIENNA from Aug. ’04 Prod. (OM45422U)
To reset the hour: Push the “H” button.
To reset the minutes: Push the “M” button.
The key must be in the “ACC” or �")

341
2004 SIENNA from Aug. ’04 Prod. (OM45422U)
Beside second seat
Beside third seat
The power outlets (115 VAC) are de-
signed for use as a power supply for
electric appliance")