2004 TOYOTA MATRIX Navigation Manual
-
 1
1 -
 2
2 -
 3
3 -
 4
4 -
 5
5 -
 6
6 -
 7
7 -
 8
8 -
 9
9 -
 10
10 -
 11
11 -
 12
12 -
 13
13 -
 14
14 -
 15
15 -
 16
16 -
 17
17 -
 18
18 -
 19
19 -
 20
20 -
 21
21 -
 22
22 -
 23
23 -
 24
24 -
 25
25 -
 26
26 -
 27
27 -
 28
28 -
 29
29 -
 30
30 -
 31
31 -
 32
32 -
 33
33 -
 34
34 -
 35
35 -
 36
36 -
 37
37 -
 38
38 -
 39
39 -
 40
40 -
 41
41 -
 42
42 -
 43
43 -
 44
44 -
 45
45 -
 46
46 -
 47
47 -
 48
48 -
 49
49 -
 50
50 -
 51
51 -
 52
52 -
 53
53 -
 54
54 -
 55
55 -
 56
56 -
 57
57 -
 58
58 -
 59
59 -
 60
60 -
 61
61 -
 62
62 -
 63
63 -
 64
64 -
 65
65 -
 66
66 -
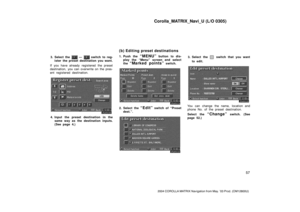
 67
67 -
 68
68 -
 69
69 -
 70
70 -
 71
71 -
 72
72 -
 73
73 -
 74
74 -
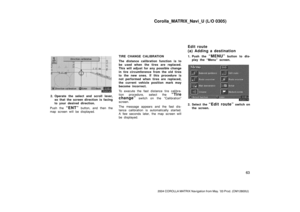
 75
75 -
 76
76 -
 77
77 -
 78
78 -
 79
79 -
 80
80 -
 81
81 -
 82
82 -
 83
83 -
 84
84 -
 85
85 -
 86
86 -
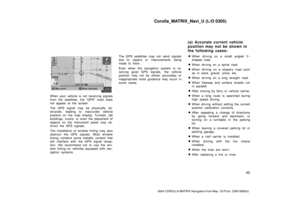
 87
87 -
 88
88 -
 89
89 -
 90
90 -
 91
91 -
 92
92 -
 93
93 -
 94
94 -
 95
95 -
 96
96 -
 97
97 -
 98
98 -
 99
99 -
 100
100 -
 101
101 -
 102
102 -
 103
103 -
 104
104 -
 105
105 -
 106
106 -
 107
107 -
 108
108 -
 109
109 -
 110
110 -
 111
111 -
 112
112 -
 113
113 -
 114
114 -
 115
115 -
 116
116 -
 117
117 -
 118
118

81
2004 COROLLA MATRIX Navigation from May. ’03 Prod. (OM12800U)
1. Push the “SETUP” button.
3NAN025
2. Push the “Maintenance” button
to display the “Maint")

82
2004 COROLLA MATRIX Navigation from May. ’03 Prod. (OM12800U)
You can edit your dealer’s name, staff,
location and phone number if you al-
ready registered the")

83
2004 COROLLA MATRIX Navigation from May. ’03 Prod. (OM12800U)
EDITING THE PHONE NUMBER
3NAN036
Select numeral keys.
After you finish your entry, select the
“OK�")

84
2004 COROLLA MATRIX Navigation from May. ’03 Prod. (OM12800U)
3NAN039
This system has a function which in-
forms you the memo you entered. When
the system begins")

85
2004 COROLLA MATRIX Navigation from May. ’03 Prod. (OM12800U)
3NAN042
1. Select the day you want to input a
memo.
3NAN074
2. Select the “Memo” switch to dis-")

86
2004 COROLLA MATRIX Navigation from May. ’03 Prod. (OM12800U)
3NAN047
Select your desired date or mark color.
If you want to default the date color
you chose, sel")

87
2004 COROLLA MATRIX Navigation from May. ’03 Prod. (OM12800U)
3NAN077
If you want to edit the memo, select
the date. Selecting the
“Edit” switch
will display")

88
2004 COROLLA MATRIX Navigation from May. ’03 Prod. (OM12800U)
In case of selecting the “Period”switch, you can display the “Memo list”
as long as you desi")