Page 10 of 342
2
2004 L/C100 from Aug ’03 Prod. (OM60A04U)
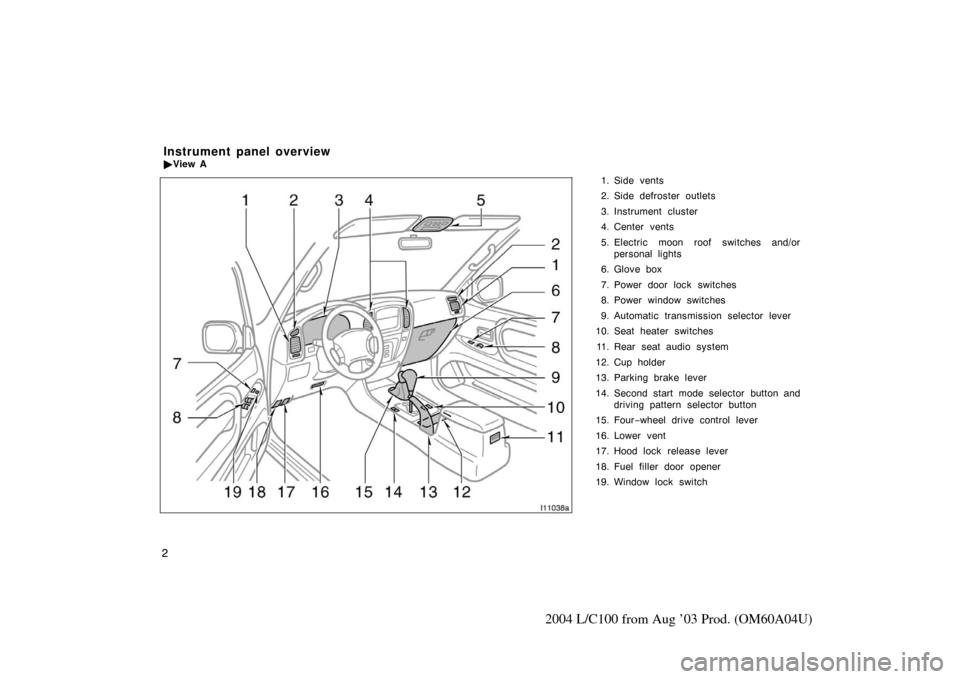
1. Side vents
2. Side defroster outlets
3. Instrument cluster
4. Center vents
5. Electric moon roof switches and/orpersonal lights
6. Glove box
7. Power door lock switches
8. Power window switches
9. Automatic transmission selector lever
10. Seat heater switches
11. Rear seat audio system
12. Cup holder
13. Parking brake lever
14. Second start mode selector button and driving pattern selector button
15. Four −wheel drive control lever
16. Lower vent
17. Hood lock release lever
18. Fuel filler door opener
19. Window lock switch
Instrument panel overview
� View A
Page 18 of 342
10
2004 L/C100 from Aug ’03 Prod. (OM60A04U)
Keys
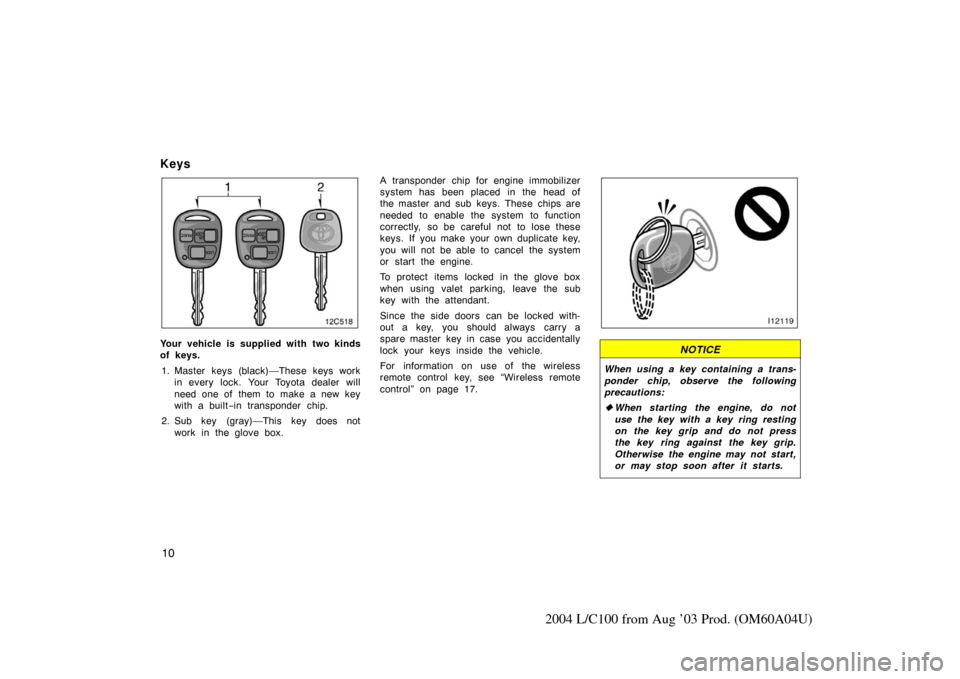
Your vehicle is supplied with two kinds
of keys.1. Master keys (black)—These keys work in every lock. Your Toyota dealer will
need one of them to make a new key
with a built −in transponder chip.
2. Sub key (gray)—This key does not work in the glove box. A transponder chip for engine immobilizer
system has been placed in the head of
the master and sub keys. These chips are
needed to enable the system to function
correctly, so be careful not to lose these
keys. If you make your own duplicate key,
you will not be able to cancel the system
or start the engine.
To protect items locked in the glove box
when using valet parking, leave the sub
key with the attendant.
Since the side doors can be locked with-
out a key, you should always carry a
spare master key in case you accidentally
lock your keys inside the vehicle.
For information on use of the wireless
remote control key, see “Wireless remote
control” on page 17.NOTICE
When using a key containing a trans-
ponder chip, observe the following
precautions:
�
When starting the engine, do not
use the key with a key ring resting
on the key grip and do not press
the key ring against the key grip.
Otherwise the engine may not start,
or may stop soon after it starts.
Page 193 of 342

OPERATION OF INSTRUMENTS AND
CONTROLS
Other equipment
Clock186
. . . . . . . . . . . . . . . . . . . . . . . . . . . . . . . . . . . . .\
. . . . . . .")
185
2004 L/C100 from Aug ’03 Prod. (OM60A04U)
OPERATION OF INSTRUMENTS AND
CONTROLS
Other equipment
Clock186
. . . . . . . . . . . . . . . . . . . . . . . . . . . . . . . . . . . . .\
. . . . . . . . . . . . . . . . .
Outside temperature display 186
. . . . . . . . . . . . . . . . . . . . . . . . . . . . . . . . .
Rear view monitor system 187
. . . . . . . . . . . . . . . . . . . . . . . . . . . . . . . . . . .
Cigarette lighter and ashtray 190
. . . . . . . . . . . . . . . . . . . . . . . . . . . . . . . . .
Power outlets 190
. . . . . . . . . . . . . . . . . . . . . . . . . . . . . . . . . . . . \
. . . . . . . . . .
Roll sensing of curtain shield airbags off switch 191
. . . . . . . . . . . . . . . .
Rear console box 192
. . . . . . . . . . . . . . . . . . . . . . . . . . . . . . . . . . . . \
. . . . . . .
Glove box 193
. . . . . . . . . . . . . . . . . . . . . . . . . . . . . . . . . . . . \
. . . . . . . . . . . . . .
Garage door opener 193
. . . . . . . . . . . . . . . . . . . . . . . . . . . . . . . . . . . . \
. . . .
Auxiliary boxes 196
. . . . . . . . . . . . . . . . . . . . . . . . . . . . . . . . . . . . \
. . . . . . . . .
Cup holders 197
. . . . . . . . . . . . . . . . . . . . . . . . . . . . . . . . . . . . \
. . . . . . . . . . . .
Card holder 199
. . . . . . . . . . . . . . . . . . . . . . . . . . . . . . . . . . . . \
. . . . . . . . . . . .
Tie −down hooks 199
. . . . . . . . . . . . . . . . . . . . . . . . . . . . . . . . . . . . \
. . . . . . . .
Cargo net hooks 200
. . . . . . . . . . . . . . . . . . . . . . . . . . . . . . . . . . . . \
. . . . . . . .
Roof luggage carrier 200
. . . . . . . . . . . . . . . . . . . . . . . . . . . . . . . . . . . . \
. . . .
Floor mat 202
. . . . . . . . . . . . . . . . . . . . . . . . . . . . . . . . . . . . \
. . . . . . . . . . . . . .
Coat hooks 203
. . . . . . . . . . . . . . . . . . . . . . . . . . . . . . . . . . . . \
. . . . . . . . . . . .
SECTION 1 10
Page 201 of 342
193
2004 L/C100 from Aug ’03 Prod. (OM60A04U)
Glove box
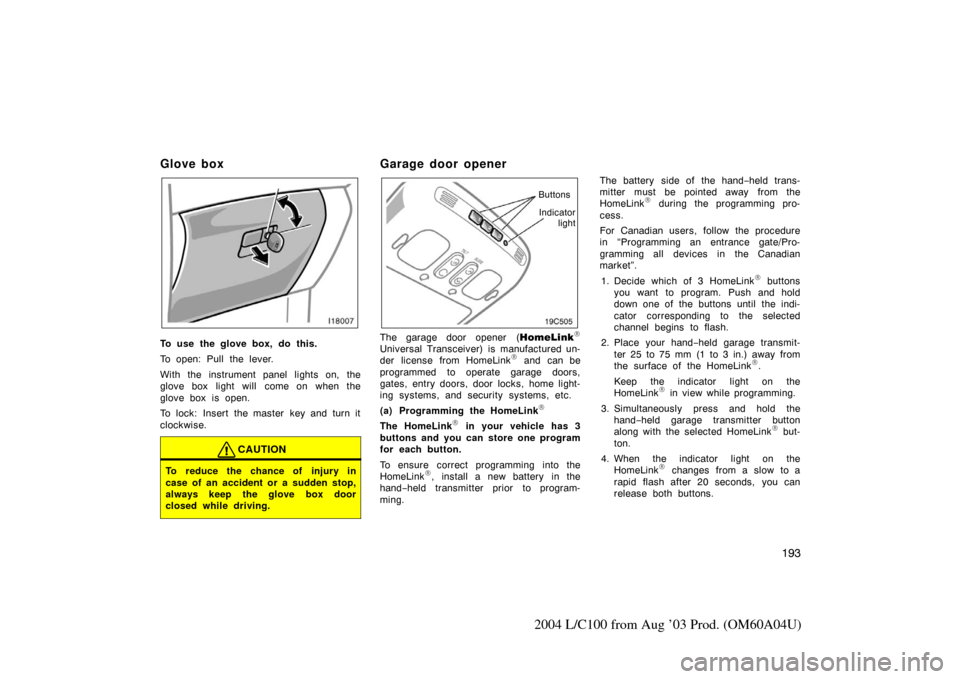
To use the glove box, do this.
To open: Pull the lever.
With the instrument panel lights on, the
glove box light will come on when the
glove box is open.
To lock: Insert the master key and turn it
clockwise.
CAUTION
To reduce the chance of injury in
case of an accident or a sudden stop,
always keep the glove box door
closed while driving.
Garage door opener
Indicatorlight
Buttons
The garage door opener (
HomeLink\b
Universal Transceiver) is manufactured un-
der license from HomeLink\b and can be
programmed to operate garage doors,
gates, entry doors, door locks, home light-
ing systems, and security systems, etc.
(a) Programming the HomeLink
\b
The HomeLink\b in your vehicle has 3
buttons and you can store one program
for each button.
To ensure correct programming into the
HomeLink
\b, install a new battery in the
hand− held transmitter prior to program-
ming. The battery side of the hand
−held trans-
mitter must be pointed away from the
HomeLink
\b during the programming pro-
cess.
For Canadian users, follow the procedure
in “Programming an entrance gate/Pro-
gramming all devices in the Canadian
market”.
1. Decide which of 3 HomeLink
\b buttons
you want to program. Push and hold
down one of the buttons until the indi-
cator corresponding to the selected
channel begins to flash.
2. Place your hand −held garage transmit-
ter 25 to 75 mm (1 to 3 in.) away from
the surface of the HomeLink
\b.
Keep the indicator light on the
HomeLink
\b in view while programming.
3. Simultaneously press and hold the hand− held garage transmitter button
along with the selected HomeLink
\b but-
ton.
4. When the indicator light on the HomeLink
\b changes from a slow to a
rapid flash after 20 seconds, you can
release both buttons.
Page 323 of 342
315
2004 L/C100 from Aug ’03 Prod. (OM60A04U)
Light bulbsBulbNo.WTy p e
Rear turn signal
lights744021G
Stop/tail lights744321/5D
Back −up lights744021D
License plate lights—5D
Interior lights—8E
Personal lights
Ty p e A
Ty p e B
—
—5
8F
E
Glove box light—1.4D
Door courtesy
lights—3D
Vanity lights—1.5E
A : HB3 halogen bulbs
B : HB4 halogen bulbs
C : Single end bulbs (amber)
D : Wedge base bulbs
E : Double end bulbs
F : Single end bulbs
G : Wedge base bulbs (amber)
—Headlights
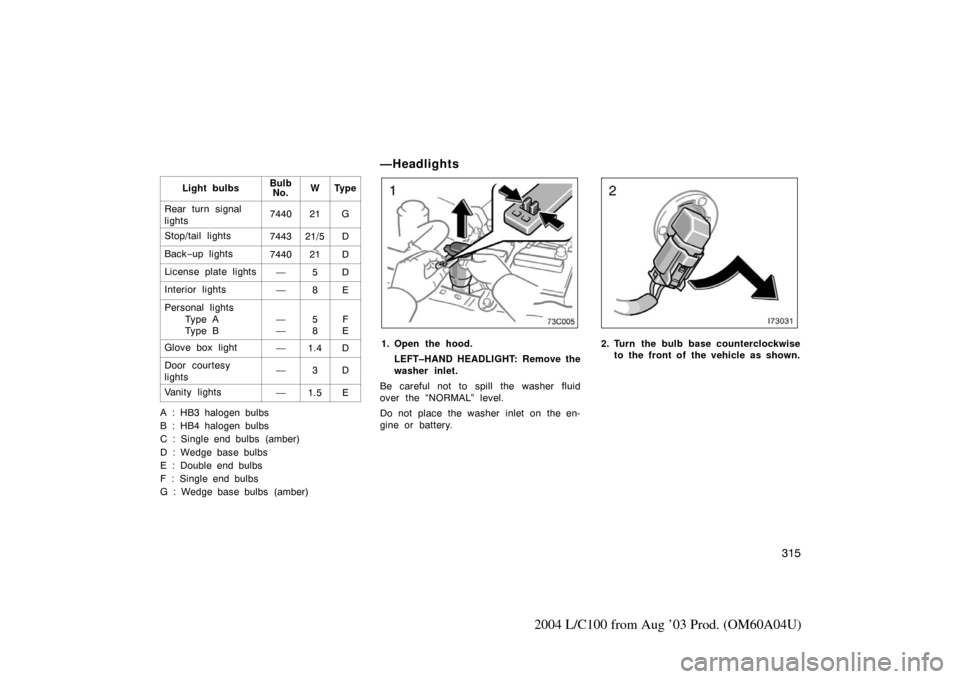
1. Open the hood.
LEFT–HAND HEADLIGHT: Remove the
washer inlet.
Be careful not to spill the washer fluid
over the “NORMAL” level.
Do not place the washer inlet on the en-
gine or battery.2. Turn the bulb base counterclockwise to the front of the vehicle as shown.