Page 70 of 491
1-43
Seat, seatbelt and SRS airbags
– CONTINUED –
Some types of child restraint systems can be installed
on the rear seat of your vehicle without use of the seat-
belts. Such child restraint systems are secured to the
designated anchorages provided on the vehicle body.
The lower and tether anchorages are sometimes re-
ferred to as the LATCH system ( Lower Anchors and
T ethers for CHildren).
Your vehicle is equipped with four lower anchorages
(bars) and three upper anchorages (tether anchorag-
es) for accommodating such child restraint systems. The lower anchorages (bars) are used for installing a
child restraint system only on the rear seat window-
side seating positions. For each window-side seating
position, two lower anchorages are provided.
Each anchor bar is located where the seat cushionmeets the seatback.
UG1091BAHS1076BA
Page 73 of 491

1-46
Seat, seatbelt and SRS airbags
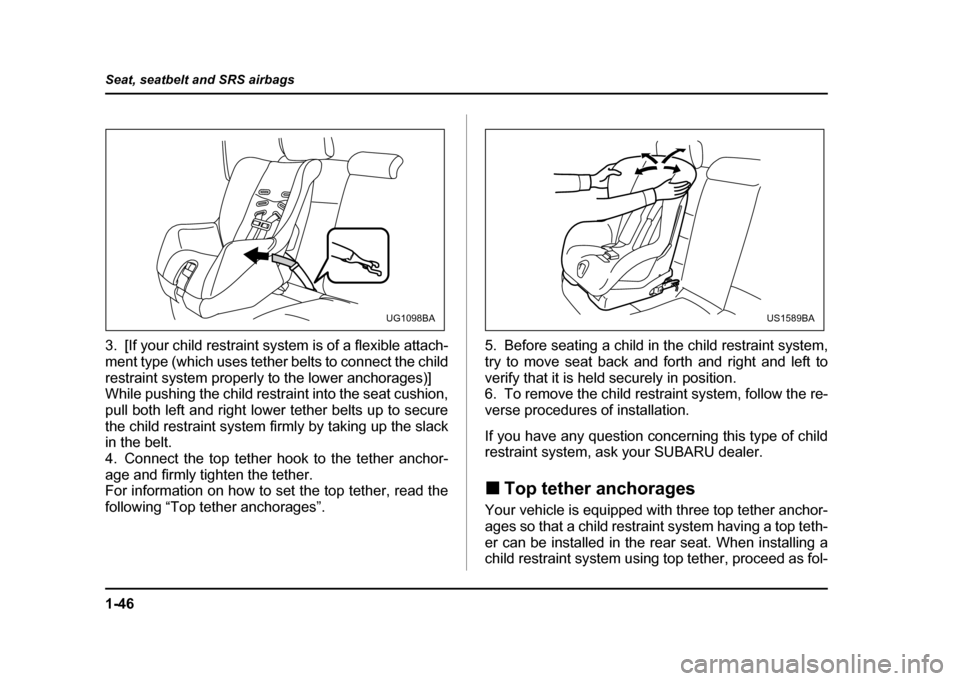
3. [If your child restraint system is of a flexible attach-
ment type (which uses tether belts to connect the child
restraint system properly to the lower anchorages)]
While pushing the child restraint into the seat cushion,
pull both left and right lower tether belts up to secure
the child restraint system firmly by taking up the slack
in the belt.
4. Connect the top tether hook to the tether anchor-
age and firmly tighten the tether.
For information on how to set the top tether, read the
following “Top tether anchorages”.
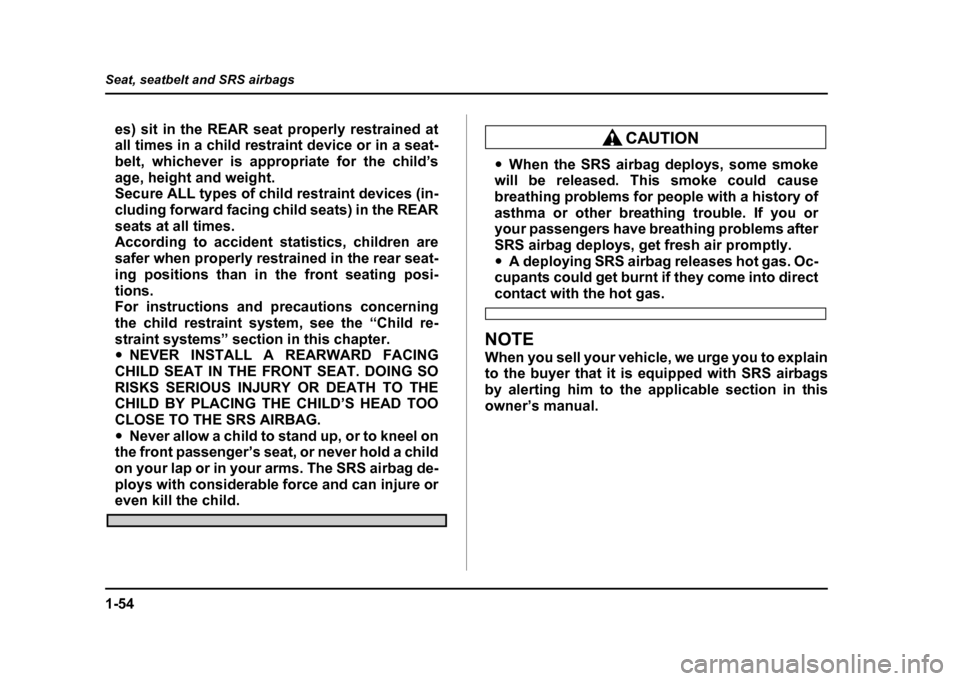
5. Before seating a child in the child restraint system,
try to move seat back and forth and right and left to
verify that it is held securely in position.
6. To remove the child restraint system, follow the re-
verse procedures of installation.
If you have any question concerning this type of child
restraint system, ask your SUBARU dealer. !
Top tether anchorages
Your vehicle is equipped with three top tether anchor-
ages so that a child restraint system having a top teth-
er can be installed in the rear seat. When installing a
child restraint system using top tether, proceed as fol-
UG1098BAUS1589BA
Page 76 of 491
1-49
Seat, seatbelt and SRS airbags
– CONTINUED –
There is an anchorage for the center seating position
at the rear edge of the roof, and anchorages for each
of the two window-side seating positions on the rear
wall of the cargo area. !To hook the top tether
" Sedan
1. Attach the child restraint top tether hook to the ap-
propriate upper anchorage.
2. Tighten the top tether securely.
Please contact your SUBARU dealer if you have any
question regarding the installation of a child restraint system. "
Wagon
1. Remove the headrest at the seating position where
the child restraint system has been installed with the
lower anchorages or seatbelt; lift up the headrest while
pressing the release button. Store the headrest in the
cargo area. Avoid placing the headrest in the passen-
ger compartment to prevent it from being thrown
around in the passenger compartment in a sudden
stop or a sharp turn.
UG1087BA
HS1081BA
Page 78 of 491
1-51
Seat, seatbelt and SRS airbags
– CONTINUED –
Window-side
3. Attach the child restraint top tether hook to the ap-
propriate upper anchorage.
4. Tighten the top tether securely.
Please contact your SUBARU dealer if you have any
question regarding the installation of a child restraint system.
Always remove the headrest when mounting a
child restraint system with a top tether. Other- wise, it may not be possible to fasten the top
tether cannot be fastened tightly.
UG1097BA
Page 81 of 491

1-54
Seat, seatbelt and SRS airbags
es) sit in the REAR seat properly restrained at
all times in a child restraint device or in a seat-
belt, whichever is appropriate for the child’s
age, height and weight.
Secure ALL types of child restraint devices (in-
cluding forward facing child seats) in the REAR
seats at all times.
According to accident statistics, children are
safer when properly restrained in the rear seat-
ing positions than in the front seating posi-
tions.
For instructions and precautions concerning
the child restraint system, see the “Child re-
straint systems” section in this chapter. "
NEVER INSTALL A REARWARD FACING
CHILD SEAT IN THE FRONT SEAT. DOING SO RISKS SERIOUS INJURY OR DEATH TO THE
CHILD BY PLACING THE CHILD’S HEAD TOO
CLOSE TO THE SRS AIRBAG." Never allow a child to stand up, or to kneel on
the front passenger’s seat, or never hold a child
on your lap or in your arms. The SRS airbag de-
ploys with considerable force and can injure or
even kill the child.
" When the SRS airbag deploys, some smoke
will be released. This smoke could cause
breathing problems for people with a history of
asthma or other breathing trouble. If you or
your passengers have breathing problems after
SRS airbag deploys, get fresh air promptly." A deploying SRS airbag releases hot gas. Oc-
cupants could get burnt if they come into direct
contact with the hot gas.
NOTE
When you sell your vehicle, we urge you to explain
to the buyer that it is equipped with SRS airbags
by alerting him to the applicable section in this
owner’s manual.
Page 104 of 491

2-1
2
Keys and doors
Keys ............................................................... 2-2 Key number ....................................................... 2-3
Door locks ..................................................... 2-3 Locking and unlocking from the outside ........ 2-3
Locking and unlocking from the inside .......... 2-4
Power door locking switches ...................... 2-5
Remote keyless entry system ..................... 2-6 Locking the doors ............................................. 2-7
Unlocking the doors ......................................... 2-8
Illuminated entry ............................................... 2-8
Vehicle finder function ..................................... 2-8
Sounding a panic alarm ................................... 2-9
Selecting audible signal operation .................. 2-9
Replacing the battery ....................................... 2-9
Replacing lost transmitters .............................. 2-10
Security system (if equipped) ..................... 2-14 System operation .............................................. 2-14
Arming the system ............................................ 2-15
Disarming the system ....................................... 2-17
Valet mode ......................................................... 2-17
Passive arming .................................................. 2-18
Child safety locks ......................................... 2-21
Windows ........................................................ 2-22 Power windows ................................................. 2-22
Trunk lid (Sedan) .......................................... 2-25 To open and close the trunk lid from outside 2-25
To open the trunk lid from inside .................... 2-26
To cancel the trunk lid release ........................ 2-26
Internal trunk lid release handle ...................... 2-26
Rear gate (Wagon) ........................................ 2-29 Moonroof (if equipped) ................................. 2-31
Tilt function ....................................................... 2-31
Sliding function ................................................. 2-31
Sun shades ........................................................ 2-33
Page 109 of 491

2-6
Keys and doors
NOTE
Make sure that you do not leave the key inside the
vehicle before locking the doors from the outside
using power door locking switches.Remote keyless entry system
Two transmitters are provided for your vehicle.
The remote keyless entry system has the following
functions. "
Locking and unlocking the doors (and rear gate on
the wagon) without a key " Sounding a panic alarm
" Arming and disarming the security system (if your
vehicle is equipped with an optional security system).
See the next section “Security system (if equipped)”
for detailed information.
This device complies with Part 15 of the FCC
Rules and with RSS-210 of Industry Canada. Oper- ation is subject to the following two conditions: (1)
This device may not cause harmful interference,
and (2) this device must accept any interference
received, including interference that may cause
undesired operation.
Changes or modifications not expressly approved
by the party responsible for compliance could
void the user’s authority to operate the equipment.
The operable distance of the keyless entry system is
approximately 30 feet (10 meters). However, this dis-
tance will vary depending on environmental condi-
Page 113 of 491

2-10
Keys and doors
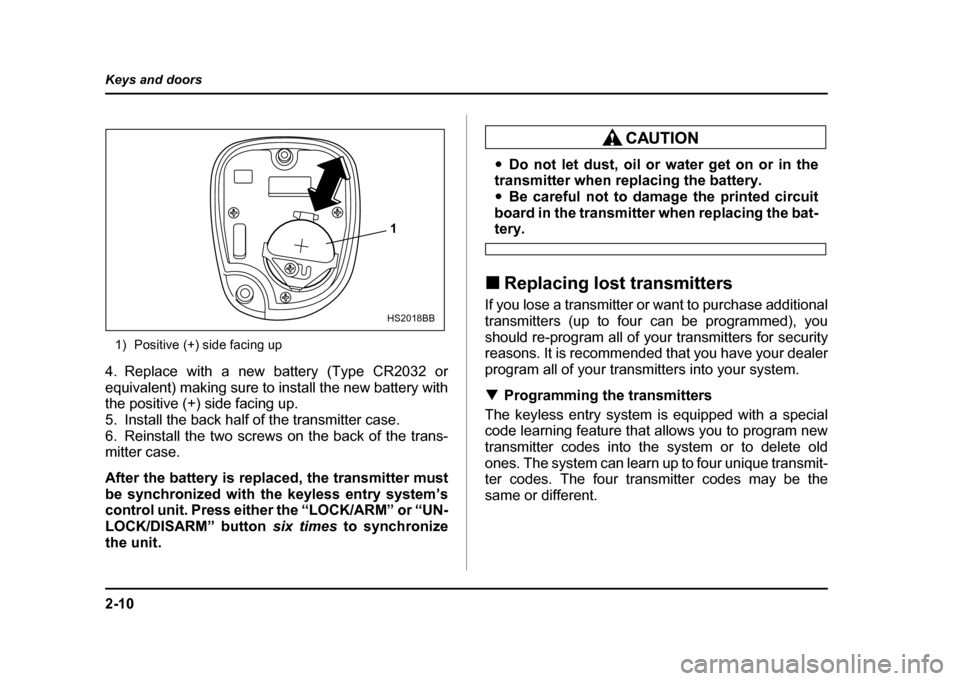
1) Positive (+) side facing up
4. Replace with a new battery (Type CR2032 or
equivalent) making sure to install the new battery with
the positive (+) side facing up.
5. Install the back half of the transmitter case.
6. Reinstall the two screws on the back of the trans-
mitter case. After the battery is replaced, the transmitter must
be synchronized with the keyless entry system’s
control unit. Press either the “LOCK/ARM” or “UN- LOCK/DISARM” button six times to synchronize
the unit.
" Do not let dust, oil or water get on or in the
transmitter when replacing the battery. " Be careful not to damage the printed circuit
board in the transmitter when replacing the bat-
tery.
! Replacing lost transmitters
If you lose a transmitter or want to purchase additional
transmitters (up to four can be programmed), you
should re-program all of your transmitters for security
reasons. It is recommended that you have your dealer
program all of your transmitters into your system. ! Programming the transmitters
The keyless entry system is equipped with a special
code learning feature that allows you to program new
transmitter codes into the system or to delete old
ones. The system can learn up to four unique transmit-
ter codes. The four transmitter codes may be the
same or different.1
HS2018BB