2004 SUBARU IMPREZA WRX service schedule
[x] Cancel search: service schedulePage 5 of 491

2
How to use this owner’s manual !Using your Owner’s manual
Before you operate your vehicle, carefully read this
manual. To protect yourself and extend the service life
of your vehicle, follow the instructions in this manual.
Failure to observe these instructions may result in se-
rious injury and damage to your vehicle.
This manual is composed of fourteen chapters. Each
chapter begins with a brief table of contents, so you
can usually tell at a glance if that chapter contains the
information you want.
Chapter 1: Seat, seatbelt and SRS airbags
This chapter informs you how to use the seat and seat-
belt and contains precautions for the SRS airbags.
Chapter 2: Keys and doors
This chapter informs you how to operate the keys,
locks and windows.
Chapter 3: Instruments and controls
This chapter informs you about the operation of instru-
ment panel indicators and how to use the instruments
and other switches.
Chapter 4: Climate Control
This chapter informs you how to operate the climate
control.
Chapter 5: Audio This chapter informs you how to operate your audio system.
Chapter 6: Interior equipment
This chapter informs you how to operate interior
equipment.
Chapter 7: Starting and operating
This chapter informs you how to start and operate your SUBARU.
Chapter 8: Driving tips
This chapter informs you how to drive your SUBARU
in various conditions and explains some safety tips on
driving.
Chapter 9: In case of emergency
This chapter informs you what to do if you have a prob-
lem while driving, such as a flat tire or engine over-
heating.
Chapter 10: Appearance care
This chapter informs you how to keep your SUBARU
looking good.
Chapter 11: Maintenance and service
This chapter informs you when you need to take your
SUBARU to the dealer for scheduled maintenance
and informs you how to keep your SUBARU running
properly.
Chapter 12: Specifications
This chapter informs you about dimension and capac-
ities of your SUBARU.
Page 209 of 491

4-20
Climate control
!
Cooling and dehumidifying in high hu-
midity and low temperature weather
conditions
Under certain weather conditions (high relative humid-
ity, low temperatures, etc.) a small amount of water
vapor emission from the air outlets may be noticed.
This condition is normal and does not indicate any
problem with the air conditioning system. ! Air conditioner compressor shut-off
when engine is heavily loaded
To improve acceleration and gas mileage, the air con-
ditioner compressor is designed to temporarily shut off
during air conditioner operation whenever the acceler-
ator is fully depressed such as during rapid accelera-
tion or when driving on a steep upgrade. ! Refrigerant for your climate control
system
Your air conditioner uses ozone friendly refrigerant
HFC134a. Therefore, the method of adding, changing
or checking the refrigerant is different from the method
for CFC12 (Freon). Consult your SUBARU dealer for
service. Repairs needed as a result of using the wrong
refrigerant are not covered under warranty.Air filtration system (if equipped)
If your vehicle’s air conditioning system is equipped
with an air filtration system, replace the filter element
according to the replacement schedule shown below.
This schedule should be followed to maintain the fil-
ter’s dust collection ability. Under extremely dusty con-
ditions, the filter should be replaced more frequently. It
is recommended that you have your filter checked or
replaced by your SUBARU dealer. For replacement,
use only a genuine SUBARU air filter kit.
Replacement schedule: Every 12 months or 7,500 miles (12,000 km) whichev-
er comes first
Page 317 of 491

8-6
Driving tips
Periodic inspections
To keep your vehicle in the best condition at all times,
always have the recommended maintenance services
listed in the maintenance schedule in the “Warranty
and Maintenance Booklet” performed at the specified
time or mileage intervals.Driving in foreign countries
When planning to use your vehicle in another country: "
Confirm the availability of the correct fuel. (Refer to
the “Fuel requirements” section in chapter 7.)" Comply with all regulations and requirements of
each country.
Page 386 of 491

11 - 1
11
Maintenance and service
Maintenance schedule ................................. 11-3
Maintenance precautions ............................ 11-3 Before checking or servicing in the engine compartment .................................................. 11-4
When you do checking or servicing in the engine compartment while the engine is
running ............................................................ 11-5
Engine hood .................................................. 11-5
Engine compartment overview ................... 11-8 2.5 liter model .................................................... 11-8
2.0 liter (Turbo) model ...................................... 11-9
2.5 liter (Turbo) model ...................................... 11-10
Engine oil ...................................................... 11-11 Checking the oil level ....................................... 11-11
Changing the oil and oil filter .......................... 11-12
Recommended grade and viscosity ................ 11-16
Recommended grade and viscosity under severe driving conditions .............................. 11-18
Synthetic oil ....................................................... 11-18
Cooling system ............................................. 11-18 Cooling fan, hose and connections ................ 11-19
Engine coolant .................................................. 11-19
Air cleaner element ...................................... 11-23 Replacing the air cleaner element ................... 11-23
Spark plugs ................................................... 11-26 Recommended spark plugs ............................. 11-27
Drive belts ..................................................... 11-27
Manual transmission oil ............................... 11-28 Checking the oil level ....................................... 11-28
Recommended grade and viscosity ................ 11-30 Automatic transmission fluid ...................... 11-31
Checking the fluid level .................................... 11-31
Recommended fluid ......................................... 11-32
Front differential gear oil (AT vehicles) ...... 11-33 Checking the oil level ....................................... 11-33
Recommended grade and viscosity ............... 11-33
Rear differential gear oil ............................... 11-34 Checking the gear oil level .............................. 11-34
Recommended grade and viscosity ............... 11-35
Power steering fluid ...................................... 11-36 Checking the fluid level .................................... 11-36
Recommended fluid ......................................... 11-37
Brake fluid ..................................................... 11-37 Checking the fluid level .................................... 11-37
Recommended brake fluid ............................... 11-38
Clutch fluid (MT vehicles) ............................ 11-38 Checking the fluid level .................................... 11-38
Recommended clutch fluid .............................. 11-39
Brake booster ................................................ 11-40
Brake pedal .................................................... 11-40 Checking the brake pedal free play ................ 11-40
Checking the brake pedal reserve distance ... 11-41
Clutch pedal (MT vehicles) ........................... 11-41 Checking the clutch function .......................... 11-41
Checking the clutch pedal free play ............... 11-42
Replacement of brake pad and lining ......... 11-42 Breaking-in of new brake pads and linings .... 11-43
Parking brake stroke .................................... 11-44
Tires and wheels ........................................... 11-44
Page 388 of 491

11 - 3
Maintenance and service
– CONTINUED –
Maintenance and serviceMaintenance schedule
The scheduled maintenance items required to be ser-
viced at regular intervals are shown in the “Warranty
and Maintenance Booklet”.
For details of your maintenance schedule, read the
separate “Warranty and Maintenance Booklet”.Maintenance precautions
When maintenance and service are required, it is rec-
ommended that all work be done by an authorized
SUBARU dealer.
If you perform maintenance and service by yourself,
you should familiarize yourself with the information
provided in this section on general maintenance and
service for your SUBARU.
Incorrect or incomplete service could cause improper
or unsafe vehicle operation. Any problems caused by
improper maintenance and service performed by you
are not eligible for warranty coverage.
"Testing of an All-Wheel Drive vehicle must
NEVER be performed on a single two-wheel dy-
namometer or similar apparatus. Attempting to
do so will result in transmission damage and in
uncontrolled vehicle movement and may cause
an accident or injuries to persons nearby. " Always select a safe area when performing
maintenance on your vehicle." Always be very careful to avoid injury when
working on the vehicle. Remember that some of
Page 397 of 491

11 - 1 2
Maintenance and service
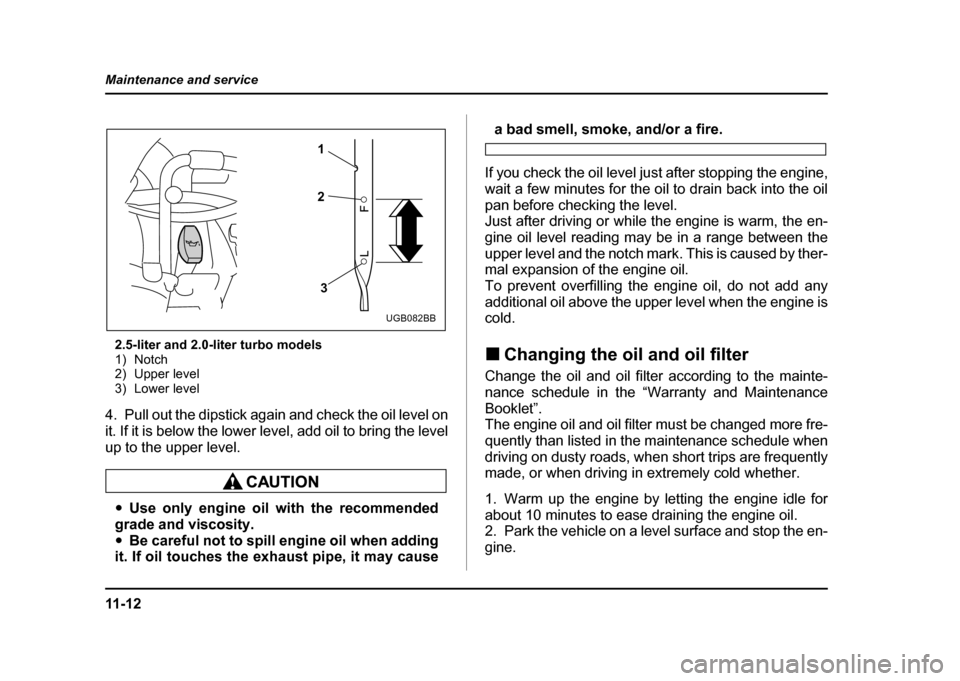
2.5-liter and 2.0-liter turbo models
1) Notch
2) Upper level
3) Lower level
4. Pull out the dipstick again and check the oil level on
it. If it is below the lower level, add oil to bring the level
up to the upper level.
" Use only engine oil with the recommended
grade and viscosity. " Be careful not to spill engine oil when adding
it. If oil touches the exhaust pipe, it may cause
a bad smell, smoke, and/or a fire.
If you check the oil level just after stopping the engine,
wait a few minutes for the oil to drain back into the oil
pan before checking the level.
Just after driving or while the engine is warm, the en-
gine oil level reading may be in a range between the
upper level and the notch mark. This is caused by ther-
mal expansion of the engine oil.
To prevent overfilling the engine oil, do not add any
additional oil above the upper level when the engine iscold. ! Changing the oil and oil filter
Change the oil and oil filter according to the mainte-
nance schedule in the “Warranty and Maintenance Booklet”.
The engine oil and oil filter must be changed more fre-
quently than listed in the maintenance schedule when
driving on dusty roads, when short trips are frequently
made, or when driving in extremely cold whether.
1. Warm up the engine by letting the engine idle for
about 10 minutes to ease draining the engine oil.
2. Park the vehicle on a level surface and stop the en-
gine.
1 2
3
UGB082BB
Page 403 of 491

11 - 1 8
Maintenance and service
!
Recommended grade and viscosity
under severe driving conditions
If the vehicle is used in desert areas, in areas with very
high temperatures, or used for heavy-duty applica-
tions such as towing a trailer, use of oil with the follow-
ing grade and viscosities is recommended.
API classification SL (or SJ):
SAE viscosity No.: 30, 40, 10W-50, 20W-40, 20W-50
! Synthetic oil
You can use synthetic engine oil that meets the same
requirements given for conventional engine oil. When
using synthetic oil, you must use oil of the same clas-
sification, viscosity and grade shown in this owner’s
manual, and must follow the oil and filter changing in-
tervals shown in the maintenance schedule.
Cooling system
Never attempt to remove the radiator cap until
the engine has been shut off and has cooled
down completely. Since the coolant is under
pressure, you may suffer serious burns from a
spray of boiling hot coolant when the cap is re-
moved.
" The cooling system has been filled at the fac-
tory with a high quality, corrosion-inhibiting,
year-around coolant which provides protection
against freezing down to –33 °F (–36 °C). For
adding, use genuine SUBARU coolant or an
equivalent: a mixture of 50% soft water and 50%
ethylene-glycol basis coolant. Use of improper
coolants may result in corrosion in the cooling
system. It is important to maintain protection
against freezing and corrosion, even if freezing
temperatures are not expected. Never mix dif-
ferent kinds of coolant. " Do not splash the engine coolant over paint-
Page 405 of 491

11 - 2 0
Maintenance and service
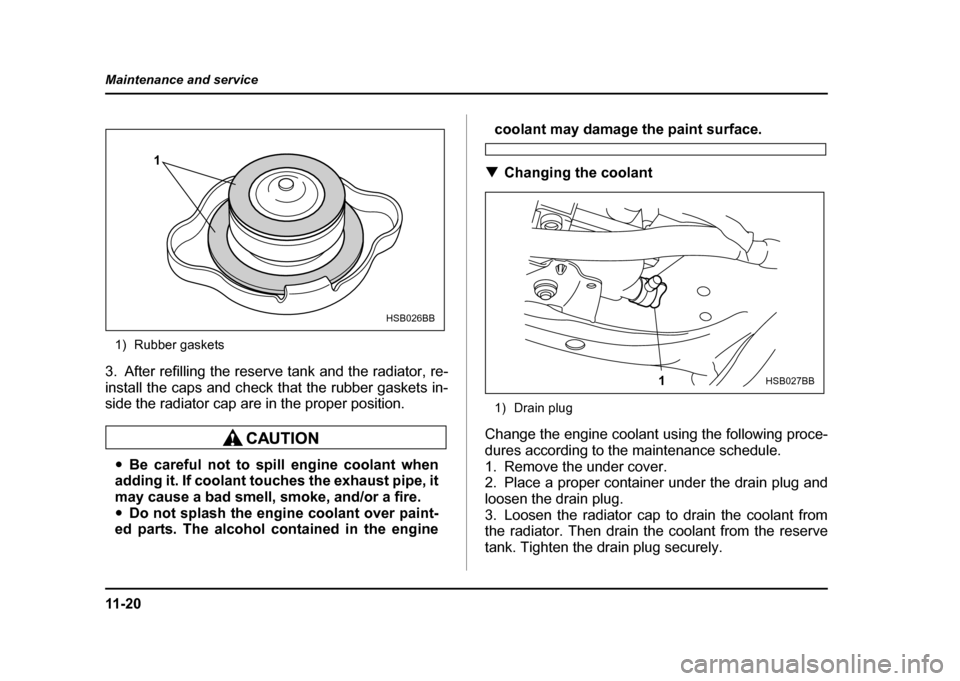
1) Rubber gaskets
3. After refilling the reserve tank and the radiator, re-
install the caps and check that the rubber gaskets in-
side the radiator cap are in the proper position.
" Be careful not to spill engine coolant when
adding it. If coolant touches the exhaust pipe, it
may cause a bad smell, smoke, and/or a fire." Do not splash the engine coolant over paint-
ed parts. The alcohol contained in the engine
coolant may damage the paint surface.
! Changing the coolant
1) Drain plug
Change the engine coolant using the following proce-
dures according to the maintenance schedule.
1. Remove the under cover.
2. Place a proper container under the drain plug and
loosen the drain plug.
3. Loosen the radiator cap to drain the coolant from
the radiator. Then drain the coolant from the reserve
tank. Tighten the drain plug securely.
1
HSB026BB
1HSB027BB