2004 SUBARU IMPREZA brake light
[x] Cancel search: brake lightPage 270 of 491

7-1
7
Starting and operating
F uel .. ... ... ... .. ... ... ... ... .. ... ... ... ... ... .. ... ... ... ... .. ... ... 7-2
F uel re quire ments ..................... ..................... ... 7-2
Fuel filler lid and cap ........................................ 7-4
State emission testing (U.S. only) ............... 7-7
Preparing to drive ......................................... 7-9
Starting the engine ....................................... 7-9 Manual transmission vehicle ........................... 7-9
Automatic transmission vehicle ...................... 7-10
Starting the engine during cold weather below −4 °F ( −20 °C) ......................................... 7-10
Starting a flooded engine ................................. 7-11
Stopping the engine ..................................... 7-11
Manual transmission – 6 speed (WRX-STi) 7-12 Selecting reverse gear ...................................... 7-12
Shifting speeds ................................................. 7-13
Driving tips ........................................................ 7-14
Manual transmission – 5 speed (except WRX-STi) ...................................... 7-15Shifting speeds ................................................. 7-15
Driving tips ........................................................ 7-17
Driver’s Control Center Differential (DCCD) (WRX-STi) ..................................... 7-18Auto mode ......................................................... 7-18
Manual mode ..................................................... 7-19
Temporary release ............................................ 7-21
Automatic transmission ............................... 7-21 Selector lever for automatic transmission ..... 7-22
Shift lock release .............................................. 7-26
Limited slip differential (LSD) (if equipped) 7-27 Power steering .............................................. 7-28
Braking ........................................................... 7-28
Braking tips ....................................................... 7-28
Brake system .................................................... 7-29
Disc brake pad wear warning indicators ........ 7-29
ABS (Anti-lock Brake System) ..................... 7-30 ABS system self-check .................................... 7-30
ABS warning light ............................................. 7-31
Electronic Brake Force Distribution (EBD) system ........................................................ 7-32Steps to take if EBD system fails .................... 7-33
Parking your vehicle ..................................... 7-34 Parking brake .................................................... 7-34
Parking tips ....................................................... 7-35
Cruise control ................................................ 7-37 To set cruise control ........................................ 7-37
To temporarily cancel the cruise control ....... 7-39
To turn off the cruise control ........................... 7-40
To change the cruising speed ......................... 7-40
Page 278 of 491
7-9
Starting and operating
– CONTINUED –
Preparing to drive
You should perform the following checks and adjust-
ments every day before you start driving.
1. Check that all windows, mirrors, and lights are
clean and unobstructed.
2. Check the appearance and condition of the tires.
Also check tires for proper inflation.
3. Look under the vehicle for any sign of leaks.
4. Check that the hood, trunk and rear gate are fully
closed.
5. Check the adjustment of the seat.
6. Check the adjustment of the inside and outside mir-
rors.
7. Fasten your seatbelt. Check that your passengers
have fastened their seatbelts.
8. Check the operation of the warning and indicator
lights when the ignition switch is turned to the “ON” po-sition.
9. Check the gauges, indicator and warning lights af-
ter starting the engine.
NOTE
Engine oil, engine coolant, brake fluid, washer flu-
id and other fluid levels should be checked daily,
weekly or at fuel stops.
Starting the engine
Do not operate the starter motor continuously
for more than ten seconds. If the engine fails to
start after operating the starter for five to ten
seconds, wait for ten seconds or more before
trying again.
! Manual transmission vehicle
1. Apply the parking brake.
2. Turn off unnecessary lights and accessories.
3. Press the clutch pedal to the floor and shift the shift
lever into neutral. Hold the clutch pedal to the floor
while starting the engine.
The starter motor will only operate when the clutch
pedal is pressed fully to the floor.
4. Turn the ignition switch to the “ON” position and
check the operation of the warning and indicator lights.
Refer to the “Warning and indicator lights” section (chapter 3).
5. Turn the ignition switch to the “START” position
without depressing the accelerator pedal. Release
the key immediately after the engine has started.
Page 279 of 491
7-10
Starting and operating
If the engine does not start within ten seconds, wait a
while and then turn the ignition switch to the “START”
position again while depressing the accelerator pedal
half way down.
6. Confirm that all warning and indicator lights have
gone off after the engine has started. The fuel injection
system automatically lowers the idle speed as the en-
gine warms up. !
Automatic transmission vehicle
1. Apply the parking brake.
2. Turn off unnecessary lights and accessories.
3. Shift the selector lever to the “P” or “N” position
(preferably “P” position).
The starter motor will only operate when the select le-
ver is at the “P” or “N” position.
4. Turn the ignition switch to the “ON” position and
check the operation of the warning and indicator lights.
Refer to the “Warning and indicator lights” section
(chapter 3).
5. Turn the ignition switch to the “START” position
without depressing the accelerator pedal. Release
the key immediately after the engine has started.
If the engine does not start within ten seconds, wait a
while and then turn the ignition switch to the “START”
position again while depressing the accelerator pedal half way down.
6. Confirm that all warning and indicator lights have
gone out after the engine has started. The fuel injec-
tion system automatically lowers the idle speed as the
engine warms up.
While the engine is warming up, make sure that the
selector lever is at the “P” or “N” position and that the
parking brake is applied.
If you restart the engine while the vehicle is
moving, shift the selector lever into the “N” po-
sition. Do not attempt to place the selector lever
of a moving vehicle into the “P” position.
! Starting the engine during cold weath- er below −4 °F ( −20 °C)
If the engine is difficult to start using the normal meth-
od (without depressing the accelerator pedal), turn the
ignition switch to the “START” position while slightly
depressing the accelerator pedal.
Page 288 of 491
7-19
Starting and operating
– CONTINUED –
suit driving and road-surface conditions. When the ig-
nition switch is turned ON, the “AUTO” indicator light
in the combination meter comes on. The system can
be switched to a manual mode. !Manual mode
The manual mode allows the driver to set the differen-
tial-action limiting factor of the center differential as
desired to suit driving and road-surface conditions.
When this mode is selected, the “AUTO” indicator light
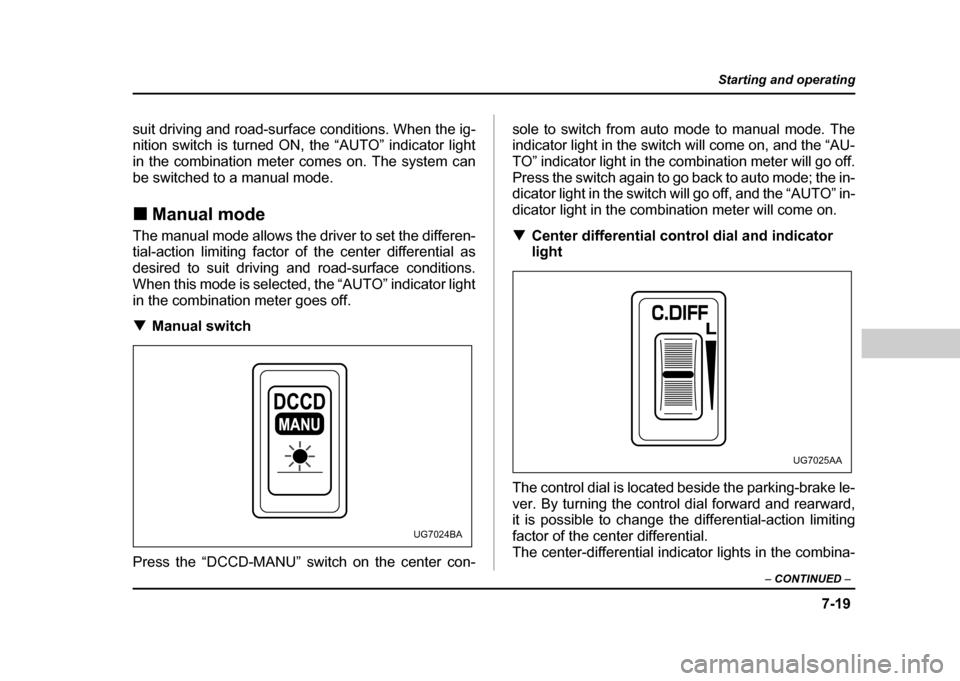
in the combination meter goes off. ! Manual switch
Press the “DCCD-MANU” switch on the center con- sole to switch from auto mode to manual mode. The
indicator light in the switch will come on, and the “AU-
TO” indicator light in the combination meter will go off.
Press the switch again to go back to auto mode; the in-
dicator light in the switch will go off, and the “AUTO” in-
dicator light in the combination meter will come on. !
Center differential control dial and indicator
light
The control dial is located beside the parking-brake le-
ver. By turning the control dial forward and rearward,
it is possible to change the differential-action limiting
factor of the center differential.
The center-differential indicator lights in the combina-
MANU
UG7024BA
UG7025AA
Page 290 of 491
7-21
Starting and operating
– CONTINUED –
mode.
NOTE "If the differential-limiting factor is large during
cornering maneuvers, a small speed difference
between the front and rear wheels may cause tight
corner braking (a phenomenon accompanied by
vibration and noise). This phenomenon does not
indicate a problem. It will disappear if the differen-
tial-action limiting factor is reduced. " Use the center-differential indicator light only as
a rough indication of the differential-action limit-
ing factor. ! Temporary release
When the driver stop the vehicle and pulls the parking-
brake lever after manually setting the differential-ac-
tion limiting factor, the factor is temporarily minimized.
The indicator in the combination meter continues to
show the driver’s selected differential-action limiting
factor. When the driver releases the parking-brake le-
ver, the factor set by the driver is restored.
Automatic transmission
The automatic transmission is electronically controlled
with 4-forward speeds and 1-reverse speed.
NOTE
Immediately after a disconnected battery is recon-
nected or ATF (automatic transmission fluid) is re-
placed, you may feel that the automatic transmis-
sion operation is somewhat unusual.
This results from erasure or invalidation of data
the on-board computer has collected and stored in
memory to allow the transmission to shift at the
most appropriate times for the current condition
of your vehicle. Optimized shifting will be restored
as the vehicle continues to be driven for a while.
Do not shift from the “P” or “N” position into
the “D”, “3”, “2”, “1” or “R” position while de-
pressing the accelerator pedal. This may cause
the vehicle to jump forward or backward.
" Shift into the “P” or “R” position only after
Page 292 of 491
7-23
Starting and operating
– CONTINUED –
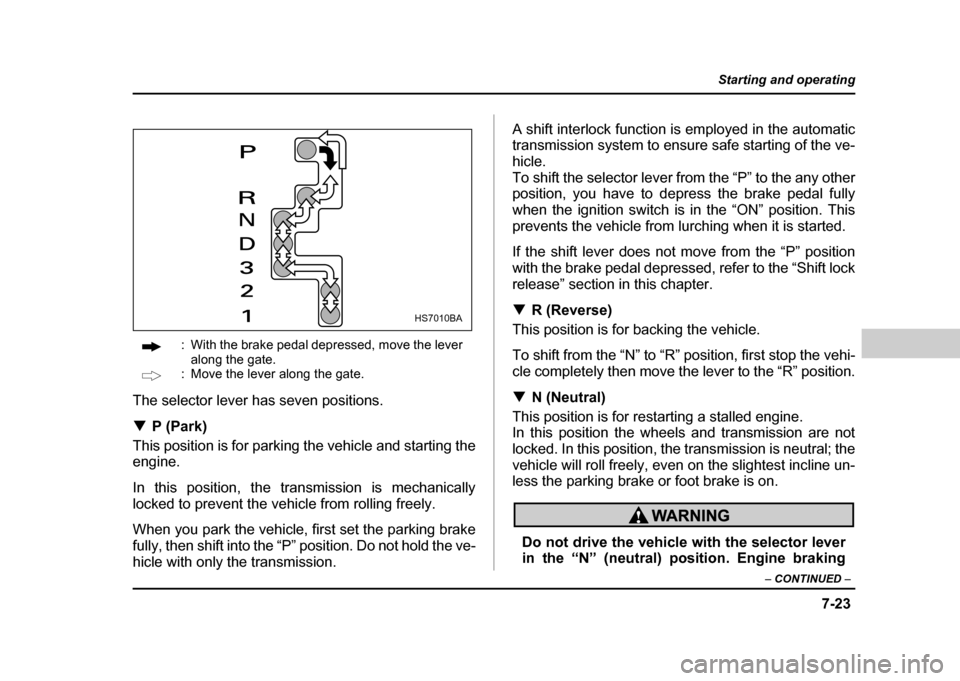
: With the brake pedal depressed, move the lever
along the gate.
: Move the lever along the gate.
The selector lever has seven positions. ! P (Park)
This position is for parking the vehicle and starting the
engine.
In this position, the transmission is mechanically
locked to prevent the vehicle from rolling freely.
When you park the vehicle, first set the parking brake
fully, then shift into the “P” position. Do not hold the ve-
hicle with only the transmission. A shift interlock function is employed in the automatic
transmission system to ensure safe starting of the ve-
hicle.
To shift the selector lever from the “P” to the any other
position, you have to depress the brake pedal fully
when the ignition switch is in the “ON” position. This
prevents the vehicle from lurching when it is started.
If the shift lever does not move from the “P” position
with the brake pedal depressed, refer to the “Shift lock
release” section in this chapter. !
R (Reverse)
This position is for backing the vehicle.
To shift from the “N” to “R” position, first stop the vehi-
cle completely then move the lever to the “R” position. ! N (Neutral)
This position is for restarting a stalled engine.
In this position the wheels and transmission are not
locked. In this position, the transmission is neutral; the
vehicle will roll freely, even on the slightest incline un-
less the parking brake or foot brake is on.
Do not drive the vehicle with the selector lever
in the “N” (neutral) position. Engine braking
HS7010BA
Page 297 of 491

7-28
Starting and operating
Power steering
The power steering system operates only when the
engine is running.
If you lose power steering assist because the engine
stops or the system fails to function, you can steer butit will take much more effort.
NOTE
Right after the engine has been started and before
it has warmed up, you may hear a noise coming
from areas adjacent to the power steering pump
which is located at the right-front area of the en-
gine compartment. This noise is normal. It does
not indicate power steering system trouble.
Do not hold the steering wheel at the fully
locked position left or right for more than five
seconds. This may damage the power steering
pump.
Braking !
Braking tips
Never rest your foot on the brake pedal while
driving. This can cause dangerous overheating
of the brakes and needless wear on the brake
pads and linings.
! When the brakes get wet
When driving in rain or after washing the vehicle, the
brakes may get wet. As a result, brake stopping dis-
tance will be longer. To dry the brakes, drive the vehi-
cle at a safe speed while lightly depressing the brake
pedal to heat up the brakes. ! Use of engine braking
Remember to make use of engine braking in addition
to foot braking. When descending a grade, if only the
foot brake is used, the brakes may start working im-
properly because of brake fluid overheating, caused
by overheated brake pads. To help prevent this, shift
into a lower gear to get stronger engine braking.
Page 299 of 491
7-30
Starting and operating
ABS (Anti-lock Brake System)
The ABS system prevents the lock-up of wheels which
may occur during sudden braking or braking on slip-
pery road surfaces. This helps prevent the loss of
steering control and directional stability caused by
wheel lock-up.
When the ABS system is operating, you may hear a
chattering noise or feel a slight vibration in the brake
pedal. This is normal when the ABS operates.
The ABS system will not operate when the vehicle
speed is below approximately 6 mph (10 km/h).
Always use the utmost care in driving – over-
confidence because you are driving with an
ABS equipped vehicle could easily lead to a se-
rious accident.
"
The ABS system does not always decrease
stopping distance. You should always main-
tain a safe following distance from other vehi- cles. "
When driving on badly surfaced roads, gravel
roads, icy roads, or over deep newly fallen
snow, stopping distances may be longer for a
vehicle with the ABS system than one without.
When driving under these conditions, there-
fore, reduce your speed and leave ample dis-
tance from other vehicles. " When you feel the ABS system operating,
you should maintain constant brake pedal pres-
sure. Do not pump the brake pedal since doing
so may defeat the operation of the ABS system.
! ABS system self-check
You may feel a slight shock in the brake pedal and hear the operating sound of ABS from the engine com-
partment just after the vehicle is started. This is
caused by an automatic functional test of the ABS sys-
tem being carried out and does not indicate any abnor-
mal condition.