2004 SUBARU FORESTER length
[x] Cancel search: lengthPage 872 of 2870
ME(H4SO)-3
MECHANICAL
General Description
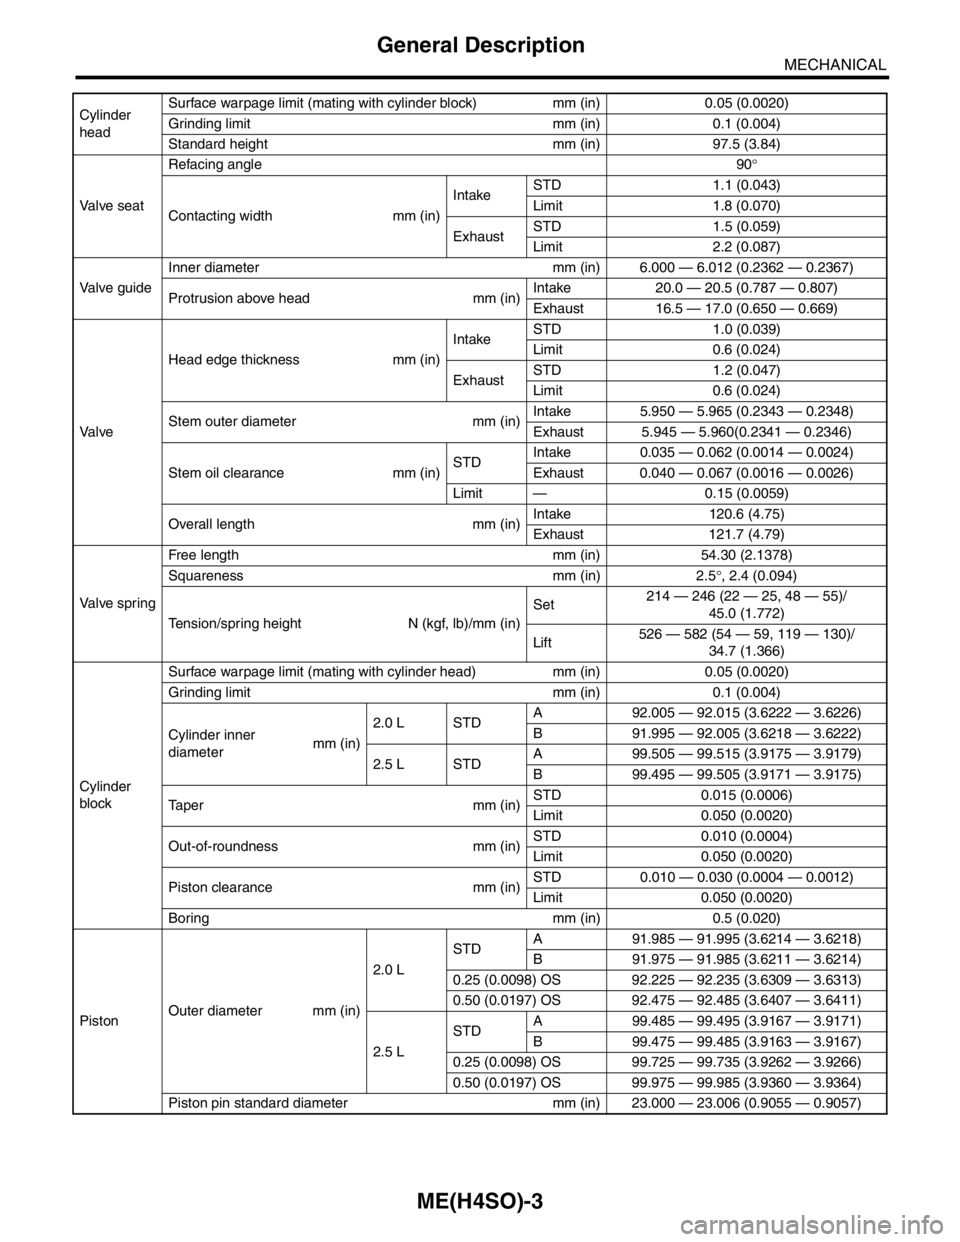
Cylinder
headSurface warpage limit (mating with cylinder block) mm (in) 0.05 (0.0020)
Grinding limit mm (in) 0.1 (0.004)
Standard height mm (in) 97.5 (3.84)
Va l ve s e a tRefacing angle90°
Contacting width mm (in)IntakeSTD 1.1 (0.043)
Limit 1.8 (0.070)
ExhaustSTD 1.5 (0.059)
Limit 2.2 (0.087)
Valve guideInner diameter mm (in) 6.000 — 6.012 (0.2362 — 0.2367)
Protrusion above head mm (in)Intake 20.0 — 20.5 (0.787 — 0.807)
Exhaust 16.5 — 17.0 (0.650 — 0.669)
Va l veHead edge thickness mm (in)IntakeSTD 1.0 (0.039)
Limit 0.6 (0.024)
ExhaustSTD 1.2 (0.047)
Limit 0.6 (0.024)
Stem outer diameter mm (in)Intake 5.950 — 5.965 (0.2343 — 0.2348)
Exhaust 5.945 — 5.960(0.2341 — 0.2346)
Stem oil clearance mm (in)STDIntake 0.035 — 0.062 (0.0014 — 0.0024)
Exhaust 0.040 — 0.067 (0.0016 — 0.0026)
Limit — 0.15 (0.0059)
Overall length mm (in)Intake 120.6 (4.75)
Exhaust 121.7 (4.79)
Valve springFree length mm (in) 54.30 (2.1378)
Squareness mm (in) 2.5°, 2.4 (0.094)
Tension/spring height N (kgf, lb)/mm (in)Set214 — 246 (22 — 25, 48 — 55)/
45.0 (1.772)
Lift526 — 582 (54 — 59, 119 — 130)/
34.7 (1.366)
Cylinder
blockSurface warpage limit (mating with cylinder head) mm (in) 0.05 (0.0020)
Grinding limit mm (in) 0.1 (0.004)
Cylinder inner
diametermm (in)2.0 L STDA 92.005 — 92.015 (3.6222 — 3.6226)
B 91.995 — 92.005 (3.6218 — 3.6222)
2.5 L STDA 99.505 — 99.515 (3.9175 — 3.9179)
B 99.495 — 99.505 (3.9171 — 3.9175)
Ta p e r m m ( i n )STD 0.015 (0.0006)
Limit 0.050 (0.0020)
Out-of-roundness mm (in)STD 0.010 (0.0004)
Limit 0.050 (0.0020)
Piston clearance mm (in)STD 0.010 — 0.030 (0.0004 — 0.0012)
Limit 0.050 (0.0020)
Boring mm (in) 0.5 (0.020)
PistonOuter diameter mm (in)2.0 LSTDA 91.985 — 91.995 (3.6214 — 3.6218)
B 91.975 — 91.985 (3.6211 — 3.6214)
0.25 (0.0098) OS 92.225 — 92.235 (3.6309 — 3.6313)
0.50 (0.0197) OS 92.475 — 92.485 (3.6407 — 3.6411)
2.5 LSTDA 99.485 — 99.495 (3.9167 — 3.9171)
B 99.475 — 99.485 (3.9163 — 3.9167)
0.25 (0.0098) OS 99.725 — 99.735 (3.9262 — 3.9266)
0.50 (0.0197) OS 99.975 — 99.985 (3.9360 — 3.9364)
Piston pin standard diameter mm (in) 23.000 — 23.006 (0.9055 — 0.9057)
Page 873 of 2870
ME(H4SO)-4
MECHANICAL
General Description
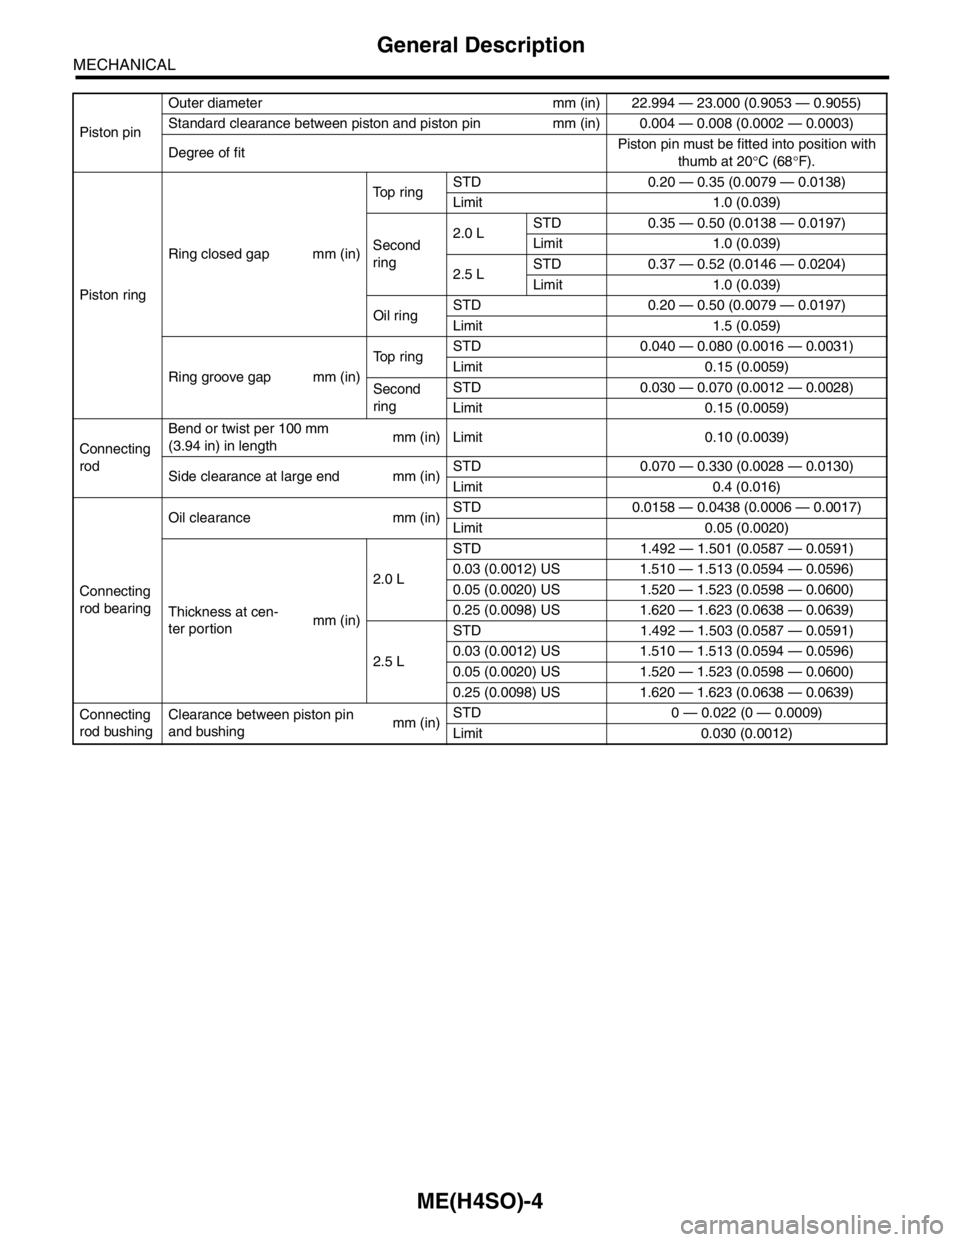
Piston pinOuter diameter mm (in) 22.994 — 23.000 (0.9053 — 0.9055)
Standard clearance between piston and piston pin mm (in) 0.004 — 0.008 (0.0002 — 0.0003)
Degree of fitPiston pin must be fitted into position with
thumb at 20°C (68°F).
Piston ringRing closed gap mm (in)Top ringSTD 0.20 — 0.35 (0.0079 — 0.0138)
Limit 1.0 (0.039)
Second
ring2.0 LSTD 0.35 — 0.50 (0.0138 — 0.0197)
Limit 1.0 (0.039)
2.5 LSTD 0.37 — 0.52 (0.0146 — 0.0204)
Limit 1.0 (0.039)
Oil ringSTD 0.20 — 0.50 (0.0079 — 0.0197)
Limit 1.5 (0.059)
Ring groove gap mm (in)Top ringSTD 0.040 — 0.080 (0.0016 — 0.0031)
Limit 0.15 (0.0059)
Second
ringSTD 0.030 — 0.070 (0.0012 — 0.0028)
Limit 0.15 (0.0059)
Connecting
rodBend or twist per 100 mm
(3.94 in) in lengthmm (in) Limit 0.10 (0.0039)
Side clearance at large end mm (in)STD 0.070 — 0.330 (0.0028 — 0.0130)
Limit 0.4 (0.016)
Connecting
rod bearingOil clearance mm (in)STD 0.0158 — 0.0438 (0.0006 — 0.0017)
Limit 0.05 (0.0020)
Thickness at cen-
ter portionmm (in)2.0 LSTD 1.492 — 1.501 (0.0587 — 0.0591)
0.03 (0.0012) US 1.510 — 1.513 (0.0594 — 0.0596)
0.05 (0.0020) US 1.520 — 1.523 (0.0598 — 0.0600)
0.25 (0.0098) US 1.620 — 1.623 (0.0638 — 0.0639)
2.5 LSTD 1.492 — 1.503 (0.0587 — 0.0591)
0.03 (0.0012) US 1.510 — 1.513 (0.0594 — 0.0596)
0.05 (0.0020) US 1.520 — 1.523 (0.0598 — 0.0600)
0.25 (0.0098) US 1.620 — 1.623 (0.0638 — 0.0639)
Connecting
rod bushingClearance between piston pin
and bushingmm (in)STD 0 — 0.022 (0 — 0.0009)
Limit 0.030 (0.0012)
Page 917 of 2870
ME(H4SO)-48
MECHANICAL
Timing Belt
15.Timing Belt
A: REMOVAL
1. TIMING BELT
1) Remove the V-belt.
2) Remove the crank pulley.
3) Remove the belt cover.
4) Remove the timing belt guide. (MT model)
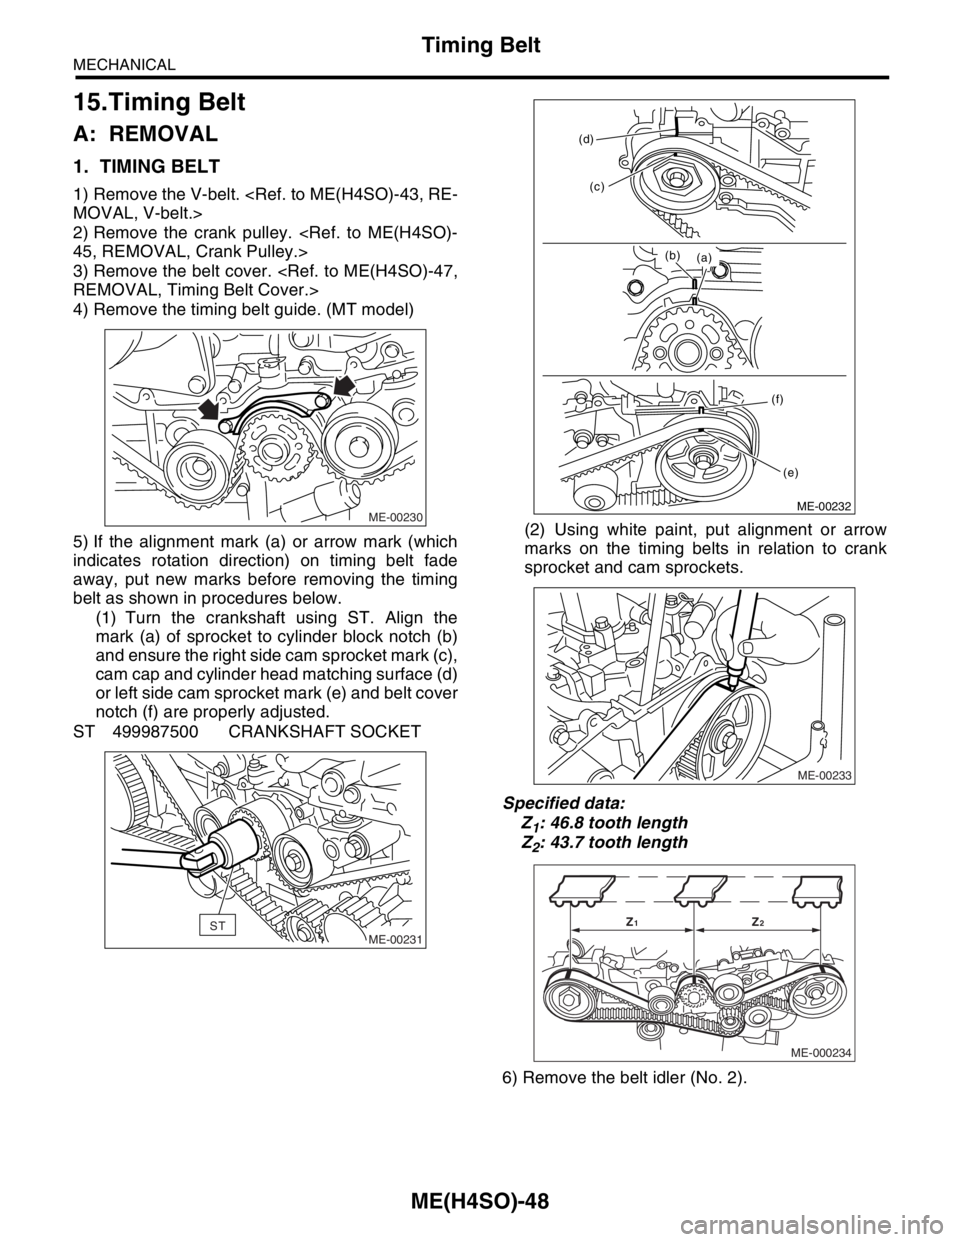
5) If the alignment mark (a) or arrow mark (which
indicates rotation direction) on timing belt fade
away, put new marks before removing the timing
belt as shown in procedures below.
(1) Turn the crankshaft using ST. Align the
mark (a) of sprocket to cylinder block notch (b)
and ensure the right side cam sprocket mark (c),
cam cap and cylinder head matching surface (d)
or left side cam sprocket mark (e) and belt cover
notch (f) are properly adjusted.
ST 499987500 CRANKSHAFT SOCKET(2) Using white paint, put alignment or arrow
marks on the timing belts in relation to crank
sprocket and cam sprockets.
Specified data:
Z
1: 46.8 tooth length
Z
2: 43.7 tooth length
6) Remove the belt idler (No. 2).
ME-00230
ME-00231ST
ME-00232
(a) (b) (d)
(c)
(f)
(e)
ME-00233
ME-000234
Z1Z2
Page 936 of 2870
ME(H4SO)-65
MECHANICAL
Cylinder Head
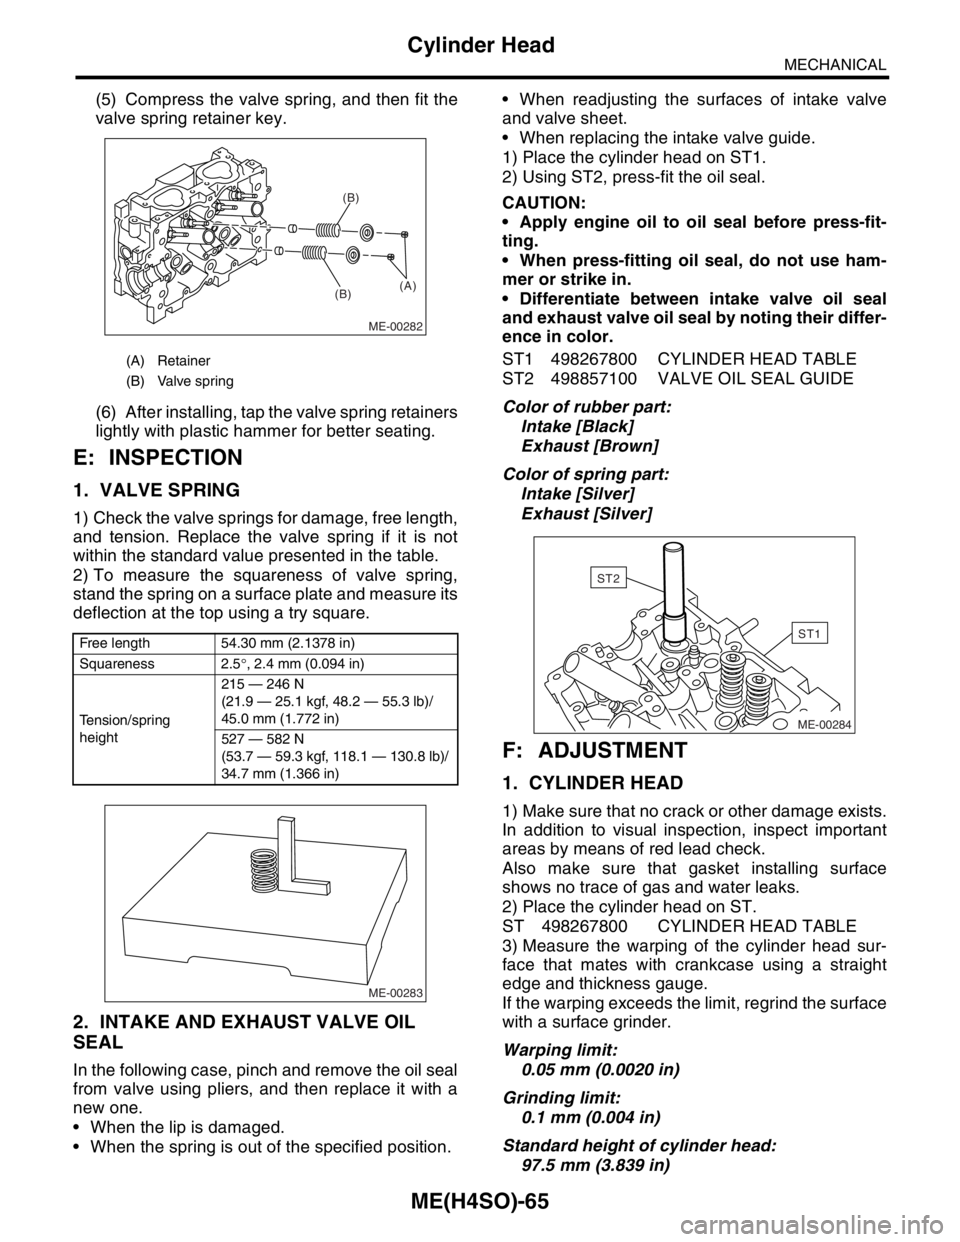
(5) Compress the valve spring, and then fit the
valve spring retainer key.
(6) After installing, tap the valve spring retainers
lightly with plastic hammer for better seating.
E: INSPECTION
1. VALVE SPRING
1) Check the valve springs for damage, free length,
and tension. Replace the valve spring if it is not
within the standard value presented in the table.
2) To measure the squareness of valve spring,
stand the spring on a surface plate and measure its
deflection at the top using a try square.
2. INTAKE AND EXHAUST VALVE OIL
SEAL
In the following case, pinch and remove the oil seal
from valve using pliers, and then replace it with a
new one.
When the lip is damaged.
When the spring is out of the specified position. When readjusting the surfaces of intake valve
and valve sheet.
When replacing the intake valve guide.
1) Place the cylinder head on ST1.
2) Using ST2, press-fit the oil seal.
CAUTION:
Apply engine oil to oil seal before press-fit-
ting.
When press-fitting oil seal, do not use ham-
mer or strike in.
Differentiate between intake valve oil seal
and exhaust valve oil seal by noting their differ-
ence in color.
ST1 498267800 CYLINDER HEAD TABLE
ST2 498857100 VALVE OIL SEAL GUIDE
Color of rubber part:
Intake [Black]
Exhaust [Brown]
Color of spring part:
Intake [Silver]
Exhaust [Silver]
F: ADJUSTMENT
1. CYLINDER HEAD
1) Make sure that no crack or other damage exists.
In addition to visual inspection, inspect important
areas by means of red lead check.
Also make sure that gasket installing surface
shows no trace of gas and water leaks.
2) Place the cylinder head on ST.
ST 498267800 CYLINDER HEAD TABLE
3) Measure the warping of the cylinder head sur-
face that mates with crankcase using a straight
edge and thickness gauge.
If the warping exceeds the limit, regrind the surface
with a surface grinder.
Warping limit:
0.05 mm (0.0020 in)
Grinding limit:
0.1 mm (0.004 in)
Standard height of cylinder head:
97.5 mm (3.839 in)
(A) Retainer
(B) Valve spring
Free length 54.30 mm (2.1378 in)
Squareness 2.5°, 2.4 mm (0.094 in)
Tension/spring
height215 — 246 N
(21.9 — 25.1 kgf, 48.2 — 55.3 lb)/
45.0 mm (1.772 in)
527 — 582 N
(53.7 — 59.3 kgf, 118.1 — 130.8 lb)/
34.7 mm (1.366 in)
ME-00282
(B)(B)
(A)
ME-00283
ME-00284
ST1
ST2
Page 939 of 2870
ME(H4SO)-68
MECHANICAL
Cylinder Head
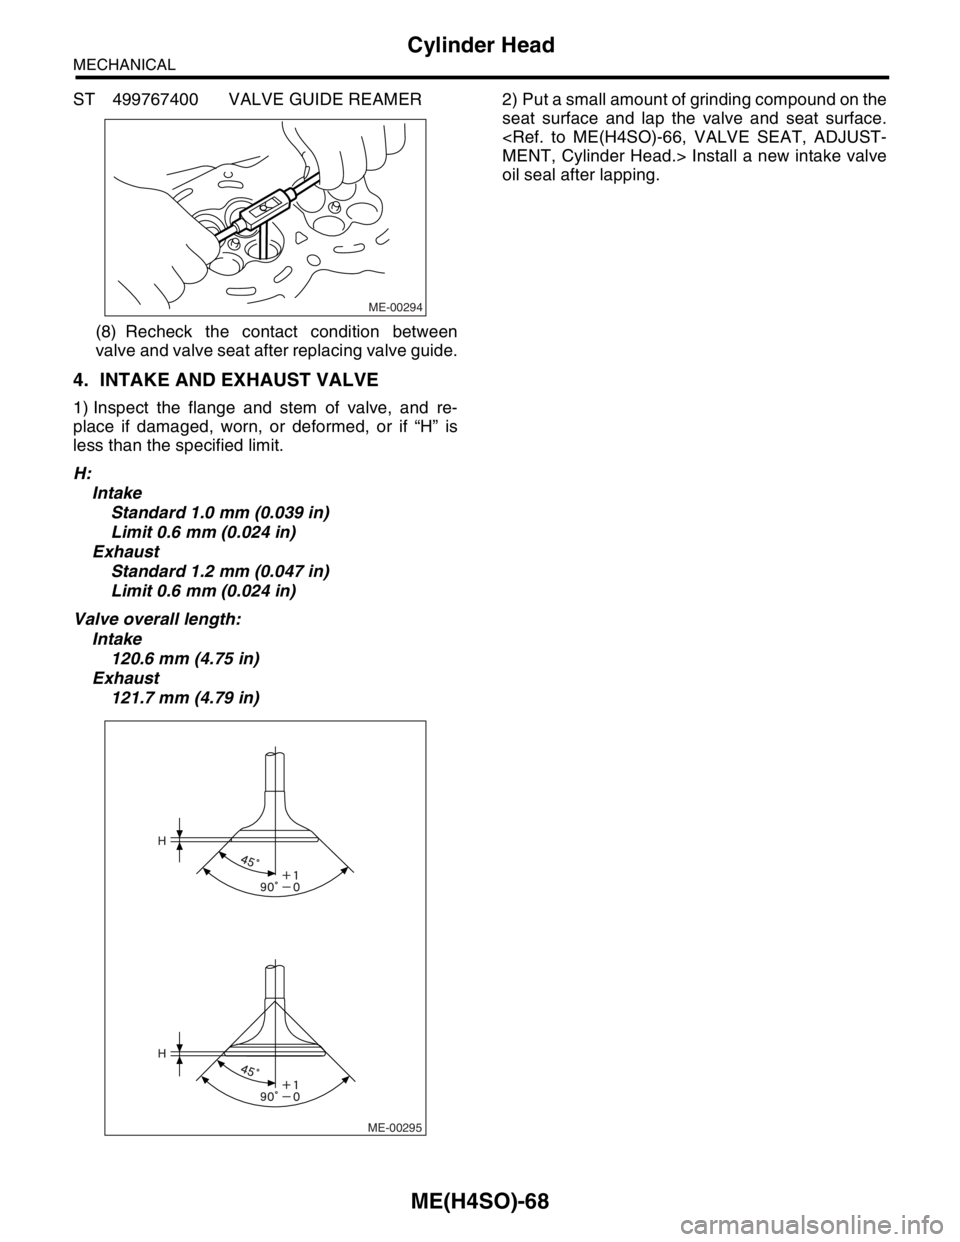
ST 499767400 VALVE GUIDE REAMER
(8) Recheck the contact condition between
valve and valve seat after replacing valve guide.
4. INTAKE AND EXHAUST VALVE
1) Inspect the flange and stem of valve, and re-
place if damaged, worn, or deformed, or if “H” is
less than the specified limit.
H:
Intake
Standard 1.0 mm (0.039 in)
Limit 0.6 mm (0.024 in)
Exhaust
Standard 1.2 mm (0.047 in)
Limit 0.6 mm (0.024 in)
Valve overall length:
Intake
120.6 mm (4.75 in)
Exhaust
121.7 mm (4.79 in)2) Put a small amount of grinding compound on the
seat surface and lap the valve and seat surface.
oil seal after lapping.
ME-00294
ME-00295
H
H
Page 958 of 2870
ME(H4SO)-87
MECHANICAL
Cylinder Block
2) Clean the piston ring groove and piston ring.
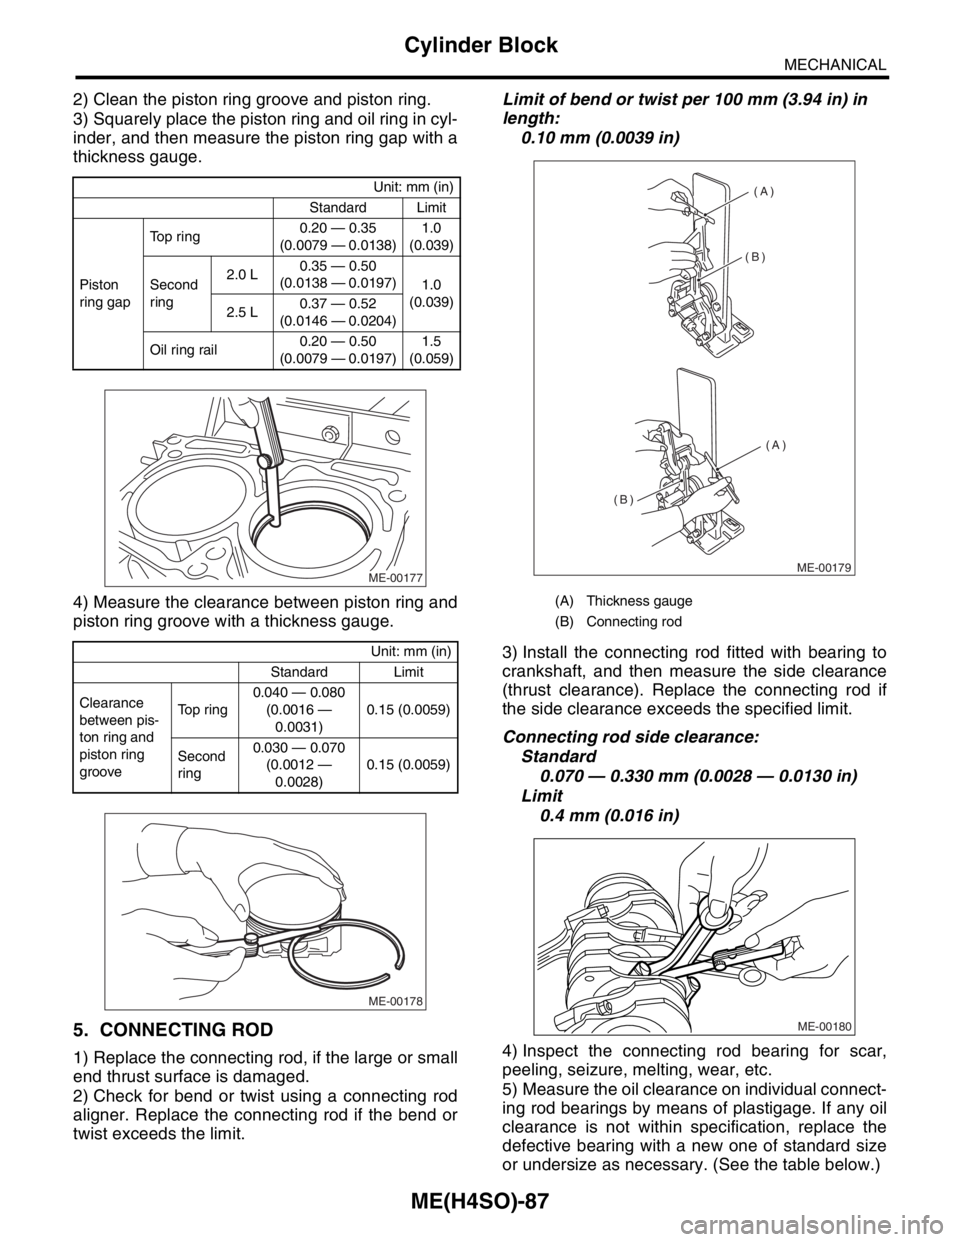
3) Squarely place the piston ring and oil ring in cyl-
inder, and then measure the piston ring gap with a
thickness gauge.
4) Measure the clearance between piston ring and
piston ring groove with a thickness gauge.
5. CONNECTING ROD
1) Replace the connecting rod, if the large or small
end thrust surface is damaged.
2) Check for bend or twist using a connecting rod
aligner. Replace the connecting rod if the bend or
twist exceeds the limit.Limit of bend or twist per 100 mm (3.94 in) in
length:
0.10 mm (0.0039 in)
3) Install the connecting rod fitted with bearing to
crankshaft, and then measure the side clearance
(thrust clearance). Replace the connecting rod if
the side clearance exceeds the specified limit.
Connecting rod side clearance:
Standard
0.070 — 0.330 mm (0.0028 — 0.0130 in)
Limit
0.4 mm (0.016 in)
4) Inspect the connecting rod bearing for scar,
peeling, seizure, melting, wear, etc.
5) Measure the oil clearance on individual connect-
ing rod bearings by means of plastigage. If any oil
clearance is not within specification, replace the
defective bearing with a new one of standard size
or undersize as necessary. (See the table below.)
Unit: mm (in)
Standard Limit
Piston
ring gapTop ring0.20 — 0.35
(0.0079 — 0.0138)1.0
(0.039)
Second
ring2.0 L0.35 — 0.50
(0.0138 — 0.0197)
1.0
(0.039)
2.5 L0.37 — 0.52
(0.0146 — 0.0204)
Oil ring rail0.20 — 0.50
(0.0079 — 0.0197)1.5
(0.059)
Unit: mm (in)
Standard Limit
Clearance
between pis-
ton ring and
piston ring
grooveTop ring0.040 — 0.080
(0.0016 —
0.0031)0.15 (0.0059)
Second
ring0.030 — 0.070
(0.0012 —
0.0028)0.15 (0.0059)
ME-00177
ME-00178
(A) Thickness gauge
(B) Connecting rod
(A)
(A) (B)
(B)
ME-00179
ME-00180
Page 1043 of 2870
LU(H4SO)-15
LUBRICATION
Oil Pump
E: INSPECTION
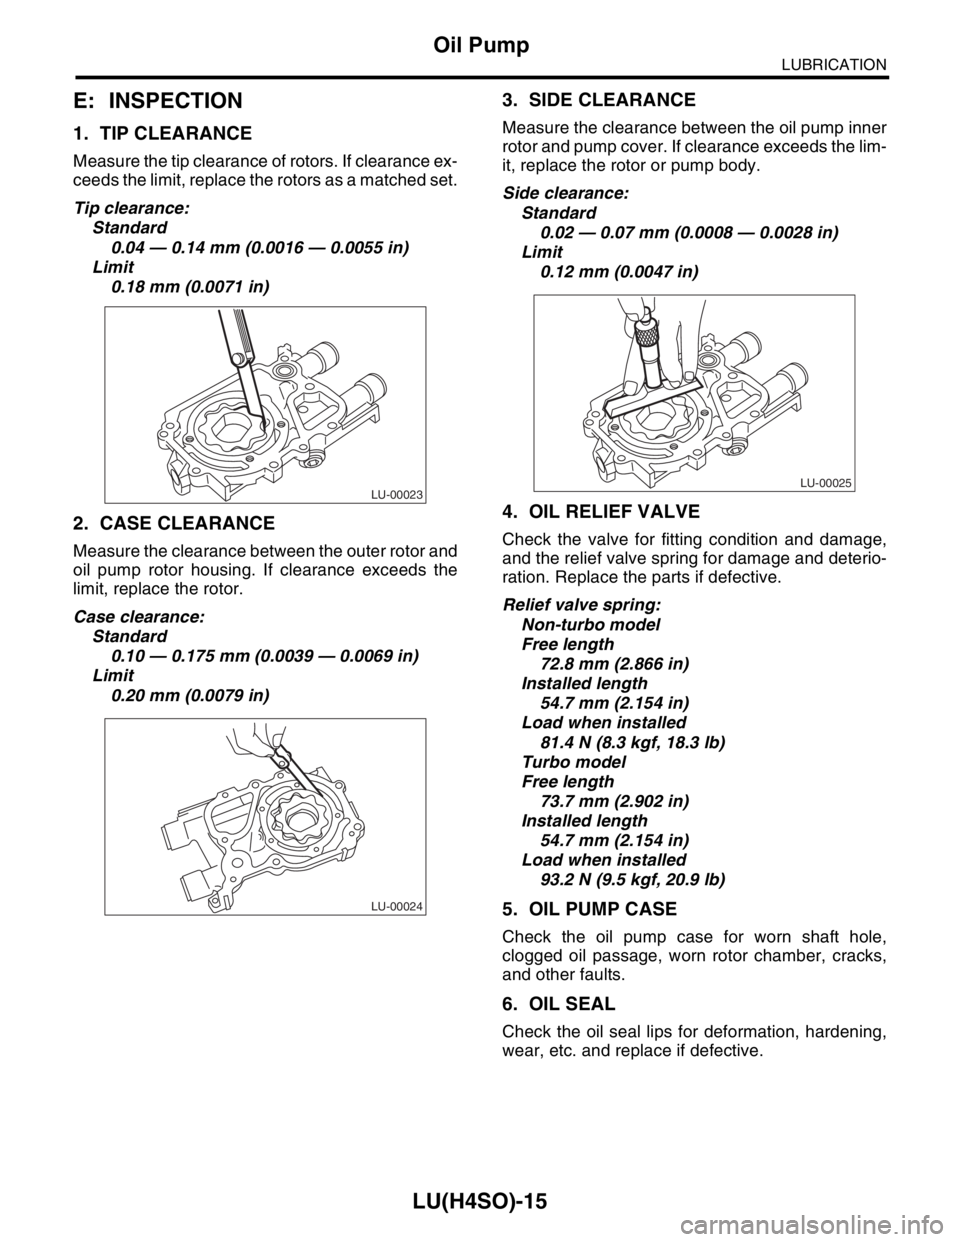
1. TIP CLEARANCE
Measure the tip clearance of rotors. If clearance ex-
ceeds the limit, replace the rotors as a matched set.
Tip clearance:
Standard
0.04 — 0.14 mm (0.0016 — 0.0055 in)
Limit
0.18 mm (0.0071 in)
2. CASE CLEARANCE
Measure the clearance between the outer rotor and
oil pump rotor housing. If clearance exceeds the
limit, replace the rotor.
Case clearance:
Standard
0.10 — 0.175 mm (0.0039 — 0.0069 in)
Limit
0.20 mm (0.0079 in)
3. SIDE CLEARANCE
Measure the clearance between the oil pump inner
rotor and pump cover. If clearance exceeds the lim-
it, replace the rotor or pump body.
Side clearance:
Standard
0.02 — 0.07 mm (0.0008 — 0.0028 in)
Limit
0.12 mm (0.0047 in)
4. OIL RELIEF VALVE
Check the valve for fitting condition and damage,
and the relief valve spring for damage and deterio-
ration. Replace the parts if defective.
Relief valve spring:
Non-turbo model
Free length
72.8 mm (2.866 in)
Installed length
54.7 mm (2.154 in)
Load when installed
81.4 N (8.3 kgf, 18.3 lb)
Turbo model
Free length
73.7 mm (2.902 in)
Installed length
54.7 mm (2.154 in)
Load when installed
93.2 N (9.5 kgf, 20.9 lb)
5. OIL PUMP CASE
Check the oil pump case for worn shaft hole,
clogged oil passage, worn rotor chamber, cracks,
and other faults.
6. OIL SEAL
Check the oil seal lips for deformation, hardening,
wear, etc. and replace if defective.
LU-00023
LU-00024
LU-00025
Page 1087 of 2870
SC(H4SO)-12
STARTING/CHARGING SYSTEM
Starter
2. YOKE
Make sure the pole is set in position.
3. OVERRUNNING CLUTCH
Inspect the teeth of pinion for wear and damage.
Replace if it is damaged. Rotate the pinion in direc-
tion of rotation (counterclockwise). It should rotate
smoothly. But in opposite direction, it should be
locked.
CAUTION:
Do not clean the overrunning clutch with oil to
prevent grease from flowing out.
4. BRUSH AND BRUSH HOLDER
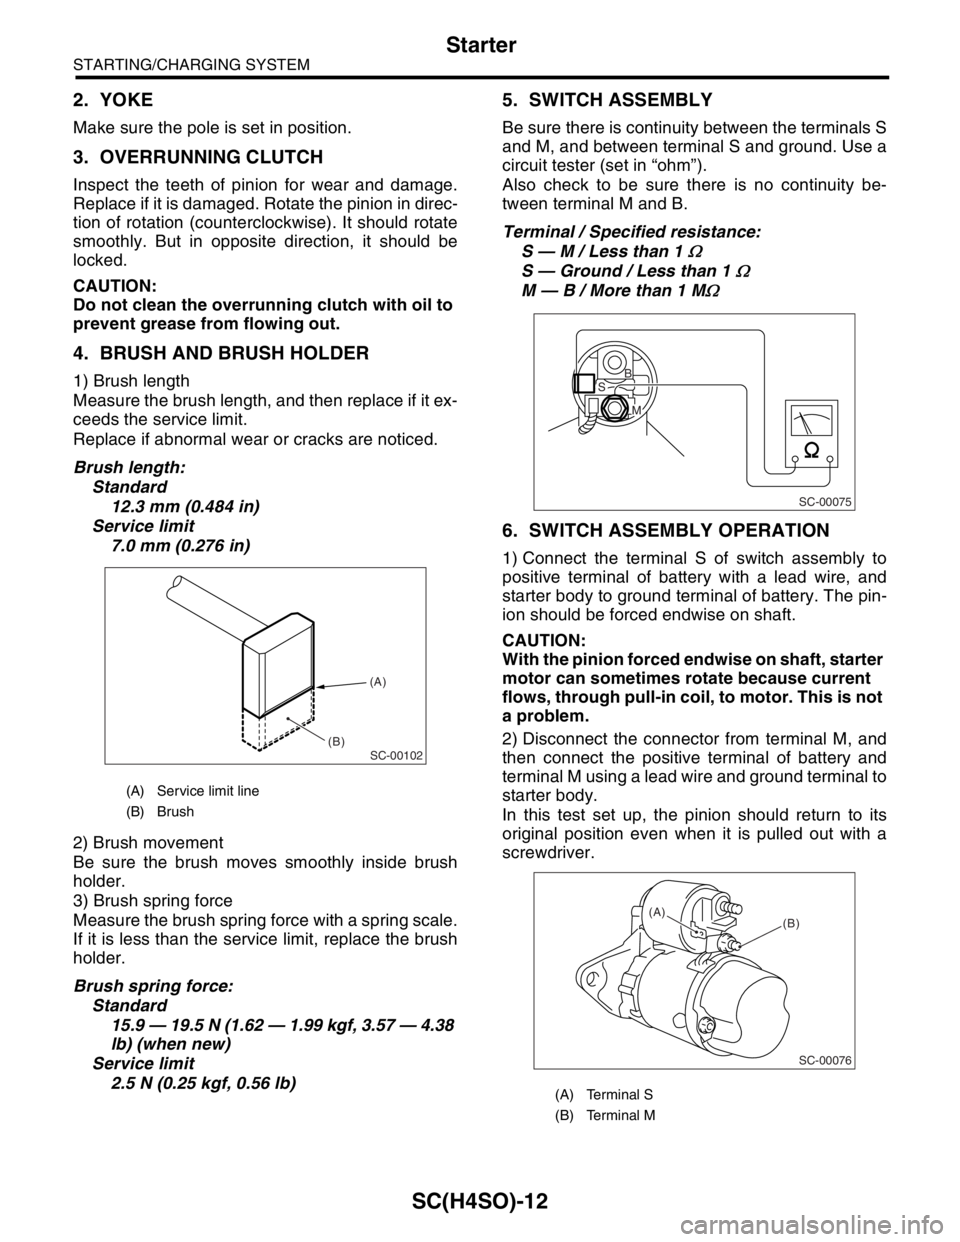
1) Brush length
Measure the brush length, and then replace if it ex-
ceeds the service limit.
Replace if abnormal wear or cracks are noticed.
Brush length:
Standard
12.3 mm (0.484 in)
Service limit
7.0 mm (0.276 in)
2) Brush movement
Be sure the brush moves smoothly inside brush
holder.
3) Brush spring force
Measure the brush spring force with a spring scale.
If it is less than the service limit, replace the brush
holder.
Brush spring force:
Standard
15.9 — 19.5 N (1.62 — 1.99 kgf, 3.57 — 4.38
lb) (when new)
Service limit
2.5 N (0.25 kgf, 0.56 lb)
5. SWITCH ASSEMBLY
Be sure there is continuity between the terminals S
and M, and between terminal S and ground. Use a
circuit tester (set in “ohm”).
Also check to be sure there is no continuity be-
tween terminal M and B.
Terminal / Specified resistance:
S — M / Less than 1
Ω
S — Ground / Less than 1 Ω
M — B / More than 1 MΩ
6. SWITCH ASSEMBLY OPERATION
1) Connect the terminal S of switch assembly to
positive terminal of battery with a lead wire, and
starter body to ground terminal of battery. The pin-
ion should be forced endwise on shaft.
CAUTION:
With the pinion forced endwise on shaft, starter
motor can sometimes rotate because current
flows, through pull-in coil, to motor. This is not
a problem.
2) Disconnect the connector from terminal M, and
then connect the positive terminal of battery and
terminal M using a lead wire and ground terminal to
starter body.
In this test set up, the pinion should return to its
original position even when it is pulled out with a
screwdriver.
(A) Service limit line
(B) Brush
SC-00102
(A)
(B)
(A) Terminal S
(B) Terminal M
SC-00075
B
M
S
SC-00076
(B) (A)