Page 76 of 370
Power Windows
If your vehicle has this
option, the switches
controlling the driver's
and passenger's windows
are located on the
driver's door.
The power window switch on each passenger door
controls that window only. These switches work while
the ignition is on.
For the front windows, press the front of a switch to
lower a window and lift the front of the switch to raise a
window. For the rear windows, the power window
lever is located on each door below the arm rest.AUTO (Express-Down):Press this switch all the way
down and release it to lower the driver's window
quickly.
Lock-Out:Press the
window lock-out button,
located next to the driver's
power door lock switch, to
disable the passenger's
power window switches.
Press the button again to
enable the window
switches.
The driver can still control the left front passenger
window with the lock-out button pressed.
2-12
Page 78 of 370

Arming the System
To arm the system, do the following:
1. Turn the ignition key to the LOCK position and
remove it.
2. Have all passengers get out of the vehicle.
3. Close and lock all the side doors and liftgate with
the key or remote keyless entry transmitter.
The indicator light located
on the instrument panel to
the left of the steering
wheel will come on when
all the side doors and
liftgate are closed
and locked.
The system will be automatically set after 30 seconds.
When the system is set, the indicator light will start
¯ashing.4. After the indicator light starts ¯ashing, you may
leave the vehicle.
Do not leave anyone in the vehicle when you set
the system, because unlocking the vehicle from the
inside will activate the system.
Testing the Alarm
To test the alarm, do the following:
1. Open all the windows.
2. Set the system as described in the previous
procedure. The side doors and liftgate should
be locked with the key or remote keyless entry
transmitter. Be sure to wait until the indicator light
starts ¯ashing.
3. Unlock the driver's door from the inside. The
system should activate the alarm.
4. Stop the alarm as described in the disarming
procedure.
5. Repeat this operation for the other doors. Also
check that the system is activated when the
battery terminal is disconnected and then
reconnected.
If the system does not work properly, have it
checked by your dealer.
2-14
Page 79 of 370

How the System Alarm is Activated
The system will activate the alarm under the following
conditions:
·If the driver's or front passenger's door is unlocked
or if any of the other side doors or the liftgate is
forcibly opened without the key or remote keyless
entry transmitter.
·If the battery terminal is disconnected and then
reconnected.
·If the ignition is hot-wired.
·If the side window glass is broken or damaged.
The indicator light will come on when the system
is activated.
If the driver's or front passenger's side doors are
unlocked without using the key or remote keyless entry
transmitter, the other side doors and the liftgate will
be automatically locked again.
After one minute the alarm will automatically stop and
the indicator light will start ¯ashing again.
Reactivating the System
Once the system is set, it will automatically reset the
alarm after the alarm stops. The alarm will activate again
under the same conditions as described earlier.
Disarming the System
The alarm can be disarmed by doing one of the
following:
·Turn the ignition key from LOCK to ON.
·Unlock any of the side doors with the key or with
the remote keyless entry transmitter.
If the liftgate or liftglass is opened with the key, the
system will still be activated.
2-15
Page 97 of 370
Engine Exhaust
{CAUTION:
Engine exhaust can kill. It contains the gas
carbon monoxide (CO), which you can't see or
smell. It can cause unconsciousness and death.
You might have exhaust coming in if:
·Your exhaust system sounds strange or
different.
·Your vehicle gets rusty underneath.
·Your vehicle was damaged in a collision.
·Your vehicle was damaged when driving
over high points on the road or over road
debris.
CAUTION: (Continued)
CAUTION: (Continued)
·
Repairs weren't done correctly.
·Your vehicle or exhaust system had been
modi®ed improperly.
If you ever suspect exhaust is coming into
your vehicle:
·Drive it only with all the windows down to
blow out any CO; and
·Have your vehicle ®xed immediately.
2-33
Page 109 of 370

The main components of your instrument panel are the
following:
A. Air Outlets. See
Outlet Adjustment on page 3-22.
B. Instrument Panel Cluster. See
Instrument Panel
Cluster on page 3-26.
C. Hazard Warning Flasher Button. See
Hazard
Warning Flashers on page 3-4.
D. Audio System. See
Audio System(s) on page 3-41.
E. Rear Window Defogger Button. See ªRear Window
Defoggerº under
Climate Control System on
page 3-19.
F. Front Passenger Safety Belt Reminder Light. See
Safety Belt Reminder Light on page 3-28.
G. Climate Control System. See
Climate Control
System on page 3-19.
H. Power Remote Control Mirror Button. See
Outside
Remote Control Mirrors on page 2-36.
I. Instrument Panel Brightness Control. See
ªInstrument Panel Brightnessº under
Interior Lamps
on page 3-14.
J. Rear Liftglass Release Button. See
Liftgate/Liftglass
on page 2-9.
K. Coinholder. See
Coinholder(s) on page 2-37.
L. Content Theft-Deterrent Security Light. See
Content
Theft-Deterrent on page 2-13.M. Storage Compartment. See
Instrument Panel
Storage Area on page 2-37.
N. Turn Signal/Multifunction Lever. See
Turn
Signal/Multifunction Lever on page 3-5.
O. Hood Release. See
Hood Release on page 5-10.
P. Tilt Lever. See
Tilt Wheel on page 3-5.
Q. Horn. See
Horn on page 3-5.
R. Cruise Control Lever (Option). See ªCruise Controlº
under
Turn Signal/Multifunction Lever on page 3-5.
S. Ignition Switch. See
Ignition Positions on page 2-16.
T. Windshield Wiper Lever. See ªWindshield Wipersº
under
Turn Signal/Multifunction Lever on page 3-5.
U. Cigarette Lighter. See
Ashtrays and Cigarette Lighter
on page 3-19.
V. Shift Lever. See
Shifting Into Park (P) on page 2-28.
W. Power Outlet. See
Power Outlet 115 Volt Alternating
Current on page 3-18.
X. Parking Brake. See
Parking Brake on page 2-27.
Y. Center Console Storage Area. See
Center Console
Storage Area on page 2-37.
Z. Glove Box. See
Glove Box on page 2-37.
3-3
Page 113 of 370
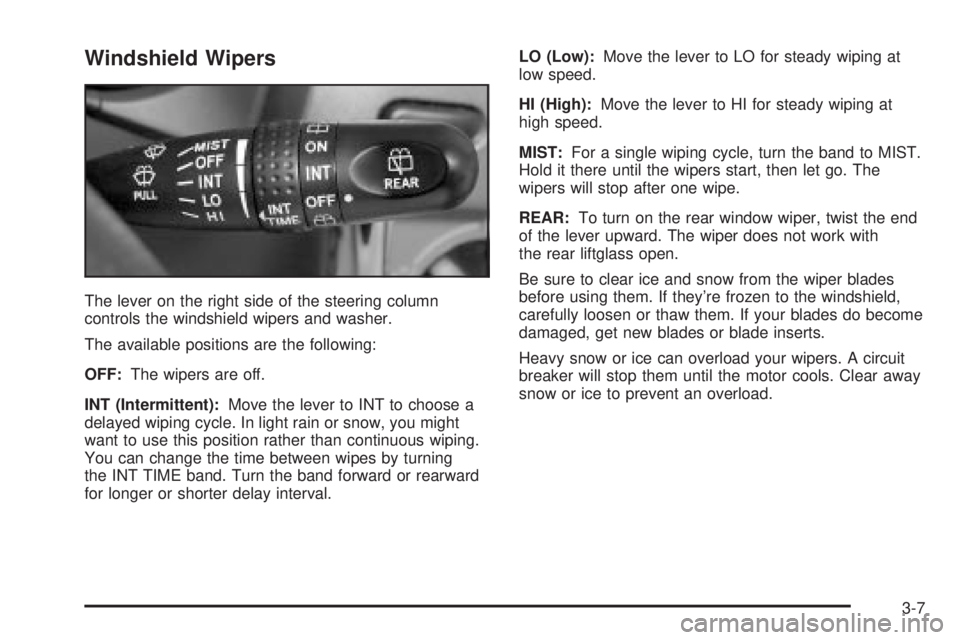
Windshield Wipers
The lever on the right side of the steering column
controls the windshield wipers and washer.
The available positions are the following:
OFF:The wipers are off.
INT (Intermittent):Move the lever to INT to choose a
delayed wiping cycle. In light rain or snow, you might
want to use this position rather than continuous wiping.
You can change the time between wipes by turning
the INT TIME band. Turn the band forward or rearward
for longer or shorter delay interval.LO (Low):Move the lever to LO for steady wiping at
low speed.
HI (High):Move the lever to HI for steady wiping at
high speed.
MIST:For a single wiping cycle, turn the band to MIST.
Hold it there until the wipers start, then let go. The
wipers will stop after one wipe.
REAR:To turn on the rear window wiper, twist the end
of the lever upward. The wiper does not work with
the rear liftglass open.
Be sure to clear ice and snow from the wiper blades
before using them. If they're frozen to the windshield,
carefully loosen or thaw them. If your blades do become
damaged, get new blades or blade inserts.
Heavy snow or ice can overload your wipers. A circuit
breaker will stop them until the motor cools. Clear away
snow or ice to prevent an overload.
3-7
Page 114 of 370
Windshield Washer
Pull the lever toward you to spray washer ¯uid on the
windshield. The spray will continue until you release the
lever. The wipers will run a few times. See
Windshield
Washer Fluid on page 5-39.
To squirt washer ¯uid on the rear window, twist the knob
upward and downward as far as it will go. The knob
automatically returns from these positions after you
release it. You can twist the lever downward to create a
large ¯ow of water on the rear window, then twist the
lever back up to wipe the window. This feature is helpful
to quickly clear the rear liftglass when very dirty.
{CAUTION:
In freezing weather, don't use your washer
until the windshield is warmed. Otherwise the
washer ¯uid can form ice on the windshield,
blocking your vision.
Cruise Control
The cruise control lever is located on the right side of
the steering wheel.
3-8
Page 126 of 370

To change the current mode, select one of the following:
H(Vent):This mode directs air to the upper
instrument panel outlets.
)(Bi-Level):This mode directs the air to the upper
instrument panel outlets, and to the ¯oor outlets.
6(Floor):This mode directs the air to the ¯oor outlets
and to the outboard outlets (for the side windows).
?(Recirculation):This mode keeps outside
air from coming in the vehicle. It can be used to prevent
outside air and odors from entering your vehicle or to
help heat or cool the air inside your vehicle more quickly.
Press this button, located in the center of the instrument
panel to the left of the audio system, to turn the
recirculation mode on or off. When the button is pressed,
an indicator light in the button will come on. Press the
button again to turn off recirculate and to circulate
outside air through the system. The indicator light will
go off. Recirculate is automatically turned off when
the climate control system mode knob is turned to defog
or defrost or is between modes.
Temperature Control:Turn the right knob clockwise or
counterclockwise to increase or decrease the
temperature inside your vehicle.A/C (Air Conditioning):Press this button, located in
the center of the instrument panel to the left of the audio
system, to turn the air-conditioning system on or off.
When A/C is pressed, an indicator light in the button will
come on to let you know that the air conditioning is
activated.
On hot days, open the windows to let hot inside air
escape; then close them. This helps to reduce the time
it takes for your vehicle to cool down. It also helps
the system to operate more efficiently.
For quick cool down on hot days:
1. Select the vent mode.
2. Select the recirculation mode.
3. Select A/C.
4. Select the coolest temperature.
5. Select the highest fan speed.
The air-conditioning system removes moisture from the
air, so you may sometimes notice a small amount of
water dripping underneath your vehicle while idling
or after turning off the engine. This is normal.
3-20


