2004 PONTIAC GRAND PRIX height
[x] Cancel search: heightPage 23 of 432

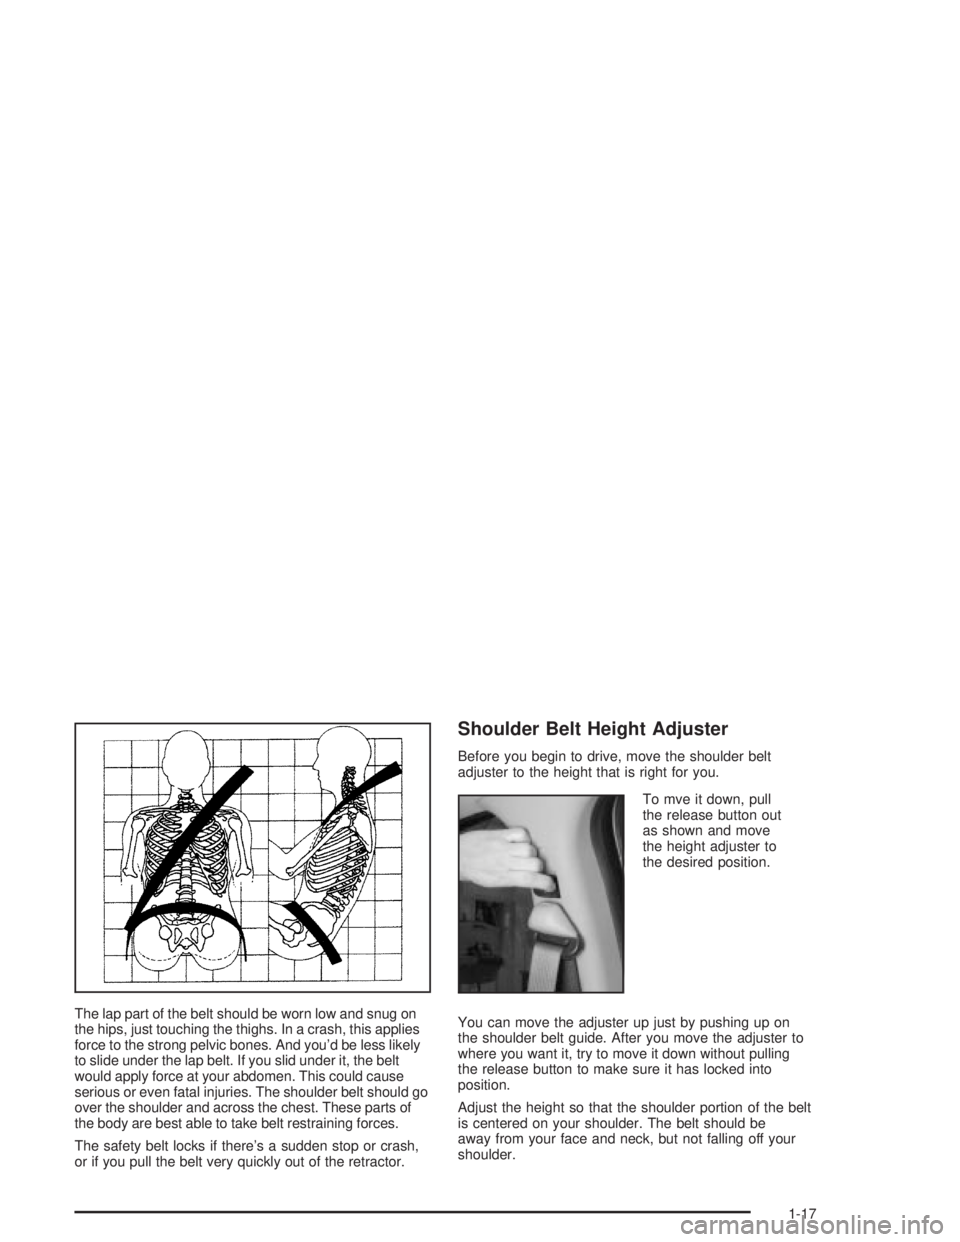
The lap part of the belt should be worn low and snug on
the hips, just touching the thighs. In a crash, this applies
force to the strong pelvic bones. And you'd be less likely
to slide under the lap belt. If you slid under it, the belt
would apply force at your abdomen. This could cause
serious or even fatal injuries. The shoulder belt should go
over the shoulder and across the chest. These parts of
the body are best able to take belt restraining forces.
The safety belt locks if there's a sudden stop or crash,
or if you pull the belt very quickly out of the retractor.
Shoulder Belt Height Adjuster
Before you begin to drive, move the shoulder belt
adjuster to the height that is right for you.
To mve it down, pull
the release button out
as shown and move
the height adjuster to
the desired position.
You can move the adjuster up just by pushing up on
the shoulder belt guide. After you move the adjuster to
where you want it, try to move it down without pulling
the release button to make sure it has locked into
position.
Adjust the height so that the shoulder portion of the belt
is centered on your shoulder. The belt should be
away from your face and neck, but not falling off your
shoulder.
1-17
Page 40 of 432

Q:What are the different types of add-on child
restraints?
A:Add-on child restraints, which are purchased by
the vehicle's owner, are available in four basic
types. Selection of a particular restraint should take
into consideration not only the child's weight,
height, and age but also whether or not the
restraint will be compatible with the motor vehicle
in which it will be used.
For most basic types of child restraints, there are
many different models available. When purchasing
a child restraint, be sure it is designed to be
used in a motor vehicle. If it is, the restraint will
have a label saying that it meets federal motor
vehicle safety standards.
The restraint manufacturer's instructions that come
with the restraint state the weight and height
limitations for a particular child restraint. In addition,
there are many kinds of restraints available for
children with special needs.
{CAUTION:
Newborn infants need complete support,
including support for the head and neck.
This is necessary because a newborn infant's
neck is weak and its head weighs so much
compared with the rest of its body. In a crash,
an infant in a rear-facing seat settles into
the restraint, so the crash forces can be
distributed across the strongest part of an
infant's body, the back and shoulders. Infants
always should be secured in appropriate infant
restraints.
1-34
Page 126 of 432

The HUD will ªrememberº the last display format
selected. When the vehicle is started if the last format
displayed was Format One or Format Three, then
Format One will be displayed.
If the last format was Format Two, then Format Two
will be displayed.
The HUD will automatically dim and brighten to
compensate for outside lighting.
The HUD display can temporarily light up depending on
the angle and position of the sunlight on the display.
This is normal and will change when the angle of
the sunlight on the HUD display changes.
Polarized sunglasses could also make the HUD image
harder to see.
Care of the HUD
Clean the inside of the windshield as needed to remove
any dirt or ®lm that reduces the sharpness or clarity
of the HUD image.
To clean the HUD, spray household glass cleaner on a
soft, clean cloth. Wipe the HUD lens gently, then dry
it. Do not spray cleaner directly on the lens because the
cleaner could leak into the unit.
If You Can't See the HUD Image When
the Ignition Is On
·Is anything covering the HUD unit?
·Is the HUD dimmer setting bright enough?
·Is the HUD image adjusted to the proper height?
·Are you wearing polarized sunglasses?
·Still no HUD image? Check the fuse in the
instrument panel fuse block. See
Fuses and Circuit
Breakers on page 5-99.
If the HUD Image Is Not Clear
·Is the HUD image too bright?
·Are the windshield and HUD lens clean?
The windshield is part of the HUD system. If you ever
need a new windshield, be sure to get one designed for
HUD. If you don't, the HUD image may look blurred
and out of focus.
3-22
Page 327 of 432

Brake Wear
Your vehicle has four-wheel disc brakes.
Disc brake pads have built-in wear indicators that make a
high-pitched warning sound when the brake pads are
worn and new pads are needed. The sound may come
and go or be heard all the time your vehicle is moving
(except when you are pushing on the brake pedal ®rmly).
{CAUTION:
The brake wear warning sound means that
soon your brakes won't work well. That could
lead to an accident. When you hear the brake
wear warning sound, have your vehicle
serviced.
Notice:Continuing to drive with worn-out brake
pads could result in costly brake repair.Some driving conditions or climates may cause a brake
squeal when the brakes are ®rst applied or lightly
applied. This does not mean something is wrong with
your brakes.
Properly torqued wheel nuts are necessary to help
prevent brake pulsation. When tires are rotated, inspect
brake pads for wear and evenly tighten wheel nuts in
the proper sequence to GM torque speci®cations.
Brake linings should always be replaced as complete
axle sets.
See
Brake System Inspection on page 6-15.
Brake Pedal Travel
See your dealer if the brake pedal does not return to
normal height, or if there is a rapid increase in
pedal travel. This could be a sign of brake trouble.
Brake Adjustment
Every time you apply the brakes, with or without the
vehicle moving, your brakes adjust for wear.
5-47
Page 356 of 432

Each new wheel should have the same load-carrying
capacity, diameter, width, offset and be mounted
the same way as the one it replaces.
If you need to replace any of your wheels, wheel bolts or
wheel nuts, replace them only with new GM original
equipment parts. This way, you will be sure to have the
right wheel, wheel bolts and wheel nuts for your vehicle.
{CAUTION:
Using the wrong replacement wheels, wheel
bolts or wheel nuts on your vehicle can be
dangerous. It could affect the braking and
handling of your vehicle, make your tires lose
air and make you lose control. You could have
a collision in which you or others could be
injured. Always use the correct wheel, wheel
bolts and wheel nuts for replacement.
Notice:The wrong wheel can also cause problems
with bearing life, brake cooling, speedometer or
odometer calibration, headlamp aim, bumper height,
vehicle ground clearance and tire or tire chain
clearance to the body and chassis.
See
Changing a Flat Tire on page 5-78for more
information.
Used Replacement Wheels
{CAUTION:
Putting a used wheel on your vehicle is
dangerous. You can't know how it's been
used or how far it's been driven. It could fail
suddenly and cause a crash. If you have to
replace a wheel, use a new GM original
equipment wheel.
5-76
Page 429 of 432

Setting the Time.............................................3-88
Setting the Tone (Bass/Treble).......3-92, 3-103, 3-117
Sheet Metal Damage.......................................5-95
Shifting Into Park (P).......................................2-28
Shifting Out of Park (P)...................................2-30
Shoulder Belt Height Adjuster...........................1-17
Skidding........................................................4-18
Some Other Rainy Weather Tips.......................4-22
Special Fabric Cleaning Problems.....................5-91
Speci®cations, Capacities...............................5-104
Speedometer..................................................3-33
Split Folding Rear Seat..................................... 1-8
Stabilitrak
žPlus System..................................4-13
STABILITY CONTROL ACTIVE.........................3-85
STABILITY CONTROL OFF..............................3-85
Starter Switch Check.......................................6-12
STARTING DISABLED DUE TO
ELECTRONIC THROTTLE CONTROL............3-86
STARTING DISABLED DUE TO
THEFT SYSTEM.........................................3-86
Starting Your Engine.......................................2-19
Steering........................................................4-14
Steering in Emergencies..................................4-15
Steering, Suspension and Front Drive Axle
Boot and Seal Inspection..............................6-14
Steering Tips..................................................4-14
Steering Wheel Controls, Audio.......................3-129Storage Areas
Center Console Storage Area........................2-37
Convenience Net.........................................2-38
Front Seat Storage Net................................2-37
Glove Box..................................................2-36
Overhead Console.......................................2-36
Storing the Flat Tire and Tools..........................5-87
Storing the Spare Tire and Tools.......................5-88
Stuck in Sand, Mud, Ice or Snow......................4-32
Sun Visors.....................................................2-13
Sunglasses Storage Compartment.....................2-37
Sunroof.........................................................2-39
T
3800 V6 Engine.............................................5-12
3800 V6 Supercharged Engine.........................5-14
Tachometer....................................................3-33
Taillamps
Turn Signal, and Stoplamps..........................5-64
TCS Warning Light..........................................3-38
Temperature...................................................3-27
THEFT SYSTEM NOT PROGRAMMED.............3-86
Theft-Deterrent, Radio....................................3-128
Theft-Deterrent Systems...................................2-14
Content Theft-Deterrent................................2-14
PASS-Key
žIII .............................................2-15
PASS-KeyžIII Operation..............................2-16
13