2004 PONTIAC GRAND PRIX climate control
[x] Cancel search: climate controlPage 1 of 432

Seats and Restraint Systems........................... 1-1
Front Seats
............................................... 1-2
Rear Seats
............................................... 1-8
Safety Belts
.............................................1-10
Child Restraints
.......................................1-29
Air Bag Systems
......................................1-48
Restraint System Check
............................1-56
Features and Controls..................................... 2-1
Keys
........................................................ 2-2
Doors and Locks
....................................... 2-7
Windows
.................................................2-12
Theft-Deterrent Systems
............................2-14
Starting and Operating Your Vehicle
...........2-18
Mirrors
....................................................2-33
OnStar
žSystem
......................................2-35
Storage Areas
.........................................2-36
Sunroof
..................................................2-39
Instrument Panel............................................. 3-1
Instrument Panel Overview
.......................... 3-2
Climate Controls
......................................3-25
Warning Lights, Gages and Indicators
.........3-31
Driver Information Center (DIC)
..................3-45
Audio System(s)
.......................................3-88Driving Your Vehicle....................................... 4-1
Your Driving, the Road, and Your Vehicle
..... 4-2
Towing
...................................................4-33
Service and Appearance Care.......................... 5-1
Service
..................................................... 5-3
Fuel
......................................................... 5-4
Checking Things Under the Hood
...............5-10
Headlamp Aiming
.....................................5-56
Bulb Replacement
....................................5-59
Windshield Wiper Blade Replacement
.........5-67
Tires
......................................................5-68
Appearance Care
.....................................5-90
Vehicle Identi®cation
.................................5-98
Electrical System
......................................5-99
Capacities and Speci®cations
...................5-104
Normal Maintenance Replacement Parts
......5-105
Maintenance Schedule..................................... 6-1
Maintenance Schedule
................................ 6-2
Customer Assistance Information.................... 7-1
Customer Assistance Information
.................. 7-2
Reporting Safety Defects
............................ 7-9
Index................................................................ 1
2004 Pontiac Grand Prix Owner ManualM
Page 4 of 432

Vehicle Damage Warnings
Also, in this book you will ®nd these notices:
Notice:These mean there is something that could
damage your vehicle.
A notice will tell you about something that can damage
your vehicle. Many times, this damage would not be
covered by your warranty, and it could be costly. But the
notice will tell you what to do to help avoid the
damage.
When you read other manuals, you might see CAUTION
and NOTICE warnings in different colors or in different
words.
You'll also see warning labels on your vehicle. They use
the same words, CAUTION or NOTICE.
Vehicle Symbols
Your vehicle has components and labels that use
symbols instead of text. Symbols, used on your vehicle,
are shown along with the text describing the operation
or information relating to a speci®c component, control,
message, gage or indicator.
If you need help ®guring out a speci®c name of a
component, gage or indicator, reference the following
topics:
·Seats and Restraint Systems in Section 1
·Features and Controls in Section 2
·Instrument Panel Overview in Section 3
·Climate Controls in Section 3
·Warning Lights, Gages and Indicators in Section 3
·Audio System(s) in Section 3
·Engine Compartment Overview in Section 5
iv
Page 11 of 432

Power Lumbar
If your vehicle has this feature, the power lumber
control lets you adjust the amount of support in the
lower seatback.
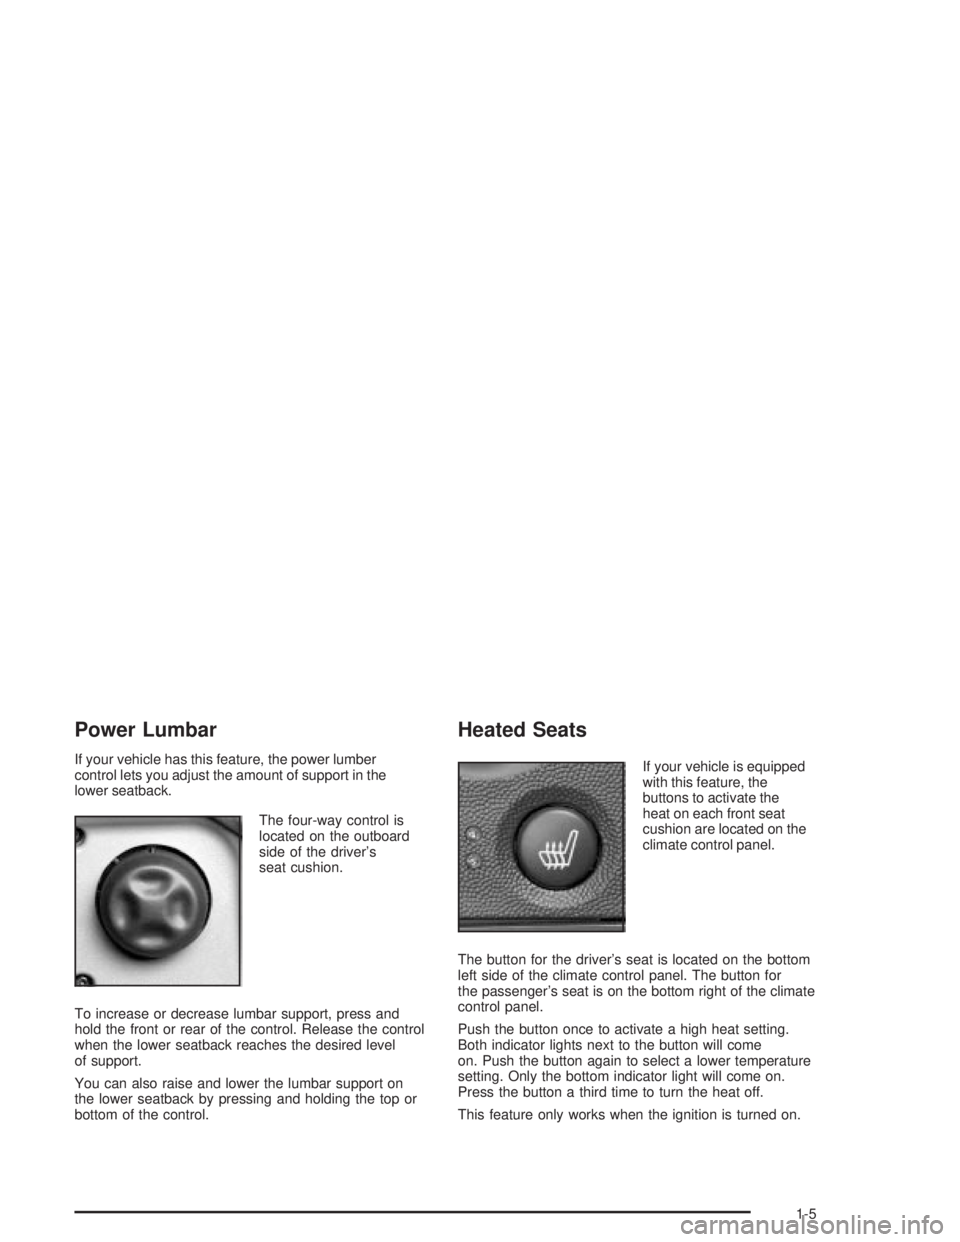
The four-way control is
located on the outboard
side of the driver's
seat cushion.
To increase or decrease lumbar support, press and
hold the front or rear of the control. Release the control
when the lower seatback reaches the desired level
of support.
You can also raise and lower the lumbar support on
the lower seatback by pressing and holding the top or
bottom of the control.
Heated Seats
If your vehicle is equipped
with this feature, the
buttons to activate the
heat on each front seat
cushion are located on the
climate control panel.
The button for the driver's seat is located on the bottom
left side of the climate control panel. The button for
the passenger's seat is on the bottom right of the climate
control panel.
Push the button once to activate a high heat setting.
Both indicator lights next to the button will come
on. Push the button again to select a lower temperature
setting. Only the bottom indicator light will come on.
Press the button a third time to turn the heat off.
This feature only works when the ignition is turned on.
1-5
Page 74 of 432

Trunk
{CAUTION:
It can be dangerous to drive with the trunk lid
open because carbon monoxide (CO) gas can
come into your vehicle. You can't see or smell
CO. It can cause unconsciousness and even
death. If you must drive with the trunk lid
open or if electrical wiring or other cable
connections must pass through the seal
between the body and the trunk lid:
·Make sure all other windows are shut.
·Turn the fan on your heating or cooling
system to its highest speed and select the
control setting that will force outside air
into your vehicle. See ªClimate Control
Systemº in the Index.
·If you have air outlets on or under the
instrument panel, open them all the way.
See ªEngine Exhaustº in the Index.
Trunk Lock
To unlock the trunk from the outside, insert the key into
the lock on the trunk and turn it clockwise. You can
also press the open trunk symbol on the remote keyless
entry transmitter. See
Remote Keyless Entry System
Operation on page 2-5for more information.
The ignition must be off, or, the transaxle must be in
PARK (P), in order for the trunk to open.
Remote Trunk Release
This feature is used to unlock the trunk from inside the
vehicle using the power door lock switch.
Press and hold the
power door lock switch
to the left for one and
one-half seconds to
unlock the trunk.
The transaxle must be in PARK (P) to activate the
trunk release.
2-10
Page 96 of 432

Running Your Engine While You
Are Parked
It's better not to park with the engine running. But if you
ever have to, here are some things to know.
{CAUTION:
Idling the engine with the climate control
system off could allow dangerous exhaust into
your vehicle. See the earlier Caution under
ªEngine Exhaust.º
Also, idling in a closed-in place can let deadly
carbon monoxide (CO) into your vehicle even if
the climate control fan is at the highest setting.
One place this can happen is a garage.
Exhaust Ð with CO Ð can come in easily.
NEVER park in a garage with the engine
running.
Another closed-in place can be a blizzard.
See ªWinter Drivingº in the Index.
{CAUTION:
It can be dangerous to get out of your vehicle
if the shift lever is not fully in PARK (P) with
the parking brake ®rmly set. Your vehicle can
roll. Don't leave your vehicle when the engine
is running unless you have to. If you've left
the engine running, the vehicle can move
suddenly. You or others could be injured.
To be sure your vehicle won't move, even
when you're on fairly level ground, always set
your parking brake and move the shift lever
to PARK (P).
Follow the proper steps to be sure your vehicle won't
move. See
Shifting Into Park (P) on page 2-28.
If you are parking on a hill and if you're pulling a trailer,
also see
Towing a Trailer on page 4-37.
2-32
Page 105 of 432

Instrument Panel Overview...............................3-2
Hazard Warning Flashers................................3-4
Other Warning Devices...................................3-5
Horn.............................................................3-5
Tilt Wheel.....................................................3-5
Windshield Washer Lever................................3-6
Cruise Control Lever.......................................3-8
Exterior Lamps.............................................3-12
Interior Lamps..............................................3-16
Head-Up Display (HUD).................................3-19
Accessory Power Outlets...............................3-23
Ashtrays and Cigarette Lighter........................3-24
Climate Controls............................................3-25
Climate Control System.................................3-25
Outlet Adjustment.........................................3-29
Warning Lights, Gages and Indicators.............3-31
Instrument Panel Cluster................................3-32
Speedometer and Odometer...........................3-33
Tachometer.................................................3-33
Safety Belt Reminder Light.............................3-34
Air Bag Readiness Light................................3-34
Up-Shift Light...............................................3-35
Brake System Warning Light..........................3-36
Anti-Lock Brake System Warning Light.............3-37
Traction Control System (TCS)
Warning Light...........................................3-38Enhanced Traction System Warning Light.........3-38
Engine Coolant Temperature Warning Light......3-39
Engine Coolant Temperature Gage..................3-39
Malfunction Indicator Lamp.............................3-40
Oil Pressure Light.........................................3-43
Fog Lamp Light............................................3-44
High-Beam On Light......................................3-44
Fuel Gage...................................................3-44
Driver Information Center (DIC).......................3-45
DIC Controls and Displays.............................3-45
DIC Warnings and Messages.........................3-65
Audio System(s).............................................3-88
Setting the Time...........................................3-88
Radio with CD..............................................3-89
Radio with Cassette and CD.........................3-100
Radio with Six-Disc CD................................3-114
Theft-Deterrent Feature................................3-128
Audio Steering Wheel Controls......................3-129
Understanding Radio Reception....................3-130
Care of Your Cassette Tape Player...............3-130
Care of Your CDs.......................................3-131
Care of Your CD Player...............................3-131
Backglass Antenna......................................3-132
XMŸ Satellite Radio Antenna System
(United States Only).................................3-132
Section 3 Instrument Panel
3-1
Page 107 of 432

The main components of the instrument panel are the following:
A. Side Window Defogger Outlets. (See
Outlet
Adjustment on page 3-29.)
B. Instrument Panel Outlets. (See
Outlet Adjustment
on page 3-29.)
C. Exterior Lamps Control. (See
Exterior Lamps on
page 3-12.)
D. TAP-ShiftŸ Control. (See
Automatic Transaxle
Operation on page 2-22.)
E. Hazard Warning Flashers Button. (See
Hazard
Warning Flashers on page 3-4.)
F. Instrument Panel Cluster. (See
Instrument Panel
Cluster on page 3-32.)
G. Windshield Wiper Lever. (See
Windshield Washer
Lever on page 3-6.)
H. Ignition. (See
Ignition Positions on page 2-18.)
I. DIC (Driver Information Center). (See
Driver
Information Center (DIC) on page 3-45.)J. Audio System. (See
Audio System(s) on page 3-88.)
K. Interior Lamps Brightness Control (Behind Steering
Wheel). (See
Interior Lamps on page 3-16.)
L. Audio Controls. (See
Audio System(s) on page 3-88.)
M. Hood Release. (See
Hood Release on page 5-11.)
N. Tilt Steering Wheel Lever (on Steering Column).
(See
Tilt Wheel on page 3-5.)
O. Cruise Control. (See
Cruise Control Lever on
page 3-8.)
P. Climate Controls. (See
Climate Control System
on page 3-25.)
Q. Storage Area.
R. Glove Box. (See
Glove Box on page 2-36.)
S. Instrument Panel Fuse Block.
(See
Fuses and Circuit Breakers on page 5-99.)
3-3
Page 129 of 432

Climate Controls
Climate Control System
Manual Climate Control System
The climate control system allows you to manually
control the heating, cooling and ventilation for the vehicle.
Fan
9
(Fan):Turn the knob by this symbol, located on
the left side of the climate control panel, clockwise or
counterclockwise to increase or decrease the fan speed.During the highest fan speed selections, the fan speed
will be temporarily reduced between the transition to a
new mode. The fan will resume the original speed when
the transition to the new mode is complete.
9(Off):Turn the knob to this position to turn the
fan off.
Mode
Turn the middle knob to select the following modes:
H(Vent) Outside Air:This mode directs outside air
to the instrument panel outlets. If you are in city traffic,
and the vehicle is stopped and idling, or the weather is
hot, you may switch from this mode to the recirculation
mode. To prevent the air inside the vehicle from
becoming stale, be sure to return to the vent mode
periodically.
)(Bi-Level):This mode directs half of the air to the
instrument panel outlets, and then directs the remaining
air to the ¯oor outlets. Some air may be directed toward
the windshield. Slightly cooler air is directed to the
instrument panel outlets and warmer air is directed to
the ¯oor outlets.
3-25