2004 PONTIAC BONNEVILLE CD player
[x] Cancel search: CD playerPage 219 of 446
If playing a CD-R the sound quality may be reduced
due to CD-R quality, the method of recording, the quality
of the music that has been recorded, and the way the
CD-R has been handled. You may experience an
increase in skipping, difficulty in �nding tracks, and/or
difficulty in loading and ejecting. If these problems occur
try a known good CD.
Do not add paper labels to CDs, they could get caught
in the CD player.
Do not play 3 inch CDs without a standard adapter CD.
If an error appears on the display, see “CD Messages”
later in this section.
\1 (Forward):Press and hold this pushbutton to
advance quickly within a track. You will hear sound at a
reduced volume. Release this button to play the
passage. The elapsed time of the track will appear on
the display.
RDM 3 (Random):Press this pushbutton to hear the
tracks in random, rather than sequential, order.
RDM and the track number will appear on the display.4
s(Reverse):Press and hold this pushbutton to
reverse quickly within a track. You will hear sound at a
reduced volume. Release this button to play the
passage. The elapsed time of the track will appear on
the display.
EQ (Equalizer):Press EQ to select the desired
customized equalization setting while playing a CD. The
equalization will be automatically set whenever you
play a CD. See “EQ” listed previously for more
information.
wSEEKx:Press the down arrow while playing a
CD to go to the start of the current track if more
than eight seconds have played. Press the up arrow to
go to the next track. If you hold either arrow or press
it more than once, the player will continue moving
backward or forward through the CD.
wSCANx:Press and hold either arrow for more
than two seconds until SCAN and the track number
appear on the display and you hear a beep. The CD will
go to the next track, play for a few seconds, then go
on to the next track. Press this button again to stop
scanning.
3-99
Page 220 of 446
RCL (Recall):Push this knob to see how long the
current track has been playing. To change the default
on the display (track or elapsed time), push the
knob until you see the display you want, then hold the
knob until the display �ashes. The selected display
will now be the default. While elapsed time is showing,
CD TIME will appear on the display.
BAND:Press this button to listen to the radio when a
cassette tape or CD is playing. The inactive tape or CD
will remain safely inside the radio for future listening.
CD TAPE:Press this button to play a cassette tape or
CD when listening to the radio. The cassette tape or
CD symbol will appear on the display when a tape or CD
is loaded.
Z(Eject):Press this button, located next to the CD
slot, to eject a CD. Eject may be activated with either
the ignition or radio off. CDs may be loaded with
the radio and ignition off if this button is pressed �rst.
CD Messages
CHECK CD:If this message appears on the display
and the CD comes out, it could be for one of the
following reasons:
It is very hot. When the temperature returns to
normal, the CD should play.
You are driving on a very rough road. When the
road becomes smooth, the CD should play.
The CD is dirty, scratched, wet, or upside down.
The air is very humid. If so, wait about an hour and
try again.
There may have been a problem while burning
the CD.
The label may be caught in the CD player.
If the CD is not playing correctly, for any other reason,
try a known good CD.
If any error occurs repeatedly or if an error cannot be
corrected, contact your dealer. If your radio displays an
error message, write it down and provide it to your
dealer when reporting the problem.
3-100
Page 222 of 446
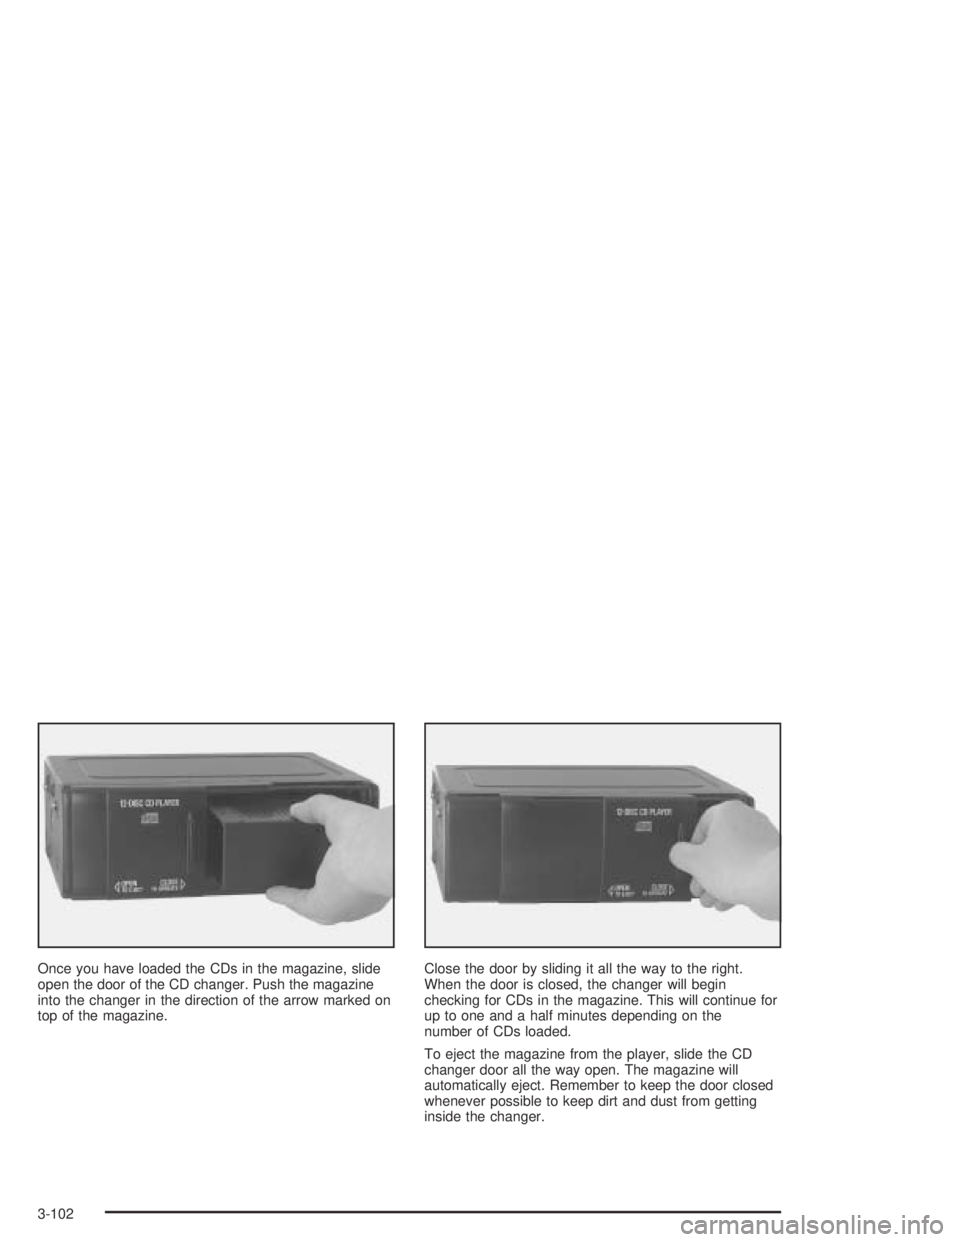
Once you have loaded the CDs in the magazine, slide
open the door of the CD changer. Push the magazine
into the changer in the direction of the arrow marked on
top of the magazine.Close the door by sliding it all the way to the right.
When the door is closed, the changer will begin
checking for CDs in the magazine. This will continue for
up to one and a half minutes depending on the
number of CDs loaded.
To eject the magazine from the player, slide the CD
changer door all the way open. The magazine will
automatically eject. Remember to keep the door closed
whenever possible to keep dirt and dust from getting
inside the changer.
3-102
Page 224 of 446
QSEEKR:Press the down arrow while playing a
CD to go back to the start of the current track if
more than eight seconds have played. Press the up
arrow to go to the next track on the CD. If you
hold either arrow or press it more than once, the player
will continue moving backward or forward through
the CD.
QSCANR:Press and hold either arrow for more
than two seconds until TRACK SCAN appears on
the display and you hear a beep. You will hear the �rst
few seconds of each track on the current CD. The
scan symbol will appear on the display and T will blink
to indicate track scan mode. Press either arrow
again, to stop scanning.
To scan all loaded CDs, press and hold either SCAN
arrow for more than four seconds until CD SCAN
appears on the display and you hear a double beep.
You will hear the �rst few seconds of the �rst track each
CD. The scan symbol will appear on the display
and D will blink to indicate CD scan mode. Press either
SCAN arrow again, to stop scanning.
AM FM:Press this button to listen to the radio when a
CD is playing. The inactive CD(s) will remain safely
inside the radio for future listening.CD AUX or CD TAPE:Press this button to play a CD,
if you have a CD loaded in the changer, when
listening to the radio. You can also press this button to
switch between playing a cassette tape or CD, in
the CD player, if these sources are loaded.
CD Messages
NO CDS:An empty magazine is inserted in the CD
changer. Try the magazine again with a CD loaded on
one of the trays.
CHECK CD:If this message appears, it could be for
one of the following reasons:
It is very hot. When the temperature returns to
normal, the CD should play.
You are driving on a very rough road. When the
road becomes smooth, the CD should play.
The CD is dirty, scratched, wet, or upside down.
The air is very humid. If so, wait about an hour and
try again.
There may have been a problem while burning
the CD.
The label may be caught in the CD player.
3-104
Page 227 of 446
XM™ Satellite Radio Service
(48 Contiguous US States)
XM™ Satellite Radio gives you digital radio reception
from coast to coast. Just as with FM, tall buildings
or hills can interfere with satellite radio signals, causing
the sound to come and go. Your radio may display
NO SIGNAL to indicate interference.
Care of Your Cassette Tape Player
A tape player that is not cleaned regularly can cause
reduced sound quality, ruined cassettes, or a damaged
mechanism. Cassette tapes should be stored in their
cases away from contaminants, direct sunlight, and
extreme heat. If they are not, they may not operate
properly or may cause failure of the tape player.
Your tape player should be cleaned regularly after every
50 hours of use. Your radio may display CLEAN PLAYER
to indicate that you have used your tape player for
50 hours without resetting the tape clean timer. If this
message appears on the display, your cassette tape
player needs to be cleaned. It will still play tapes, but you
should clean it as soon as possible to prevent damage to
your tapes and player. If you notice a reduction in sound
quality, try a known good cassette to see if the tape or the
tape player is at fault. If this other cassette has no
improvement in sound quality, clean the tape player.For best results, use a scrubbing action, non-abrasive
cleaning cassette with pads which scrub the tape
head as the hubs of the cleaner cassette turn. The
recommended cleaning cassette is available through
your dealer.
You may also choose a non-scrubbing action, wet-type
cleaner which uses a cassette with a fabric belt to
clean the tape head. This type of cleaning cassette will
not eject on its own. A non-scrubbing action cleaner
may not clean as thoroughly as the scrubbing type
cleaner. The use of a non-scrubbing action, dry-type
cleaning cassette is not recommended.
After you clean the player, press and hold the eject
button for �ve seconds to reset the CLEAN PLAYER
indicator. The radio will display CLEANED to show the
indicator was reset.
Cassettes are subject to wear and the sound quality
may degrade over time. Always make sure the cassette
tape is in good condition before you have your tape
player serviced.
3-107
Page 228 of 446
Care of Your CDs
Handle CDs carefully. Store them in their original cases
or other protective cases and away from direct
sunlight and dust. If the surface of a CD is soiled,
dampen a clean, soft cloth in a mild, neutral detergent
solution and clean it, wiping from the center to the edge.
Be sure never to touch the side without writing when
handling CDs. Pick up CDs by grasping the outer edges
or the edge of the hole and the outer edge.
Care of Your CD Player
The use of CD lens cleaners for CD players is not
advised, due to the risk of contaminating the lens of the
CD optics with lubricants internal to the CD mechanism.
Diversity Antenna System
Your AM-FM antennas are located in the windshield and
rear window. Be sure that the inside surfaces of the
windshield and rear window are not scratched and that
the lines on the glass are not damaged. If the inside
surfaces are damaged, they could interfere with
radio reception.
Notice:Do not apply aftermarket glass tinting with
metallic �lm. The metallic �lm in some tinting
materials will interfere with or distort the incoming
radio reception. Any damage caused to your
backglass antenna due to metallic tinting materials
will not be covered by your warranty.
3-108
Page 407 of 446
Part B: Owner Checks and Services
Listed in this part are owner checks and services
which should be performed at the intervals speci�ed to
help ensure the safety, dependability and emission
control performance of your vehicle.
Be sure any necessary repairs are completed at once.
Whenever any �uids or lubricants are added to your
vehicle, make sure they are the proper ones, as shown
in Part D.
At Each Fuel Fill
It is important for you or a service station attendant to
perform these underhood checks at each fuel �ll.
Engine Oil Level Check
Check the engine oil level and add the proper oil if
necessary. SeeEngine Oil on page 5-16for further
details.
Engine Coolant Level Check
Check the engine coolant level and add DEX-COOL®
coolant mixture if necessary. SeeEngine Coolant
on page 5-26for further details.
Windshield Washer Fluid Level Check
Check the windshield washer �uid level in the windshield
washer tank and add the proper �uid if necessary. See
Windshield Washer Fluid on page 5-40for further details.
At Least Once a Month
Tire In�ation Check
Visually inspect your tires and make sure tires are in�ated
to the correct pressures. Do not forget to check your
spare tire. SeeTires on page 5-58for further details.
Cassette Tape Player Service
Clean cassette tape player. Cleaning should be done
every 50 hours of tape play. SeeAudio System(s)
on page 3-73for further details.
6-19
Page 431 of 446
A
Accessory In�ator...........................................5-78
Accessory Power Outlets.................................3-25
Adding Washer Fluid.......................................5-41
Additional Program Information........................... 7-9
Additives, Fuel................................................. 5-6
Add-On Electrical Equipment...........................5-100
Adjusting the Speakers (Balance/Fade)......3-78, 3-90
Air Bag
Readiness Light..........................................3-41
Air Bag Systems.............................................1-51
How Does an Air Bag Restrain?....................1-57
Servicing Your Air Bag-Equipped Vehicle.........1-60
What Makes an Air Bag In�ate?....................1-57
What Will You See After an Air Bag In�ates?......1-58
When Should an Air Bag In�ate?...................1-56
Where Are the Air Bags?..............................1-54
Air Cleaner/Filter, Engine.................................5-21
Airbag Sensing and Diagnostic Module (SDM).......7-10
AM .............................................................3-106
Antenna, Diversity Antenna System..................3-108
Antenna, XM™ Satellite Radio Antenna
System.....................................................3-109
Anti-lock Brake System (ABS)............................ 4-7
Anti-Lock Brake, System Warning Light..............3-44
Appearance Care............................................5-91
Care of Safety Belts....................................5-94
Chemical Paint Spotting...............................5-97Appearance Care (cont.)
Cleaning the Inside of Your Vehicle................5-91
Cleaning the Outside of Your Vehicle..............5-94
Finish Damage............................................5-96
Sheet Metal Damage...................................5-96
Underbody Maintenance...............................5-97
Vehicle Care/Appearance Materials................5-98
Weatherstrips..............................................5-94
Ashtrays........................................................3-26
Audio System(s).............................................3-73
Audio Steering Wheel Controls....................3-105
Care of Your Cassette Tape Player...............3-107
Care of Your CD Player..............................3-108
Care of Your CDs......................................3-108
Chime Level Adjustment.............................3-109
Diversity Antenna System............................3-108
Radio with Cassette and CD.........................3-86
Radio with CD............................................3-74
Setting the Time..........................................3-73
Theft-Deterrent Feature...............................3-105
Trunk-Mounted CD Changer........................3-101
Understanding Radio Reception...................3-106
XM™ Satellite Radio Antenna System...........3-109
Automatic Climate Control System.....................3-29
Automatic Door Locks.....................................3-66
Automatic Level Control...................................4-38
Automatic Operation........................................3-30
1