Page 2 of 128
.
2 - Windscreen demisting vents.
3 - Controls:- Electric windows.
- Demisting of rear door
windows or tailgate.
- Air conditioning.
- ASR/ESP")
22-12-2003
3YOUR PARTNER AT A GLANCE
1 -Speaker (tweeter).
2 - Windscreen demisting vents.
3 - Controls:- Electric windows.
- Demisting of rear door
windows or tailgate.
- Air conditioning.
- ASR/ESP.
4 - Central locking button.
5 - Multifunction display or clock.
6 - Hazard lights button.
7 - Central adjustable heating/ventilation vents.
8 - Lights and direction indica-tors stalk.
9 - Cruise control.
10 - Instrument panel.
11 - Driver's air bag.Horn. 12 -
Windscreen wash-wipe stalk.
13 - Audio equipment steeringwheel control.
14 - Steering lock and ignition.
15 - Fuse box.
16 - Passenger air bag disar-ming control*.
17 - Steering wheel adjustmentcontrol.
18 - Passenger's electric mirrorcontrol.
19 - Headlamp height adjustment.
20 - Heated seats control.
21 - Handbrake.
22 - 12 V accessories socket.
23 - Removable ashtray.
24 - Lighter.
25 - Storage.
26 - Gear lever. 27 -
Heating/air conditioningcontrols.
28 - Audio RB3 or RD3.
29 - Lower glove box.
30 - Upper glove box or passenger air bag.
31 - Bonnet release.
32 - Side adjustableheating/ventilation vents.
33 - Side window demistingvents.
* According to country.
Page 7 of 128
22-12-2003
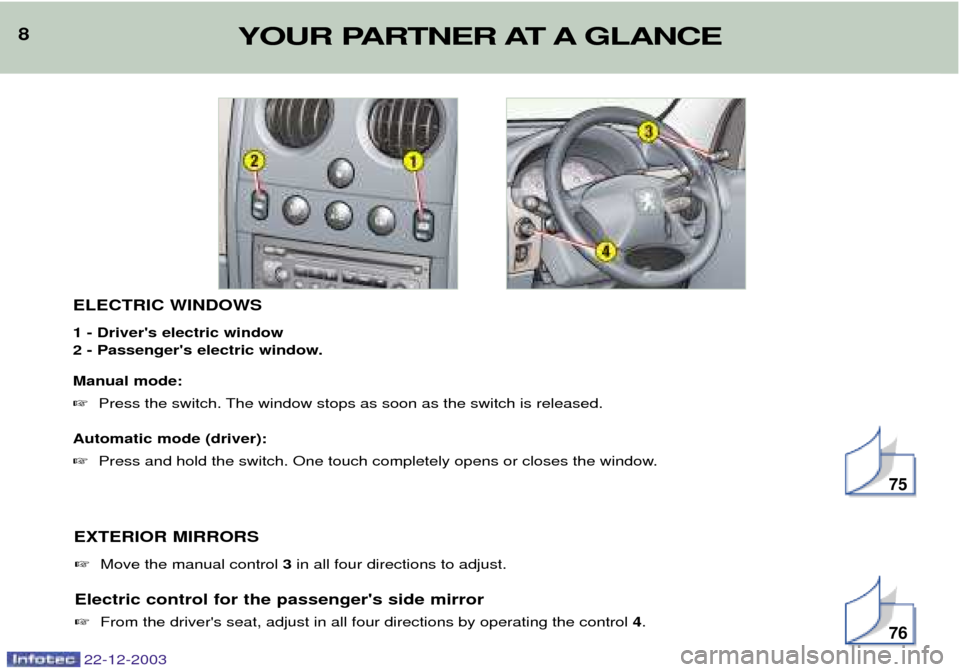
8ELECTRIC WINDOWS 1 - Driver's electric window
2 - Passenger's electric window. Manual mode: �Press the switch. The window stops as soon as the switch is released.
Automatic mode (driver):� Press and hold the switch. One touch completely opens or closes the window.
�Move the manual control 3in all four directions to adjust.
Electric control for the passenger's side mirror � From the driver's seat, adjust in all four directions by operating the control 4.
YOUR PARTNER AT A GLANCE
EXTERIOR MIRRORS
75
76
Page 49 of 128

YOUR PARTNER IN DETAIL49
22-12-2003
VENTILATION 1
. Windscreen de-icing or demisting vents.
2 . Front window de-icing or demisting vents.
3 . Side vents.
4 . Centre vents.
5 . Air outlets to front footwells.
Advice on operation
- Select the air distribution most suited to your requirements and the climatic conditions.
- Gradually adjust the temperature setting for your comfort.
- Position the air control in the ''Outside Air'' position.
- For perfectly even air distribution, take care not to obstruct the exterior air intake grille and the vents. Check that the pa s-
senger compartment filter is in good condition.
De-icing the rear screen and mirrors With the engine running, pressing the control de-ices the rear screen and mirrors.
It switches off automatically after approximately twelve minutes.Pressing the control again switches the de-icing system on again for twleve minutes.
It is possible to switch off the de-icing by pressing the control before the twelve minutes have elapsed.
Page 50 of 128
2. Air flow adjustment and airintake control
Turn the control from position 1to position 4to
obtain an air flow sufficientto ensure your comfort.
Intake of exterior air.
This is the normal operating position. Passenger compartmentisolation.
This position prevents exteriorodours and smoke entering the passenger compartment. As soon as possible, position thecontrol in the exterior air intakeposition to prevent misting of thewindows.
HEATING
1. Air flow adjustment
Turn the control from position 1to position 4to
obtain an air flow sufficientto ensure your comfort.
YOUR PARTNER IN DETAIL
50
22-12-2003
Page 51 of 128
Windscreen, side windows and footwells. Footwells.
These settings are recommended for cold climates.
Centre and side vents.
This setting is recommended forhigh temperatures.
4. Air distribution adjustment
Windscreen and side windows (de-icing/demisting).
To quickly de-ice or demist the windscreen and side windows:
- position the air intake control in the ''Outside Air" position,
- turn the temperature and air flow controls to maximum,
- close the centre vents.
YOUR PARTNER IN DETAIL 51
22-12-2003
3. Temperature adjustment
To be adjusted to your requirements. From blue (exterior temperature) to red (hot).
Page 53 of 128
.
To quickly de-ice or demist the windscreen and side windows:
- turn the temperature and air flow controls to maximum,")
4. Air distribution adjustmentWindscreen and side windows (de-icing/demisting).
To quickly de-ice or demist the windscreen and side windows:
- turn the temperature and air flow controls to maximum,
- close the centre vents,
- position the air intake control in the "Outside Air" position,
- start the air conditioning.
Windscreen, side windows and footwells. Footwells.
These settings are recommended for cold climates.
Centre and side vents.
This setting is recommended forhigh temperatures.
Intake of exterior air.
This is the normal operating position.
Recirculation of interior air.
This position prevents exteriorodours and smoke entering the passenger compartment. Used simultaneously with the air conditioning, recirculation enablesboth heating and cooling performance to be improved. Used without the air conditioning, recirculation may result in misting of the windows. As soon as possible, position the control in the exterior air intake position.
YOUR PARTNER IN DETAIL 53
22-12-2003
3. Temperature adjustment
To be adjusted to your requirements.From blue (cold when the air conditioning is on) to red (hot).
Important precaution Operate the air conditioning system for 5 to 10 minutes, once or twice amonth, to keep it in perfect working
order.
If the system does not produce cold air, do not use it and contact a PEUGEOT
dealer. Note:
to optimise the operation of
the air conditioning, leave the vents open.
Page 60 of 128

22-12-2003
YOUR PARTNER IN DETAIL
60
Never leave one or more children alone and unsu-pervised in a vehicle. Never leave a child or an
animal in a vehicle which is expo- sed to the sun and has the win-dows closed.
To protect your young children from the sun, fit blinds on the rearwindows. Never leave the keys within reach of children inside the vehicle. Observe strictly the recommenda- tions for assembling and securingthe child seat as shown in thechild seat instructions.
To prevent the doors from opening
accidentally, use the child lock*. Also, do not open the rear win- dows more than a third*.
* According to model.
Groups 2 and 3: from 15 to 36 kg
L4 - "Recaro Start'': installed in the rear using a three-point seat belt.
The height and width at the shoulders and length of the seat cushion must be adjusted according to the age and build of your child.
L5 - "Klippan Optima": installed in the rear using a three-point seat belt. From the age of 6 years (approximately 22 kg), the booster is used on itsown.
Groups 1, 2 and 3: from 9 to 36 kg
L6 - "Kiddy Life": installed in the rear using a three-point seat belt. The height and width at the shoulders and the length of the seat cushion must be adjusted according to the age and build of your child.
For the safety of young children (from 9 to 18 kg), PEUGEOT recommends use of the restraining cushion.
Disarm the passenger air bag when installing a "rearwards facing" child seat on the front passenger seat. Otherwise, the child would risk beingkilled or seriously injured were the air bag to inflate.
Page 80 of 128

22-12-2003
YOUR PARTNER IN DETAIL75
ELECTRIC WINDOWS
1. Driver's electric window
switch
2. Passenger electric window switch
You have two options: - Manual operation:Press switch 1. The window stops
as soon as the switch is released.
- Automatic operation (driver):Press and hold switch 1. One
touch completely opens or closes
the window.
Automatic closing only operateswhen the engine is running. PARTIALLY OPENING REARWINDOWS
To partially open the rear windows, tilt the lever and push it fully to lockthe windows in the open position.
Always remove the igni- tion key when leaving thevehicle, even for a shorttime.
If an obstacle is encounteredwhile the electric windows are inuse, you must reverse the move-
ment of the window. To do this,press the switch concerned. When the driver operates the passenger electric windowswitches, he must ensure that noone is preventing correct closingof the windows. The driver must ensure that pas- sengers use the electric windows
correctly. Be aware of children when opera- ting the windows.