Page 5 of 173

Lights off. Side lights.Dipped / main beam headlamps. Front and rear fog lamps (ring B)
Front fog lamps. Neutr")
02-02-2004
YOUR AT A GLANCE6
STEERING WHEEL
STALKS LIGHTS
Front and rear lights (ring A)
Lights off. Side lights.Dipped / main beam headlamps. Front and rear fog lamps (ring B)
Front fog lamps. Neutral position of the ring. Rear fog lamps.
Parking lights
To switch on the parking lights on
the traffic side, with the engine
off, place the direction indicator
lights stalk on the traffic side.
Automatic switching on of lights
This occurs if the light is poor, as well as in cases of continuous operation of the windscreen wipers, and stops as soon as the light has become brightenough or the windscreen wipers have stopped. � To activate or disarm the function, place the key in the accessories position (1st notch), place the lights stalk in position 0 and press the
end of the stalk for more than two seconds.
Do not cover the sunshine / brightness sensor located in the centre of the fascia. It helps to regulate the air conditioning, the automatic switching on of the lightsand the automatic adjustment of the instrument panelbrightness. WINDSCREEN WIPERS 3
Rapid wipe
2 Normal wipe
1 Automatic wipe
0 Off
Automatic wipe In position 1, the wipers operate
automatically and adjust their speed to the intensity of the rain-fall. When the ignition has been switched off for more than oneminute with the control in awipe position, it is necessaryto reactivate this function.
To do this, move the control to any position, then return to therequired position.
11 211 4
Page 14 of 173
02-02-2004
INSTRUMENTS AND CONTROLS
18
1 -
Handbrake indicator light.
2 - Seat belt not fastened indicator light.
3 - Main beam headlamps indicatorlight.
4 - Dipped beam headlampsindicator light.
5 - Rev counter.
6 - Left-hand direction indicator.
7 - Fuel gauge. 8 -
Right-hand direction indicator.
9 - Speedometer.
10 - Front fog lamps indicator light.
11 - ABS anti-lock braking system warning light.
12 - Rear fog lamps indicator light.
13 - Engine diagnostics warninglight. 14 -
Coolant temperature indicator.
15 - CHECK button.
16 - Trip recorder zero re-set.
17 - Service indicator and total
distance recorder.
18 - Warning/status screen.
19 - Illumination button +.
20 - Illumination button -.
21 - Engine oil level indicator.
- Engine oil temperature
indicator.
INSTRUMENT PANEL DIALS: PETROL
Page 15 of 173
02-02-2004
INSTRUMENTS AND CONTROLS19
1 -
Handbrake indicator light.
2 - Seat belt not fastened indicator light.
3 - Main beam headlamps indicatorlight.
4 - Dipped beam headlamps indi-cator light.
5 - Rev counter.
6 - Left-hand direction indicator.
7 - Fuel gauge. 8 -
Right-hand direction indicator.
9 - Speedometer.
10 - Front fog lamps indicator light.
11 - ABS anti-lock braking system warning light.
12 - Rear fog lamps indicator light.
13 - Engine diagnostics warninglight. 14 -
Coolant temperature indicator.
15 - CHECK button.
16 - Trip recorder zero re-set.
17 - Service indicator and total
distance recorder.
18 - Warning/status screen.
19 - Illumination button +.
20 - Illumination button -.
21 - Engine oil level indicator.
- Engine oil temperature
indicator.
INSTRUMENT PANEL DIALS: DIESEL
Page 113 of 173
Left : downwards.
Right : upwards
Note : If you forget to return the
direction indicator to its normal posi-tion, the volume of the")
02-02-2004
YOUR 607 IN DETAIL
112
Direction indicators (flashers)Left : downwards.
Right : upwards
Note : If you forget to return the
direction indicator to its normal posi-tion, the volume of the audible signalwill increase, if you are driving at aspeed greater than 40 mph (60 km/h). Parking lights The parking lights are lit on the side
the traffic is on.
With the engine switched off, place
the indicator lights stalk on the trafficside (i.e. for parking on the right;switching on of the lights on the left
Dipped / main beam change
� Pull the stalk fully towards you.
Note : with the ignition and the auto-
matic lights function switched off, onopening the driver's door a buzzersounds if you have left your lights on. Front and rear fog lamps (ring B)
� Turn ring Bto the position
required. The position is con- firmed by the light on the instru-ment panel.
Front foglamps
These operate with the side lights andthe dipped / main beam headlamps.
Neutral position. Rear fog lamps
These operate with the side lights and the front fog lamps, or thedipped / main beam headlamps.
LIGHTS STALK
Front and rear lights (ring A)
� Turn ring Ato the position
required.
Lights off Side lightsDipped / main beam headlamps
Page 114 of 173

YOUR 607 IN DETAIL113
Automatic switching on of the lights Side lights and dipped beam head- lamps switch on automatically if the
light is poor, or during continuousoperation of the windscreen wipers.
They switch off as soon as the lightbecomes bright enough or the wind-screen wipers stop. Note :
in foggy weather, the bright-
ness sensor can detect sufficient
light. As a consequence, the lights
will not come on automatically. This function is active when the vehi-
cle is supplied to the customer.
To switch the function on or off:
� Place the key in the accessories position (1st notch),
� Change the stalk position to 0,
� Press the end of the stalk for morethan two seconds.
Note : after the ignition is switched
off and depending on the brightness,the lights remain on for approximate-ly thirty seconds or until the vehicle islocked. Do not cover the sunshine / brightness sensor located in thecentre of the fascia. It helps toregulate the air conditioning,automatic switching on of thelights and the automatic adjust-ment of the instrument panelbrightness. Operating check Activation
When this function is acti- vated, the indicator lightcomes on, accompanied byan audible signal.
The light also comes on as soon asthe driver changes the stalk positionto 0.
Neutralisation When neutralising the func-tion, the indicator lightcomes on, accompanied byan audible signal.
The indicator light also comes on assoon as the driver uses the manuallighting controls. If the sunshine / brightness sen-
sor does not function correctly,the system activates the function(the lights come on) and the dippedbeam headlamps indicator light onthe instrument panel flashes.
Contact a PEUGEOT dealer to have the system checked.
02-02-2004
Page 115 of 173

YOUR 607 IN DETAIL113
Automatic switching on of the lights Side lights and dipped beam head- lamps switch on automatically if the
light is poor, or during continuousoperation of the windscreen wipers.
They switch off as soon as the lightbecomes bright enough or the wind-screen wipers stop. Note :
in foggy weather, the bright-
ness sensor can detect sufficient
light. As a consequence, the lights
will not come on automatically. This function is active when the vehi-
cle is supplied to the customer.
To switch the function on or off:
� Place the key in the accessories position (1st notch),
� Change the stalk position to 0,
� Press the end of the stalk for morethan two seconds.
Note : after the ignition is switched
off and depending on the brightness,the lights remain on for approximate-ly thirty seconds or until the vehicle islocked. Do not cover the sunshine / brightness sensor located in thecentre of the fascia. It helps toregulate the air conditioning,automatic switching on of thelights and the automatic adjust-ment of the instrument panelbrightness. Operating check Activation
When this function is acti- vated, the indicator lightcomes on, accompanied byan audible signal.
The light also comes on as soon asthe driver changes the stalk positionto 0.
Neutralisation When neutralising the func-tion, the indicator lightcomes on, accompanied byan audible signal.
The indicator light also comes on assoon as the driver uses the manuallighting controls. If the sunshine / brightness sen-
sor does not function correctly,the system activates the function(the lights come on) and the dippedbeam headlamps indicator light onthe instrument panel flashes.
Contact a PEUGEOT dealer to have the system checked.
02-02-2004
Page 154 of 173

02-02-2004
PRACTICAL INFORMATION147
CHANGING A BULB Front lights
In the engine compartment, remove the style cover secured by one or two butterfly screws, a plastic retainer clip andtwo screws. Note:
handle the bulbs with a dry cloth.
1 - Dipped beam headlamps: H7-55W or Xenon bulb.
WARNING: RISK OF ELECTROCUTION Xenon bulbs must be replaced by a PEUGEOT
dealer.
2 - Main beam headlamps: H1-55W.
� Turn the protective cover of the faulty bulb a quarterof a turn and remove it.
� Disconnect the connector.
� Press the end of the securing clip to free it. Changethe bulb.
� When fitting the new bulb, ensure that the directionnotches are positioned correctly and the securing
clip is fixed properly. �
Reconnect the connector.
� Refit the protective cover.
The headlamps are fitted with polycarbonate glass with aprotective coating. Do not clean them with a dry or abra-
sive cloth, nor with a detergent or solvent product.
3 - Side lights: W 5 W.
� Pull the socket rearwards, remove the bulb and change it.
4 - Direction indicators: PY 21 W (amber).
� Turn the bulb holder a quarter turn and remove it.
� Change the bulb.
� Refit the style cover.
Front foglamps: H1 - 55 W.
Note: In certain climatic conditions (low temperature,
humidity), condensation on the inside surface of the
headlamp glass is normal ; it disappears a few minutes
after the lights are switched on.
Page 157 of 173
02-02-2004
149
PRACTICAL INFORMATION
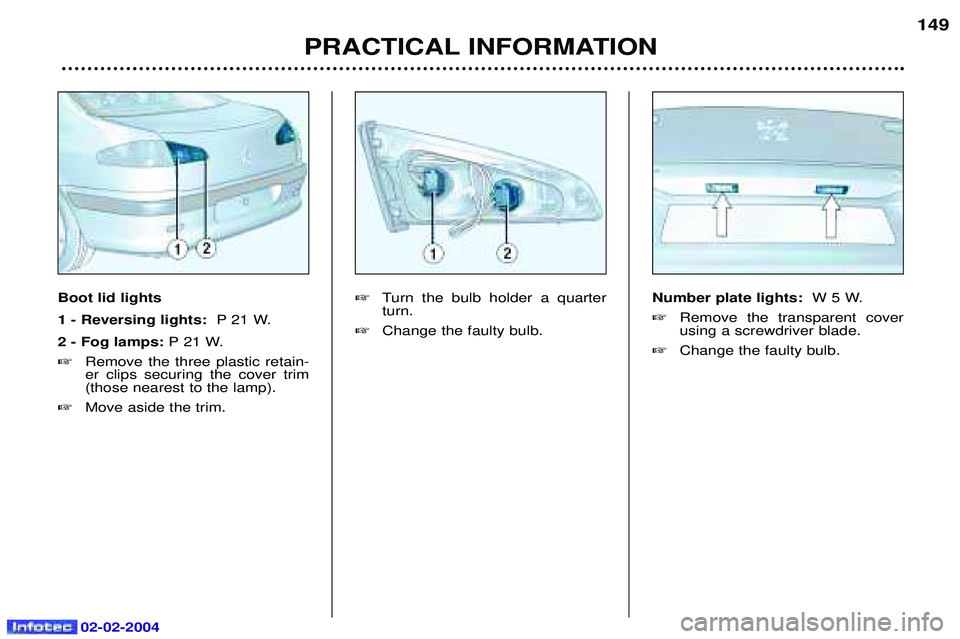
Boot lid lights 1 - Reversing lights: P 21 W.
2 - Fog lamps: P 21 W.
� Remove the three plastic retain- er clips securing the cover trim(those nearest to the lamp).
� Move aside the trim. �
Turn the bulb holder a quarterturn.
� Change the faulty bulb. Number plate lights:
W 5 W.
� Remove the transparent coverusing a screwdriver blade.
� Change the faulty bulb.