Page 76 of 173

02-02-2004
Navigation options From the navigation/guidance menu, the'Navigation options'
menu offers the following options:
- management of the directories. This allows details of a stored address to be renamed or deleted, by selecting the directory and the details to be modified,
- voice synthesis volume adjustment. Once the function has been selected, adjust the volumeof the voice synthesis using the dial, the audio systembutton or the steering wheel stalk, then confirm. Note: the voice synthesis volume can also be adjusted
during a message using the audio system button or the steering wheel stalk.
- deletion of all data stored in both directories.
- stopping or resuming of guidance. Two messages may be displayed depending on the previous status: "Resume guidance" or "Stop guidance" . Guidance tools Access to the
'Guidance tools' menu is by pressing the
dial at any time during guidance. It enables:
- the current guidance criterion to be changed,
- the programmed destination to be displayed or changed,
- the voice synthesis volume to be adjusted (see ''Navigation options'' ' paragraph),
- the current guidance to be stopped.
YOUR 607 IN DETAIL
79
Page 83 of 173

02-02-2004
Guidance options The sub-menu'Guidance options' offers various
possibilities for improving guidance:- calculation criteria,- voice synthesis adjustment,- managing the directories,- clearing the directories. Calculation criteria Select the criteria which interest you from the proposed list, then confirm. When the criteria of your choice have been selected, choo- se the ''OK'' function, then confirm. Voice synthesis adjustment Activate using the
'Switch off/Activate' button, then
confirm:
- once to cancel the function,
- a second time to re-activate it.Select "Female speaker" or "Male speaker" , then confirm.
Select the volume adjustment zone, then confirm:
- turn the dial clockwise to increase the volume,
- turn the dial anti-clockwise to decrease the volume,
- confirm the setting.Select the 'OK'function when the setting is satisfactory,
then confirm.Note: the voice synthesis volume can also be adjusted
during a message using the audio system button or the steering wheel stalk.
YOUR 607 IN DETAIL
86
Page 87 of 173
.
� Press the corresponding top andbottom arrows to adjust.
YO")
02-02-2004
1 - Driver's sideadjustment
2 - Passenger's side adjustment
The required value is displayed (from 15 to
30: comfort value = 22).
� Press the corresponding top andbottom arrows to adjust.
YOUR 607 IN DETAIL
90
AUTOMATIC AIR CONDITIONING Located on the centre console, the control panel is between the multi-function display and the audio system. The driver and front passenger can each adjust the temperature and the air dis- tribution, to suit their requirements. Do not cover the sunshine / brightness sensor located in the centre of the fascia. It helps to regulate the air conditioning, automatic switching on ofthe lights and the automatic adjustment of the instrument panel bright-ness. 3 - Driver comfort
programme
4 - Passenger comfort programme
� Press the 'AUTO'button(s).
The system adjusts automatically tothe required value .
It also controls the air distribution,
flow and intake so that there is suffi-cient air circulation in the passengercompartment. The air flow (fan) symbol and the
'AUTO' symbols are displayed.
Note: when programme 5or function
11 (following pages) are being used,
the 'AUTO' passenger button does
not operate; it causes temporaryflashing of button 5or 11 indicator
light.
Page 158 of 173
PRACTICAL INFORMATION
150
Correct Incorrect
Pliers A
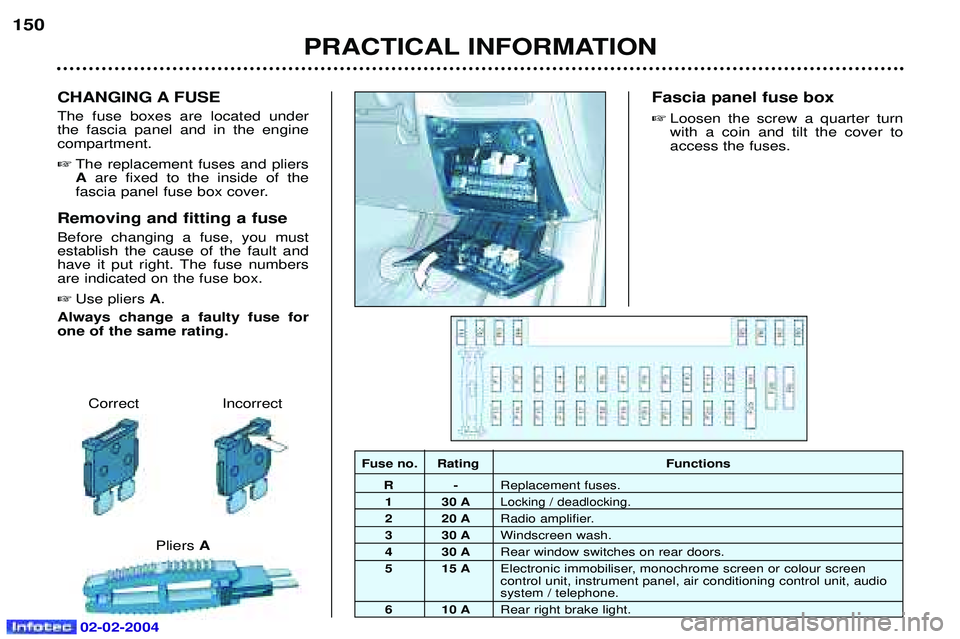
CHANGING A FUSE The fuse boxes are located under the fascia panel and in the enginecompartment. �
The replacement fuses and pliers A are fixed to the inside of the
fascia panel fuse box cover.
Removing and fitting a fuse Before changing a fuse, you must establish the cause of the fault and
have it put right. The fuse numbersare indicated on the fuse box. � Use pliers A.
Always change a faulty fuse forone of the same rating. Fascia panel fuse box
� Loosen the screw a quarter turnwith a coin and tilt the cover toaccess the fuses.
Fuse no. Rating Functions R- Replacement fuses.
1 30 A
Locking / deadlocking.
2 20 A Radio amplifier.
3 30 A Windscreen wash.
4 30 A Rear window switches on rear doors.
5 15 A Electronic immobiliser, monochrome screen or colour screen control unit, instrument panel, air conditioning control unit, audiosystem / telephone.
6 10 A Rear right brake light.
02-02-2004
Page 161 of 173
PRACTICAL INFORMATION
150
Correct Incorrect
Pliers A
CHANGING A FUSE The fuse boxes are located under the fascia panel and in the enginecompartment. �
The replacement fuses and pliers A are fixed to the inside of the
fascia panel fuse box cover.
Removing and fitting a fuse Before changing a fuse, you must establish the cause of the fault and
have it put right. The fuse numbersare indicated on the fuse box. � Use pliers A.
Always change a faulty fuse forone of the same rating. Fascia panel fuse box
� Loosen the screw a quarter turnwith a coin and tilt the cover toaccess the fuses.
Fuse no. Rating Functions R- Replacement fuses.
1 30 A
Locking / deadlocking.
2 20 A Radio amplifier.
3 30 A Windscreen wash.
4 30 A Rear window switches on rear doors.
5 15 A Electronic immobiliser, monochrome screen or colour screen control unit, instrument panel, air conditioning control unit, audiosystem / telephone.
6 10 A Rear right brake light.
02-02-2004
Page 162 of 173

02-02-2004
PRACTICAL INFORMATION151
Fuse no. Rating Functions 7 10 A Switches, rear ashtray illumination, front courtesy light, rear courtesy light, rear lighter, number plate lighting, headlamp height adjustment.
8 10 A Diagnostic connector, headlamp height adjustment control unit, HF locking receiver,
passenger compartment air temperature sensor, HF tyre under-inflation receiver.
9 20 A Headlamp wash.
10 20 A Glove box lighting, front lighter, front and rear courtesy light, electrochrome interior mirror,electric exterior mirrors.
11 5 A Control unit for automatic lighting of headlamps, air bags control unit, safety relay for automatic lighting of headlamps.
12 30 A Rear window switches on driver's pad, rear windows.
13 30 A Windscreen wiper.
14 15 A Not used.
15 15 A Driver's door pad, passenger's door pad.
16 15 A Rear lighter.
17 5 A Heated exterior mirrors.
18 15 A Rear left brake light, additional brake light.
19 10 A Parking assistance control unit, navigation control unit.
20 15 A Alarm siren, monochrome screen or colour screen control unit, HF receiver, audio system /telephone, monochrome or colour navigation control unit, diesel additive control unit.
21 15 A Diagnostic connector, caravan socket, trailer sidelights relay.
22 15 A Diesel additive control unit, driver's seat memory control unit, driver's door pad, passenger'sdoor pad.
23 30 A Driver's window, passenger's window, sunroof safety auto-reverse, passenger window switch on driver's door pad and passenger's door pad.
24 10 A Rear fog lamp.
25 40 A PARC shunt.
26 40 A Heated rear screen, radio aerial amplifier.
Page 163 of 173

02-02-2004
PRACTICAL INFORMATION
154
CHANGING A WINDSCREEN WIPER BLADE Placing the wiper blades in the maintenance position� Less than one minute after switch-
ing off the ignition, activate thewindscreen wiper stalk to positionthe blades in the centre of thewindscreen (maintenance posi-tion).
Replacing a blade � Lift the arm, then unclip the bladeand remove it.
� Fit the new blade and fold downthe arm.
To park the blades, switch on theignition and operate the wind-screen wiper stalk.
REMOVING A MAT When removing a mat on the driver's or passenger's side, push back theseat as far as possible and removethe clips.
To remove a rear mat, push the corresponding front seat forward andremove the clip. On refitting, position the mat and
tighten the securing clips fully.
LOAD REDUCTION FUNCTION When driving, certain functions (air conditioning, heated rear screen,heating system for passenger com-partment of diesel vehicles, etc.)
may be switched off temporarily,depending on the level of batterycharge. Reactivation of these functions is automatic, once the battery charge is
sufficient. Note:
at the risk of discharging the
battery, the functions that have been
switched off may be reactivated
manually.
A flat battery prevents the engine from starting.
ECONOMY MODE FUNCTION After the engine has stopped, certain
functions (windscreen wiper, electricwindows, sunroof, rear electric blind,electric seats, audio equipment, tele-phone etc) can only be used for thir-ty minutes, to prevent discharging
the battery.
Once the thirty minutes are over, the message "Economy mode active"
appears on the multiÐfunction dis-play and the active functions are put
on standby. These functions are automaticallyreactivated next time the vehicle isdriven. Note:
if the telephone is being used
when economy mode starts, it will still be possible to finish the call.