2004 NISSAN XTERRA child seat
[x] Cancel search: child seatPage 62 of 296
cThe three-point seat belt in your vehicle
is equipped with an automatic locking
mode retractor which must be used
when installing a child restraint.
cFailure to use the retractor’s locking
mode will result in the child restraint
not being properly secured. The re-
straint could tip over or otherwise be
unsecured and cause injury to the child
in a sudden stop or collision.
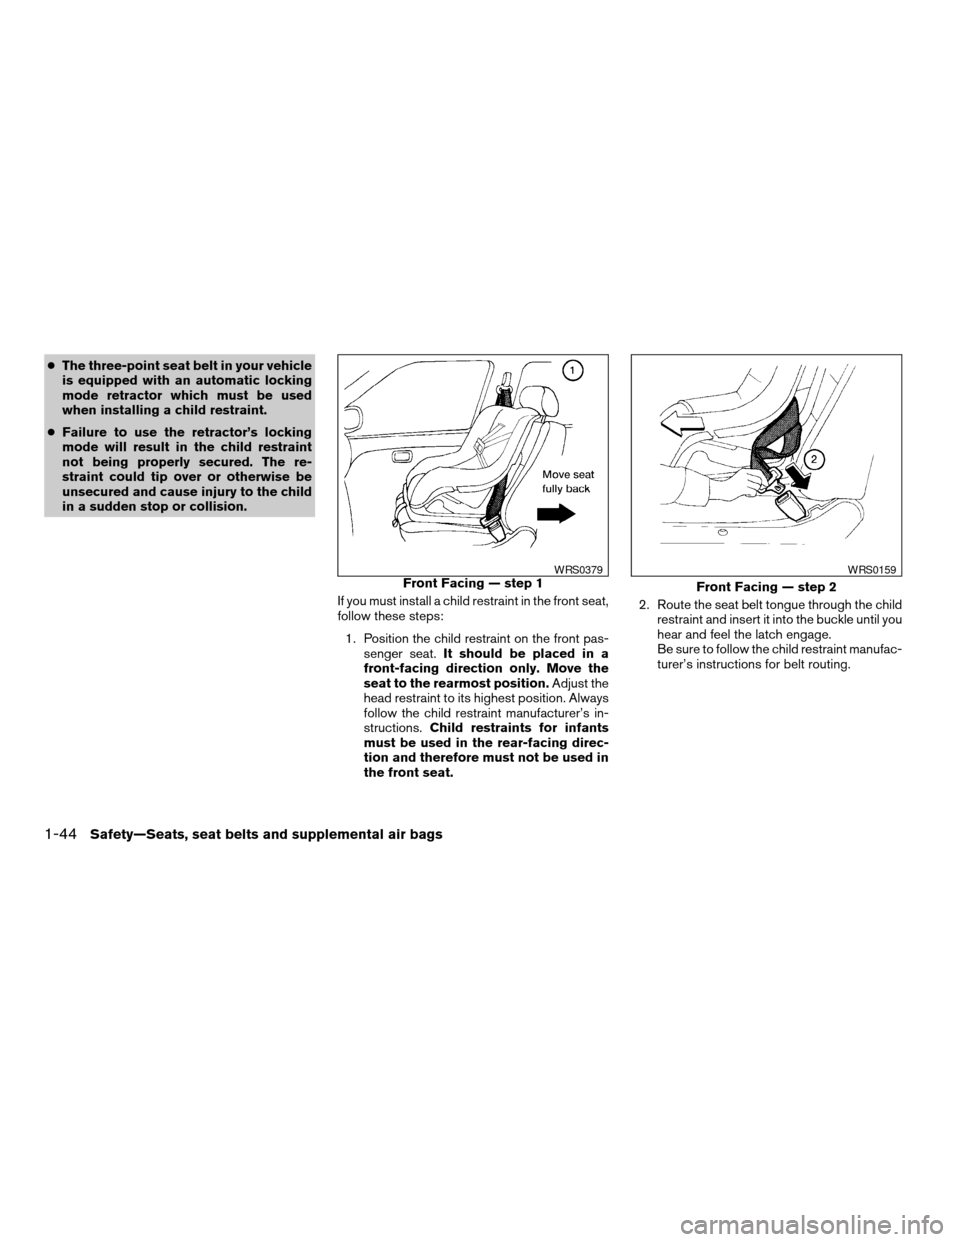
If you must install a child restraint in the front seat,
follow these steps:
1. Position the child restraint on the front pas-
senger seat.It should be placed in a
front-facing direction only. Move the
seat to the rearmost position.Adjust the
head restraint to its highest position. Always
follow the child restraint manufacturer’s in-
structions.Child restraints for infants
must be used in the rear-facing direc-
tion and therefore must not be used in
the front seat.2. Route the seat belt tongue through the child
restraint and insert it into the buckle until you
hear and feel the latch engage.
Be sure to follow the child restraint manufac-
turer’s instructions for belt routing.
Front Facing — step 1WRS0379
Front Facing — step 2
WRS0159
1-44Safety—Seats, seat belts and supplemental air bags
ZREVIEW COPY:Ð2004 Xterra(xtr)
Owners Manual(owners)ÐUSA English(nna)
10/23/03Ðdebbie
X
Page 63 of 296

3. Pull on the shoulder belt until all of the belt is
fully extended. At this time, the seat belt
retractor is in the automatic locking mode
(child restraint mode) . It reverts to emer-
gency locking mode when the seat belt is
fully retracted.4. Allow the seat belt to retract slightly. Pull up
on the shoulder belt to remove any slack in
the belt.
If necessary to ensure the child restraint is
secure, pull the shoulder belt through the
seat belt tongue beyond the stitching in the
belt.
After the seat belt is fully retracted and the child
restraint is removed from the seat, the stitching
on the shoulder belt can be pulled back through
the seat belt tongue. This stitching locates the
seat belt tongue near the top of the seat back for
easy access for passengers.5. Before placing the child in the child restraint,
use force to tilt the child restraint from side
to side, and tug it forward to make sure that
it is securely held in place. It should not move
more than 1 inch.
6. Check that the retractor is in the automatic
locking mode by trying to pull more seat belt
out of the retractor. If you cannot pull any
more belt webbing out of the retractor, the
retractor is in the automatic locking mode.
Front Facing — step 3
WRS0160
Front Facing — step 4
WRS0161
Front Facing — step 5
WRS0380
Safety—Seats, seat belts and supplemental air bags1-45
ZREVIEW COPY:Ð2004 Xterra(xtr)
Owners Manual(owners)ÐUSA English(nna)
10/23/03Ðdebbie
X
Page 64 of 296

7. Check to make sure the child restraint is
properly secured prior to each use. If the
seat belt is not locked, repeat steps 3
through 6.
After the child restraint is removed and the seat
belt is fully retracted, the automatic locking mode
(child restraint mode) is canceled.
1-46Safety—Seats, seat belts and supplemental air bags
ZREVIEW COPY:Ð2004 Xterra(xtr)
Owners Manual(owners)ÐUSA English(nna)
10/23/03Ðdebbie
X
Page 99 of 296
cProperly secure all cargo with ropes or
straps to help prevent it from sliding or
shifting. Do not place cargo higher than
the seatbacks. In a sudden stop or col-
lision, unsecured cargo could cause
personal injury.
cThe child restraint top tether strap may
be damaged by contact with the ton-
neau cover or items in the cargo area.
Remove the tonneau cover from the ve-
hicle or secure it and any cargo. Your
child could be seriously injured or killed
in a collision if the top tether strap is
damaged.
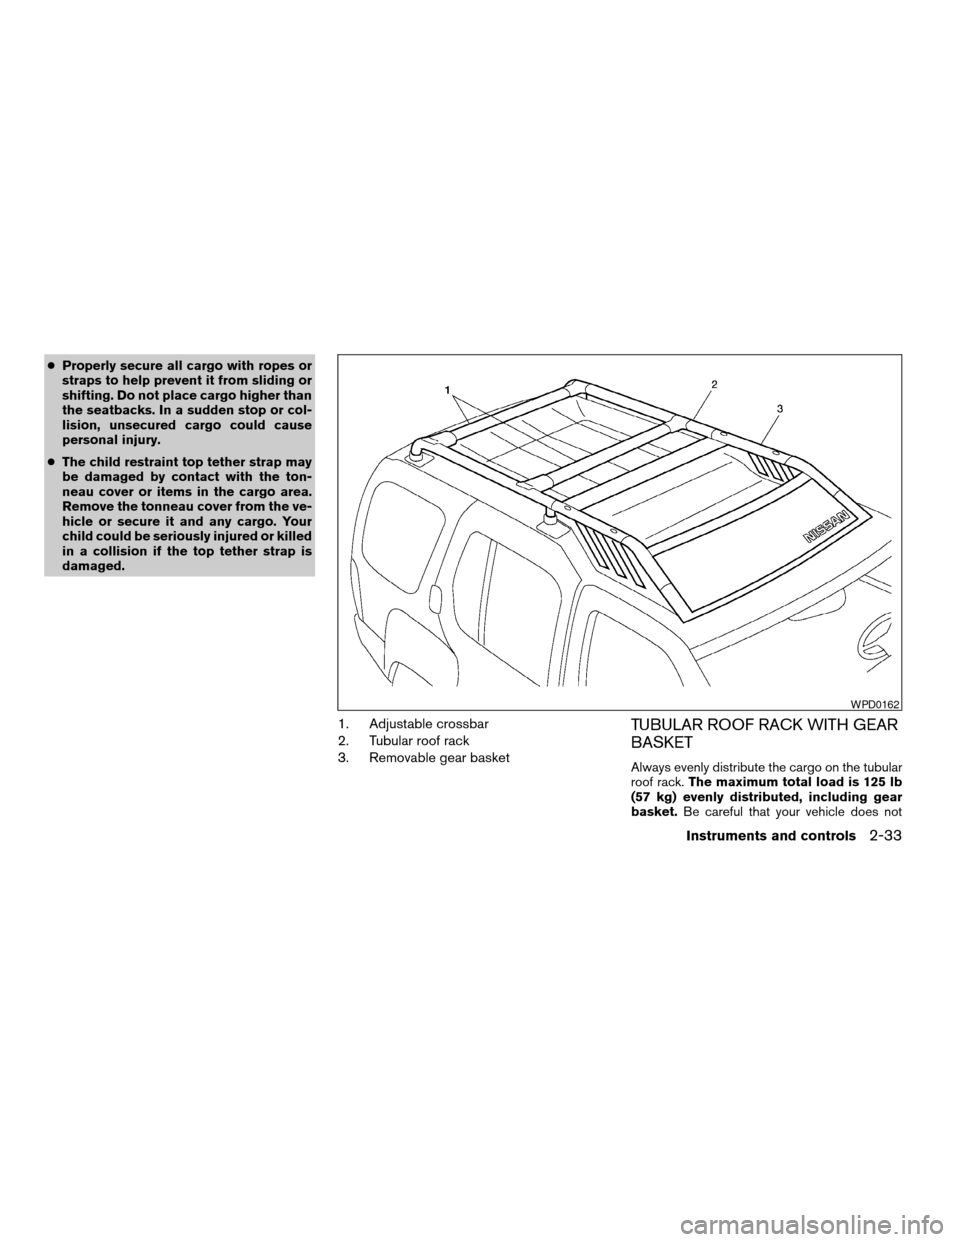
1. Adjustable crossbar
2. Tubular roof rack
3. Removable gear basketTUBULAR ROOF RACK WITH GEAR
BASKET
Always evenly distribute the cargo on the tubular
roof rack.The maximum total load is 125 lb
(57 kg) evenly distributed, including gear
basket.Be careful that your vehicle does not
WPD0162
Instruments and controls2-33
ZREVIEW COPY:Ð2004 Xterra(xtr)
Owners Manual(owners)ÐUSA English(nna)
10/23/03Ðdebbie
X
Page 105 of 296
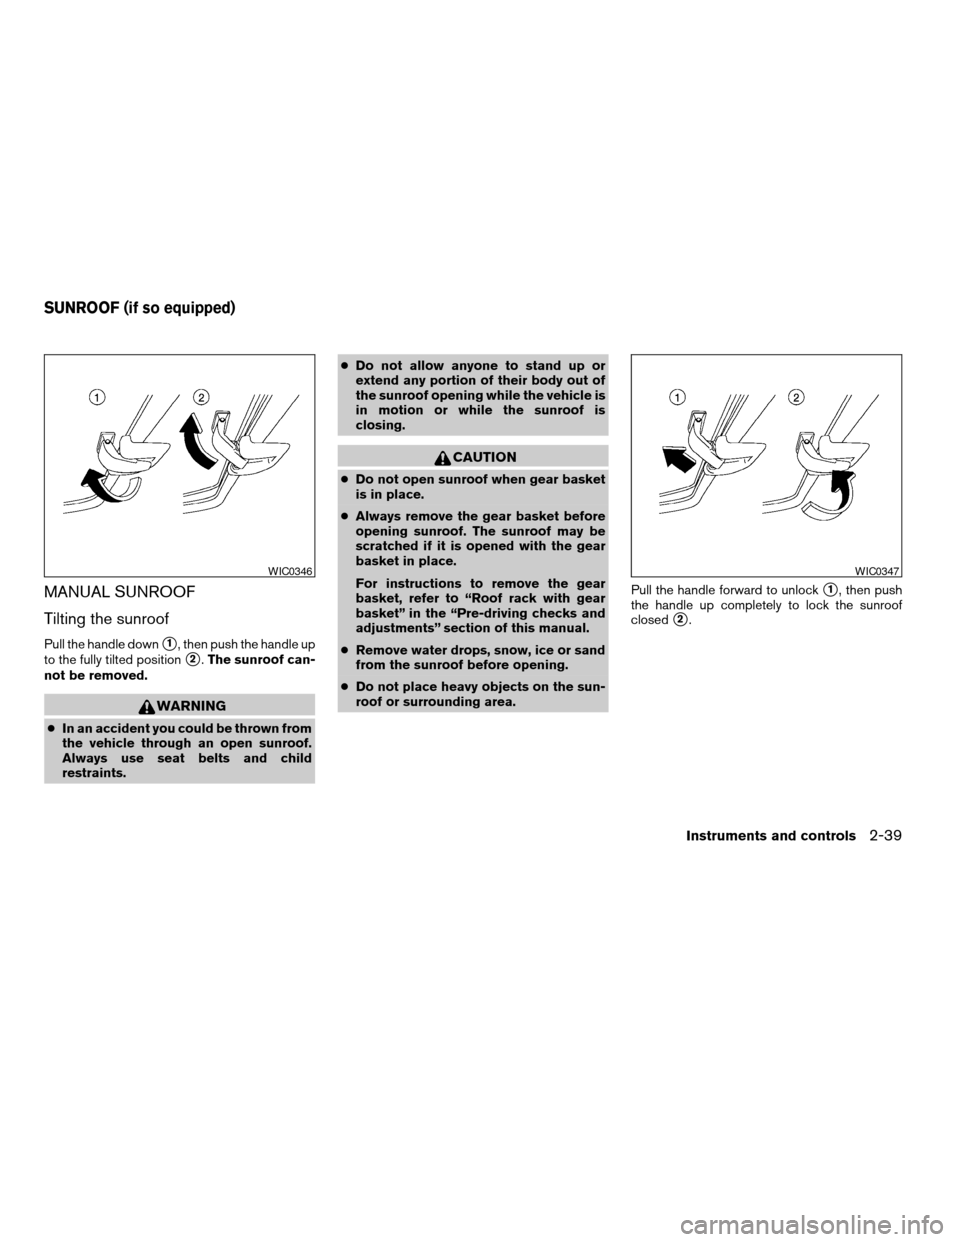
MANUAL SUNROOF
Tilting the sunroof
Pull the handle downs1, then push the handle up
to the fully tilted position
s2.The sunroof can-
not be removed.
WARNING
cIn an accident you could be thrown from
the vehicle through an open sunroof.
Always use seat belts and child
restraints.cDo not allow anyone to stand up or
extend any portion of their body out of
the sunroof opening while the vehicle is
in motion or while the sunroof is
closing.
CAUTION
cDo not open sunroof when gear basket
is in place.
cAlways remove the gear basket before
opening sunroof. The sunroof may be
scratched if it is opened with the gear
basket in place.
For instructions to remove the gear
basket, refer to “Roof rack with gear
basket” in the “Pre-driving checks and
adjustments” section of this manual.
cRemove water drops, snow, ice or sand
from the sunroof before opening.
cDo not place heavy objects on the sun-
roof or surrounding area.Pull the handle forward to unlock
s1, then push
the handle up completely to lock the sunroof
closed
s2.
WIC0346WIC0347
SUNROOF (if so equipped)
Instruments and controls2-39
ZREVIEW COPY:Ð2004 Xterra(xtr)
Owners Manual(owners)ÐUSA English(nna)
10/23/03Ðdebbie
X
Page 110 of 296
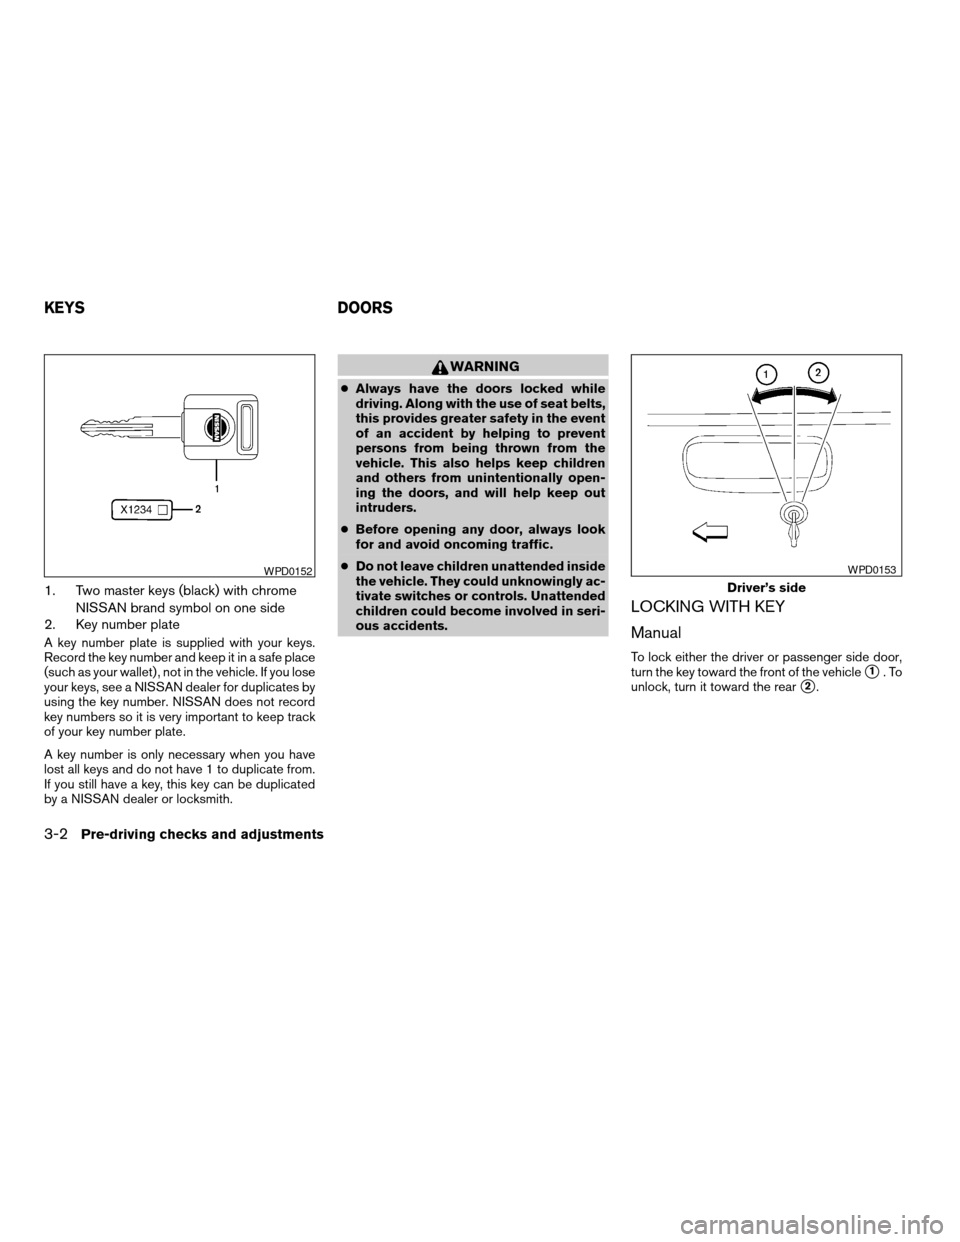
1. Two master keys (black) with chrome
NISSAN brand symbol on one side
2. Key number plate
A key number plate is supplied with your keys.
Record the key number and keep it in a safe place
(such as your wallet) , not in the vehicle. If you lose
your keys, see a NISSAN dealer for duplicates by
using the key number. NISSAN does not record
key numbers so it is very important to keep track
of your key number plate.
A key number is only necessary when you have
lost all keys and do not have 1 to duplicate from.
If you still have a key, this key can be duplicated
by a NISSAN dealer or locksmith.
WARNING
cAlways have the doors locked while
driving. Along with the use of seat belts,
this provides greater safety in the event
of an accident by helping to prevent
persons from being thrown from the
vehicle. This also helps keep children
and others from unintentionally open-
ing the doors, and will help keep out
intruders.
cBefore opening any door, always look
for and avoid oncoming traffic.
cDo not leave children unattended inside
the vehicle. They could unknowingly ac-
tivate switches or controls. Unattended
children could become involved in seri-
ous accidents.
LOCKING WITH KEY
Manual
To lock either the driver or passenger side door,
turn the key toward the front of the vehicle
s1.To
unlock, turn it toward the rear
s2.
WPD0152
Driver’s side
WPD0153
KEYS DOORS
3-2Pre-driving checks and adjustments
ZREVIEW COPY:Ð2004 Xterra(xtr)
Owners Manual(owners)ÐUSA English(nna)
10/23/03Ðdebbie
X
Page 156 of 296
WARNING
cOn hot, sunny days, temperatures in a
closed vehicle could quickly become
high enough to cause severe or possi-
bly fatal injuries to people or animals.
Do not leave children or adults who
would normally require the support of
others in your vehicle. Unattended pets
should not be left alone either.
cProperly secure all cargo with ropes or
straps to help prevent it from sliding or
shifting. Do not place cargo higher than
the seatbacks. In a sudden stop or col-
lision, unsecured cargo could cause
personal injury.
EXHAUST GAS (carbon monoxide)
WARNING
cDo not breathe exhaust gases; they
contain colorless and odorless carbon
monoxide. Carbon monoxide is danger-
ous. It can cause unconsciousness or
death.
cIf you suspect that exhaust fumes are
entering the vehicle, drive with all win-
dows fully open, and have the vehicle
inspected immediately.cDo not run the engine in closed spaces
such as a garage.
cDo not park the vehicle with the engine
running for any extended length of time.
cKeep the back door and rear windows
closed while driving, otherwise exhaust
gases could be drawn into the passen-
ger compartment. If you must drive with
the back door or rear windows open,
follow these precautions:
1. Open all the windows.
2. Set the
air recirculation but-
ton (if so equipped) to off and the fan
control dial to 4 (high) to circulate
the air.
cIf electrical wiring or other cable con-
nections must pass to a trailer through
the seal on the back door or the body,
follow the manufacturer’s recommen-
dation to prevent carbon monoxide en-
try into the vehicle.
cThe exhaust system and body should be
inspected by a qualified mechanic
whenever:
a. The vehicle is raised for service.b. You suspect that exhaust fumes are
entering into the passenger
compartment.
c. You notice a change in the sound of
the exhaust system.
d. You have had an accident involving
damage to the exhaust system, un-
derbody, or rear of the vehicle.
THREE-WAY CATALYST
The three-way catalyst is an emission control
device installed in the exhaust system. Exhaust
gases in the three-way catalyst are burned at
high temperatures to help reduce pollutants.
WARNING
cThe exhaust gas and the exhaust sys-
tem are very hot. Keep people, animals
or flammable materials away from the
exhaust system components.
cDo not stop or park the vehicle over
flammable materials such as dry grass,
waste paper or rags. They may ignite
and cause a fire.
PRECAUTIONS WHEN STARTING
AND DRIVING
5-2Starting and driving
ZREVIEW COPY:Ð2004 Xterra(xtr)
Owners Manual(owners)ÐUSA English(nna)
11/20/03Ðcathy
X
Page 285 of 296

Headlights....................8-33
Heater
Heater and air conditioner controls.....4-2
Heater operation...............4-4
Hood release...................3-9
Horn.......................2-23
Hubs
Auto-lock free-running hubs........5-20
I
Ignition switch..................5-7
Important vehicle information label.......9-10
In-cabin microfilter...............8-23
Increasing fuel economy............5-18
Indicator lights and audible reminders
(See warning/indicator lights and
audible reminders)................2-9
Inside mirror...................3-13
Instrument brightness control.........2-22
Instrument panel.................2-2
Interior light...................2-40
ISOFIX child restraints.............1-39
J
Jump starting...................6-9
K
Key ........................3-2
Keyless entry system
(See remote keyless entry system).......3-4L
Labels
Air conditioner specification label.....9-11
Emission control information label.....9-11
Engine serial number............9-10
F.M.V.S.S. certification label........9-10
Vehicle identification number (VIN) plate . .9-9
Warning labels (for SRS)..........1-19
LATCH (Lower Anchors and Tethers for
CHildren) System................1-39
License plate
Installing the license plate.........9-12
Light
Air bag warning light.........1-19, 2-13
Brake light (See stop light).........8-36
Bulb check/instrument panel........2-9
Bulb replacement..............8-36
Charge warning light............2-11
Fog light switch...............2-22
Headlight and turn signal switch......2-20
Headlights..................8-33
Interior light.................2-40
Light bulbs..................8-33
Low tire pressure warning light......2-11
Low washer fluid warning light.......2-12
Spotlights (See map light).........2-41
Warning/indicator lights and audible
reminders...................2-9
Lights
Map lights..................2-41
Lock
Child safety rear door lock..........3-4
Door locks..................3-2
Glove box lock...............2-30Power door locks...............3-3
Rear door lock...............3-10
Low fuel warning light.............2-11
Low tire pressure warning light........2-11
Low tire pressure warning system........5-3
Low washer fluid warning light.........2-12
Luggage rack..................2-33
Luggage rack (see roof rack).........2-33
Luggage rack
(see roof rack with gear basket)........2-33
Luggage (See vehicle loading information) . .9-12
M
Maintenance
General maintenance............8-2
Inside the vehicle...............8-3
Maintenance precautions..........8-5
Outside the vehicle..............8-2
Seat belt maintenance...........1-30
Under the hood and vehicle.........8-4
Malfunction indicator lamp (MIL)........2-14
Manual front seat adjustment..........1-2
Manual windows................2-38
Map lights....................2-41
Meters and gauges................2-3
Instrument brightness control.......2-22
Mirror
Inside mirror.................3-13
Outside mirror control........3-14, 3-15
Outside mirrors...............3-14
Vanity mirror.................3-13
Multi-remote control system
(See remote keyless entry system).......3-4
10-3
ZREVIEW COPY:Ð2004 Xterra(xtr)
Owners Manual(owners)ÐUSA English(nna)
10/23/03Ðdebbie
X