2004 NISSAN XTERRA change wheel
[x] Cancel search: change wheelPage 34 of 296
cNo unauthorized changes should be
made to any components or wiring of
the supplemental air bag system. This is
to prevent accidental inflation of the
supplemental air bag or damage to the
supplemental air bag system.
cDo not make unauthorized changes to
your vehicle’s electrical system, sus-
pension system or front end structure.
This could affect proper operation of
the supplemental front air bag system.
cTampering with the supplemental front
air bag system may result in serious
personal injury. Tampering includes
changes to the steering wheel and the
instrument panel assembly by placing
material over the steering wheel pad
and above the instrument panel or by
installing additional trim material
around the air bag system.cWork on and around the supplemental
front air bag system should be done by
a NISSAN dealer. Installation of electri-
cal equipment should also be done by a
NISSAN dealer. The Supplemental Re-
straint System (SRS) wiring should not
be modified or disconnected. Unautho-
rized electrical test equipment and
probing devices should not be used on
the air bag system.
cA cracked windshield should be re-
placed immediately by a qualified re-
pair facility. A cracked windshield could
affect inflation of the supplemental air
bag system.
cThe SRS wiring harness connectors are
yellow and orange for easy
identification.
When selling your vehicle, we request that you
inform the buyer about the supplemental front air
bag system and guide the buyer to the appropri-
ate sections in this Owner’s Manual.
Supplemental curtain side-impact air
bag system (if so equipped)
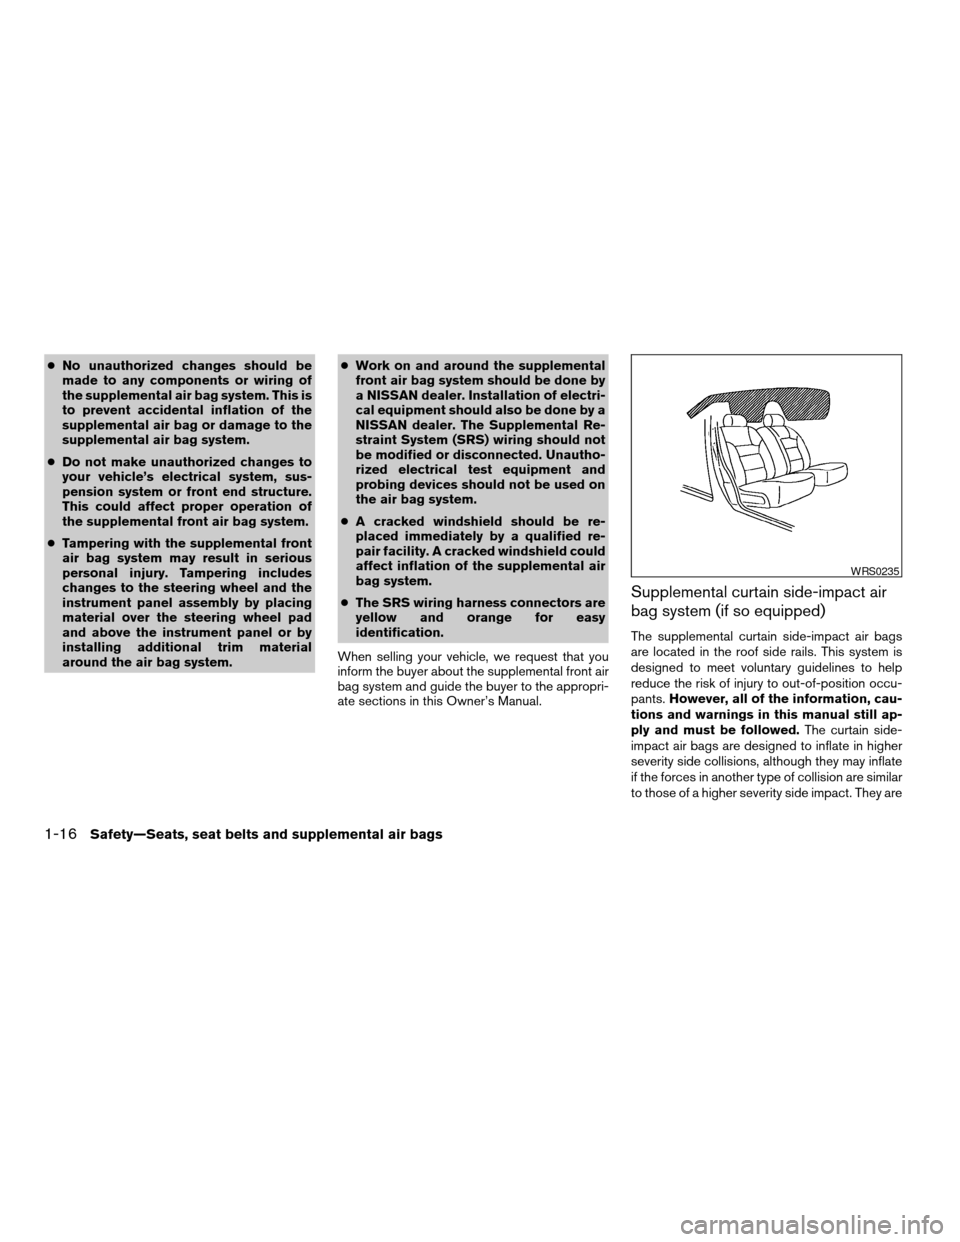
The supplemental curtain side-impact air bags
are located in the roof side rails. This system is
designed to meet voluntary guidelines to help
reduce the risk of injury to out-of-position occu-
pants.However, all of the information, cau-
tions and warnings in this manual still ap-
ply and must be followed.The curtain side-
impact air bags are designed to inflate in higher
severity side collisions, although they may inflate
if the forces in another type of collision are similar
to those of a higher severity side impact. They are
WRS0235
1-16Safety—Seats, seat belts and supplemental air bags
ZREVIEW COPY:Ð2004 Xterra(xtr)
Owners Manual(owners)ÐUSA English(nna)
10/23/03Ðdebbie
X
Page 125 of 296

4 Heater, air conditioner and audio
systems
Ventilators........................................4-2
Heater and air conditioner (manual)..................4-2
Controls.......................................4-3
Heater operation...............................4-4
Air conditioner operation........................4-5
Air flow charts..................................4-6
Servicing air conditioner............................4-9
Audio system....................................4-10
Radio........................................4-10
FM radio reception............................4-10
AM radio reception............................4-10Audio operation precautions....................4-11
FM-AM radio with compact disc (CD) player
(if so equipped)...............................4-12
FM-AM radio with compact disc (CD)
changer (if so equipped).......................4-16
CD care and cleaning..........................4-27
Steering wheel switch for audio control
(if so equipped)...............................4-28
Antenna......................................4-28
Car phone or CB radio............................4-29
ZREVIEW COPY:Ð2004 Xterra(xtr)
Owners Manual(owners)ÐUSA English(nna)
10/23/03Ðdebbie
X
Page 152 of 296
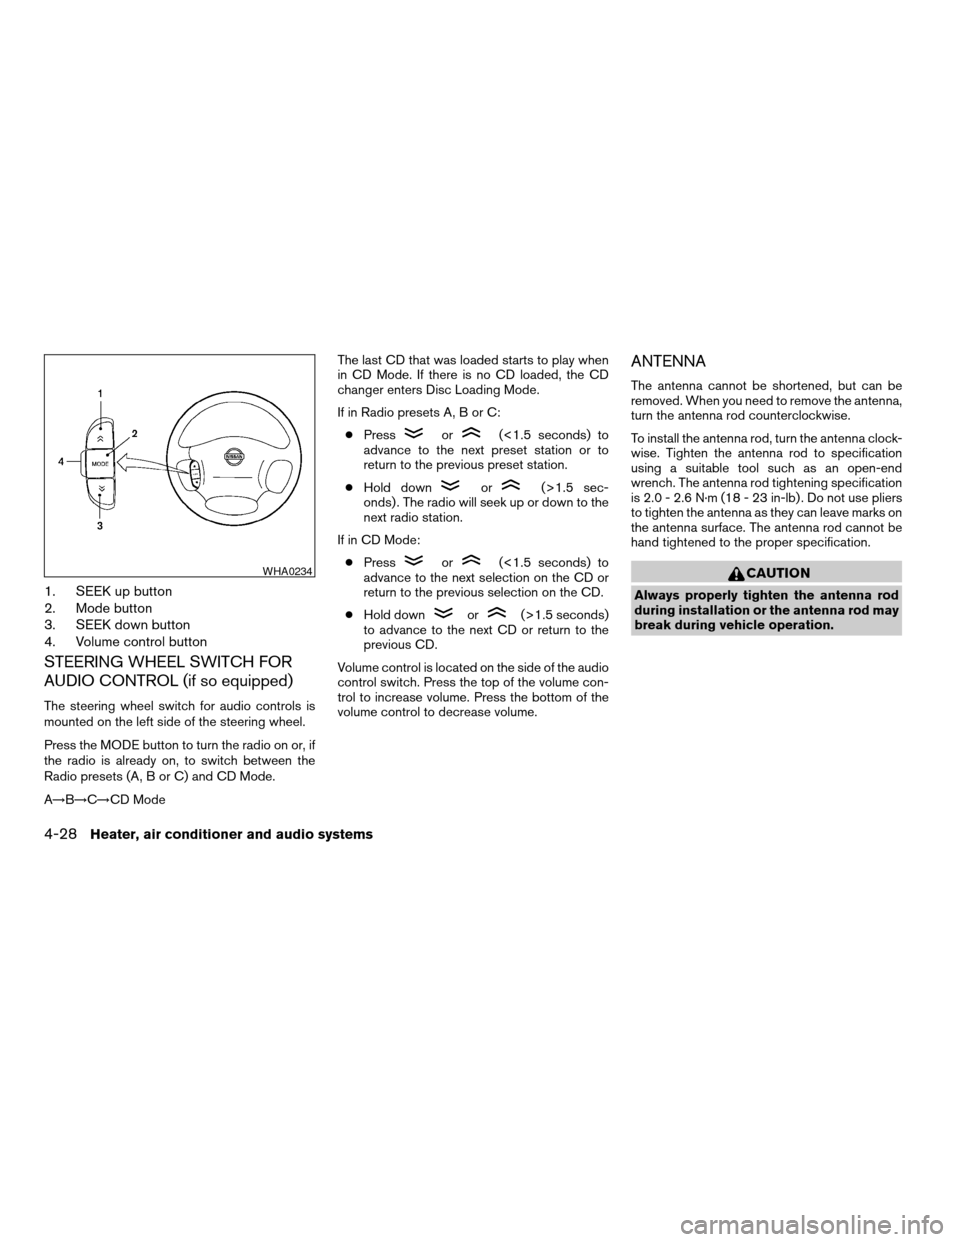
1. SEEK up button
2. Mode button
3. SEEK down button
4. Volume control button
STEERING WHEEL SWITCH FOR
AUDIO CONTROL (if so equipped)
The steering wheel switch for audio controls is
mounted on the left side of the steering wheel.
Press the MODE button to turn the radio on or, if
the radio is already on, to switch between the
Radio presets (A, B or C) and CD Mode.
A!B!C!CD ModeThe last CD that was loaded starts to play when
in CD Mode. If there is no CD loaded, the CD
changer enters Disc Loading Mode.
If in Radio presets A, B or C:
cPress
or(<1.5 seconds) to
advance to the next preset station or to
return to the previous preset station.
cHold down
or(>1.5 sec-
onds) . The radio will seek up or down to the
next radio station.
If in CD Mode:
cPress
or(<1.5 seconds) to
advance to the next selection on the CD or
return to the previous selection on the CD.
cHold down
or(>1.5 seconds)
to advance to the next CD or return to the
previous CD.
Volume control is located on the side of the audio
control switch. Press the top of the volume con-
trol to increase volume. Press the bottom of the
volume control to decrease volume.
ANTENNA
The antenna cannot be shortened, but can be
removed. When you need to remove the antenna,
turn the antenna rod counterclockwise.
To install the antenna rod, turn the antenna clock-
wise. Tighten the antenna rod to specification
using a suitable tool such as an open-end
wrench. The antenna rod tightening specification
is 2.0 - 2.6 N·m (18 - 23 in-lb) . Do not use pliers
to tighten the antenna as they can leave marks on
the antenna surface. The antenna rod cannot be
hand tightened to the proper specification.
CAUTION
Always properly tighten the antenna rod
during installation or the antenna rod may
break during vehicle operation.
WHA0234
4-28Heater, air conditioner and audio systems
ZREVIEW COPY:Ð2004 Xterra(xtr)
Owners Manual(owners)ÐUSA English(nna)
10/23/03Ðdebbie
X
Page 158 of 296
cWhen a spare tire is mounted or a wheel
is replaced, tire pressure will not be
indicated and the low tire pressure
warning system will not function. Con-
tact your NISSAN dealer as soon as
possible for tire replacement and/or
system resetting.
cDo not inject any tire liquid or aerosol
tire sealant into the tires, as this may
cause a malfunction of the tire pressure
sensors.
CAUTION
Do not place metalized film or any metal
parts (antenna, etc.) on the windows. This
may cause poor reception of the signals
from the tire pressure sensors, and the
low tire pressure warning system will not
function properly.
FCC Notice:
Changes or modifications not expressly ap-
proved by the manufacturer compliance
could void the user’s authority to operate
the equipment.
This device complies with Part 15 of the
FCC Rules and RSS-210 of Industry
Canada.Operation is subject to the following two
conditions: (1) This device may not cause
harmful interface, and (2) this device must
accept any interference received, including
interference that may cause undesired op-
eration of the device.
ON-PAVEMENT AND OFF-ROAD
DRIVING PRECAUTIONS
Utility vehicles have a significantly higher
rollover rate than other types of vehicles.
They have higher ground clearance than passenger
cars to make them capable of performing in a variety
of on-pavement and off-road applications. This
gives them a higher center of gravity than ordinary
cars. An advantage of higher ground clearance is a
better view of the road, allowing you to anticipate
problems. However, they are not designed for cor-
nering at the same speeds as conventional two-
wheel drive vehicles any more than low-slung
sports cars are designed to perform satisfactorily
under off-road conditions. If at all possible, avoid
sharp turns at high speeds. As with other vehicles of
this type, failure to operate this vehicle correctly
may result in loss of control or vehicle rollover. In a
rollover crash, an unbelted person is significantly
more likely to die than a person wearing a seat belt.
Be sure to read the driving safety precautions
later in this section.
AVOIDING COLLISION AND
ROLLOVER
WARNING
Failure to operate this vehicle in a safe
and prudent manner may result in loss of
control or an accident.
Be alert and drive defensively at all times. Obey
all traffic regulations. Avoid excessive speed,
high speed cornering, or sudden steering ma-
neuvers, because these driving practices could
cause you to lose control of your vehicle.As with
any vehicle, loss of control could result in a
collision with other vehicles or objects, or
cause the vehicle to roll over, particularly if
the loss of control causes the vehicle to
slide sideways.Be attentive at all times, and
avoid driving when tired. Never drive when under
the influence of alcohol or drugs (including pre-
scription or over-the-counter drugs which may
cause drowsiness) . Always wear your seat belt
as outlined in the “Safety – Seats, seat belts and
supplemental air bags” section of this manual,
and also instruct your passengers to do so.
Seat belts help reduce the risk of injury in colli-
sions and rollovers.In a rollover crash, an
unbelted or improperly belted person is
significantly more likely to be injured or
killed than a person wearing a seat belt.
5-4Starting and driving
ZREVIEW COPY:Ð2004 Xterra(xtr)
Owners Manual(owners)ÐUSA English(nna)
10/23/03Ðdebbie
X
Page 169 of 296

You cannot shift directly from 5th gear into R
(Reverse) . First shift into N (Neutral) , then into R
(Reverse) .
If it is difficult to move the shift lever into R
(Reverse) or 1 (First) , shift into N (Neutral) , then
release the clutch pedal. Depress the clutch
pedal again and shift into R (Reverse) or 1 (First) .
If your vehicle is equipped with 4-wheel drive, see
“ Transfer case shifting procedures” later in this
section.
Suggested upshift speeds
The following are suggested vehicle speeds for
shifting into a higher gear. These suggestions
relate to fuel economy and vehicle performance.
Actual upshift speeds will vary according to road
conditions, the weather and individual driving
habits.
cTwo-wheel drive models and four-wheel
drive models (2H and 4H position):
GEAR CHANGE MPH (km/h)
1st to 2nd 15 (24)
2nd to 3rd 25 (40)
3rd to 4th 40 (64)
4th to 5th 45 (72)
c4–wheel drive model (4L position):
GEAR CHANGE MPH (km/h)
1st to 2nd 8 (13)
2nd to 3rd 12 (19)
3rd to 4th 20 (32)
4th to 5th 22 (35)
Suggested maximum speed in each
gear
Downshift to a lower gear if the engine is not
running smoothly, or if you need to accelerate.
Do not exceed the maximum suggested speed
(shown below) in any gear. For level road driving,
use the highest gear suggested for that speed.
Always observe posted speed limits, and drive
according to the road conditions, which will en-
sure safe operation. Do not over-rev the engine
when shifting to a lower gear as it may cause
engine damage or loss of vehicle control.
Allowable maximum speed in each gear:
2–wheel drive models
GEAR CHANGE MPH (km/h)
1st 30 (48)
2nd 55 (88)
3rd 80 (129)
4th —
5th —
4–wheel drive models
2H/4H position
GEAR CHANGE MPH (km/h)
1st 25 (40)
2nd 43 (69)
3rd 68 (109)
4th —
5th —
4L position
GEAR CHANGE MPH (km/h)
1st 12 (19)
2nd 22 (35)
3rd 30 (48)
4th —
5th —
Starting and driving5-15
ZREVIEW COPY:Ð2004 Xterra(xtr)
Owners Manual(owners)ÐUSA English(nna)
10/23/03Ðdebbie
X
Page 185 of 296
WARNING
cIf the low tire pressure warning light
flashes while driving, avoid sudden
steering maneuvers or abrupt braking,
reduce vehicle speed, pull off the road
to a safe location and stop the vehicle
as soon as possible. Serious vehicle
damage could occur and may lead to an
accident and could result in serious
personal injury. Check the tire pressure
for all four tires. Adjust the tire pressure
to the recommended COLD tire pres-
sure shown on the tire placard to turn
the low tire pressure warning light OFF.
If you have a flat tire, replace it with a
spare tire as soon as possible.
cWhen a spare tire is mounted or a wheel
is replaced, tire pressure will not be
indicated and the low tire pressure
warning system will not function. Con-
tact your NISSAN dealer as soon as
possible for tire replacement and/or
system resetting.
cDo not inject any tire liquid or aerosol
tire sealant into the tires, as this may
cause a malfunction of the tire pressure
sensors.
CHANGING A FLAT TIRE
If you have a flat tire, follow the instructions be-
low.
Stopping the vehicle
1. Safely move the vehicle off the road and
away from traffic.
2. Turn on the hazard warning flashers.
3. Park on a level surface and apply the parking
brake. Shift the manual transmission into R
(Reverse) , or the automatic transmission
into P (Park) .
WARNING
cThe transfer control lever must
be in the 2H, 4H or 4L position.
cDo not leave the transfer control lever in
the N (Neutral) position. Otherwise, the
vehicle could roll unexpectedly even if
the manual transmission is in any gear
or the automatic transmission is in the
P (Park) position. This could result in
serious personal injury or property
damage.
4. Turn off the engine.5. Raise the hood to warn other traffic and to
signal professional road assistance person-
nel that you need assistance.
6. Have all passengers get out of the vehicle
and stand in a safe place, away from traffic
and clear of the vehicle.
WARNING
cMake sure the parking brake is securely
applied and the manual transmission is
shifted into R (Reverse) , or the auto-
matic transmission into P (Park) .
cNever change tires when the vehicle is
on a slope, ice or slippery areas. This is
hazardous.
cNever change tires if oncoming traffic is
close to your vehicle. Wait for profes-
sional road assistance.
cWhen a spare tire is mounted or a wheel
is replaced, the low tire pressure warn-
ing system will not function. Contact
your NISSAN dealer as soon possible
for tire replacement and/or system re-
setting. (For models with the low tire
pressure warning system)
In case of emergency6-3
ZREVIEW COPY:Ð2004 Xterra(xtr)
Owners Manual(owners)ÐUSA English(nna)
10/23/03Ðdebbie
X
Page 186 of 296
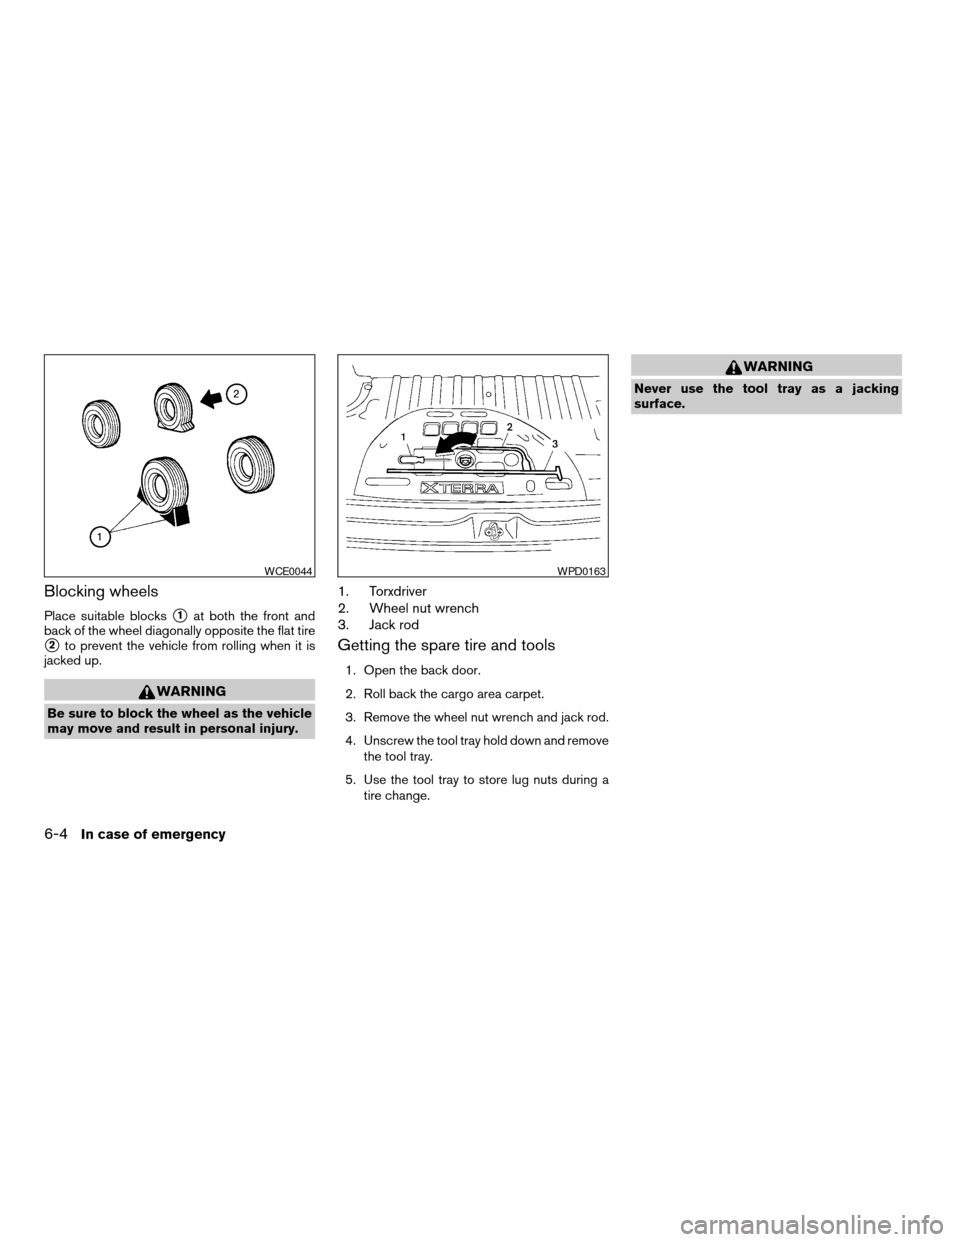
Blocking wheels
Place suitable blockss1at both the front and
back of the wheel diagonally opposite the flat tire
s2to prevent the vehicle from rolling when it is
jacked up.
WARNING
Be sure to block the wheel as the vehicle
may move and result in personal injury.
1. Torxdriver
2. Wheel nut wrench
3. Jack rod
Getting the spare tire and tools
1. Open the back door.
2. Roll back the cargo area carpet.
3. Remove the wheel nut wrench and jack rod.
4. Unscrew the tool tray hold down and remove
the tool tray.
5. Use the tool tray to store lug nuts during a
tire change.
WARNING
Never use the tool tray as a jacking
surface.
WCE0044WPD0163
6-4In case of emergency
ZREVIEW COPY:Ð2004 Xterra(xtr)
Owners Manual(owners)ÐUSA English(nna)
10/23/03Ðdebbie
X
Page 189 of 296
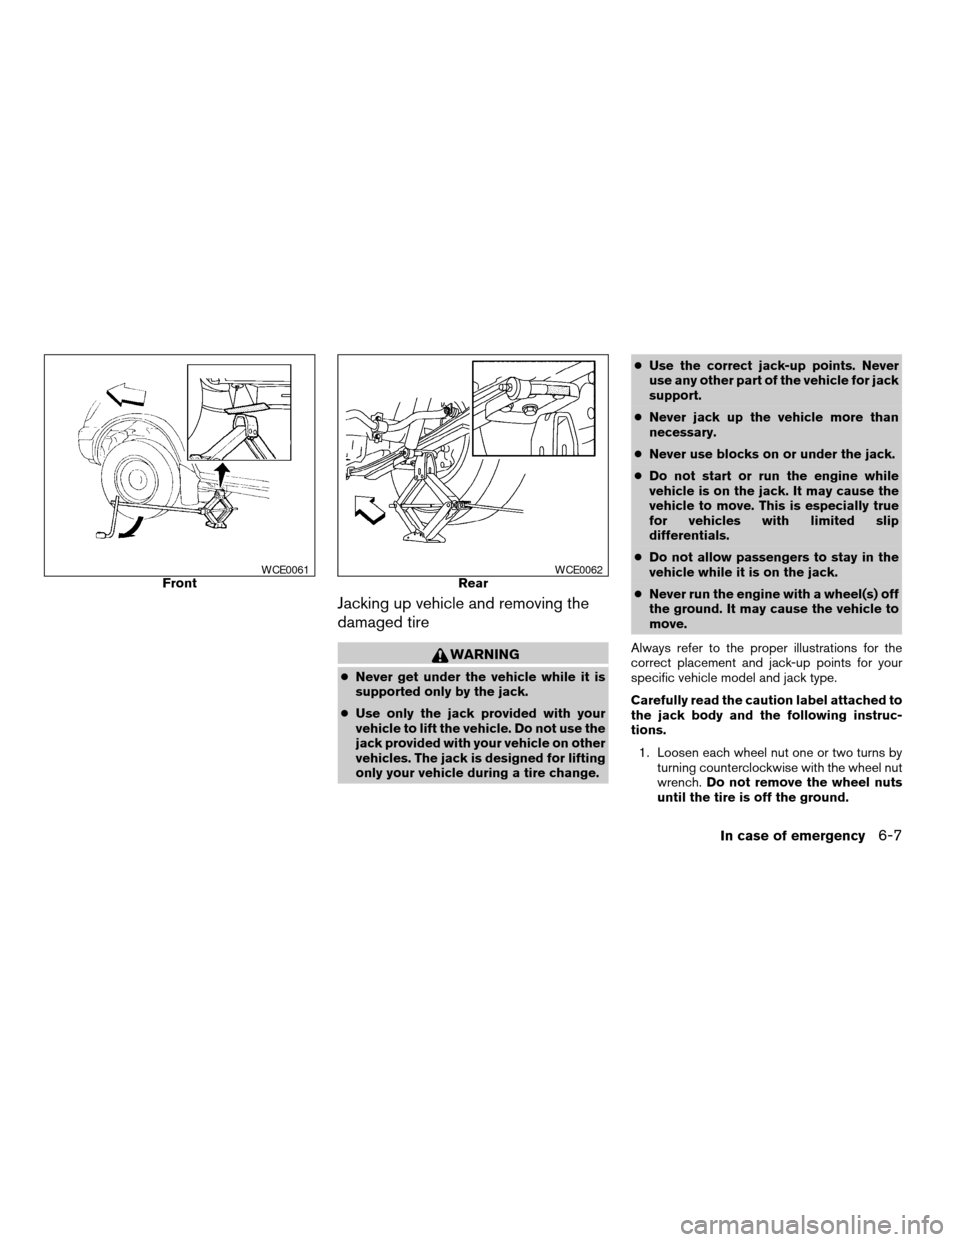
Jacking up vehicle and removing the
damaged tire
WARNING
cNever get under the vehicle while it is
supported only by the jack.
cUse only the jack provided with your
vehicle to lift the vehicle. Do not use the
jack provided with your vehicle on other
vehicles. The jack is designed for lifting
only your vehicle during a tire change.cUse the correct jack-up points. Never
use any other part of the vehicle for jack
support.
cNever jack up the vehicle more than
necessary.
cNever use blocks on or under the jack.
cDo not start or run the engine while
vehicle is on the jack. It may cause the
vehicle to move. This is especially true
for vehicles with limited slip
differentials.
cDo not allow passengers to stay in the
vehicle while it is on the jack.
cNever run the engine with a wheel(s) off
the ground. It may cause the vehicle to
move.
Always refer to the proper illustrations for the
correct placement and jack-up points for your
specific vehicle model and jack type.
Carefully read the caution label attached to
the jack body and the following instruc-
tions.
1. Loosen each wheel nut one or two turns by
turning counterclockwise with the wheel nut
wrench.Do not remove the wheel nuts
until the tire is off the ground.
FrontWCE0061RearWCE0062
In case of emergency6-7
ZREVIEW COPY:Ð2004 Xterra(xtr)
Owners Manual(owners)ÐUSA English(nna)
10/23/03Ðdebbie
X