Page 205 of 306

if the automatic transmission is in
the P position. This could result in
serious personal injury or property
damage.
4. Turn off the engine.
5. Raise the hood to warn other traffic and to
signal professional road assistance person-
nel that you need help.
6. Have all passengers get out of the vehicle
and stand in a safe place away from traffic
and clear of the vehicle.
WARNING
�Make sure that the parking brake is
securely applied and the manual
transmission is shifted into R (re-
verse), on the automatic transmis-
sion in P (Park).
�Never change tires when the vehicle
is on a slope, ice or a slippery area.
This is hazardous.
�Never change tires if oncoming trafficis close to your vehicle. Wait for pro-
fessional road assistance.
�When a spare tire is mounted or a
wheel is replaced, the low tire pres-
sure warning system will not func-
tion. Contact your NISSAN dealer as
soon as possible for tire replacement
and/or system resetting. (For models
with the low tire pressure warning
system)
Blocking wheelsPlace suitable blocks at both the front and back
of the wheel diagonally opposite the flat tire to
prevent the vehicle from rolling when it is jacked
up.
WARNING
Be sure to block the wheel as the ve-
hicle may move and could cause per-
sonal injury.
MCE0001
In case of emergency
6-3
�
04.3.9/R50-D/V5
�
Page 207 of 306
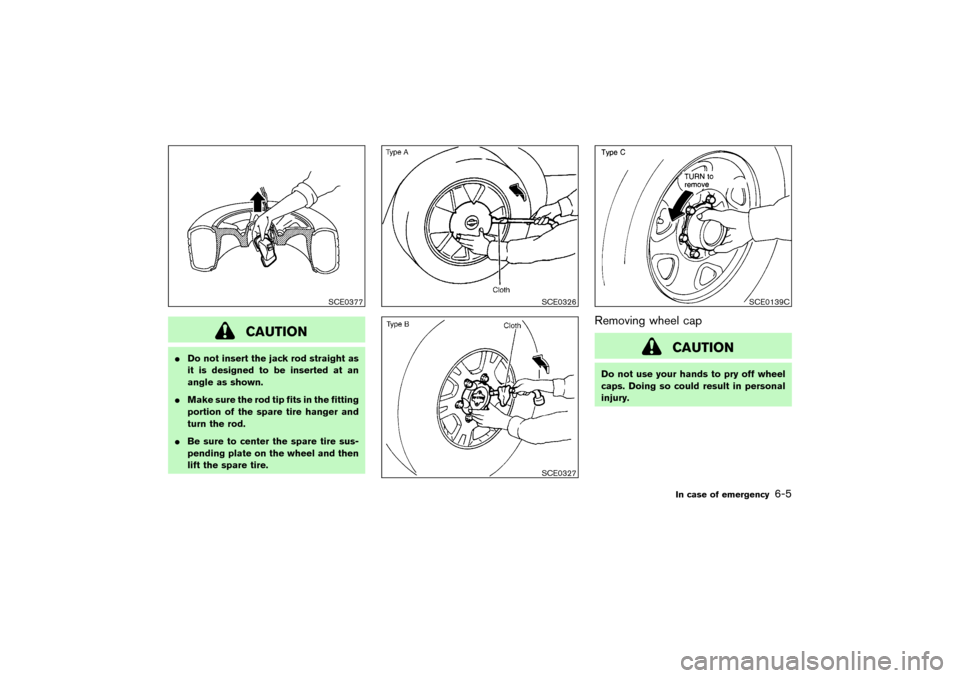
CAUTION
�Do not insert the jack rod straight as
it is designed to be inserted at an
angle as shown.
�Make sure the rod tip fits in the fitting
portion of the spare tire hanger and
turn the rod.
�Be sure to center the spare tire sus-
pending plate on the wheel and then
lift the spare tire.
Removing wheel cap
CAUTION
Do not use your hands to pry off wheel
caps. Doing so could result in personal
injury.
SCE0377
SCE0326SCE0327
SCE0139C
In case of emergency
6-5
�
04.3.9/R50-D/V5
�
Page 209 of 306

Installing the spare tireThe spare tire is designed for emergency
use. See specific instructions under the
heading “Wheels and tires” in the “Main-
tenance and do-it-yourself” section.
1. Clean any mud or dirt from the surface
between the wheel and hub.
2. Carefully put the wheel on and tighten the
wheel nuts finger tight.
3. With the wheel nut wrench, tighten wheel
nuts alternately and evenly until they are tight.
4. Lower the vehicle slowly until the tire touchesthe ground. Then, with the wheel nut wrench,
tighten the wheel nuts securely in the se-
quence as illustrated (
�1,�2,�3,�4,�5,�6).
Lower the vehicle completely.
WARNING
�Incorrect wheel nuts or improperly
tightened wheel nuts can cause the
wheel to become loose or come off.
This could cause an accident.
�Do not use oil or grease on the wheel
studs or nuts. This could cause the
nuts to become loose.
Retighten the wheel nuts after the vehicle
has been driven for 600 miles (1,000 km)
(also in cases of a flat tire, etc.). As soon as
possible tighten the wheel nuts to the
specified torque with a torque wrench.
Wheel nut tightening torque:
98 ft-lb (133 N⋅m)
The wheel nuts must be kept tightened to
specification at all times. It is recom-
mended that wheel nuts be tightened to
specification at each lubrication interval.
Adjust tire pressure to the COLD pressure.COLD pressure:
After vehicle has been parked for three
hours or more or driven less than 1 mile
(1.6 km).
COLD tire pressures are shown on the tire
placard/Tire and Loading Information label
affixed to the glove box lid.
SCE0122
In case of emergency
6-7
�
04.3.9/R50-D/V5
�
Page 210 of 306
5. Securely store the tire and jacking equipment
in the vehicle as illustrated.
WARNING
�Always make sure that the spare tire
and jacking equipment are properly
secured after use. Such items can
become dangerous projectiles in an
accident or sudden stop.
�The small size spare tire is designed
for emergency use. See “Tires andwheels” in the “8. Maintenance and
do-it-yourself” section.
Tightening torque of nuts:
48 to 66 ft-lb
(66 to 89 N⋅m)
Use a suitable padlock.
SCE0339C
SCE0244
6-8
In case of emergency
�
04.3.9/R50-D/V5
�
Page 229 of 306

When driving in areas using road salt or other
corrosive materials, check lubrication frequently.
Lights*:
Clean the headlights on a regular basis. Make
sure that the headlights, stop lights, tail lights,
turn signal lights, and other lights are all operat-
ing properly and installed securely. Also check
headlight aim.
Road wheel nuts (lug nuts)*:
When checking the tires, make sure no wheel
nuts are missing, and check for any loose wheel
nuts. Tighten if necessary.
Tires*:
Check the pressure with a gauge often and
always prior to long distance trips. If necessary,
adjust the pressure in all tires, including the
spare, to the pressure specified. Check carefully
for damage, cuts or excessive wear.
Tire rotation*:
Tires should be rotated every 7,500 miles
(12,000 km). However, the timing for tire rotation
may vary according to your driving habits and
road surface conditions.
Tire, wheel alignment and balance:
If the vehicle should pull to either side while
driving on a straight and level road, or if youdetect uneven or abnormal tire wear, there may
be a need for wheel alignment.
If the steering wheel or seat vibrates at normal
highway speeds, wheel balancing may be
needed.
For additional information regarding tires, refer to
“Important Tire Safety Information” (US) or “Tire
Safety Information” (Canada) in the Warranty
Information booklet.
Windshield:
Clean the windshield on a regular basis. Check
the windshield at least every six months for
cracks or other damage. Have a damaged wind-
shield repaired by a qualified repair facility.
Windshield wiper blades*:
Check for cracks or wear if they do not wipe
properly.
Inside the vehicleThe maintenance items listed here should be
checked on a regular basis, such as when
performing periodic maintenance, cleaning the
vehicle, etc.
Accelerator pedal:
Check the pedal for smooth operation and make
sure the pedal does not catch or require uneven
effort. Keep the floor mats away from the pedal.Automatic transmission P (Park) position
mechanism:
On a fairly steep hill check that your vehicle is
held securely with the selector lever in the P
position without applying any brakes.
Brake pedal and booster*:
Check the pedal for smooth operation and make
sure it has the proper distance under it when
depressed fully. Check the brake booster func-
tion. Be certain to keep floormats away from the
pedal.
Brakes:
Check that the brakes do not pull the vehicle to
one side when applied.
Clutch pedal*:
Make sure the pedal operates smoothly and
check that it has the proper free travel.
Parking brake*:
Check that the lever has the proper travel and
confirm that your vehicle is held securely on a
fairly steep hill with only the parking brake ap-
plied.
Seats:
Check seat position controls such as seat ad-
justers, seatback recliner, etc. to ensure they
Maintenance and do-it-yourself
8-3
�
04.3.9/R50-D/V5
�
Page 257 of 306
 often and always prior to long distance
trips. The recommended tire pressure specifica-
tions are shown on th")
TIRE PRESSURE
Tire inflation pressureCheck the pressure of the tires (including the
spare) often and always prior to long distance
trips. The recommended tire pressure specifica-
tions are shown on the Tire and Loading Infor-
mation label under the “Recommended Cold
Tire Inflation Pressure” heading. The tire and
Loading Information label is affixed to the driver
side center pillar. Tire pressures should be
checked regularly because:
�Most tires naturally lose air over time.
�Tires can lose air suddenly when driven over
potholes or other objects or if the vehicle
strikes a curbwhile parking.
The tire pressures should be check when the
tires are cold. The tires are considered COLD
after the vehicle has been parked for 3 or more
hours, or driven less than 1 mile (1.6 km) at
moderate speeds.
Incorrect tire pressure, including under in-
flation, may adversely affect tire life and
vehicle handling.
SDI0980A
SDI0333B
WHEELS AND TIRES
Maintenance and do-it-yourself
8-31
�
04.3.9/R50-D/V5
�
Page 258 of 306

WARNING
�Improperly inflated tires can fail sud-
denly and cause an accident.
�The vehicle weight capacity is indi-
cated on the Tire and Loading Infor-
mation label. Do not load your ve-
hicle beyond this capacity. Over-
loading your vehicle may result in
reduced tire life, unsafe operating
conditions due to premature tire mal-
functions, or unfavorable handling
characteristics and could also lead to
a serious accident. Loading beyond
the specified capacity may also result
in a malfunction of other vehicle
components.
�Before taking a long trip, or when-
ever you heavily load your vehicle,
use a tire pressure gauge to ensure
that the tire pressures are at the
specified level.
�Do not drive your vehicle over 85
MPH (137 km/h) unless it is equippedwith high-speed capability tires. Driv-
ing faster than 85 MPH (137 km/h)
may result in tire malfunction, loss of
control and possible injury.
�For additional information regarding
tires, refer to “Important Tire Safety
Information” (US) or “Tire Safety In-
formation” (Canada) in the Warranty
Information Booklet.
Low tire pressure warning system
(if so equipped)The low tire pressure warning system monitors
the tire pressure of all tires (except the spare tire)
by sending a signal from a sensor that is installed
in each wheel. For more details, refer to “Low tire
pressure warning light” in the “2. Instruments
and controls” section, “Low tire pressure warn-
ing system” in the “5. Starting and driving”
section, and “Flat tire” in the “6. In case of
emergency” section. The low tire pressure warn-
ing system will activate only when the vehicle is
driven at speeds above 20 MPH (32 km/h).
8-32
Maintenance and do-it-yourself
�
04.3.9/R50-D/V5
�
Page 260 of 306

the Tire and Loading Information label.
5. Add air to the tire as needed. If too much air
is added, press the core of the valve stem
briefly with the tip of the gauge stem to
release pressure. Recheck the pressure and
add or release air as needed.
6. Install the valve stem cap.
7. Check the pressure of all other tires, includ-
ing the spare. (Refer to the “Wheels and
tires” section.)
TIRE LABELINGFederal law requires tire manufacturers to place
standardized information on the sidewall of all
tires. This information identifies and describes
the fundamental characteristics of the tire and
also provides the tire identification number (TIN)
for safety standard certification. The TIN can be
used to identify the tire in case of a recall in case
of recall.
�1Tire size (example: P215/60R16 94H)
1 P: The “P” indicates the tire is designed for
passenger vehicles.
2. Three-digit number (215): This number gives
the width in millimeters of the tire from side-
wall edge to sidewall edge.
(Not all tires have this information.)
3. Two-digit number (60): This number, known
as the aspect ratio, gives the tire’s ratio of
height to width.
4. R: The “R” stands for radial.
5. Two-digit number (16): This number is the
wheel or rim diameter in inches.
SDI1575
SDI1606
8-34
Maintenance and do-it-yourself
�
04.3.9/R50-D/V5
�