Page 109 of 283

Push the LOCK and UNLOCK buttons on the
keyfobsimultaneously for more than 2 seconds
to switch from one mode to the other.
When pushing the buttons to set hazard indica-
tor only")
(Switching procedure)
Push the LOCK and UNLOCK buttons on the
keyfobsimultaneously for more than 2 seconds
to switch from one mode to the other.
When pushing the buttons to set hazard indica-
tor only mode, the hazard indicator flashes 3
times.
When pushing the buttons to set hazard indica-
tor and horn mode, the hazard indicator flashes
once and the horn chirps once.
Locking doors and fuel filler lid1. Remove the ignition key.*1
2. Close all the doors and fuel filler lid.*2
3. Push the LOCK button on the keyfob.
4. All the doors and fuel filler lid will lock.
All of the doors will lock when the LOCK
button on the keyfob is pushed even
though a door remains open and/or the
ignition key is in the ONposition.
5. The hazard indicator flashes twice and the
horn chirps once.�When the LOCK button is pushed with all
doors and fuel filler lid locked, the hazard
indicator flashes twice and the horn chirps
once as a reminder that the doors and fuel
filler lid are already locked.
*1: Doors and fuel filler lid lock with the keyfob
while a key is in the ignition switch. How-
ever, the panic alarm will not activate when
the key is in the ignition switch.
*2: Doors and fuel filler lid lock with the keyfob
while any door is open. However, hazard
indicator and horn mode will not function.
SPA1260
3-6
Pre-driving checks and adjustments
�
04.4.5/Z50-D/V5.0
�
Page 110 of 283

Unlocking doors1. Push the UNLOCK button on the keyfob
once.
�The driver’s door and fuel filler lid unlocks
�The hazard indicator flashes once if all doors
and fuel filler lid are completely closed with
the ignition key in any position except the ON
position.
�The interior light turns on and the light timer
activates for 30 seconds when the switch is
in the DOOR position with the ignition key in
any position except the ON position.2. Push the UNLOCK button on the keyfob
again within 5 seconds.
�All doors unlock
�The hazard indicator flashes once if all doors
are completely closed.
If the following operation is not carried out
within 1 minute after pressing the
UNLOCK button, all doors will be locked
automatically.
�any door is opened.
�the ignition key is turned to the ON
position
The interior light can be turned off without
waiting for 30 seconds by turning the ignition
switch to the ON position or by locking the
doors with the keyfob.
Opening the front windowPush the UNLOCK button on the keyfob.
The driver’s door will unlock.
Continue to press the UNLOCK button for 3
seconds. The driver’s and front passenger’s
windows will be lowered.
Continue to press the UNLOCK button until
windows are fully open.To stop lowering the windows, release the UN-
LOCK button.
To start lowering the windows, press the UN-
LOCK button again for 3 more seconds.
This function will operate after the ignition switch
is off and 45 seconds passed or either the front
door is opened.
Using the panic alarmIf you are near your vehicle and feel threatened,
you may activate the alarm to call attention as
follows:
1. Push the PANIC button on the keyfob for
longer than 0.5 seconds.
2. The theft warning alarm and headlights will
stay on for 30 seconds.
3. The panic alarm stops when:
�It has run for 30 seconds, or
�The LOCK or the UNLOCK button is
pressed, or
�The panic button is pushed on the keyfob for
more than 0.5 seconds.
SPA1397
Pre-driving checks and adjustments
3-7
�
04.4.5/Z50-D/V5.0
�
Page 112 of 283
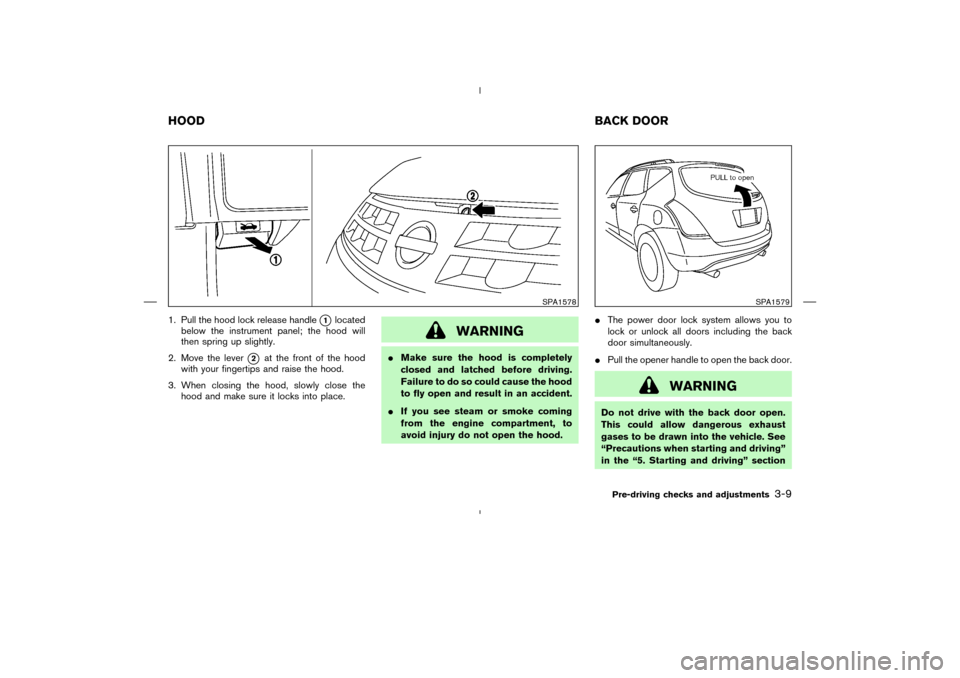
1. Pull the hood lock release handle
�1
located
below the instrument panel; the hood will
then spring up slightly.
2. Move the lever
�2
at the front of the hood
with your fingertips and raise the hood.
3. When closing the hood, slowly close the
hood and make sure it locks into place.
WARNING
�Make sure the hood is completely
closed and latched before driving.
Failure to do so could cause the hood
to fly open and result in an accident.
�If you see steam or smoke coming
from the engine compartment, to
avoid injury do not open the hood.�The power door lock system allows you to
lock or unlock all doors including the back
door simultaneously.
�Pull the opener handle to open the back door.
WARNING
Do not drive with the back door open.
This could allow dangerous exhaust
gases to be drawn into the vehicle. See
“Precautions when starting and driving”
in the “5. Starting and driving” section
SPA1578
SPA1579
HOODBACK DOOR
Pre-driving checks and adjustments
3-9
�
04.4.5/Z50-D/V5.0
�
Page 113 of 283
for exhaust gas.
To lock or unlock the back doorIf the back door cannot be locked or unlocked
with the door lock switch or remote controller
due to a discharged battery, follow the next
steps.
1. Remove the cover inside of the back door
with a suitable tool.
2. Move the lever as illustrated to lock or unlock.
Contact your NISSAN dealer as soon as pos-
sible.
WARNING
�Always check the back door has been
closed securely to prevent it from
opening while driving.
�Do not drive with the back door open.
This could allow dangerous exhaust
gases to be drawn into the vehicle.
SPA1617
3-10
Pre-driving checks and adjustments
�
04.4.5/Z50-D/V5.0
�
Page 114 of 283

OPEN THE FILLER LIDTo open the fuel filler lid, unlock it using one of
the following operations, then push the right-
hand side of the lid
�A.
�Press the unlock button on the keyfob once.
�Insert the key into the door lock cylinder and
turn the door key clockwise twice.
�Press the power door lock switch to the
unlock side.
To lock, close the fuel filler lid and lock the doors.
FUEL FILLER CAPThe fuel filler cap is a ratcheting type. Tighten the
cap clockwise until ratcheting clicks are heard.
Put the fuel filler cap on the cap holder while
refueling.
WARNING
�Gasoline is extremely flammable and
highly explosive under certain condi-
tions. You could be burned or seri-ously injured if it is misused or mis-
handled. Always stop the engine and
do not smoke or allow open flames
or sparks near the vehicle when refu-
eling.
�Fuel may be under pressure. Turn the
cap a third of a turn, and wait for any
hissing sound to stop to prevent fuel
from spraying out and possible per-
sonal injury. Then remove the cap.
�Do not attempt to top off the fuel
SPA1580
SPA1581
FUEL FILLER LID
Pre-driving checks and adjustments
3-11
�
04.4.5/Z50-D/V5.0
�
Page 116 of 283
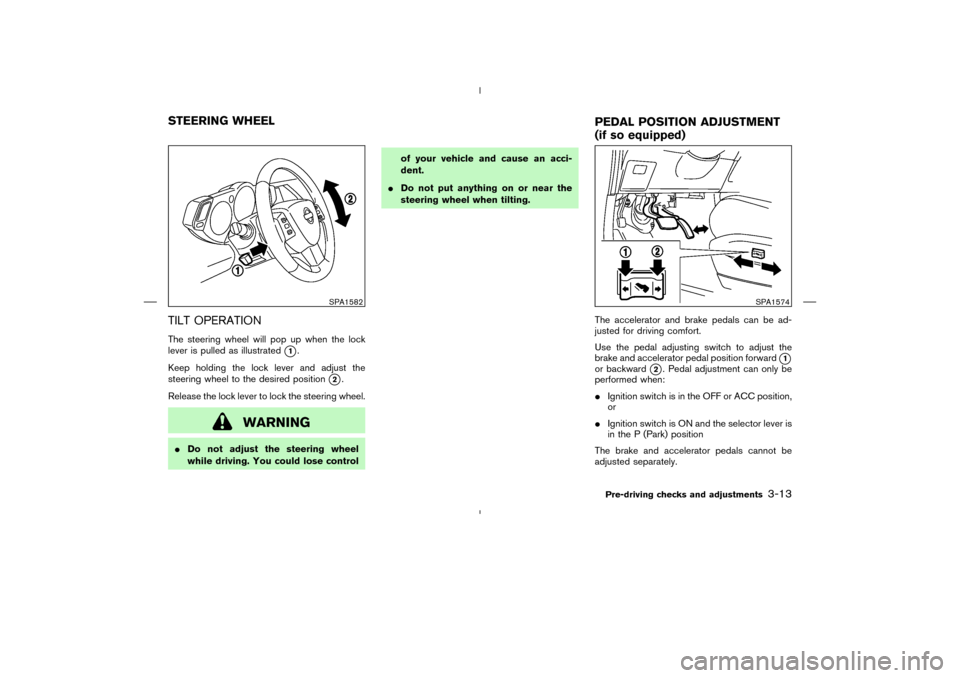
TILT OPERATIONThe steering wheel will pop up when the lock
lever is pulled as illustrated
�1.
Keep holding the lock lever and adjust the
steering wheel to the desired position
�2.
Release the lock lever to lock the steering wheel.
WARNING
�Do not adjust the steering wheel
while driving. You could lose controlof your vehicle and cause an acci-
dent.
�Do not put anything on or near the
steering wheel when tilting.
The accelerator and brake pedals can be ad-
justed for driving comfort.
Use the pedal adjusting switch to adjust the
brake and accelerator pedal position forward
�1
or backward
�2. Pedal adjustment can only be
performed when:
�Ignition switch is in the OFF or ACC position,
or
�Ignition switch is ON and the selector lever is
in the P (Park) position
The brake and accelerator pedals cannot be
adjusted separately.
SPA1582
SPA1574
STEERING WHEEL
PEDAL POSITIONADJUSTMENT
(if so equipped)
Pre-driving checks and adjustments
3-13
�
04.4.5/Z50-D/V5.0
�
Page 119 of 283

ignition switch is in the ACC or ON position.
Move the switch to right
�A
or left
�B
to select
the right or left outside mirror, then adjust the
mirror to the desired position by pushing the
button
�C.
Foldable outside mirrorsFold the outside mirror by pushing it toward the
rear of the vehicle.The automatic drive positioner system has two
features:
�Entry/exit function
�Memory storage
ENTRY/EXIT FUNCTIONThis system is designed so that the driver’s seat,
pedals (Brake, Accelerator) and outside mirrors
will automatically move when the selector lever is
in the P (Park) position. This allows the driver to
get into and out of the driver’s seat more easily.
The driver’s seat will slide backward:
�When the key is removed from the ignition
switch.
�When the driver’s door is opened with the
key turned to LOCK.
�When the key is turned from ACC to LOCK
with the driver’s door open while the selector
lever is in the P (Park) position.
The driver’s seat will return to the previous
position:
�When the key is inserted into the ignition
switch.
�When the driver’s door is closed with the key
turned to LOCK.
�When the key is turned from ACC to ON
MPA0008
AUTOMATIC DRIVE POSITIONER
(if so equipped)
3-16
Pre-driving checks and adjustments
�
04.4.5/Z50-D/V5.0
�
Page 120 of 283

position.
The entry/exit feature can be adjusted or can-
celed. See “Display screen, heater, air condi-
tioner and audio systems” section of this manual")
while the selector lever is in the P (Park)
position.
The entry/exit feature can be adjusted or can-
celed. See “Display screen, heater, air condi-
tioner and audio systems” section of this manual.
MEMORY STORAGETwo positions for the driver’s seat, pedals (Brake
and Accelerator) and outside mirrors can be
stored in the automatic drive positioner memory.
Follow these procedures to use the memory
system.
1. Set the selector lever to the P (Park) position.
2. Turn the ignition ON.
3. Adjust the driver’s seat, pedals (Brake and
Accelerator) and outside mirrors to the de-
sired positions by manually operating each
adjusting switch. For additional information,
see “Seats” in the “Safety — Seats, seat beltsand supplemental air bags” section and
“Pedal position adjustment” and “Outside
mirrors” earlier in this section.
During this step, do not turn the ignition to
any positions other than ON.
4. Push the SET switch and, within 5 seconds,
push the memory switch (1 or 2) fully for at
least 1 second.
The indicator light for the pushed memory
switch will come on and stay on for approxi-
mately 5 seconds after pushing the switch.
After the indicator light goes off, the selected
positions are stored in the selected memory
(1 or 2).
If memory is stored in the same memory switch,
the previous memory will be deleted.
Linking a keyfobto a stored memory
positionA keyfobcan be linked to a stored memory
position with the following procedure.
1. Follow the steps for storing a memory posi-
tion.
2. While the indicator light for the memory
switch being set is illuminated for 5 seconds,
press the unlock button on the keyfob. The
indicator light will blink. After the indicator
SPA1584
Pre-driving checks and adjustments
3-17
�
04.4.5/Z50-D/V5.0
�