Page 180 of 283

AWD LOCK SWITCH OPERATIONSThe AWD system is used to select OFF/AUTO, ON/LOCK depending on the driving conditions.
The AWD system electronically controls the coupling.
Push the AWD LOCK switch to move between each mode OFF/AUTO and ON/LOCK, depending
on driving conditions.AWD LOCK
switchWheel drivenAWD LOCK
indicator
lightUse conditions
OFF/AUTODistribution of torque to the front and
rear wheels changes automatically,
depending on road conditions en-
countered [100:0]↔[50:50].
This results in improved driving stabil-
ity.Goes off. For driving on paved or slippery roads
ON/LOCK *1 ALL wheel drive AWD LOCK For driving on rough roads
*1 LOCK mode will change to AUTO mode automatically, when the vehicle is accelerated or the vehicle speed is
over approximately 19 MPH (30 km/h). The AWD LOCK indicator light does not go off.�If the AWD LOCK switch is operated while accelerating or decelerating, or if the key switch is
turned off while in the OFF/AUTO or ON/LOCK position, you may feel a jerk. This is normal.
�The oil temperature of power train parts will increase if the vehicle is continuously operated under
conditions where the difference in rotation between the front and rear wheels is large (wheel slip)
such as when driving the vehicle on rough roads through sand, mud or freeing a stuck vehicle. In
these cases, the AWD warning light blinks rapidly and the AWD mode changes to 2WD to protect
the power train parts. If you stop driving with the engine idling and wait until the warning light stops
blinking, the AWD returns to the OFF/AUTO mode.
WARNING
�Do not place an AWD equipped ve-
hicle on a two wheel dynamometer or
raise two wheels off the ground and
shift the transmission to any D (drive)
or R (reverse) position. Doing so may
result in transmission damage or un-
expected vehicle movement which
could result in serious vehicle dam-
age or personal injury.
�When driving straight, shift the AWD
lock switch to OFF/AUTO or
ON/LOCK. Do not operate the AWD
lock switch when making a turn or
backing up.
�Do not operate the AWD lock switch
(OFF/AUTO and ON/LOCK) with the
front wheel spinning.
�Engine idling speed is high while
warming up the engine. Be especially
careful when starting or driving on
slippery surfaces with the AWD lock
switch set in OFF/AUTO.
Starting and driving
5-23
�
04.4.5/Z50-D/V5.0
�
Page 195 of 283

�Use the correct jack up points; never
use any other part of the vehicle for
jack support.
�Never jack up the vehicle more than
necessary.
�Never use blocks on or under the
jack.
�Do not start or run engine while ve-
hicle is on the jack, as it may cause
the vehicle to move. This is especially
true for vehicles with limited slip dif-
ferential carriers.
�Do not allow passengers to stay in
the vehicle while it is on the jack.
Installing the spare tireThe spare tire is designed for emergency
use. See specific instructions under the
heading “Wheels and tires” in the “8. Main-
tenance and do-it-yourself ” section of this
manual.
1. Clean any mud or dirt from the surface
between the wheel and hub.
2. Carefully put the spare tire on and tighten the
wheel nuts with your fingers.
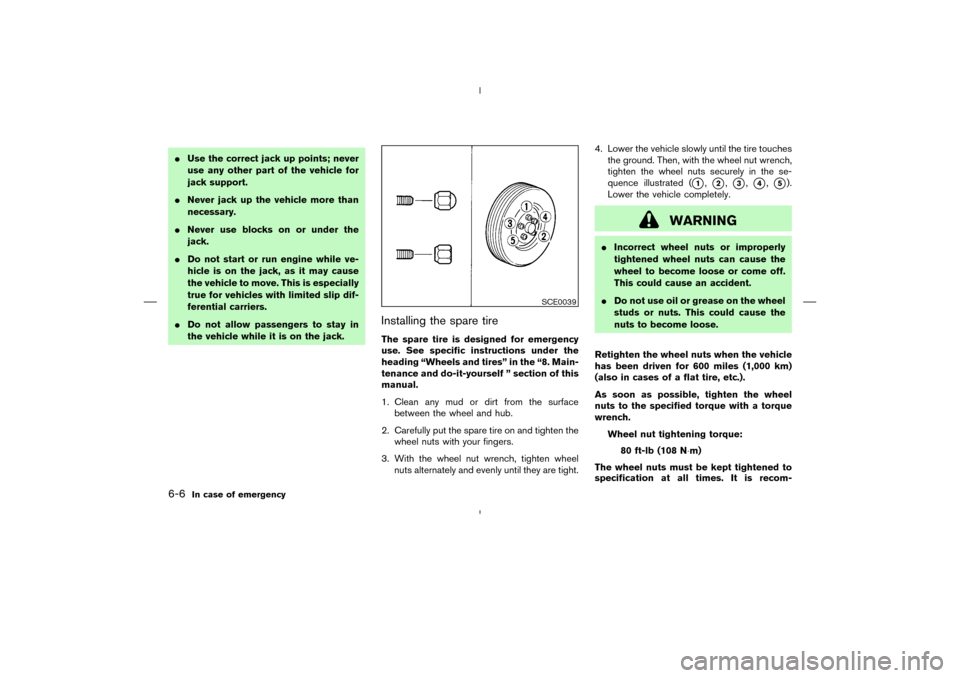
3. With the wheel nut wrench, tighten wheel
nuts alternately and evenly until they are tight.4. Lower the vehicle slowly until the tire touches
the ground. Then, with the wheel nut wrench,
tighten the wheel nuts securely in the se-
quence illustrated (
�1,�2,�3,�4,�5).
Lower the vehicle completely.
WARNING
�Incorrect wheel nuts or improperly
tightened wheel nuts can cause the
wheel to become loose or come off.
This could cause an accident.
�Do not use oil or grease on the wheel
studs or nuts. This could cause the
nuts to become loose.
Retighten the wheel nuts when the vehicle
has been driven for 600 miles (1,000 km)
(also in cases of a flat tire, etc.).
As soon as possible, tighten the wheel
nuts to the specified torque with a torque
wrench.
Wheel nut tightening torque:
80 ft-lb (108 N⋅m)
The wheel nuts must be kept tightened to
specification at all times. It is recom-
SCE0039
6-6
In case of emergency
�
04.4.5/Z50-D/V5.0
�
Page 242 of 283

�Do not use the chains on dry roads.
Tire chains must be installed only on the
front wheels and not on the rear wheels.
Do not drive with tire chains on paved roads
which are clear of snow. Driving with chains in
such conditions can cause damage to the vari-
ous mechanisms of the vehicle due to some
overstress.
CHANGING WHEELS AND TIRES
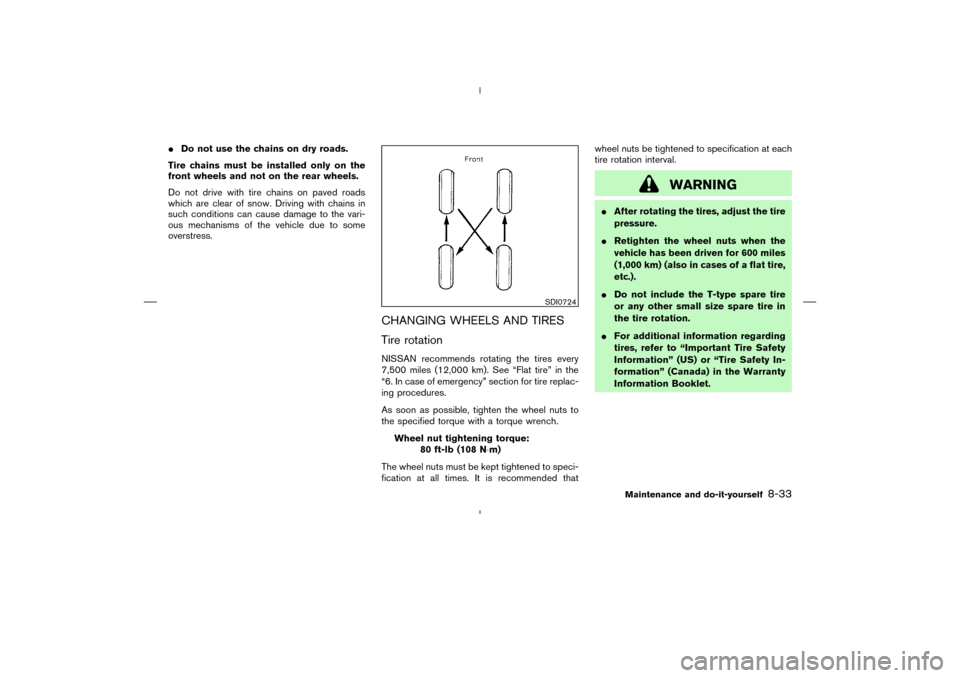
Tire rotationNISSAN recommends rotating the tires every
7,500 miles (12,000 km). See “Flat tire” in the
“6. In case of emergency” section for tire replac-
ing procedures.
As soon as possible, tighten the wheel nuts to
the specified torque with a torque wrench.
Wheel nut tightening torque:
80 ft-lb (108 N⋅m)
The wheel nuts must be kept tightened to speci-
fication at all times. It is recommended thatwheel nuts be tightened to specification at each
tire rotation interval.
WARNING
�After rotating the tires, adjust the tire
pressure.
�Retighten the wheel nuts when the
vehicle has been driven for 600 miles
(1,000 km) (also in cases of a flat tire,
etc.).
�Do not include the T-type spare tire
or any other small size spare tire in
the tire rotation.
�For additional information regarding
tires, refer to “Important Tire Safety
Information” (US) or “Tire Safety In-
formation” (Canada) in the Warranty
Information Booklet.
SDI0724
Maintenance and do-it-yourself
8-33
�
04.4.5/Z50-D/V5.0
�