2004 NISSAN ALTIMA light
[x] Cancel search: lightPage 162 of 264
WARNING
cBe sure the parking brake is fully re-
leased before driving. Failure to do so
can cause brake failure and lead to an
accident.
cDo not release the parking brake from
outside the vehicle.
cDo not use the gear shift in place of the
parking brake. When parking, be sure
the parking brake is fully engaged.
cDo not leave children unattended in a
vehicle. They could release the parking
brake and cause an accident.
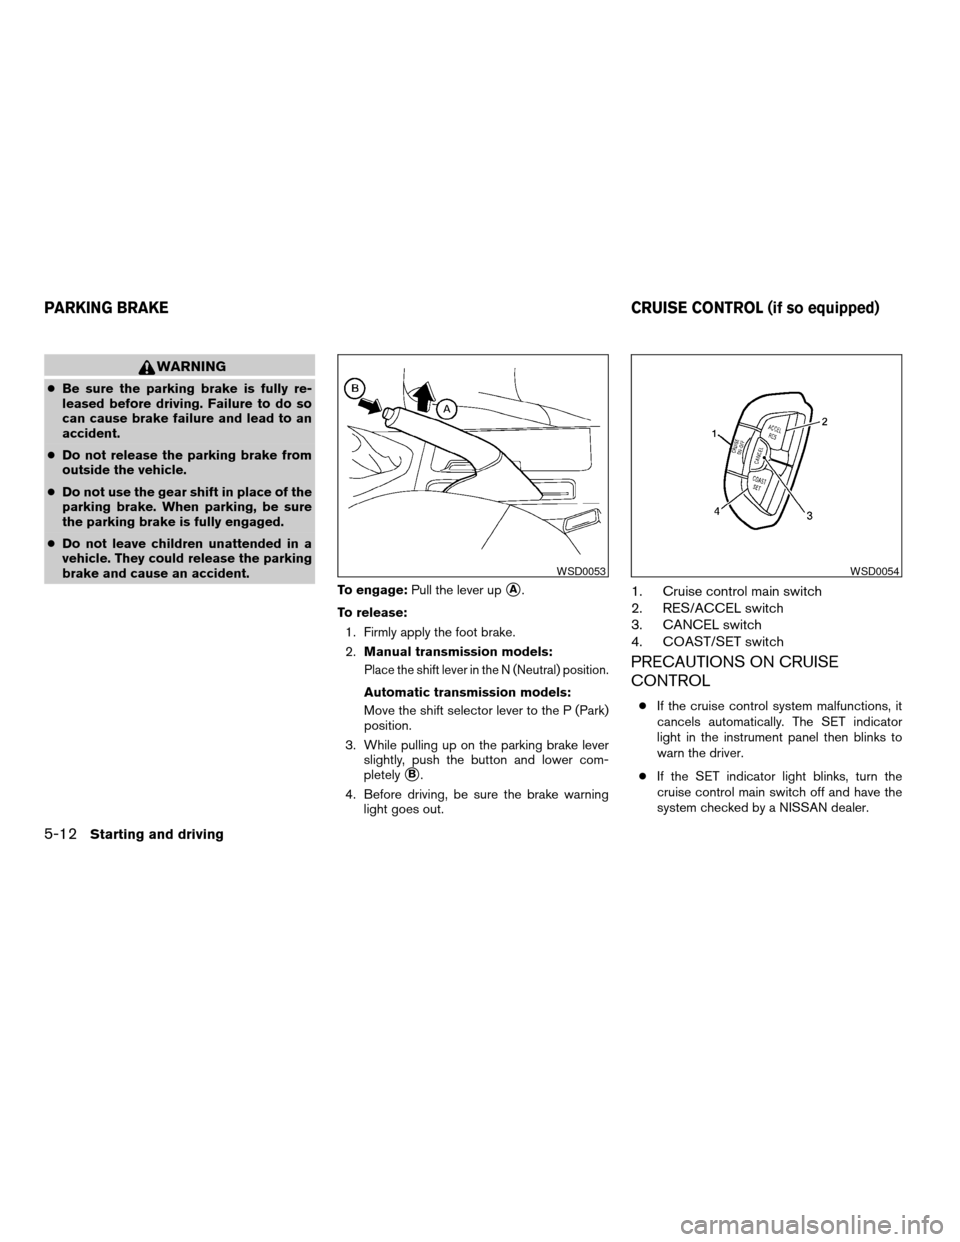
To engage:Pull the lever up
sA.
To release:
1. Firmly apply the foot brake.
2.Manual transmission models:
Place the shift lever in the N (Neutral) position.
Automatic transmission models:
Move the shift selector lever to the P (Park)
position.
3. While pulling up on the parking brake lever
slightly, push the button and lower com-
pletely
sB.
4. Before driving, be sure the brake warning
light goes out.
1. Cruise control main switch
2. RES/ACCEL switch
3. CANCEL switch
4. COAST/SET switch
PRECAUTIONS ON CRUISE
CONTROL
cIf the cruise control system malfunctions, it
cancels automatically. The SET indicator
light in the instrument panel then blinks to
warn the driver.
cIf the SET indicator light blinks, turn the
cruise control main switch off and have the
system checked by a NISSAN dealer.
WSD0053WSD0054
PARKING BRAKE CRUISE CONTROL (if so equipped)
5-12Starting and driving
ZREVIEW COPY:Ð2004 Altima(l30)
Owners Manual(owners)ÐUSA English(nna)
10/13/03Ðtbrooks
X
Page 163 of 264
cThe SET indicator light may blink when the
cruise control main switch is turned ON
while pushing the RES/ACCEL,
COAST/SET, or CANCEL switch (located
on the steering wheel) . To properly set the
cruise control system, use the following pro-
cedures.
WARNING
Do not use the cruise control when driving
under the following conditions:
cWhen it is not possible to keep the
vehicle at a set speed.
cIn heavy traffic or in traffic that varies in
speed.
cOn winding or hilly roads.
cOn slippery roads (rain, snow, ice, etc.) .
cIn very windy areas.
Doing so could cause a loss of vehicle
control and result in an accident.
CAUTION
On manual transmission models, do not
shift into N (Neutral) without depressing the
clutch pedal when the cruise control is set.
Should this occur, depress the clutch pedal
and turn the main switch off immediately.
Failure to do so may cause engine damage.
CRUISE CONTROL OPERATIONS
The cruise control allows driving at a speed be-
tween 30 - 90 MPH (48 - 144 km/h) without
keeping your foot on the accelerator pedal.
To turn on the cruise control,push the main
switch. The CRUISE indicator light in the instru-
ment panel comes on.
To set cruising speed,accelerate the vehicle to
the desired speed, push the COAST/SET switch
and release it. The SET indicator light in the
instrument panel comes on. Take your foot off the
accelerator pedal. Your vehicle maintains the set
speed.
cTo pass another vehicle,depress the ac-
celerator pedal. When you release the
pedal, the vehicle returns to the previously
set speed.
cThe vehicle may not maintain the set speed
when going up or down steep hills. If this
happens, drive without the cruise control.To cancel the preset speed,use one of the
following three methods.
cPush the CANCEL button; the SET indicator
light in the instrument panel goes out.
cTap the brake pedal; the SET indicator light
goes out.
cTurn the main switch off. Both the CRUISE
indicator light and SET indicator light in the
instrument panel go out.
The cruise control is automatically canceled and
the SET light in the instrument panel goes out if:
cyou depress the brake or clutch pedal while
pushing the ACCEL/RES or SET/COAST
switch. The preset speed is deleted from
memory.
cthe vehicle slows down more than 8 MPH
(13 km/h) below the set speed.
cyou depress the clutch pedal (manual trans-
mission) , or move the shift selector lever to N
(Neutral) (automatic transmission) .
To reset at a faster cruising speed,use one
of the following three methods.
cDepress the accelerator pedal. When the
vehicle attains the desired speed, push and
release the COAST/SET switch.
Starting and driving5-13
ZREVIEW COPY:Ð2004 Altima(l30)
Owners Manual(owners)ÐUSA English(nna)
10/13/03Ðtbrooks
X
Page 164 of 264
cPush and hold the RES/ACCEL switch.
When the vehicle attains the speed you de-
sire, release the switch.
cPush and release the RES/ACCEL switch.
Each time you do this, the set speed in-
creases by about 1 MPH (1.6 km/h) .
To reset at a slower cruising speed,use one
of the following three methods.
cLightly tap the brake pedal. When the ve-
hicle attains the desired speed, push the
COAST/SET switch and release it.
cPush and hold the COAST/SET switch. Re-
lease the switch when the vehicle slows to
the desired speed.
cPush and release the COAST/SET switch.
Each time you do this, the set speed de-
creases by about 1 MPH (1.6 km/h) .
To resume the preset speed,push and re-
lease the RES/ACCEL switch. The vehicle re-
turns to the last set cruising speed when the
vehicle speed is over 30 MPH (48 km/h) .CAUTION
During the first 1,200 miles (2,000 km) ,
follow these recommendations to obtain
maximum engine performance and en-
sure the future reliability and economy of
your new vehicle. Failure to follow these
recommendations may result in short-
ened engine life and reduced engine
performance.
cAvoid driving for long periods at constant
speed, either fast or slow, and do not run the
engine over 4,000 rpm.
cDo not accelerate at full throttle in any gear.
cAvoid quick starts.
cAvoid hard braking as much as possible.
cDo not tow a trailer for the first 500 miles
(800 km) . Your engine, axle or other parts
could be damaged.cAccelerate slowly and smoothly. Maintain
cruising speeds with a constant accelerator
position.
cDrive at moderate speeds on the highway.
Driving at high speed lowers fuel economy.
cAvoid unnecessary stopping and braking.
Maintain a safe distance behind other ve-
hicles.
cUse a proper gear range which suits road
conditions. On level roads, shift into high
gear as soon as possible.
cAvoid unnecessary engine idling.
cKeep your engine tuned up.
cFollow the recommended periodic mainte-
nance schedule.
cKeep the tires inflated to the correct pres-
sure. Low tire pressure increases tire wear
and lowers fuel economy.
cKeep the wheels in correct alignment. Im-
proper alignment increases tire wear and
lowers fuel economy.
cAir conditioner operation lowers fuel
economy. Use the air conditioner only when
necessary.
BREAK-IN SCHEDULE INCREASING FUEL ECONOMY
5-14Starting and driving
ZREVIEW COPY:Ð2004 Altima(l30)
Owners Manual(owners)ÐUSA English(nna)
10/13/03Ðtbrooks
X
Page 167 of 264
The brake system has two separate hydraulic
circuits. If one circuit malfunctions, you will still
have braking at two wheels.
BRAKE PRECAUTIONS
Vacuum assisted brakes
The brake booster aids braking by using engine
vacuum. If the engine stops, you can stop the
vehicle by depressing the brake pedal. However,
greater foot pressure on the brake pedal will be
required to stop the vehicle and stopping dis-
tance will be longer.
Using the brakes
Avoid resting your foot on the brake pedal while
driving. This will overheat the brakes, wear out the
brake linings and pads faster, and reduce gas
mileage.
To help reduce brake wear and to prevent the
brakes from overheating, reduce speed and
downshift to a lower gear before going down a
slope or long grade. Overheated brakes may
reduce braking performance and could result in
loss of vehicle control.
WARNING
cWhile driving on a slippery surface, be
careful when braking, accelerating or
downshifting. Abrupt braking or accel-
erating could cause the wheels to skid
and result in an accident.
cIf the engine is not running or is turned
off while driving, the power assist for
the brakes will not work. Braking will be
harder.
Parking brake bedding
The parking brake shoes must be “bedded down”
whenever the stopping effect of the parking
brake is weakened or whenever the parking brake
shoes and/or drum/rotors are replaced, in order
to assure the best brake performance.
This procedure is described in the vehicle service
manual and can be performed by a NISSAN
dealer.
Wet brakes
When the vehicle is washed or driven through
water, the brakes may get wet. As a result, your
braking distance will be longer and the vehicle
may pull to one side during braking.
To dry the brakes, drive the vehicle at a safe
speed while lightly pressing the brake pedal toheat up the brakes. Do this until the brakes return
to normal. Avoid driving the vehicle at high
speeds until the brakes function correctly.
ANTI-LOCK BRAKE SYSTEM (ABS)
(if so equipped)
The anti-lock brake system controls the brakes so
the wheels do not lock when braking abruptly or
when braking on slippery surfaces. The system
detects the rotation speed at each wheel and
varies the brake fluid pressure to prevent each
wheel from locking and sliding. By preventing
wheel lockup, the system helps the driver main-
tain steering control and helps to minimize swerv-
ing and spinning on slippery surfaces.
Using the system
Depress the brake pedal and hold it down.
WARNING
Do not pump the brake pedal. Doing so
may result in increased stopping
distances.
Normal operation
The anti-lock brake system does not operate at
speeds below3-6MPH(5-10km/h) . (The
speeds vary according to road conditions.)
BRAKE SYSTEM
Starting and driving5-17
ZREVIEW COPY:Ð2004 Altima(l30)
Owners Manual(owners)ÐUSA English(nna)
10/13/03Ðtbrooks
X
Page 168 of 264
When driving, the anti-lock brake system con-
trols the wheels so they will not lock when brak-
ing abruptly or when braking on a slippery road.
Thus, difficult steering and swerving of the ve-
hicle due to locked wheels is minimized. The
system detects the wheel rotation rate and elec-
tronically controls the pressure applied to each
brake. Slight vibration on the brake pedal accom-
panied by noise usually occurs while the ABS
system is operating. Such vibration and noise
encountered during abrupt braking is not a prob-
lem, but indicates that the system is functioning
properly. However, the pulsation may indicate
that road conditions are hazardous and extra care
is required while driving.
Self-test feature
The anti-lock brake system consists of electronic
sensors and hydraulic solenoids controlled by a
computer. The computer has a built-in diagnostic
feature that tests the system each time you start
the engine and move the vehicle at a low speed in
forward or reverse. When the self-test occurs,
you may hear a ‘‘clunk’’ noise and/or feel a pulsa-
tion in the brake pedal. This is normal and is not
an indication of any malfunction. If the computer
senses any malfunction, it switches the anti-lock
brake system off and turns on the ABS brake
warning light on the instrument panel. The brake
system then operates normally, but without anti-
lock assistance.If a malfunction occurs in the system, the anti-
lock function will not operate, but the standard
vehicle brake system will continue to operate
normally. The ABS brake warning light will then
come on.
If the light comes on during the self-test or while
driving, take the vehicle to a NISSAN dealer for
repair.
WARNING
cThe anti-lock brake system is a sophis-
ticated device, but it cannot prevent ac-
cidents resulting from careless or dan-
gerous driving techniques. It can help
maintain vehicle control during braking
on slippery surfaces, but remember that
the stopping distance on slippery sur-
faces will be longer than on normal
surfaces even with the anti-lock brake
system. Stopping distances may also
be longer on rough, gravel or snow cov-
ered roads, or if you are using tire
chains. Tire type and condition may also
affect braking effectiveness. Always
maintain a safe distance from the ve-
hicle in front of you. Ultimately, the re-
sponsibility for safety of self and others
rests in the hands of the driver.cTire type and condition of tires may also
affect braking effectiveness.
cWhen replacing tires, install the speci-
fied size of tires on all four wheels.
cWhen installing a spare tire, make sure
it is the proper size and type as speci-
fied on the tire placard. For tire placard
location information, refer to “Tire plac-
ard” in the “Technical and consumer
information” section of this manual.
cRefer to “Wheels and tires” in the
“Maintenance and do-it-yourself” sec-
tion of this manual.
5-18Starting and driving
ZREVIEW COPY:Ð2004 Altima(l30)
Owners Manual(owners)ÐUSA English(nna)
10/13/03Ðtbrooks
X
Page 169 of 264
When accelerating on slippery surfaces the tire
may spin or slip. With the vehicle traction control
system, sensors detect these movements and
control the braking and engine output to help
improve vehicle stability while accelerating.
cWhen the traction control system is operat-
ing, the slip indicator in the instrument panel
blinks.
cIf the slip indicator blinks, the vehicle is un-
der slippery conditions. Be sure to drive
carefully. See “Slip indicator light” and “Trac-
tion control off indicator light” in the “Instru-
ments and controls” section of this manual.
cIf a malfunction occurs in the system,
the
andindicator lights
come on in the meter panel.
As long as these warning lights are on, the trac-
tion control function is canceled. The vehicle will
behave like a vehicle without the system.
WARNING
cThe traction control system is designed
to help improve driving stability but
does not prevent accidents due to
abrupt steering operation at high
speeds or by careless or dangerous
driving techniques. Reduce vehicle
speed and be especially careful when
driving and cornering on slippery sur-
faces and always drive carefully.
cIf brake related parts such as brake
pads, rotors and calipers are not stan-
dard equipment or are extremely dete-
riorated, the traction control system
may not operate properly and the
indicator light may come on.
cDo not modify the vehicle’s suspension.
If suspension parts such as shock ab-
sorbers, struts, springs and bushings
are not standard equipment or are ex-
tremely deteriorated, the traction con-
trol system may not operate properly
and the
indicator light may come
on.cWhen driving on extremely inclined sur-
faces such as higher banked corners,
the traction control system may not op-
erate properly and the
indicator
light may come on. Do not drive on
these types of roads.
cIf wheels or tires other than the recom-
mended ones are used, the traction
control system may not operate prop-
erly and the
indicator light may
come on.
cThe traction control system is not a sub-
stitute for winter tires or tire chains on a
snow covered road.
TRACTION CONTROL SYSTEM (TCS)
(if so equipped)
Starting and driving5-19
ZREVIEW COPY:Ð2004 Altima(l30)
Owners Manual(owners)ÐUSA English(nna)
10/13/03Ðtbrooks
X
Page 179 of 264
WARNING
Always follow the instructions below.
Failure to do so could result in damage to
the charging system and cause personal
injury.
1. If the booster battery is in another vehicle,
position the two vehicles to bring their bat-
teries near each other.
Do not allow the two vehicles to touch.2. Apply the parking brake. Move the shift lever
to N (Neutral) (manual transmission) or to P
(Park) (automatic transmission) . Switch off
all unnecessary electrical systems (lights,
heater, air conditioner, etc.) .
3. Remove vent caps on the battery (if so
equipped) . Cover the battery with an old
cloth to reduce explosion hazard.
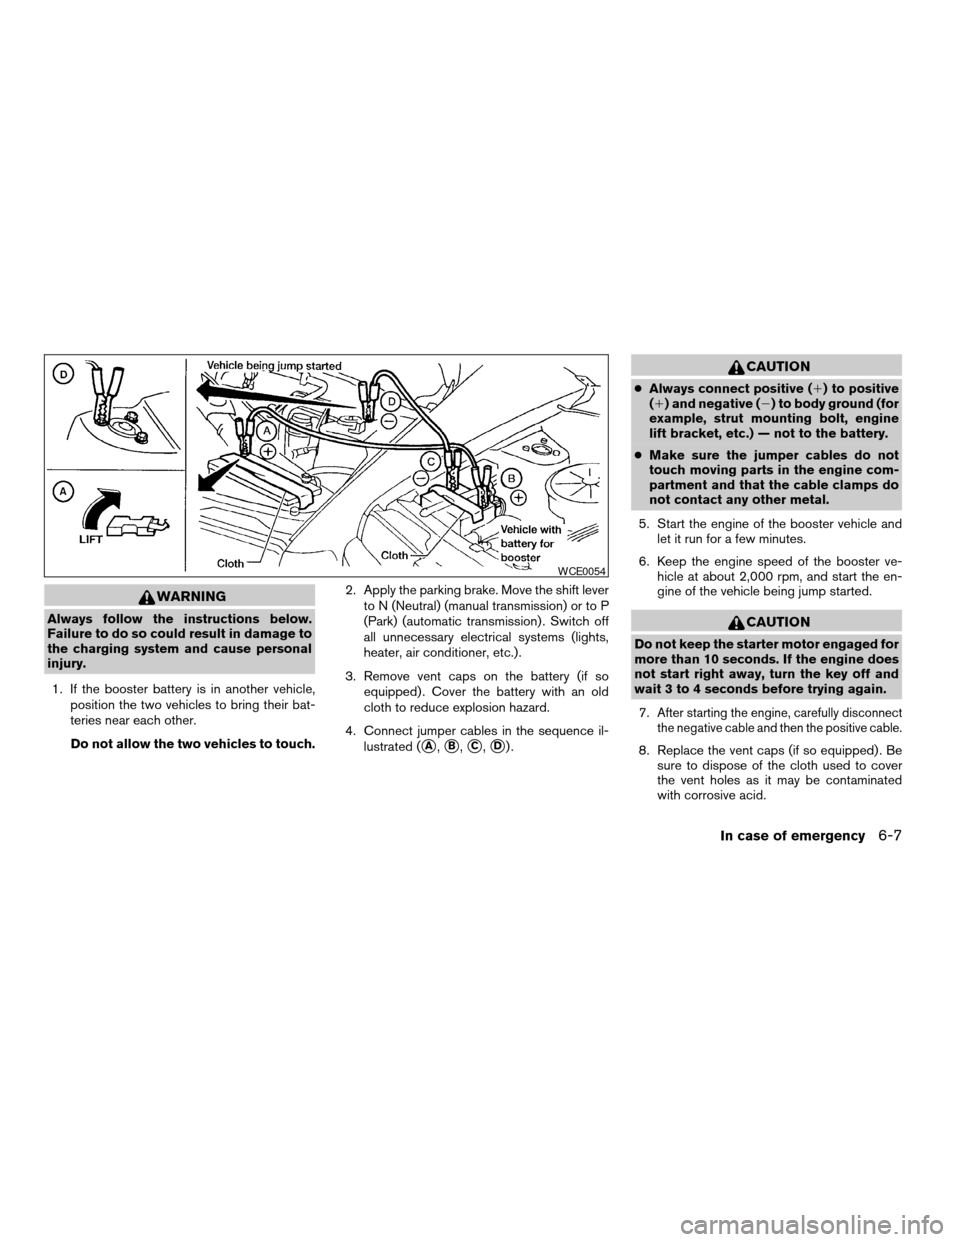
4. Connect jumper cables in the sequence il-
lustrated (
sA,sB,sC,sD).
CAUTION
cAlways connect positive (1) to positive
(1) and negative (2) to body ground (for
example, strut mounting bolt, engine
lift bracket, etc.) — not to the battery.
cMake sure the jumper cables do not
touch moving parts in the engine com-
partment and that the cable clamps do
not contact any other metal.
5. Start the engine of the booster vehicle and
let it run for a few minutes.
6. Keep the engine speed of the booster ve-
hicle at about 2,000 rpm, and start the en-
gine of the vehicle being jump started.
CAUTION
Do not keep the starter motor engaged for
more than 10 seconds. If the engine does
not start right away, turn the key off and
wait 3 to 4 seconds before trying again.
7.
After starting the engine, carefully disconnect
the negative cable and then the positive cable.
8. Replace the vent caps (if so equipped) . Be
sure to dispose of the cloth used to cover
the vent holes as it may be contaminated
with corrosive acid.
WCE0054
In case of emergency6-7
ZREVIEW COPY:Ð2004 Altima(l30)
Owners Manual(owners)ÐUSA English(nna)
10/13/03Ðtbrooks
X
Page 186 of 264
In order to maintain the appearance of your ve-
hicle, it is important to take proper care of it.
To protect the paint surfaces, please wash your
vehicle as soon as you can:
cafter a rainfall to prevent possible damage
from acid rain.
cafter driving on coastal roads.
cwhen contaminants such as soot, bird drop-
pings, tree sap, metal particles or bugs get
on the paint surface.
cwhen dust or mud builds up on the surface.
Whenever possible, store or park your vehicle
inside a garage or in a covered area.
When it is necessary to park outside, park in a
shady area or protect the vehicle with a body
cover.
Be careful not to scratch the paint surface
when putting on or removing the body
cover.
WASHING
Wash dirt off with a wet sponge and plenty of
water. Clean the vehicle thoroughly using a mild
soap, a special vehicle soap or general purpose
dishwashing liquid mixed with clean, lukewarm
(never hot) water.
CAUTION
cDo not wash the vehicle with strong
household soap, strong chemical deter-
gents, gasoline or solvents.
cDo not wash the vehicle in direct sun-
light or while the vehicle body is hot, as
the surface may become water-spotted.
cAvoid using tight-napped or rough
cloths, such as washing mitts. Care
must be taken when removing
caked-on dirt or other foreign sub-
stances so the paint surface is not
scratched or damaged.
Rinse the vehicle thoroughly with plenty of clean
water.
Inside flanges, seams and folds on the doors,
hatches and hood are particularly vulnerable to
the effects of road salt. Therefore, these areas
must be cleaned regularly. Take care that the
drain holes in the lower edge of the door are
open. Spray water under the body and in the
wheel wells to loosen the dirt and wash away
road salt.
A damp chamois can be used to dry the vehicle to
avoid water spots.
WAXING
Regular waxing protects the paint surface and
helps retain new vehicle appearance. After wax-
ing, polishing is recommended to remove
built-up residue and to avoid a “weathered” ap-
pearance.
A NISSAN dealer can assist you in choosing the
proper product.
cWax your vehicle only after a thorough wash-
ing. Follow the instructions supplied with the
wax.
cDo not use a wax containing any abrasives,
cutting compounds or cleaners that may
damage the vehicle finish.
cIf the surface does not polish easily, use a
“road tar” remover and wax again.
Machine compounding or aggressive polishing
on a base coat/clear coat paint finish may dull the
finish or leave swirl marks.
REMOVING SPOTS
Remove tar and oil spots, industrial dust, insects,
and tree sap as quickly as possible from the
surface of the paint to avoid lasting damage or
staining. Special cleaning products are available
at a NISSAN dealer or any automotive accessory
store.
CLEANING EXTERIOR
7-2Appearance and care
ZREVIEW COPY:Ð2004 Altima(l30)
Owners Manual(owners)ÐUSA English(nna)
10/13/03Ðtbrooks
X