Page 287 of 3870

CONSOLE ASSEMBL
Y . Remove left and right A-pillar trim panels.
Remove hood lock release handle.
3. Remove end panel. See Fig. 8
. Remove driver-side knee bolster. Remove fog
light switch. Remove steering column upper and lower covers. Remove
combination meter assembly. Remove center panel assembly. Remove air
vents. Remove radio panel. Remove AC-heater control assembly.
4. Remove hazard warning switch. Remove console meter hood. Remove multi-
center display unit. Remove audio components. Remove glove box assembly.
Remove left and right speaker covers. Remove speakers. Disconnect
clockspring and steering column switch connectors. Remove photo sensor and
photo sensor clamp.
5. Remove interior temperature sensor. Disconnect passenger-side air bag module
connector. Remove left and right center instrument panel brackets. Disconnect
remaining electrical connectors. Remove instrument panel nuts and bolts.
Remove instrument panel.
6. To install, reverse removal procedure. Tighten NEW steering wheel nut and
drive
r-side air ba
g module bolts to s
pecification. Activate air ba
g system.
2004 Mitsubishi Endeavor Limited
2004 ACCESSORIES/SAFETY EQUIPMENT Mitsubishi - Air Bag Restraint Systems
Page 291 of 3870
Fig. 10: Identifying Passenger
-side Air Bag Module (Dual
-stage Air Bag
System)
Courtesy of MITSUBISHI MOTOR SALES OF AMERICA.
SEAT BELT PRETENSIONER (DUAL STAGE AIR BAG SYSTEM) Removal & Installation (Single Stage AIR Bag System) 1. Before proceeding, see AIR BAG SAFETY PRECAUTIONS
. Disable air
bag system. See DISABLING & ACTIVATING AIR BAG SYSTEM
.
2. Remove appropriate upper anchor bolt cover. See Fig. 11
. Remove upper
anchor bolt. Remove lower anchor bolt. Remove lower B-pillar trim panel.
Disconnect seat belt pretensioner electrical connector. Remove seat belt
pretensioner retaining bolt. Remove seat belt pretensioner.
3. To install, reverse removal procedure. Tighten seat belt pretensioner anchor
bolts to specification. See TORQUE SPECIFICATIONS . Activate air bag
s
ystem.
2004 Mitsubishi Endeavor Limited
2004 ACCESSORIES/SAFETY EQUIPMENT Mitsubishi - Air Bag Restraint Systems
Page 292 of 3870

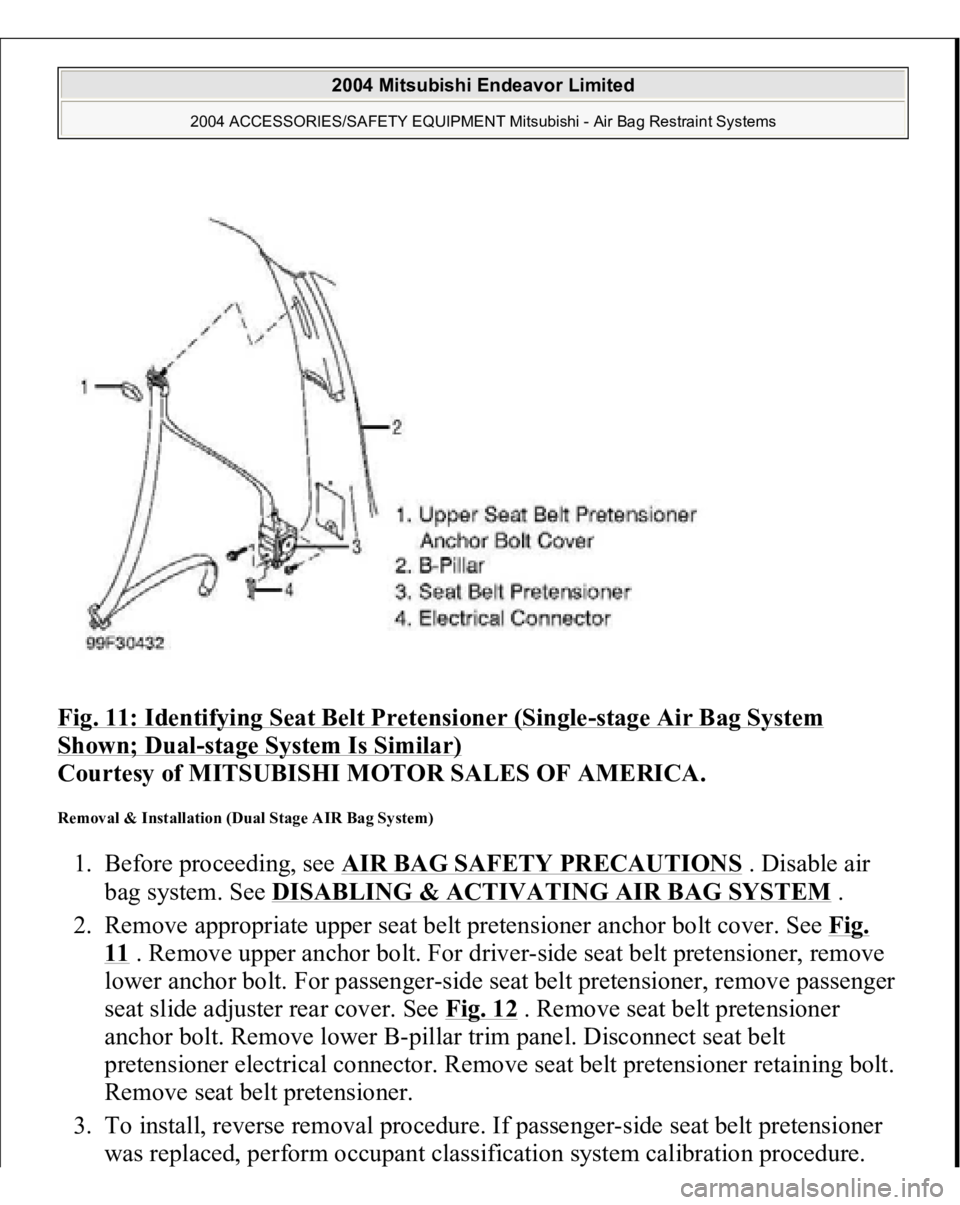
Fig. 11: Identifying Seat Belt Pretensioner (Single
-stage Air Bag System
Shown; Dual
-stage System Is Similar)
Courtesy of MITSUBISHI MOTOR SALES OF AMERICA.
Removal & Installation (Dual Stage AIR Bag System) 1. Before proceeding, see AIR BAG SAFETY PRECAUTIONS
. Disable air
bag system. See DISABLING & ACTIVATING AIR BAG SYSTEM
.
2. Remove appropriate upper seat belt pretensioner anchor bolt cover. See Fig.
11 . Remove upper anchor bolt. For driver-side seat belt pretensioner, remove
lower anchor bolt. For passenger-side seat belt pretensioner, remove passenger
seat slide adjuster rear cover. See Fig. 12
. Remove seat belt pretensioner
anchor bolt. Remove lower B-pillar trim panel. Disconnect seat belt
pretensioner electrical connector. Remove seat belt pretensioner retaining bolt.
Remove seat belt pretensioner.
3. To install, reverse removal procedure. If passenger-side seat belt pretensioner
was replaced, perform occupant classification system calibration procedure.
2004 Mitsubishi Endeavor Limited
2004 ACCESSORIES/SAFETY EQUIPMENT Mitsubishi - Air Bag Restraint Systems
Page 293 of 3870
See OCCUPANT CLASSIFICATION SENSOR CALIBRATION
under
COMPONENT TESTING. Tighten seat belt pretensioner anchor bolts to
specification. See TORQUE SPECIFICATIONS
. Activate air bag system.
Fig. 12: Identifying Passenger Seat Slide Adjuster Rear Cover (Dual
-stage Air
Bag System)
Courtesy of MITSUBISHI MOTOR SALES OF AMERICA.
SEAT SLIDE SENSOR (DUAL STAGE AIR BAG SYSTEM) Removal & Installation 1. Before proceeding, see AIR BAG SAFETY PRECAUTIONS
. Disable air
bag system. See DISABLING & ACTIVATING AIR BAG SYSTEM
.
2. Remove driver seat. Remove seat slide sensor bolt. See Fig. 13
. Remove seat
2004 Mitsubishi Endeavor Limited
2004 ACCESSORIES/SAFETY EQUIPMENT Mitsubishi - Air Bag Restraint Systems
Page 456 of 3870

2004 TRANSMISSION
Automatic Transaxle Overhaul - Endeavor
GENERAL INFORMATION This automatic transaxle is made up of the following main parts.
The gear train is made up of 3 multi-plate clutches, 2 multi-plate brakes and 2
planetary gears made up of a sun gear, carrier, pinion gear and annulus gear.
The torque converter employs a 3 element, 1 step, 2 phase lock-up clutch.
The cases consist of a converter housing, transaxle case, rear cover and a valve
body cover.
Parts related to oil pressure regulation are the oil pump, which pressurizes the oil;
the regulator, which controls the pressure setting; the solenoid valves, which
changes the oil pressure with electrical signals; the pressure control valve, which
controls the oil pressure coming from the solenoid valve that effects each clutch and
brake; each kind of valve, which carry out the retention of the oil pressure through
the lines; and finally the valve body, which houses all the valves. SECTIONAL VIEW < F4A5A >
2004 Mitsubishi Endeavor XLS
2004 TRANSMISSION Automatic Transaxle Overhaul - Endeavor
2004 Mitsubishi Endeavor XLS
2004 TRANSMISSION Automatic Transaxle Overhaul - Endeavor
Page 469 of 3870

Required Special Tools:
MB990607: Torque Wrench Socket MB990930: Installer Adapter MB990931: Installer Adapter MB990936: Installer Adapter MB990938: Handle MB991625: Special Socket (41) MB991632: Clearance Dummy Plate MD998323: Bearing Installer MD998333: Oil Pump Remover MD998338: Oil Pump Remover MD998412: Guide MD998913: Dial Gauge Extension MD998924: Spring Compressor Retainer
DISASSEMBLY
CAUTION:
Because the automatic transaxle is manufactured
from high-precision parts, care must be taken not
to scratch or damage these parts during
disassembly and assembly. The working area should be covered with a
rubber mat to keep it clean at all times. Do not wear any cloth gloves and do not use any
shop towels during disassembly. Use only nylon
cloth, paper towels or any other lint-free material. Parts which have been disassembled should all
be cleaned. Metal parts can be cleaned with
normal detergent, but they should be dried
completely using compressed air. Clutch discs, plastic thrust plates and rubber
parts should be cleaned with automatic
2004 Mitsubishi Endeavor XLS
2004 TRANSMISSION Automatic Transaxle Overhaul - Endeavor
Page 473 of 3870
Fig. 16: Identifying Sealing Cap
Courtesy of MITSUBISHI MOTOR SALES OF AMERICA.
10. Remove the valve bod
y cover.
2004 Mitsubishi Endeavor XLS
2004 TRANSMISSION Automatic Transaxle Overhaul - Endeavor
Page 474 of 3870
Fig. 17: Identifying Valve Body Cover
Courtesy of MITSUBISHI MOTOR SALES OF AMERICA.
11. Remove the manual control shaft detent.
2004 Mitsubishi Endeavor XLS
2004 TRANSMISSION Automatic Transaxle Overhaul - Endeavor