Page 211 of 314
211 Practical hints
What to do if …
Lamp in center consoleProblem
Possible cause
Suggested solution
7
The indicator lamp lights up.
A BabySmart
TM child seat is installed on the
passenger seat. Therefore the front passen-
ger airbag is switched off.
The system is malfunctioning when there is
no BabySmart
TM child seat installed on the
passenger seat.
�
Have the system checked as soon as
possible by an authorized
Mercedes-Benz Center.
7
The indicator lamp does not light
up when a BabySmart
TM child
seat is properly installed on the
front passenger seat.
The system is malfunctioning.
�
Make sure there is nothing between
seat cushion and child seat and check
installation of the child seat.
�
If the light remains out, have the sys-
tem checked as soon as possible by
an authorized Mercedes-Benz Center.
Do not use the BabySmart
TM restraint
to transport children on the passen-
ger seat until the system has been
repaired.
Page 226 of 314
226 Practical hintsReplacing bulbs
�Replacing bulbsSafe vehicle operation depends on proper
exterior lighting and signaling. It is there-
fore essential that all bulbs and lamp as-
semblies are in good working order at all
times.
Correct headlamp adjustment is extremely
important. Have headlamps checked and
readjusted at regular intervals and when a
bulb has been replaced. See your autho-
rized Mercedes-Benz Center for headlamp
adjustment (
�page 231).
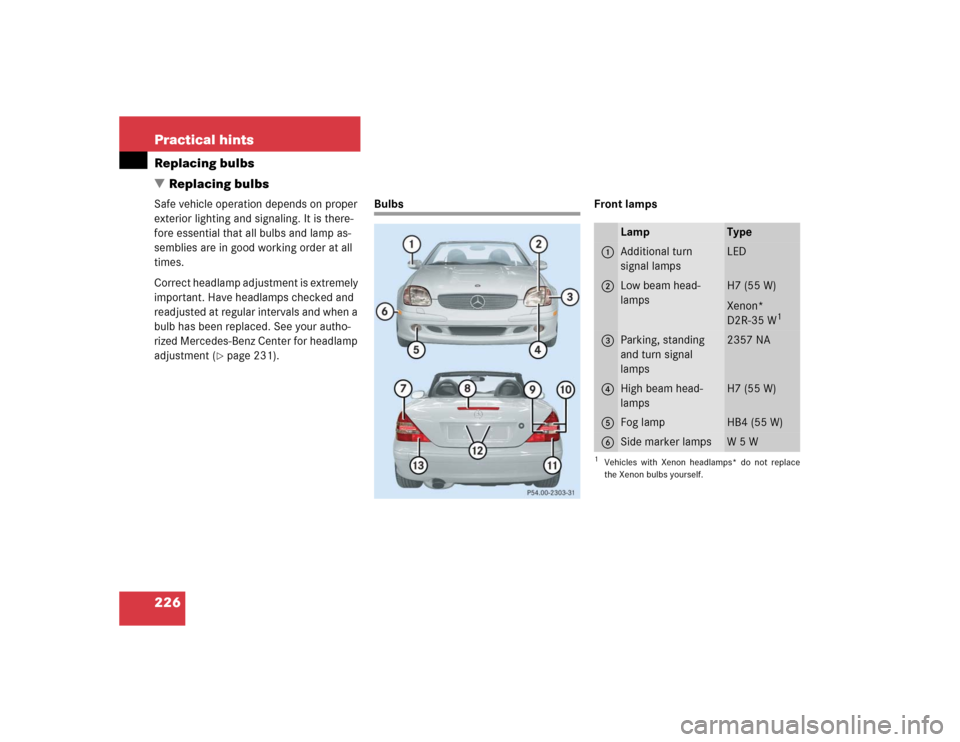
Bulbs Front lamps
Lamp
Type
1
Additional turn
signal lamps
LED
2
Low beam head-
lamps
H7 (55 W)
Xenon*
D2R-35 W
1
1Vehicles with Xenon headlamps* do not replace
the Xenon bulbs yourself.3
Parking, standing
and turn signal
lamps
2357 NA
4
High beam head-
lamps
H7 (55 W)
5
Fog lamp
HB4 (55 W)
6
Side marker lamps
W5W
Page 227 of 314

227 Practical hints
Replacing bulbs
Rear lamps Notes on bulb replacement
�
Use only 12-volt bulbs of the same type
and with the specified watt rating.
�
Switch lights off before changing a bulb
to prevent short circuits.
�
Always use a clean lint-free cloth when
handling bulbs.
�
Your hands should be dry and free of oil
and grease.
�
If the newly installed bulb does not light
up, visit an authorized Mercedes-Benz
Center.
�
Have the LEDs and bulbs for the follow-
ing lamps replaced by an authorized
Mercedes-Benz Center.�
Additional turn signals in the
exterior rear view mirrors
�
High mounted brake lamp
�
Xenon* lamps
�
Front fog lamps
Lamp
Type
7
Brake lamp
1154/ 32 cp
8
High mounted brake
lamp
LED
9
Backup lamp
1154 / 32 cp
a
Turn signal lamp
1156 NA
b
Tail, parking, stand-
ing and side marker
lamp
67 / 4 cp
c
License plate lamps
C5W
d
Rear fog lamp,
driver’s side
1155 / 32 cp
Warning!
G
Keep bulbs out of reach of children.
Bulbs and bulb sockets can be very hot.
Allow the lamp to cool down before
changing a bulb.
Halogen lamps contain pressurized gas.
A bulb can explode if you:�
touch or move it when hot
�
drop the bulb
�
scratch the bulb
Wear eye and hand protection.
Because of high voltage in xenon lamps, it is
dangerous to replace the bulb or repair the
lamp and its components. We recommend
that you have such work done by a qualified
technician.
Page 228 of 314
�
Switch off the lights.
�
Open the hood (
�page 174).
1Headlamp cover with loc")
228 Practical hintsReplacing bulbsReplacing bulbs for front lamps
Low and high beam headlamps (Halo-
gen headlamps only)�
Switch off the lights.
�
Open the hood (
�page 174).
1Headlamp cover with locking tab
�
Push down locking tab at top and end
of headlamp cover1 and remove.2Electrical connector for low beam
headlamp bulb
3Electrical connector for high beam
headlamp bulb
�
Pull off electrical connector2 or3.
�
Unhook clamping ring and pull out the
bulb together with clamping ring.
�
Remove bulb.
�
Insert new bulb so that bulb sits prop-
erly in cutouts of bulb socket.
�
Mount clamping ring and reinstall.
�
Plug electrical connector onto the bulb.
�
Reinstall headlamp cover1.Low and high beam headlamps (Xenon*
headlamps only)
Warning!
G
Do not remove the cover for the xenon head-
lamp. Because of high voltage in xenon
lamps, it is dangerous to replace the bulb or
repair the lamp and its components. We rec-
om men d t ha t y ou ha ve s uc h w o rk do n e by a
qualified technician.
Page 229 of 314
229 Practical hints
Replacing bulbs
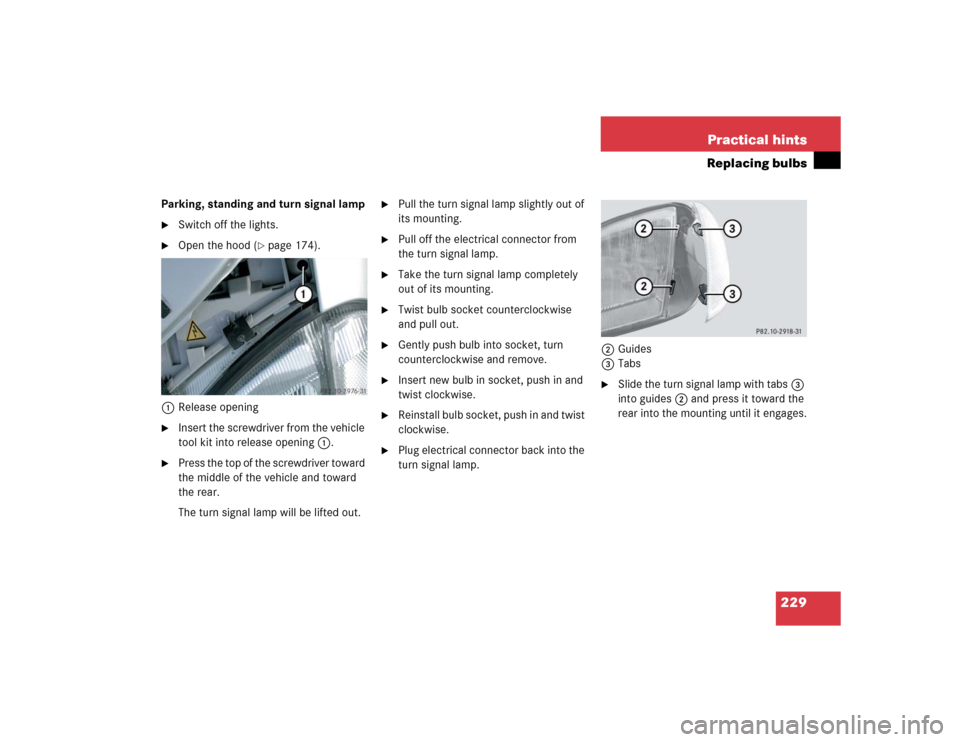
Parking, standing and turn signal lamp�
Switch off the lights.
�
Open the hood (
�page 174).
1Release opening
�
Insert the screwdriver from the vehicle
tool kit into release opening1.
�
Press the top of the screwdriver toward
the middle of the vehicle and toward
the rear.
The turn signal lamp will be lifted out.
�
Pull the turn signal lamp slightly out of
its mounting.
�
Pull off the electrical connector from
the turn signal lamp.
�
Take the turn signal lamp completely
out of its mounting.
�
Twist bulb socket counterclockwise
and pull out.
�
Gently push bulb into socket, turn
counterclockwise and remove.
�
Insert new bulb in socket, push in and
twist clockwise.
�
Reinstall bulb socket, push in and twist
clockwise.
�
Plug electrical connector back into the
turn signal lamp.2Guides
3Tabs
�
Slide the turn signal lamp with tabs3
into guides2 and press it toward the
rear into the mounting until it engages.
Page 230 of 314

230 Practical hintsReplacing bulbsSide marker lamp bulb�
Switch off the lights.
�
Carefully slide lamp towards front.
�
Remove rear end first.
�
Twist bulb socket counterclockwise
and pull out.
�
Gently push bulb into socket, turn
counterclockwise and remove.
�
Insert new bulb in socket, push in and
twist clockwise.
�
Reinstall bulb socket, push in and twist
clockwise.
�
To reinstall lamp, set rear end in
bumper and let front end snap into
place.
Replacing bulbs for rear lamps
Tail lamp assemblies
1Brake lamp
2Turn signal lamp
3Tail, parking and standing lamp, side
marker
4Backup lamp
5Rear fog lamp (driver’s side)
�
Switch off the lights.
�
Open trunk lid (
�page 78).
�
Remove cover in right side panel.
�
Remove first aid kit (
�page 212).
�
Remove cover in left side panel.
�
Turn bulb socket counterclockwise and
pull out.
�
Gently push bulb into socket, turn
counterclockwise and remove.
�
Insert new bulb in socket, push in and
turn clockwise.
�
Reinstall bulb socket, push in and turn
clockwise.
�
Close cover.
Page 231 of 314
231 Practical hints
Replacing bulbs
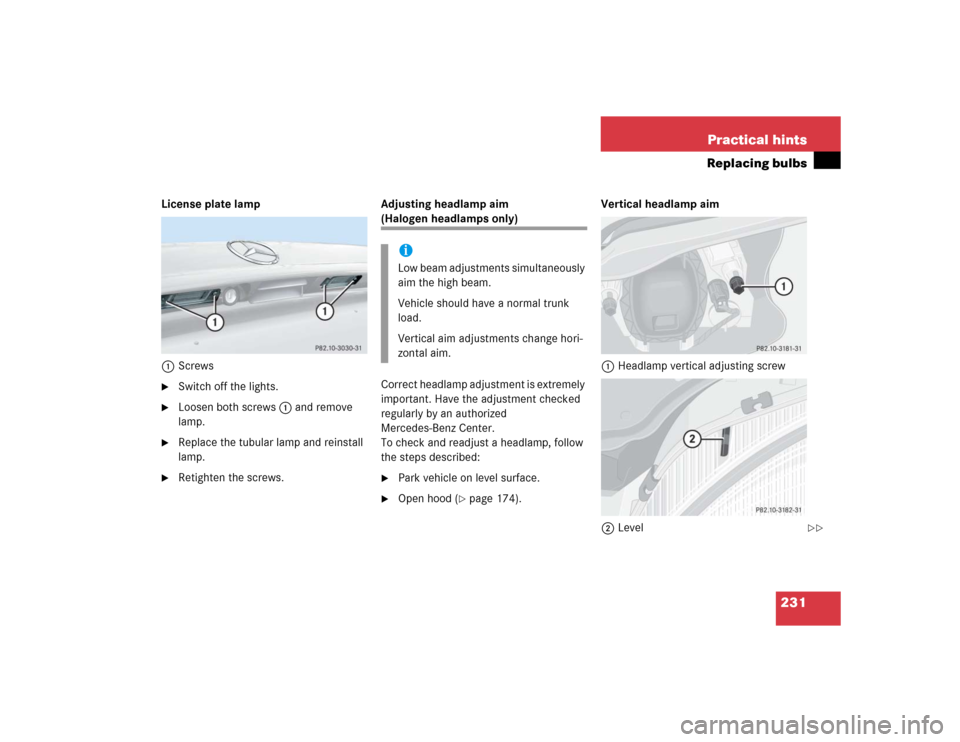
License plate lamp
1Screws�
Switch off the lights.
�
Loosen both screws1 and remove
lamp.
�
Replace the tubular lamp and reinstall
lamp.
�
Retighten the screws.Adjusting headlamp aim
(Halogen headlamps only)
Correct headlamp adjustment is extremely
important. Have the adjustment checked
regularly by an authorized
Mercedes-Benz Center.
To check and readjust a headlamp, follow
the steps described:�
Park vehicle on level surface.
�
Open hood (
�page 174).Vertical headlamp aim
1Headlamp vertical adjusting screw
2Level
iLow beam adjustments simultaneously
aim the high beam.
Vehicle should have a normal trunk
load.
Vertical aim adjustments change hori-
zontal aim.
��
Page 238 of 314

238 Practical hintsFlat tireInflating the tire
1Flap
2Air hose with pressure gauge and vent
screw
3Union nut
4Electrical plug
�
Open flap1 on air pump.
�
Pull out electrical plug4 and air hose
with pressure gauge2.
�
Screw union nut3 with air hose2 on
to the tire valve.
�
Insert electrical plug4 into vehicle
cigarette lighter socket.
�
Turn key in steering lock to position1
(�page 29).
�
PressI on the electric air pump switch.
The electric air pump should now
switch on and inflate the tire.
After 5 minutes, the pressure gauge must
display at least 26 psi (1.8 bar). The air
hose and the union nut can become hot
during inflation. Please exercise appropri-
ate caution.
�
If this tire pressure is not attained, turn
off the electric air pump, detach the air
hose from the tire valve, and again
drive vehicle back and forth very slowly
approximately 30 ft (10 m).
This serves to better distribute the
TIREFIT sealant material inside the tire.
�
Inflate the tire again.
�
Press0 on the electric air pump
switch.
�
Turn key in steering lock to position0.
The electric air pump should now be
switched off.
Warning!
G
Observe safety instructions on air pump la-
bel.
!Do not exceed the maximum pressure
of 36 psi (2.5 bar).
!Do not operate the electric air pump
longer than eight minutes without in-
terruption. Otherwise it may overheat.
You may operate the air pump again af-
ter it has cooled off.